

How to scroll nginx log file in docker

Docker usage
1. docker ps to view running containers
2. docker images to view docker images
3. docker rm id (Container ID) Delete the container (the container ID can be viewed through docker ps, the container must be stopped before it can be deleted)
3.1 Delete all containers docker rm `docker ps -a -q`
4 . docker stop id (container id) stops the container from running
5. docker rmi id (mirror id) deletes the image
6. docker pull ubuntu:16.04 (mirror name: version number) downloads the image
7. docker run -it ubuntu:16.04 Create and run the container container
-t means to specify a pseudo terminal or terminal in the new container
-i means to allow us Interact with (stdin) in the container
-p specifies the mapped port
-d Run the container in the background and print the container id
7.1 docker run -dit ubuntu:16.04 Create and run the container in the background
7.2 docker run -ditp 8080:8080 (host port: container port) ubuntu:16.04 Create and run the container in the background and map the port of the container
8. docker attach id (Container id) Enter the running container environment
9. Exit the container
9.1 exit Directly exit the container and terminate the container running
9.2 [ctrl p] [ctrl q ] (shortcut key) Exit the container, but will not terminate the container running
10. docker commit -m'version identification' id (container id) ubuntu:16.04 (image and version number) Submit the image and generate the image ( You can use this command to package the built container into a new image or overwrite the original image (that is, modify the content of the original image, and the generated image name can be directly overwritten if the name of the generated image is the same as the version number))
Thoughts
nginx official actually gives instructions on how to rotate logs:
rotating log-files
in order to rotate log files, they need to be renamed first. after that usr1 signal should be sent to the master process. the master process will then re-open all currently open log files and assign them an unprivileged user under which the worker processes are running, as an owner. after successful re-opening, the master process closes all open files and sends the message to worker process to ask them to re-open files. worker processes also open new files and close old files right away. as a result, old files are almost immediately available for post processing, such as compression. Name
•Then send the usr1 signal to the nginx master process
•The worker process opens a new log file And close the old log file
Create a test environment
Assuming that docker has been installed in your system, here we run an nginx container directly:
$ docker run -d \
 -p 80:80 \
 -v $(pwd)/logs/nginx:/var/log/nginx \
 --restart=always \
 --name=mynginx \
 nginx:1.11.3
Note that we bind the nginx log Mounted to the logs directory in the current directory.
Save the following content to the test.sh file:#!/bin/bash for ((i=1;i<=100000;i++)) do curl http://localhost > /dev/null sleep 1 done
Script to create rolling log
Create the rotatelog.sh file with the following content:
#!/bin/bash
getdatestring()
{
 tz='asia/chongqing' date "+%y%m%d%h%m"
}
datestring=$(getdatestring)
mv /var/log/nginx/access.log /var/log/nginx/access.${datestring}.log
mv /var/log/nginx/error.log /var/log/nginx/error.${datestring}.log
kill -usr1 `cat /var/run/nginx.pid`getdatestring function takes the current time and formats it as a string, such as "201807241310 ", the author prefers to name files with date and time. Note that the time zone is specified here through tz='asia/chongqing', because by default the format is UTC time, which is weird to use (you need to make up for 8 hours in real time). The following two mv commands are used to rename log files. Finally, send the usr1 signal to the nginx master process through the kill command.
Add executable permissions to the rotatelog.sh file through the following command and copy it to the $(pwd)/logs/nginx directory:
$ chmod +x rotatelog.sh
$ sudo cp rotatelog.sh $(pwd)/logs/nginx
Our nginx runs in a container, so we need to send the usr1 signal to the nginx master process in the container. Therefore we need to execute the rotatelog.sh script in the mynginx container through the docker exec command:
$ docker exec mynginx bash /var/log/nginx/rotatelog.sh
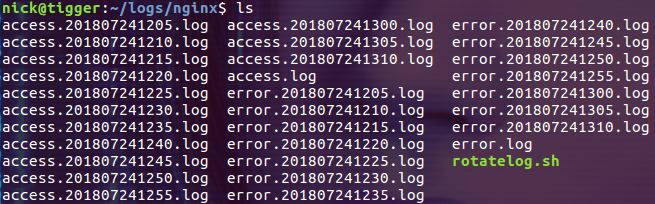
Executing the above command once will generate a batch of new log files as scheduled:
* 1 * * * docker exec mynginx bash /var/log/nginx/rotatelog.sh
Save and exit. The following picture is the effect of scrolling every 5 minutes during the author's test process:
Why not mv the log file directly in the host?
Theoretically, this is possible, because the contents of the data volume mounted through binding are the same when viewed from the host and from the container. But when you actually do this you are likely to run into permission issues. In the host machine, you generally use an ordinary user, while the owner of the log file generated in the container will be a special user, and generally other users will not be given write and execution permissions:

Of course, if you are using the root user on the host machine, there will be no problem.
Can the signal be sent from the host?
In fact, the full name of this question should be: Can a signal be sent from the host to the nginx master process in the docker container?
The answer is, yes.
We can use the command:
$ docker container kill mynginx -s usr
to process No. 1 in the container (nginx master )Send usr1 signal (this method can only send signals to process No. 1):

Combining the above two questions, we can write another way. Scroll nginx logs in docker. This method does not require executing commands in the container through the docker exec command, but completes all operations on the host:
•First rename the log file in the container data volume
• Send usr1 signal to process No. 1 in the container
The above is the detailed content of How to scroll nginx log file in docker. For more information, please follow other related articles on the PHP Chinese website!

Hot AI Tools

Undresser.AI Undress
AI-powered app for creating realistic nude photos

AI Clothes Remover
Online AI tool for removing clothes from photos.

Undress AI Tool
Undress images for free

Clothoff.io
AI clothes remover

Video Face Swap
Swap faces in any video effortlessly with our completely free AI face swap tool!

Hot Article
Hot Tools

Notepad++7.3.1
Easy-to-use and free code editor

SublimeText3 Chinese version
Chinese version, very easy to use

Zend Studio 13.0.1
Powerful PHP integrated development environment

Dreamweaver CS6
Visual web development tools

SublimeText3 Mac version
God-level code editing software (SublimeText3)
Hot Topics
 1672
1672
 14
1428
52
1332
25
1277
29
1257
24
14
1428
52
1332
25
1277
29
1257
24

 How to exit the container by docker
Apr 15, 2025 pm 12:15 PM
How to exit the container by docker
Apr 15, 2025 pm 12:15 PM
Four ways to exit Docker container: Use Ctrl D in the container terminal Enter exit command in the container terminal Use docker stop <container_name> Command Use docker kill <container_name> command in the host terminal (force exit)
 How to start containers by docker
Apr 15, 2025 pm 12:27 PM
How to start containers by docker
Apr 15, 2025 pm 12:27 PM
Docker container startup steps: Pull the container image: Run "docker pull [mirror name]". Create a container: Use "docker create [options] [mirror name] [commands and parameters]". Start the container: Execute "docker start [Container name or ID]". Check container status: Verify that the container is running with "docker ps".
 How to copy files in docker to outside
Apr 15, 2025 pm 12:12 PM
How to copy files in docker to outside
Apr 15, 2025 pm 12:12 PM
Methods for copying files to external hosts in Docker: Use the docker cp command: Execute docker cp [Options] <Container Path> <Host Path>. Using data volumes: Create a directory on the host, and use the -v parameter to mount the directory into the container when creating the container to achieve bidirectional file synchronization.
 How to check the name of the docker container
Apr 15, 2025 pm 12:21 PM
How to check the name of the docker container
Apr 15, 2025 pm 12:21 PM
You can query the Docker container name by following the steps: List all containers (docker ps). Filter the container list (using the grep command). Gets the container name (located in the "NAMES" column).
 How to restart docker
Apr 15, 2025 pm 12:06 PM
How to restart docker
Apr 15, 2025 pm 12:06 PM
How to restart the Docker container: get the container ID (docker ps); stop the container (docker stop <container_id>); start the container (docker start <container_id>); verify that the restart is successful (docker ps). Other methods: Docker Compose (docker-compose restart) or Docker API (see Docker documentation).
 How to start mysql by docker
Apr 15, 2025 pm 12:09 PM
How to start mysql by docker
Apr 15, 2025 pm 12:09 PM
The process of starting MySQL in Docker consists of the following steps: Pull the MySQL image to create and start the container, set the root user password, and map the port verification connection Create the database and the user grants all permissions to the database
 How to create containers for docker
Apr 15, 2025 pm 12:18 PM
How to create containers for docker
Apr 15, 2025 pm 12:18 PM
Create a container in Docker: 1. Pull the image: docker pull [mirror name] 2. Create a container: docker run [Options] [mirror name] [Command] 3. Start the container: docker start [Container name]
 How to view logs from docker
Apr 15, 2025 pm 12:24 PM
How to view logs from docker
Apr 15, 2025 pm 12:24 PM
The methods to view Docker logs include: using the docker logs command, for example: docker logs CONTAINER_NAME Use the docker exec command to run /bin/sh and view the log file, for example: docker exec -it CONTAINER_NAME /bin/sh ; cat /var/log/CONTAINER_NAME.log Use the docker-compose logs command of Docker Compose, for example: docker-compose -f docker-com
