
 Database
Redis
How to implement Redis stand-alone installation and sentinel mode cluster installation
Database
Redis
How to implement Redis stand-alone installation and sentinel mode cluster installation
How to implement Redis stand-alone installation and sentinel mode cluster installation

1. Redis stand-alone version installation
1.1: Download the installation package
cd /usr/local/src/
wget https://download.redis.io/releases/redis-5.0.13.tar.gz
Seeing the redis-5.0.13.tar.gz file indicates that the download is successful
1.2: Decompress the installation package
tar -zxvf redis-5.0.13.tar.gz
After decompression is completed, enter the decompressed folder and you will see the following file content
cd redis-5.0.13
ll

-rw-rw-r--.  1 root root 125833 Jul 22 02:07 00-RELEASENOTES
-rw-rw-r--.  1 root root     53 Jul 22 02:07 BUGS
-rw-rw-r--.  1 root root   2381 Jul 22 02:07 CONTRIBUTING
-rw-rw-r--.  1 root root   1487 Jul 22 02:07 COPYING
drwxrwxr-x.  6 root root    124 Jul 22 02:07 deps
-rw-rw-r--.  1 root root     11 Jul 22 02:07 INSTALL
-rw-rw-r--.  1 root root    151 Jul 22 02:07 Makefile
-rw-rw-r--.  1 root root   6888 Jul 22 02:07 MANIFESTO
-rw-rw-r--.  1 root root  20555 Jul 22 02:07 README.md
-rw-rw-r--.  1 root root  63088 Jul 22 02:07 redis.conf
-rwxrwxr-x.  1 root root    275 Jul 22 02:07 runtest
-rwxrwxr-x.  1 root root    280 Jul 22 02:07 runtest-cluster
-rwxrwxr-x.  1 root root    373 Jul 22 02:07 runtest-moduleapi
-rwxrwxr-x.  1 root root    281 Jul 22 02:07 runtest-sentinel
-rw-rw-r--.  1 root root   9710 Jul 22 02:07 sentinel.conf
drwxrwxr-x.  3 root root   4096 Jul 22 02:07 src
drwxrwxr-x. 11 root root    182 Jul 22 02:07 tests
drwxrwxr-x.  8 root root   4096 Jul 22 02:07 utils
1.3: Execute the make command and compile the redis code
make
Generally, there will be some errors, don’t panic. Since redis is developed in C language, you must first confirm whether the gcc environment (gcc -v) is installed before installation. If it is not installed, execute the following command to install it yum install -y gcc
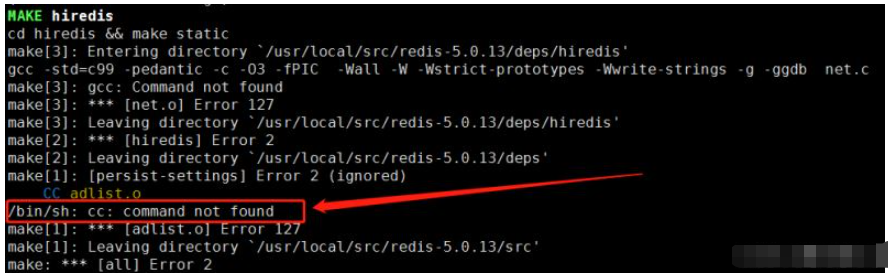
After the gcc environment is successfully installed, execute make distclean Clear the make records in between, and then re-make
1.4: Install and specify the installation directory
make install PREFIX=/usr/local/redis
1.5: Configure environment variables
vi /etc/profile
#在最后面加上以下内容
export REDIS_HOME=/usr/local/redis
export PATH=$PATH:$REDIS_HOME/bin
#使环境变量生效
source /etc/profile
1.6: Let redis start as a service in the background
1.6.1: Copy redis.conf from the redis source code directory to the redis installation directory
cp /usr/local/src/redis-5.0.13/redis.conf /usr/local/redis/bin/
1.6.2: Modify the redis.conf file, change daemonize no to daemonize yes, and start redis as a daemon thread
cd /usr/local/redis/bin/
vi redis.conf

1.6.3: Start in the background and connect to redis for testing. Execute the command to start redis
redis-server /usr/local/redis/bin/redis.conf
Then execute redis-cli to connect to redis, and then set get data test
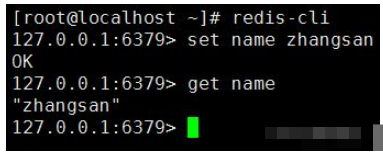
At this point, the stand-alone version of redis has been installed successfully! ! !
1.7: redis shutdown service
redis-cli shutdown
2. Redis cluster version installation
Instructions for the redis cluster version in this article use the master-slave replication cluster version installation
2.1: The basic cluster topology is as follows
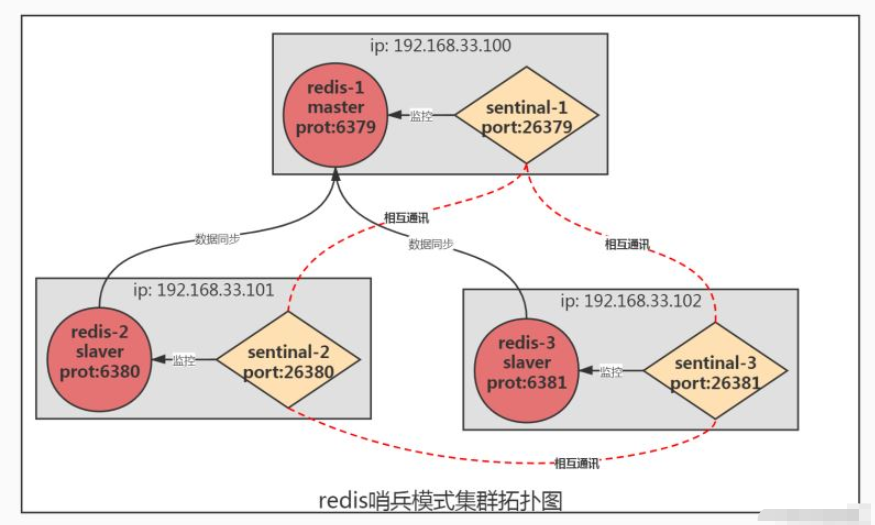
2.2: Modify the redis-sentinel configuration file sentinel.conf
#sentinel-1 配置文件修改内容
port 26379
sentinel monitor mymaster 192.168.33.100 6379 2

#sentinel-2 配置文件修改内容
port 26380
sentinel monitor mymaster 192.168.33.100 6379 2

#sentinel-3 配置文件修改内容
port 26380
sentinel monitor mymaster 192.168.33.100 6379 2
sentinel monitor
2.3: Modify the redis-server configuration file redis.conf
# redis-1 的 redis.conf配置
port 6379

# redis-2 的 redis.conf配置
port 6380
replicaof 127.0.0.1 6379

# redis-3 的 redis.conf配置
port 6381
replicaof 127.0.0.1 6379
2.4: Start the redis-1, redis-2, redis-3 services respectively
2.5: Respectively Start sentinel-1, sentinel-2, sentinel-3
cd /usr/local/redis/bin
redis-sentinel sentinel.conf
2.6: Verify the cluster effect
2.6.1: Connect to the main redis service, check the cluster status, you can see the current redis is the master, and the other two redis services are slave
redis-cli -h 192.168.33.100 -p 6379
info replication
#得到以下内容
role:master
connected_slaves:2
slave0:ip=192.168.33.101,port=6380,state=online,offset=246573,lag=1
slave1:ip=192.168.33.102,port=6381,state=online,offset=246706,lag=0
master_replid:bc4a9331019d765fe16199fcdcb357b4681a9f75
master_replid2:b41587d209ec96c2b2c634c1880fed7b12ded6e8
master_repl_offset:246839
second_repl_offset:221755
repl_backlog_active:1
repl_backlog_size:1048576
repl_backlog_first_byte_offset:9553
repl_backlog_histlen:237287
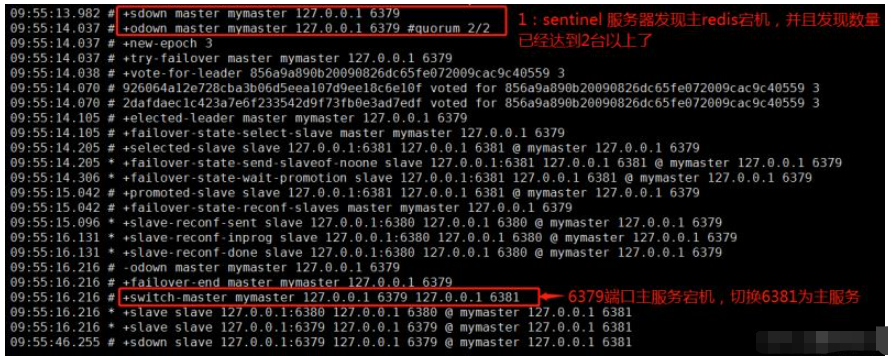
2.6.2: Stop the redis main service
redis-cli -h 192.168.33.100 -p 6379 shutdown
2.6.3: Check the log of the sentinel service, you can see that the redis main service is down , the sentinel service actively switches 6381 to the main redis service
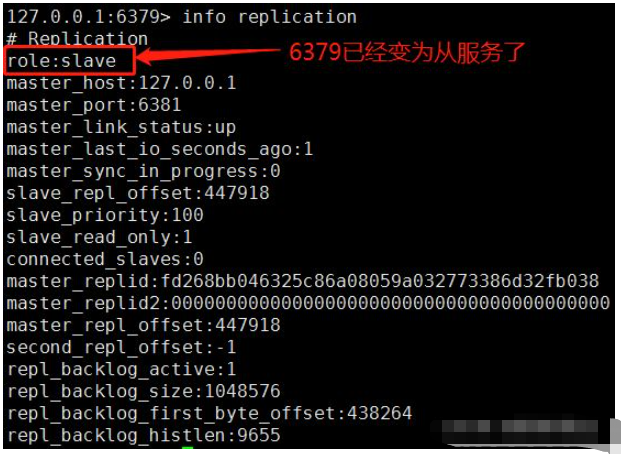
2.6.4: Start the 6379 port redis service again to check the cluster status. You can see that 6379 has become a slave service.
The above is the detailed content of How to implement Redis stand-alone installation and sentinel mode cluster installation. For more information, please follow other related articles on the PHP Chinese website!

Hot AI Tools

Undresser.AI Undress
AI-powered app for creating realistic nude photos

AI Clothes Remover
Online AI tool for removing clothes from photos.

Undress AI Tool
Undress images for free

Clothoff.io
AI clothes remover

Video Face Swap
Swap faces in any video effortlessly with our completely free AI face swap tool!

Hot Article
Hot Tools

Notepad++7.3.1
Easy-to-use and free code editor

SublimeText3 Chinese version
Chinese version, very easy to use

Zend Studio 13.0.1
Powerful PHP integrated development environment

Dreamweaver CS6
Visual web development tools

SublimeText3 Mac version
God-level code editing software (SublimeText3)
Hot Topics
 1660
1660
 14
1416
52
1310
25
1260
29
1233
24
14
1416
52
1310
25
1260
29
1233
24

 How to build the redis cluster mode
Apr 10, 2025 pm 10:15 PM
How to build the redis cluster mode
Apr 10, 2025 pm 10:15 PM
Redis cluster mode deploys Redis instances to multiple servers through sharding, improving scalability and availability. The construction steps are as follows: Create odd Redis instances with different ports; Create 3 sentinel instances, monitor Redis instances and failover; configure sentinel configuration files, add monitoring Redis instance information and failover settings; configure Redis instance configuration files, enable cluster mode and specify the cluster information file path; create nodes.conf file, containing information of each Redis instance; start the cluster, execute the create command to create a cluster and specify the number of replicas; log in to the cluster to execute the CLUSTER INFO command to verify the cluster status; make
 How to clear redis data
Apr 10, 2025 pm 10:06 PM
How to clear redis data
Apr 10, 2025 pm 10:06 PM
How to clear Redis data: Use the FLUSHALL command to clear all key values. Use the FLUSHDB command to clear the key value of the currently selected database. Use SELECT to switch databases, and then use FLUSHDB to clear multiple databases. Use the DEL command to delete a specific key. Use the redis-cli tool to clear the data.
 How to read redis queue
Apr 10, 2025 pm 10:12 PM
How to read redis queue
Apr 10, 2025 pm 10:12 PM
To read a queue from Redis, you need to get the queue name, read the elements using the LPOP command, and process the empty queue. The specific steps are as follows: Get the queue name: name it with the prefix of "queue:" such as "queue:my-queue". Use the LPOP command: Eject the element from the head of the queue and return its value, such as LPOP queue:my-queue. Processing empty queues: If the queue is empty, LPOP returns nil, and you can check whether the queue exists before reading the element.
 How to configure Lua script execution time in centos redis
Apr 14, 2025 pm 02:12 PM
How to configure Lua script execution time in centos redis
Apr 14, 2025 pm 02:12 PM
On CentOS systems, you can limit the execution time of Lua scripts by modifying Redis configuration files or using Redis commands to prevent malicious scripts from consuming too much resources. Method 1: Modify the Redis configuration file and locate the Redis configuration file: The Redis configuration file is usually located in /etc/redis/redis.conf. Edit configuration file: Open the configuration file using a text editor (such as vi or nano): sudovi/etc/redis/redis.conf Set the Lua script execution time limit: Add or modify the following lines in the configuration file to set the maximum execution time of the Lua script (unit: milliseconds)
 How to use the redis command line
Apr 10, 2025 pm 10:18 PM
How to use the redis command line
Apr 10, 2025 pm 10:18 PM
Use the Redis command line tool (redis-cli) to manage and operate Redis through the following steps: Connect to the server, specify the address and port. Send commands to the server using the command name and parameters. Use the HELP command to view help information for a specific command. Use the QUIT command to exit the command line tool.
 How to implement redis counter
Apr 10, 2025 pm 10:21 PM
How to implement redis counter
Apr 10, 2025 pm 10:21 PM
Redis counter is a mechanism that uses Redis key-value pair storage to implement counting operations, including the following steps: creating counter keys, increasing counts, decreasing counts, resetting counts, and obtaining counts. The advantages of Redis counters include fast speed, high concurrency, durability and simplicity and ease of use. It can be used in scenarios such as user access counting, real-time metric tracking, game scores and rankings, and order processing counting.
 How to set the redis expiration policy
Apr 10, 2025 pm 10:03 PM
How to set the redis expiration policy
Apr 10, 2025 pm 10:03 PM
There are two types of Redis data expiration strategies: periodic deletion: periodic scan to delete the expired key, which can be set through expired-time-cap-remove-count and expired-time-cap-remove-delay parameters. Lazy Deletion: Check for deletion expired keys only when keys are read or written. They can be set through lazyfree-lazy-eviction, lazyfree-lazy-expire, lazyfree-lazy-user-del parameters.
 How to optimize the performance of debian readdir
Apr 13, 2025 am 08:48 AM
How to optimize the performance of debian readdir
Apr 13, 2025 am 08:48 AM
In Debian systems, readdir system calls are used to read directory contents. If its performance is not good, try the following optimization strategy: Simplify the number of directory files: Split large directories into multiple small directories as much as possible, reducing the number of items processed per readdir call. Enable directory content caching: build a cache mechanism, update the cache regularly or when directory content changes, and reduce frequent calls to readdir. Memory caches (such as Memcached or Redis) or local caches (such as files or databases) can be considered. Adopt efficient data structure: If you implement directory traversal by yourself, select more efficient data structures (such as hash tables instead of linear search) to store and access directory information
