

How to use dockercompose to build nginx+mysql+redis+springboot project

Please install docker and docker-compose in advance and configure image acceleration yourself.
A.docker-compose.yml file
version: "3"
services:
  nginx: # 服务名称,用户自定义
    image: nginx:latest  # 镜像版本
    ports:
      - 80:80  # 暴露端口
    volumes: # 挂载
      - /root/nginx/html:/usr/share/nginx/html
      - /root/nginx/nginx.conf:/etc/nginx/nginx.conf
    privileged: true # 这个必须要,解决nginx的文件调用的权限问题
  mysql:
    image: mysql:5.7.27
    ports:
      - 3306:3306
    environment: # 指定用户root的密码
      - MYSQL_ROOT_PASSWORD=
  redis:
    ports:
      - 6379:6379
    image: redis:latest
  vueblog:
    image: vueblog:latest
    build: . # 表示以当前目录下的Dockerfile开始构建镜像
    ports:
      - 81:81
    depends_on: # 依赖与mysql、redis,其实可以不填,默认已经表示可以
      - mysql
      - redis


  nacos1:
    hostname: nacos1
    container_name: nacos1
    image: nacos/nacos-server:latest
    volumes:
      # 需要添加mysql8的插件
      #- ./nacos/plugins/mysql/:/home/nacos/plugins/mysql/
      # 把日志文件映射出来
      - /root/nacos1:/home/nacos/logs
      # 把配置文件映射出来
      - /root/nacos1/custom.properties:/home/nacos/init.d/custom.properties

    environment: # 设置环境变量,相当于docker run命令中的-e
      - JVM_XMS=512m
      - JVM_XMX=512m
      - JVM_XMN=128m
      #- MODE=standalone   #单机版
    ports:
      - "8848:8848"
    env_file:
      # 集群配置文件
      - /root/nacos1/nacos-hostname.env
    restart: always
    depends_on:
- mysqlB.springboot configuration (own project)
The mysql and redis configurations in the configuration are both used Service name instead of ip address
server:
  port: 81


spring:
  servlet:
    multipart:
      max-file-size: 10MB
      max-request-size: 10MB
  profiles:
    active: dev
  # mysql 配置
  datasource:
      url: jdbc:mysql://mysql:3306/blog4?serverTimezone=GMT%2B8&useUnicode=true&characterEncoding=UTF-8
      username:
      password:
#      schema: classpath:springbootsecurityauth.sql
      sql-script-encoding: utf-8
      initialization-mode: always
      driver-class-name: com.mysql.cj.jdbc.Driver
      type: com.alibaba.druid.pool.DruidDataSource
      # 初始化大小,最小,最大
      initialSize: 1
      minIdle: 3
      maxActive: 20
     # 配置获取连接等待超时的时间
      maxWait: 60000
      # 配置间隔多久才进行一次检测,检测需要关闭的空闲连接,单位是毫秒
      timeBetweenEvictionRunsMillis: 60000
      # 配置一个连接在池中最小生存的时间,单位是毫秒
      minEvictableIdleTimeMillis: 30000
      validationQuery: select 'x'
      testWhileIdle: true
      testOnBorrow: false
      testOnReturn: false
      # 打开PSCache,并且指定每个连接上PSCache的大小
      poolPreparedStatements: true
      maxPoolPreparedStatementPerConnectionSize: 20
      # 配置监控统计拦截的filters,去掉后监控界面sql无法统计,'wall'用于防火墙 ,slf4j
      filters: stat,wall,slf4j
      # 通过connectProperties属性来打开mergeSql功能;慢SQL记录
      connectionProperties: druid.stat.mergeSql=true;druid.stat.slowSqlMillis=5000

  redis:
    database: 6
    host: redis
    port: 6379
    timeout: 5000s  # 连接超时时长(毫秒)
    jedis:
      pool:
        max-active: 20 #连接池最大连接数(使用负值表示没有限制)
        max-idle: 8  #连接池中的最大空闲连接
        max-wait: -1s #连接池最大阻塞等待时间(使用负值表示没有限制)
        min-idle: 0  #连接池中的最小空闲连接
password: #rootrootC.Dockerfile
FROM java:8
EXPOSE 81
ADD vueblog.jar app.jar
RUN bash -c 'touch /app.jar'
ENTRYPOINT ["java", "-jar", "/app.jar"]
D. Package the springboot project and name it the service name in the configuration
E. In the corresponding Create a folder or file under the directory
- /root/nginx/html
- /root/nginx/nginx.conf
#user  root;
worker_processes  1;
events {
    worker_connections  1024;
}
http {
    include       mime.types;
    default_type  application/octet-stream;
    sendfile        on;
    keepalive_timeout  65;

   #这里配置nacos的ip:端口,因为nginx和nacos在同一个网络下,这里可以用服务名访问
   upstream nacos {
        server nacos1:8848 weight=1 max_fails=2 fail_timeout=10s;
        #server nacos2:8848 weight=1 max_fails=2 fail_timeout=10s;
        #server nacos3:8848 weight=1 max_fails=2 fail_timeout=10s;
    }

    server {
        listen       80;
        server_name  localhost;

        location / {
            root   /usr/share/nginx/html/front;
            try_files $uri $uri/ /index.html last; # 别忘了这个哈
            index  index.html index.htm;
        }

       location /admin {
	    alias /usr/share/nginx/html/admin;
	    expires  1d;
	    index index.html;
	    autoindex on;
        }

        location /nacos {
            proxy_pass   http://nacos;
            proxy_set_header Host $host;
            proxy_set_header X-Real-IP $remote_addr;
            proxy_set_header X-Forwarded-For $proxy_add_x_forwarded_for;
            proxy_set_header REMOTE-HOST $remote_addr;
            add_header X-Cache $upstream_cache_status;
            add_header Cache-Control no-cache;
        }

        error_page   500 502 503 504  /50x.html;
        location = /50x.html {
            root   html;
        }
    }
} - /root/nacos1
# Configure File mapping
- /root/nacos1/custom.properties
#spring.security.enabled=false
#management.security=false
#security.basic.enabled=false
#nacos.security.ignore.urls=/**
#management.metrics.export.elastic.host=http://localhost:9200
# metrics for prometheus
management.endpoints.web.exposure.include=*

# metrics for elastic search
#management.metrics.export.elastic.enabled=false
#management.metrics.export.elastic.host=http://localhost:9200

# metrics for influx
#management.metrics.export.influx.enabled=false
#management.metrics.export.influx.db=springboot
#management.metrics.export.influx.uri=http://localhost:8086
#management.metrics.export.influx.auto-create-db=true
#management.metrics.export.influx.consistency=one
#management.metrics.export.influx.compressed=true
- /root/nacos1/nacos-hostname.env
Configure nacos database information
#nacos dev env
PREFER_HOST_MODE=hostname
NACOS_SERVERS=nacos1:8848
MYSQL_SERVICE_HOST=mysql
MYSQL_SERVICE_DB_NAME=nacos
MYSQL_SERVICE_PORT=3306
MYSQL_SERVICE_USER=
MYSQL_SERVICE_PASSWORD=
JVM_XMS=512m
JVM_XMX=512m
JVM_XMN=256m
JVM_MS=64m
JVM_MMS=128m
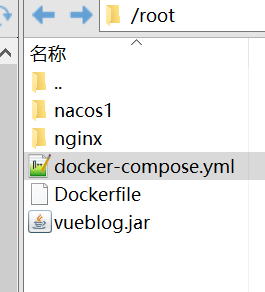
The final directory structure
Run the mysql instance first (do not directly docker-compose up -d to run all instances)
docker-compose up -d mysql
F. Since my nacos was added later, you can add the nacos database in the mysql container in advance and then start it (if you do not have a database, please add it in advance)
Start
docker-compose up
Stop
docker-compose down
The above is the detailed content of How to use dockercompose to build nginx+mysql+redis+springboot project. For more information, please follow other related articles on the PHP Chinese website!

Hot AI Tools

Undresser.AI Undress
AI-powered app for creating realistic nude photos

AI Clothes Remover
Online AI tool for removing clothes from photos.

Undress AI Tool
Undress images for free

Clothoff.io
AI clothes remover

Video Face Swap
Swap faces in any video effortlessly with our completely free AI face swap tool!

Hot Article
Hot Tools

Notepad++7.3.1
Easy-to-use and free code editor

SublimeText3 Chinese version
Chinese version, very easy to use

Zend Studio 13.0.1
Powerful PHP integrated development environment

Dreamweaver CS6
Visual web development tools

SublimeText3 Mac version
God-level code editing software (SublimeText3)
Hot Topics
 1666
1666
 14
1426
52
1328
25
1273
29
1254
24
14
1426
52
1328
25
1273
29
1254
24

 MySQL and phpMyAdmin: Core Features and Functions
Apr 22, 2025 am 12:12 AM
MySQL and phpMyAdmin: Core Features and Functions
Apr 22, 2025 am 12:12 AM
MySQL and phpMyAdmin are powerful database management tools. 1) MySQL is used to create databases and tables, and to execute DML and SQL queries. 2) phpMyAdmin provides an intuitive interface for database management, table structure management, data operations and user permission management.
 Explain the purpose of foreign keys in MySQL.
Apr 25, 2025 am 12:17 AM
Explain the purpose of foreign keys in MySQL.
Apr 25, 2025 am 12:17 AM
In MySQL, the function of foreign keys is to establish the relationship between tables and ensure the consistency and integrity of the data. Foreign keys maintain the effectiveness of data through reference integrity checks and cascading operations. Pay attention to performance optimization and avoid common errors when using them.
 Compare and contrast MySQL and MariaDB.
Apr 26, 2025 am 12:08 AM
Compare and contrast MySQL and MariaDB.
Apr 26, 2025 am 12:08 AM
The main difference between MySQL and MariaDB is performance, functionality and license: 1. MySQL is developed by Oracle, and MariaDB is its fork. 2. MariaDB may perform better in high load environments. 3.MariaDB provides more storage engines and functions. 4.MySQL adopts a dual license, and MariaDB is completely open source. The existing infrastructure, performance requirements, functional requirements and license costs should be taken into account when choosing.
 SQL vs. MySQL: Clarifying the Relationship Between the Two
Apr 24, 2025 am 12:02 AM
SQL vs. MySQL: Clarifying the Relationship Between the Two
Apr 24, 2025 am 12:02 AM
SQL is a standard language for managing relational databases, while MySQL is a database management system that uses SQL. SQL defines ways to interact with a database, including CRUD operations, while MySQL implements the SQL standard and provides additional features such as stored procedures and triggers.
 NGINX and Apache: Understanding the Key Differences
Apr 26, 2025 am 12:01 AM
NGINX and Apache: Understanding the Key Differences
Apr 26, 2025 am 12:01 AM
NGINX and Apache each have their own advantages and disadvantages, and the choice should be based on specific needs. 1.NGINX is suitable for high concurrency scenarios because of its asynchronous non-blocking architecture. 2. Apache is suitable for low-concurrency scenarios that require complex configurations, because of its modular design.
 MySQL: The Database, phpMyAdmin: The Management Interface
Apr 29, 2025 am 12:44 AM
MySQL: The Database, phpMyAdmin: The Management Interface
Apr 29, 2025 am 12:44 AM
MySQL and phpMyAdmin can be effectively managed through the following steps: 1. Create and delete database: Just click in phpMyAdmin to complete. 2. Manage tables: You can create tables, modify structures, and add indexes. 3. Data operation: Supports inserting, updating, deleting data and executing SQL queries. 4. Import and export data: Supports SQL, CSV, XML and other formats. 5. Optimization and monitoring: Use the OPTIMIZETABLE command to optimize tables and use query analyzers and monitoring tools to solve performance problems.
 How to safely store JavaScript objects containing functions and regular expressions to a database and restore?
Apr 19, 2025 pm 11:09 PM
How to safely store JavaScript objects containing functions and regular expressions to a database and restore?
Apr 19, 2025 pm 11:09 PM
Safely handle functions and regular expressions in JSON In front-end development, JavaScript is often required...
 How does MySQL differ from Oracle?
Apr 22, 2025 pm 05:57 PM
How does MySQL differ from Oracle?
Apr 22, 2025 pm 05:57 PM
MySQL is suitable for rapid development and small and medium-sized applications, while Oracle is suitable for large enterprises and high availability needs. 1) MySQL is open source and easy to use, suitable for web applications and small and medium-sized enterprises. 2) Oracle is powerful and suitable for large enterprises and government agencies. 3) MySQL supports a variety of storage engines, and Oracle provides rich enterprise-level functions.
