
 Database
Mysql Tutorial
How to build a complete permission structure based on springboot+bootstrap+mysql+redis
Database
Mysql Tutorial
How to build a complete permission structure based on springboot+bootstrap+mysql+redis
How to build a complete permission structure based on springboot+bootstrap+mysql+redis

First, introduce the encapsulated bootstrap script into our existing project. The directory is as follows:
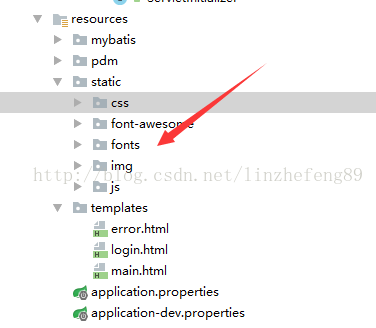
At this point, the introduction of our bootstraop framework is completed, then based on the bootstrap framework We now start to develop our first bootstrap page login page. Open our templates file and find our login.html page at the bottom. Re-edit the page code as follows:
<!DOCTYPE html>
<html xmlns:th="http://www.thymeleaf.org">
<head>
<meta content="text/html;charset=UTF-8"/>
<meta name="viewport" content="width=device-width, initial-scale=1.0"/>
<title>登录页面</title>
<link rel="stylesheet" th:href="@{/css/bootstrap.min.css}"/>
<style type="text/css">
body {
padding-top: 50px;
}
.starter-template {
padding: 40px 15px;
text-align: center;
}
</style>
</head>
<body>
<!--/
<nav class="navbar navbar-inverse navbar-fixed-top">
<div class="container">
<div class="navbar-header">
<a class="navbar-brand" href="#">Spring Security演示</a>
</div>
<div id="navbar" class="collapse navbar-collapse">
<ul class="nav navbar-nav">
<li><a th:href="@{/}"> 首页 </a></li>
</ul>
</div>.nav-collapse
</div>
</nav>
-->
<div class="container">
<div class="starter-template">
<p th:if="${param.logout}" class="bg-warning">已成功注销</p><!-- 1 -->
<p th:if="${param.error}" th:text="${session.SPRING_SECURITY_LAST_EXCEPTION.message}=='Bad credentials'?'账号/密码错误!':${session.SPRING_SECURITY_LAST_EXCEPTION.message}" class="bg-danger">
</p> <!-- 2 -->
<h2 id="使用账号密码登录">使用账号密码登录</h2>
<form name="form" th:action="@{/login}" action="/login" method="POST"> <!-- 3 -->
<div class="form-group">
<label for="username">账号</label>
<input type="text" class="form-control" name="username" id="username" value="" placeholder="账号" />
</div>
<div class="form-group">
<label for="password">密码</label>
<input type="password" class="form-control" name="password" id="password" placeholder="密码" />
</div>
<input type="submit" id="login" value="Login" class="btn btn-primary" />
</form>
</div>
</div>
</body>
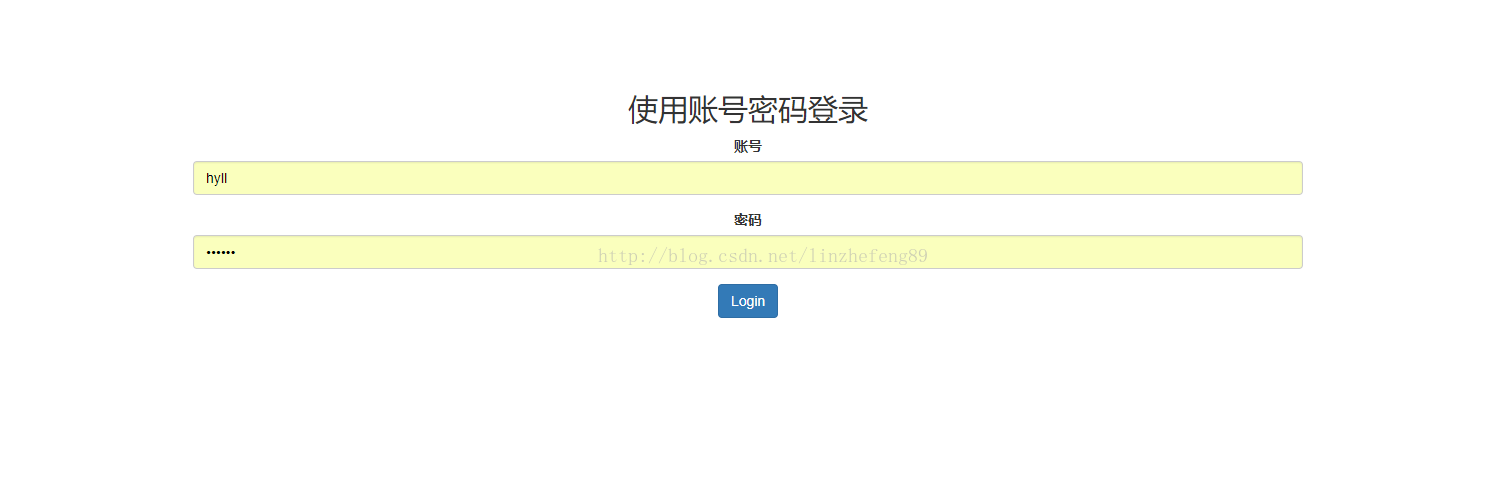
</html>Reload and run us In the program, we will see that our new page effect is as follows:
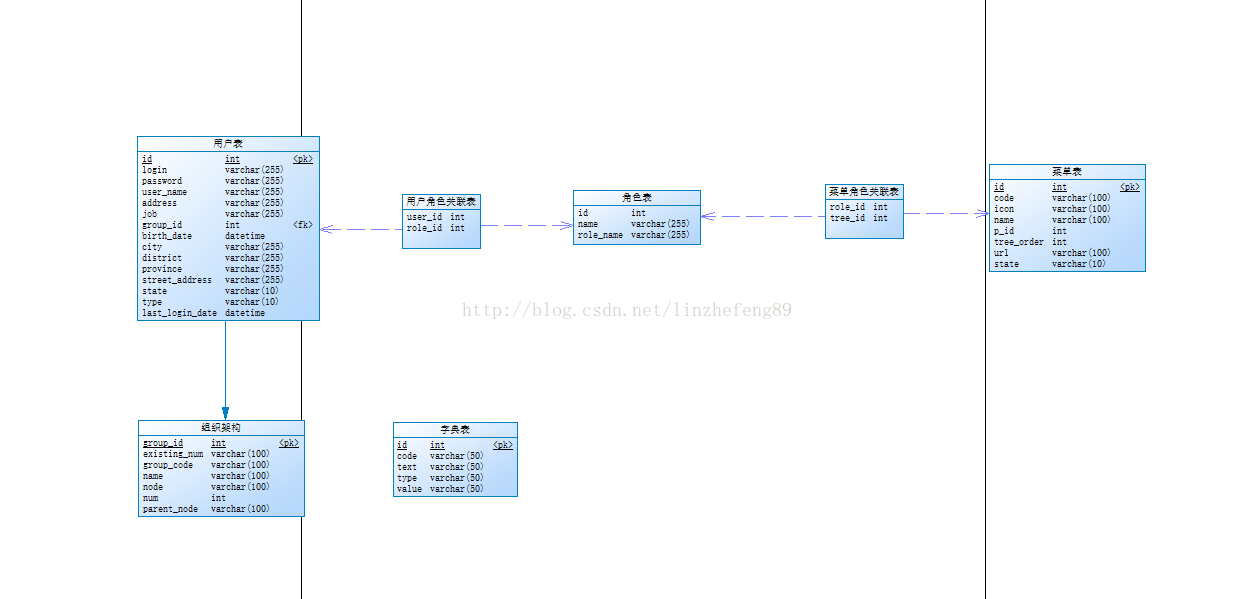
At this point, our login homepage has been completed, and then we will develop the main homepage after our successful login. html, when we write our homepage, we need to redesign our database, so our existing table structure cannot support our entire business system, so we redesign our database as shown below:
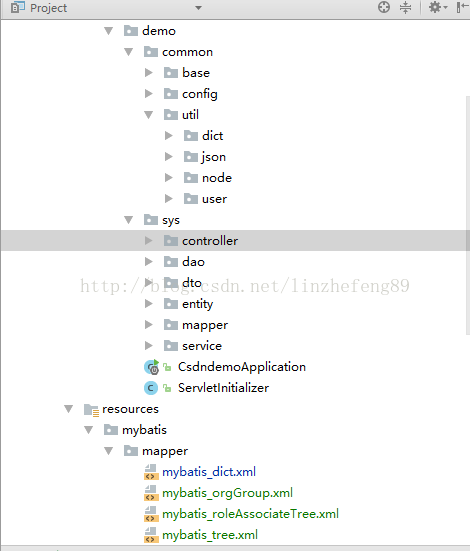
Then we directly generate our database execution script and execute it in our database. At the same time, we use the tools we developed in the previous chapter to quickly generate our code and according to our Permission structure to modify our code. The following is the structure of the modified code:
In our project, there are some CSS or js that we often use. We don’t want to reference each page once, so we create a global reference to our project (create a new folder include under templates and create an includebase.html file) as follows:
<html xmlns:th="http://www.thymeleaf.org">
<link th:href="@{/css/bootstrap.min.css}" rel="stylesheet"/>
<link th:href="@{/css/bootstrap-table.css}" rel="stylesheet"/>
<link th:href="@{/font-awesome/css/font-awesome.min.css}" rel="stylesheet"/>
<link th:href="@{/css/bootstrap-datetimepicker.css}" rel="stylesheet"/>
<link th:href="@{/css/bootstrapValidator.min.css}" rel="stylesheet"/>
<link th:href="@{/css/fileinput.css}" rel="stylesheet"/>
<link th:href="@{/css/fileinput-rtl.css}" rel="stylesheet"/>
<link th:href="@{/css/theme.css}" rel="stylesheet"/>
<link th:href="@{/css/zTreeStyle/metro.css}" rel="stylesheet"/>


<script th:src="@{/js/sockjs.min.js}"></script>
<script th:src="@{/js/stomp.min.js}"></script>
<script th:src="@{/js/jquery.js}"></script>
<script th:src="@{/js/distpicker/distpicker.data.js}"></script>
<script th:src="@{/js/distpicker/distpicker.js}"></script>
<script th:src="@{/js/websocket/socketUtil.js}"></script>
<script th:src="@{/js/bootstrap.min.js}"></script>
<script th:src="@{/js/bootstrap/nav/nav.js}"></script>
<script th:src="@{/js/bootstrap/tab/bootstrap-tab.js}"></script>
<script th:src="@{/js/bootstrap/tree/tree.js}"></script>
<script th:src="@{/js/bootstrap/alert/alert.js}"></script>
<script th:src="@{/js/bootstrap/table/bootstrap-table.js}"></script>
<script th:src="@{/js/bootstrap/date/bootstrap-datetimepicker.js}"></script>
<script th:src="@{/js/bootstrap/validator/bootstrapValidator.min.js}"></script>
<script th:src="@{/js/bootstrap/upload/fileinput.min.js}"></script>
<script th:src="@{/js/bootstrap/upload/plugins/sortable.js}"></script>
<script th:src="@{/js/bootstrap/upload/locales/zh.js}"></script>
<script th:src="@{/js/bootstrap/upload/theme.js}"></script>
<script th:src="@{/js/bootstrap/ztree/jquery.ztree.all-3.5.min.js}"></script>
<script th:src="@{/js/bootstrap/checkbox/checkbox.js}"></script>
<script th:src="@{/js/ajaxutil/ajaxUtil.js}"></script>
<script th:src="@{/js/dict/dictUtil.js}"></script>
<script th:src="@{/js/bootstrap/date/date.prototype.format.js}"></script>
<script th:src="@{/js/bootstrap/util/number.pick.util.js}"></script>

</html>
Through the rapid generation, modification and configuration of the above code, we can officially develop our home page after successful login. The home page code is as follows:
<html xmlns:th="http://www.thymeleaf.org"
xmlns:sec="http://www.thymeleaf.org/thymeleaf-extras-springsecurity4">
<head th:include="include/includebase"></head>
<link th:href="@{css/sb-admin.css}" rel="stylesheet"/>
<script th:inline="javascript">
$(function () {
// 页面加载完成以后开启websocket的连接
var options = new Array();
options.sockurl = '/ricky-websocket';
options.stompClienturl = '/ricky/topic/greetings';
options.login = [[${#authentication.name}]];
options.success = function(greeting){
var r = eval("("+JSON.parse(greeting.body).content+")")
alert(r);
// $("#greetings").append("<tr><td>" + JSON.parse(greeting.body).content + "</td></tr>");
}
$.fn.socketConnect(options);
// 初始化nav
$.fn.bootstrapNav({index:'main',navTitle:'XXXX管理系统'});
// 初始化标签页
$("#tabContainer").tabs({
data: [{
id: '99999999',
text: '首页',
url: "home",
closeable: false
}],
showIndex: 0,
loadAll: false
})
//
$.fn.bootstrapTree({url:"/user/mainTree",treeId:'menu_tree',tabId:"tabContainer"});
$.fn.dictUtil("/dict/loadDict");
});
</script>
<body >
<div id="wrapper">
<!-- Navigation -->
<nav class="navbar navbar-inverse navbar-fixed-top" role="navigation">
<!-- Brand and toggle get grouped for better mobile display -->
<div class="navbar-header" id="navbar_header">
</div>
<!-- Top Menu Items -->
<ul class="nav navbar-right top-nav">
<li class="dropdown">
<a href="#" class="dropdown-toggle" data-toggle="dropdown"><i class="fa fa-envelope"></i> <b class="caret"></b></a>
<ul class="dropdown-menu message-dropdown">
<li class="message-preview">
<a href="#">
<div class="media">
<span class="pull-left">
<img class="media-object lazy" src="/static/imghw/default1.png" data-src="http://placehold.it/50x50" alt="" />
</span>
<div class="media-body">
<h5 class="media-heading"><strong>John Smith</strong>
</h5>
<p class="small text-muted"><i class="fa fa-clock-o"></i> Yesterday at 4:32 PM</p>
<p>Lorem ipsum dolor sit amet, consectetur...</p>
</div>
</div>
</a>
</li>
<li class="message-footer">
<a href="#">Read All New Messages</a>
</li>
</ul>
</li>
<li class="dropdown">
<a href="#" class="dropdown-toggle" data-toggle="dropdown"><i class="fa fa-user"></i> <font th:text="${#authentication.name}"></font> <b class="caret"></b></a>
<ul class="dropdown-menu">
<li>
<a href="#" ><i class="fa fa-fw fa-gear"></i> 修改密码 </a>
</li>
<li class="divider"></li>
<li>
<a href="/logout" ><i class="fa fa-fw fa-power-off"></i>退 出</a>
</li>
</ul>
</li>
</ul>
<!-- Sidebar Menu Items - These collapse to the responsive navigation menu on small screens -->
<div class="collapse navbar-collapse navbar-ex1-collapse">
<ul class="nav navbar-nav side-nav" id="menu_tree">
</ul>
</div>
<!-- /.navbar-collapse -->
</nav>
<div id="page-wrapper" style="border-radius:5px 5px 0 0;">
<div id="tabContainer"></div>
</div>
</div>
<!--
<div th:text="${#authentication.name}">
The value of the "name" property of the authentication object should appear here.
</div>
这是一个登陆成功以后的首页
<div class="row">
<div class="col-md-12">
<table id="conversation" class="table table-striped">
<thead>
<tr>
<th>Greetings</th>
</tr>
</thead>
<tbody id="greetings">
</tbody>
</table>
</div>
</div>
-->
</body>
</html>The above is the detailed content of How to build a complete permission structure based on springboot+bootstrap+mysql+redis. For more information, please follow other related articles on the PHP Chinese website!

Hot AI Tools

Undresser.AI Undress
AI-powered app for creating realistic nude photos

AI Clothes Remover
Online AI tool for removing clothes from photos.

Undress AI Tool
Undress images for free

Clothoff.io
AI clothes remover

Video Face Swap
Swap faces in any video effortlessly with our completely free AI face swap tool!

Hot Article
Hot Tools

Notepad++7.3.1
Easy-to-use and free code editor

SublimeText3 Chinese version
Chinese version, very easy to use

Zend Studio 13.0.1
Powerful PHP integrated development environment

Dreamweaver CS6
Visual web development tools

SublimeText3 Mac version
God-level code editing software (SublimeText3)
Hot Topics
 1664
1664
 14
1422
52
1316
25
1268
29
1240
24
14
1422
52
1316
25
1268
29
1240
24

 Laravel Introduction Example
Apr 18, 2025 pm 12:45 PM
Laravel Introduction Example
Apr 18, 2025 pm 12:45 PM
Laravel is a PHP framework for easy building of web applications. It provides a range of powerful features including: Installation: Install the Laravel CLI globally with Composer and create applications in the project directory. Routing: Define the relationship between the URL and the handler in routes/web.php. View: Create a view in resources/views to render the application's interface. Database Integration: Provides out-of-the-box integration with databases such as MySQL and uses migration to create and modify tables. Model and Controller: The model represents the database entity and the controller processes HTTP requests.
 MySQL and phpMyAdmin: Core Features and Functions
Apr 22, 2025 am 12:12 AM
MySQL and phpMyAdmin: Core Features and Functions
Apr 22, 2025 am 12:12 AM
MySQL and phpMyAdmin are powerful database management tools. 1) MySQL is used to create databases and tables, and to execute DML and SQL queries. 2) phpMyAdmin provides an intuitive interface for database management, table structure management, data operations and user permission management.
 MySQL vs. Other Programming Languages: A Comparison
Apr 19, 2025 am 12:22 AM
MySQL vs. Other Programming Languages: A Comparison
Apr 19, 2025 am 12:22 AM
Compared with other programming languages, MySQL is mainly used to store and manage data, while other languages such as Python, Java, and C are used for logical processing and application development. MySQL is known for its high performance, scalability and cross-platform support, suitable for data management needs, while other languages have advantages in their respective fields such as data analytics, enterprise applications, and system programming.
 Solve database connection problem: a practical case of using minii/db library
Apr 18, 2025 am 07:09 AM
Solve database connection problem: a practical case of using minii/db library
Apr 18, 2025 am 07:09 AM
I encountered a tricky problem when developing a small application: the need to quickly integrate a lightweight database operation library. After trying multiple libraries, I found that they either have too much functionality or are not very compatible. Eventually, I found minii/db, a simplified version based on Yii2 that solved my problem perfectly.
 Laravel framework installation method
Apr 18, 2025 pm 12:54 PM
Laravel framework installation method
Apr 18, 2025 pm 12:54 PM
Article summary: This article provides detailed step-by-step instructions to guide readers on how to easily install the Laravel framework. Laravel is a powerful PHP framework that speeds up the development process of web applications. This tutorial covers the installation process from system requirements to configuring databases and setting up routing. By following these steps, readers can quickly and efficiently lay a solid foundation for their Laravel project.
 Solve MySQL mode problem: The experience of using the TheliaMySQLModesChecker module
Apr 18, 2025 am 08:42 AM
Solve MySQL mode problem: The experience of using the TheliaMySQLModesChecker module
Apr 18, 2025 am 08:42 AM
When developing an e-commerce website using Thelia, I encountered a tricky problem: MySQL mode is not set properly, causing some features to not function properly. After some exploration, I found a module called TheliaMySQLModesChecker, which is able to automatically fix the MySQL pattern required by Thelia, completely solving my troubles.
 How to simplify CMS development with Composer: Practical application of the Lebenlabs/SimpleCMS library
Apr 18, 2025 am 09:45 AM
How to simplify CMS development with Composer: Practical application of the Lebenlabs/SimpleCMS library
Apr 18, 2025 am 09:45 AM
When developing a new content management system (CMS), I encountered a common but difficult problem: how to quickly build a fully functional CMS without adding too much complexity. There are many ready-made CMS solutions available on the market, but they are often too large and complex to configure and can be a burden for small projects. After some exploration, I discovered the lebenlabs/simplecms library, which provides a simple and efficient solution through Composer.
 Explain the purpose of foreign keys in MySQL.
Apr 25, 2025 am 12:17 AM
Explain the purpose of foreign keys in MySQL.
Apr 25, 2025 am 12:17 AM
In MySQL, the function of foreign keys is to establish the relationship between tables and ensure the consistency and integrity of the data. Foreign keys maintain the effectiveness of data through reference integrity checks and cascading operations. Pay attention to performance optimization and avoid common errors when using them.
