

How to configure https for nginx in docker

准备环境
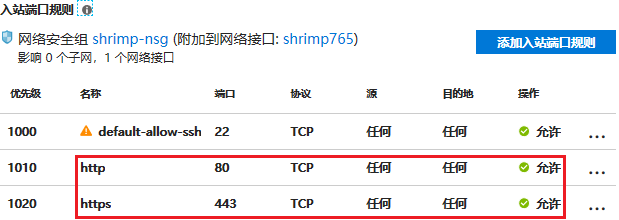
在 azure 上创建 ubuntu 类型的虚机事件非常容易的事情,安装 docker 也无须赘言。比较容易忽略的是配置合适的网络安全组规则,比如打开 80 和 443 端口:
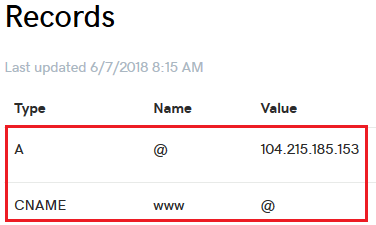
还有就是配置 dns:
创建一个普通的 http 站点
简单起见,直接使用一个镜像中的 nodejs 应用作为 web 站点:
$ docker pull ljfpower/nodedemo
$ docker network create -d bridge webnet
$ docker run -d --restart=always --expose=3000 \
   --network=webnet --name=myweb \
   ljfpower/nodedemo
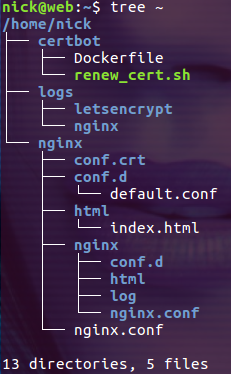
在用户的家目录下创建 nginx 目录及其子目录 conf.d、conf.crt 和 html,创建 logs 目录及其子目录 nginx 和 letsencrypt:
$ mkdir -p nginx/{conf.d,conf.crt,html}
$ mkdir -p logs/{nginx,letsencrypt}说明,本文演示的示例中需要我们手动创建的文件和目录结构如下:
创建 nginx/nginx.conf 文件,内容如下:
user nginx;
worker_processes auto;

error_log /var/log/nginx/error.log warn;
pid  /var/run/nginx.pid;

events {
 worker_connections 2048;
}

http {
 include  /etc/nginx/mime.types;
 default_type application/octet-stream;

 sendfile  on;
 keepalive_timeout 65;
 client_max_body_size 10m;

 include /etc/nginx/conf.d/*.conf;
}然后创建 nginx/conf.d/default.conf 文件,内容如下:
upstream web{
 server myweb:3000;
}
server {
 listen  80;
 listen  [::]:80;
 server_name filterinto.com www.filterinto.com;

 location ^~ /.well-known/acme-challenge/ {
  default_type "text/plain";
  root /usr/share/nginx/html;
 }
 location = /.well-known/acme-challenge/ {
  return 404;
 }
 location / {
  proxy_pass http://web;
 }
}其中 /.well-known/acme-challenge/ 目录是 certbot 工具在生成证书时创建的。接下来创建文件 nginx/html/index.html 文件,内容如下:
<!doctype html> <html> <head> <meta charset="utf-8" /> <title>let's encrypt first time cert issue site</title> </head> <body> <h1 id="hello-nbsp-https">hello https!</h1> <p> just used for the very first time ssl certificates are issued by let's encrypt's certbot. </p> </body> </html>
这个页面也是 certbot 在生成证书时需要用到的。最后让我们启动容器(在用户的家目录下执行下面的命令):
$ docker run -d \
 -p 80:80 \
 -v $(pwd)/nginx/conf.d:/etc/nginx/conf.d:ro \
 -v $(pwd)/nginx/nginx.conf:/etc/nginx/nginx.conf:ro \
 -v $(pwd)/logs/nginx:/var/log/nginx \
 -v $(pwd)/nginx/html:/usr/share/nginx/html \
 --restart=always \
 --name=gateway \
 --network=webnet \
 nginx:1.14
注意:这时没有映射 443 端口,也没有挂载存放证书的目录。只能以 http 协议访问访问我们的站点:
为站点生成 ssl/tls 证书
let's encrypt 是一个提供免费 ssl/tls 证书的网站,它为用户提供了 certbot 工具用来生成 ssl/tls 证书。方便起见,我们把 certbot 简单的封装到容器中。在用户的家目录下创建 certbot 目录,进入 certbot 目录并把下面的内容保存到 dockerfile 文件中:
from alpine:3.4
run apk add --update bash certbot
volume ["/etc/letsencrypt"]
然后执行下面的命令创建 certbot 镜像:
$ docker build -t certbot:1.0 .
然后在 certbot 目录下创建自动更新证书的脚本 renew_cert.sh,内容如下:
#!/bin/bash
webdir="$1"
list=('filterinto.com' 'www.filterinto.com')
led_list=()
www_root=/usr/share/nginx/html
for domain in ${list[@]};do
 docker run \
  --rm \
  -v ${webdir}/nginx/conf.crt:/etc/letsencrypt \
  -v ${webdir}/logs/letsencrypt:/var/log/letsencrypt \
  -v ${webdir}/nginx/html:${www_root} \
  certbot:1.0 \
  certbot certonly --verbose --noninteractive --quiet --agree-tos \
  --webroot -w ${www_root} \
  --email="nick.li@grapecity.com" \
  -d "$domain"
 code=$?
 if [ $code -ne 0 ]; then
  failed_list+=($domain)
 fi
done

# output failed domains
if [ ${#failed_list[@]} -ne 0 ];then
 echo 'failed domain:'
 for (( i=0; i<${#failed_list[@]}; i++ ));
 do
  echo ${failed_list[$i]}
 done
fi在用户的家目录中执行 ./renew_cert.sh /home/nick 命令就可以生成新的证书(/home/nick 为当前用户的家目录)。生成的证书被保存在 /home/nick/nginx/conf.crt/live 目录下,以域名命名的目录下保存着该域名的证书:

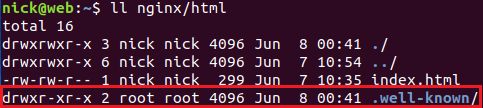
然后去检查下 nginx/html 目录,发现多了一个隐藏的 .well-known 目录,这个目录就是在生成证书时创建的:
有了 ssl/tls 证书,接下来我们就可以配置 https 站点了。
为站点配置 ssl/tls 证书
有了 ssl/tls 证书,接下来更新 nginx 的配置文件就可以了,更新 nginx/conf.d/default.conf 的内容如下:
upstream web{
 server myweb:3000;
}

server {
 listen  80;
 listen  [::]:80;
 server_name filterinto.com www.filterinto.com;

 location ^~ /.well-known/acme-challenge/ {
  default_type "text/plain";
  root /usr/share/nginx/html;
 }
 location = /.well-known/acme-challenge/ {
  return 404;
 }
 return 301 https://$server_name$request_uri;
}
server {
 listen  443;
 listen  [::]:443;
 server_name filterinto.com;

 # enable ssl
 ssl      on;
 ssl_protocols tlsv1 tlsv1.1 tlsv1.2;
 ssl_prefer_server_ciphers on;
 ssl_ciphers    "eecdh+ecdsa+aesgcm eecdh+arsa+aesgcm eecdh+ecdsa+sha384 eecdh+ecdsa+sha256 eecdh+arsa+sha384 eecdh+arsa+sha256 eecdh edh+arsa !anull !enull !low !3des !md5 !exp !psk !srp !dss !rc4";

 # config ssl certificate
 ssl_certificate   conf.crt/live/filterinto.com/fullchain.pem;
 ssl_certificate_key  conf.crt/live/filterinto.com/privkey.pem;

 location ^~ /.well-known/acme-challenge/ {
  default_type "text/plain";
  root /usr/share/nginx/html;
 }
 location = /.well-known/acme-challenge/ {
   return 404;
 }
 location / {
  proxy_pass http://web;
 }
}
server {
 listen  443;
 listen  [::]:443;
 server_name www.filterinto.com;

 # enable ssl
 ssl      on;
 ssl_protocols tlsv1 tlsv1.1 tlsv1.2;
 ssl_prefer_server_ciphers on;
 ssl_ciphers    "eecdh+ecdsa+aesgcm eecdh+arsa+aesgcm eecdh+ecdsa+sha384 eecdh+ecdsa+sha256 eecdh+arsa+sha384 eecdh+arsa+sha256 eecdh edh+arsa !anull !enull !low !3des !md5 !exp !psk !srp !dss !rc4";

 # config ssl certificate
 ssl_certificate   conf.crt/live/www.filterinto.com/fullchain.pem;
 ssl_certificate_key  conf.crt/live/www.filterinto.com/privkey.pem;

 location ^~ /.well-known/acme-challenge/ {
  default_type "text/plain";
  root /usr/share/nginx/html;
 }
 location = /.well-known/acme-challenge/ {
   return 404;
 }
 location / {
  proxy_pass http://web;
 }
}然后删除容器 gateway 并用下面的脚本重新创建:
$ docker run -d \
 -p 80:80 \
 -p 443:443 \
 -v $(pwd)/nginx/conf.d:/etc/nginx/conf.d:ro \
 -v $(pwd)/nginx/conf.crt:/etc/nginx/conf.crt:ro \
 -v $(pwd)/nginx/nginx.conf:/etc/nginx/nginx.conf:ro \
 -v $(pwd)/logs/nginx:/var/log/nginx \
 -v $(pwd)/nginx/html:/usr/share/nginx/html \
 --restart=always \
 --name=gateway \
 --network=webnet \
 nginx:1.14
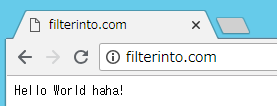
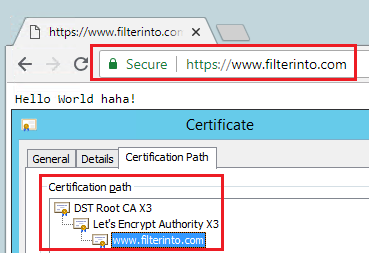
现在就只能通过 https 来访问站点了:
自动更新证书
let's encrypt 提供的 ssl/tls 证书期限只有三个月,每过三个月要手动更新一次证书也够呛的,下面我们介绍自动更新证书的方法。
其实我们的配置已经为自动化更新证书提供了最大的便利(其实是使用 docker 带来的便利),在定时任务中添加下面两条记录就可以了:
0 0 1 * * /home/nick/certbot/renew_cert.sh /home/nick >> /home/nick/logs/cert.log 2>> /home/nick/logs/cert.error.log
0 1 1 * * docker exec gateway nginx -s reload
每月 1 号的 0 点更新证书,一个小时后 reload nginx 的配置。
The above is the detailed content of How to configure https for nginx in docker. For more information, please follow other related articles on the PHP Chinese website!

Hot AI Tools

Undresser.AI Undress
AI-powered app for creating realistic nude photos

AI Clothes Remover
Online AI tool for removing clothes from photos.

Undress AI Tool
Undress images for free

Clothoff.io
AI clothes remover

Video Face Swap
Swap faces in any video effortlessly with our completely free AI face swap tool!

Hot Article
Hot Tools

Notepad++7.3.1
Easy-to-use and free code editor

SublimeText3 Chinese version
Chinese version, very easy to use

Zend Studio 13.0.1
Powerful PHP integrated development environment

Dreamweaver CS6
Visual web development tools

SublimeText3 Mac version
God-level code editing software (SublimeText3)
Hot Topics


 How to exit the container by docker
Apr 15, 2025 pm 12:15 PM
How to exit the container by docker
Apr 15, 2025 pm 12:15 PM
Four ways to exit Docker container: Use Ctrl D in the container terminal Enter exit command in the container terminal Use docker stop <container_name> Command Use docker kill <container_name> command in the host terminal (force exit)
 How to copy files in docker to outside
Apr 15, 2025 pm 12:12 PM
How to copy files in docker to outside
Apr 15, 2025 pm 12:12 PM
Methods for copying files to external hosts in Docker: Use the docker cp command: Execute docker cp [Options] <Container Path> <Host Path>. Using data volumes: Create a directory on the host, and use the -v parameter to mount the directory into the container when creating the container to achieve bidirectional file synchronization.
 How to restart docker
Apr 15, 2025 pm 12:06 PM
How to restart docker
Apr 15, 2025 pm 12:06 PM
How to restart the Docker container: get the container ID (docker ps); stop the container (docker stop <container_id>); start the container (docker start <container_id>); verify that the restart is successful (docker ps). Other methods: Docker Compose (docker-compose restart) or Docker API (see Docker documentation).
 How to check the name of the docker container
Apr 15, 2025 pm 12:21 PM
How to check the name of the docker container
Apr 15, 2025 pm 12:21 PM
You can query the Docker container name by following the steps: List all containers (docker ps). Filter the container list (using the grep command). Gets the container name (located in the "NAMES" column).
 How to start mysql by docker
Apr 15, 2025 pm 12:09 PM
How to start mysql by docker
Apr 15, 2025 pm 12:09 PM
The process of starting MySQL in Docker consists of the following steps: Pull the MySQL image to create and start the container, set the root user password, and map the port verification connection Create the database and the user grants all permissions to the database
 How to start containers by docker
Apr 15, 2025 pm 12:27 PM
How to start containers by docker
Apr 15, 2025 pm 12:27 PM
Docker container startup steps: Pull the container image: Run "docker pull [mirror name]". Create a container: Use "docker create [options] [mirror name] [commands and parameters]". Start the container: Execute "docker start [Container name or ID]". Check container status: Verify that the container is running with "docker ps".
 How to update the image of docker
Apr 15, 2025 pm 12:03 PM
How to update the image of docker
Apr 15, 2025 pm 12:03 PM
The steps to update a Docker image are as follows: Pull the latest image tag New image Delete the old image for a specific tag (optional) Restart the container (if needed)
 How to view logs from docker
Apr 15, 2025 pm 12:24 PM
How to view logs from docker
Apr 15, 2025 pm 12:24 PM
The methods to view Docker logs include: using the docker logs command, for example: docker logs CONTAINER_NAME Use the docker exec command to run /bin/sh and view the log file, for example: docker exec -it CONTAINER_NAME /bin/sh ; cat /var/log/CONTAINER_NAME.log Use the docker-compose logs command of Docker Compose, for example: docker-compose -f docker-com
