
 Operation and Maintenance
Nginx
The geo module in Nginx and how to use it to configure load balancing
Operation and Maintenance
Nginx
The geo module in Nginx and how to use it to configure load balancing
The geo module in Nginx and how to use it to configure load balancing

The geo directive uses the ngx_http_geo_module module. By default, nginx loads this module unless --without-http_geo_module is configured manually.
ngx_http_geo_module module can be used to create variables whose values depend on the client ip address.
geo directive
Syntax: geo [$address] $variable { ... }
Default value: —
Configuration section: http
Definition from the specified variable Get the client's ip address. By default, nginx gets the client IP address from the $remote_addr variable, but it can also be obtained from other variables. For example,
geo $remote_addr $geo {
    default 0;
    127.0.0.1 1;
}
geo $arg_ttlsa_com $geo {
    default 0;
    127.0.0.1 1;
}If the value of this variable cannot represent a legal IP address, then nginx will use the address "255.255.255.255".
nginx describes the address through cidr or address segment, and supports the following parameters:
delete: delete the specified network
if If the client address cannot match any defined address, nginx will use the default value. CIDR can use "0.0.0.0/0" to replace the default value.
include: Contains a file that defines addresses and values, and can contain multiple files.
proxy: Define trusted address. When the request comes from a trusted address, nginx will obtain the address information with the help of its "X-Forwarded-For" header. Compared with ordinary addresses, trusted addresses are detected sequentially.
proxy_recursive: Enable recursive address search. If recursive lookup is turned off, nginx will use the last address in "x-forwarded-for" instead of the original client address when the client address matches a trusted address. If recursive search is enabled, when the client address matches a trusted address, nginx will use the last address in "x-forwarded-for" that does not match any trusted address to replace the original client address.
ranges: Define the address in the form of an address segment. This parameter must be placed first. To speed up loading of the address library, addresses should be defined in ascending order.
geo $country {
  default    zz;
  include    conf/geo.conf;
  delete     127.0.0.0/16;
  proxy     192.168.100.0/24;
  proxy     2001:0db8::/32;

  127.0.0.0/24  us;
  127.0.0.1/32  ru;
  10.1.0.0/16  ru;
  192.168.1.0/24 uk;
}vim conf/geo.conf
10.2.0.0/16  ru;
192.168.2.0/24 ru;
Address segment example:
geo $country {
  ranges;
  default          zz;
  127.0.0.0-127.0.0.0    us;
  127.0.0.1-127.0.0.1    ru;
  127.0.0.1-127.0.0.255   us;
  10.1.0.0-10.1.255.255   ru;
  192.168.1.0-192.168.1.255 uk;
}The geo command mainly assigns values to variables based on ip. Therefore, only IP or network segments can be defined under the geo block, otherwise an error will be reported.
geo module implements global load balancing
server1 : 192.168.6.101
server2 : 192.168.6.102
server3 : 192.168.6.121
Test machine 1 ip: 192.168.6.2
Test machine 2 ip: 192.168.6.8
Test machine 3 ip: 192.168.6.189
1. Compile and install nginx on each server, I don’t have much said!
I have not changed the configurations of server1 and server2. I only changed the homepage, which is good for testing!
server1 :
shell $> cd /usr/local/nginx/html
shell $> rm index.html
shell $> echo "192.168.6.101" > index.html
server2:
shell $> cd /usr/local/nginx/html
shell $> rm index.html
shell $> echo "192.168.6.102" > index.html
Get their services up
shell $> /usr/local/nginx/sbin/nginx
2 .Modify the configuration of server3`
shell $> cd /usr/local/nginx/conf/
shell $> vim nginx.conf
worker_processes 1;

events {
  worker_connections 1024;
}
http {
  include    mime.types;
  default_type application/octet-stream;
  geo $geo {
    default default;
    192.168.6.189/32    uk;
    192.168.6.8/32     us;
#这里的子网码是 32 是因为,我是单网段测试,如果你有vlan,你可以是24 例如
# 192.168.0.0/24   tw
  }
  upstream  uk.server {
    server 192.168.6.101;
  }
  upstream  us.server {
    server 192.168.6.102;
  }
  upstream  default.server {
    server 192.168.6.121:8080;
  }
  sendfile    on;
  keepalive_timeout 65;

  server {
    listen    80;
    server_name 192.168.6.121;
    index index.html index.htm;
    root html;

    location / {
        proxy_redirect off;
        proxy_set_header host $host;
        proxy_set_header x-real-ip $remote_addr;
        proxy_set_header x-forwarded-for $proxy_add_x_forwarded_for;
        proxy_pass http://$geo.server$request_uri;
    }
    error_page  500 502 503 504 /50x.html;
    location = /50x.html {
      root  html;
    }

  }

  server {
    listen    8080;
    server_name 192.168.6.121;
    location / {
      root  html;
      index index.html index.htm;
    }
  }
}
3. Test, open the browser on test machine 1 and enter
http://192.168.6.121
display
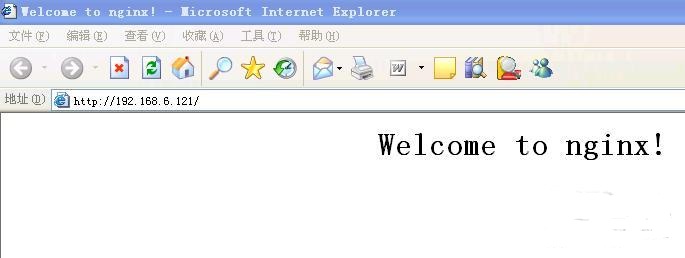
Because the IP address of test machine 1 is 192.168.6.2 according to nginx configuration, it is obvious that he accesses server3 port 8080! Because I modified the index.html of server1 server2
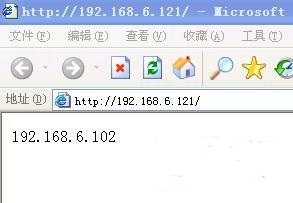
Open the browser on test machine 2~Enter
http://192.168.6.121
display
Open the browser on test machine 3 ~ enter
http://192.168.6.121
The ip of test machine 3 is 192.168.6.189
Display:
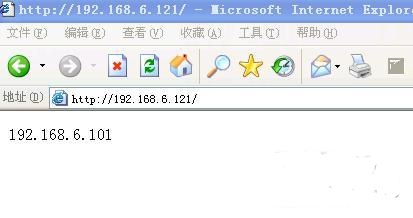
Obviously, load balancing plays a role~~~
In this way, the three servers can be placed in different IDC computer rooms. Then just synchronize the data~ The advantage of this is that it saves the trouble with DNS, because smart DNS will sometimes parse the other party's DNS address when parsing according to the visiting IP, and match it to a server. If the other party He is a Netcom user. The Telecom DNS he uses will directly match him to the Telecom server, nginx, and match the server based on the access IP. In this way, as long as we collect the IP segments in each region, it will be fine.
The above is the detailed content of The geo module in Nginx and how to use it to configure load balancing. For more information, please follow other related articles on the PHP Chinese website!

Hot AI Tools

Undresser.AI Undress
AI-powered app for creating realistic nude photos

AI Clothes Remover
Online AI tool for removing clothes from photos.

Undress AI Tool
Undress images for free

Clothoff.io
AI clothes remover

Video Face Swap
Swap faces in any video effortlessly with our completely free AI face swap tool!

Hot Article
Hot Tools

Notepad++7.3.1
Easy-to-use and free code editor

SublimeText3 Chinese version
Chinese version, very easy to use

Zend Studio 13.0.1
Powerful PHP integrated development environment

Dreamweaver CS6
Visual web development tools

SublimeText3 Mac version
God-level code editing software (SublimeText3)
Hot Topics


 How to check the name of the docker container
Apr 15, 2025 pm 12:21 PM
How to check the name of the docker container
Apr 15, 2025 pm 12:21 PM
You can query the Docker container name by following the steps: List all containers (docker ps). Filter the container list (using the grep command). Gets the container name (located in the "NAMES" column).
 How to configure nginx in Windows
Apr 14, 2025 pm 12:57 PM
How to configure nginx in Windows
Apr 14, 2025 pm 12:57 PM
How to configure Nginx in Windows? Install Nginx and create a virtual host configuration. Modify the main configuration file and include the virtual host configuration. Start or reload Nginx. Test the configuration and view the website. Selectively enable SSL and configure SSL certificates. Selectively set the firewall to allow port 80 and 443 traffic.
 How to check whether nginx is started
Apr 14, 2025 pm 01:03 PM
How to check whether nginx is started
Apr 14, 2025 pm 01:03 PM
How to confirm whether Nginx is started: 1. Use the command line: systemctl status nginx (Linux/Unix), netstat -ano | findstr 80 (Windows); 2. Check whether port 80 is open; 3. Check the Nginx startup message in the system log; 4. Use third-party tools, such as Nagios, Zabbix, and Icinga.
 How to start containers by docker
Apr 15, 2025 pm 12:27 PM
How to start containers by docker
Apr 15, 2025 pm 12:27 PM
Docker container startup steps: Pull the container image: Run "docker pull [mirror name]". Create a container: Use "docker create [options] [mirror name] [commands and parameters]". Start the container: Execute "docker start [Container name or ID]". Check container status: Verify that the container is running with "docker ps".
 How to configure cloud server domain name in nginx
Apr 14, 2025 pm 12:18 PM
How to configure cloud server domain name in nginx
Apr 14, 2025 pm 12:18 PM
How to configure an Nginx domain name on a cloud server: Create an A record pointing to the public IP address of the cloud server. Add virtual host blocks in the Nginx configuration file, specifying the listening port, domain name, and website root directory. Restart Nginx to apply the changes. Access the domain name test configuration. Other notes: Install the SSL certificate to enable HTTPS, ensure that the firewall allows port 80 traffic, and wait for DNS resolution to take effect.
 How to create containers for docker
Apr 15, 2025 pm 12:18 PM
How to create containers for docker
Apr 15, 2025 pm 12:18 PM
Create a container in Docker: 1. Pull the image: docker pull [mirror name] 2. Create a container: docker run [Options] [mirror name] [Command] 3. Start the container: docker start [Container name]
 How to check nginx version
Apr 14, 2025 am 11:57 AM
How to check nginx version
Apr 14, 2025 am 11:57 AM
The methods that can query the Nginx version are: use the nginx -v command; view the version directive in the nginx.conf file; open the Nginx error page and view the page title.
 How to start nginx server
Apr 14, 2025 pm 12:27 PM
How to start nginx server
Apr 14, 2025 pm 12:27 PM
Starting an Nginx server requires different steps according to different operating systems: Linux/Unix system: Install the Nginx package (for example, using apt-get or yum). Use systemctl to start an Nginx service (for example, sudo systemctl start nginx). Windows system: Download and install Windows binary files. Start Nginx using the nginx.exe executable (for example, nginx.exe -c conf\nginx.conf). No matter which operating system you use, you can access the server IP
