
 Database
Mysql Tutorial
How to implement MySQL master-slave replication based on SSL secure connection
Database
Mysql Tutorial
How to implement MySQL master-slave replication based on SSL secure connection
How to implement MySQL master-slave replication based on SSL secure connection

A mysql host in the production environment has a single point of failure, so we need to ensure the high availability of mysql, that is, if one of the two MySQL servers hangs up, , another one can immediately take over its work.
The principle of master-slave replication
The master records the binary log. Before each transaction updates the data, the master records these changes in the secondary log. The storage engine receives a notification from the master server after the binary log is completed to commit the MySQL transaction. Next, the slave needs to copy the master's binary log to its own relay log. First, the slave starts a working thread - the I/O thread. The I/O thread opens a normal connection on the master, and then starts the binlog dump process. The Binlog dump process reads events from the master's binary log. If the master has been synchronized, it sleeps and waits for the master to generate new events. The I/O thread writes these events to the relay log. The final step of this process is handled by the SQL slave thread.. The SQL thread reads the events in the relay log and reproduces these events to update the data in the slave database to maintain consistency with the data in the master database. Because relay logs are typically stored in the operating system's cache, there is little overhead as long as the thread is consistent with the I/O thread.
Environment preparation: Open two MySQL servers and deploy the network environment.
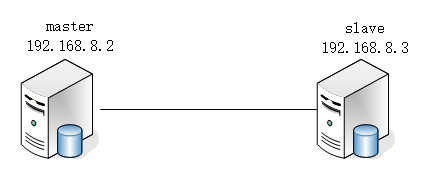
Deploy master
1. Create an SSL/RSA file on the host
[root@master ~]# cd /usr/local/mysql/bin/
[root@master bin]# mysql_ssl_rsa_setup --user=mysql --basedir=/usr/llocal/mysql --datadir=/usr/local/mysql/data
2. Grant permissions and restart.
[root@master bin]# chmod +r /usr/local/mysql/data/server-key.pem
[root@master bin]# service mysqld restart
Shutting down MySQL..                                      [  确定  ]
Starting MySQL.                                            [  确定  ]
3. Log in to mysql to check whether ssl is enabled and create a replication user.
Note: Enable mysql to support ssl secure connection, which is mainly used for mysql master-slave replication (LAN can use non-ssh connection, that is, plain text replication, but it is recommended to use ssl connection for internet replication)
mysql> grant replication slave on *.* to rep@'192.168.8.3' identified by '123';
Query OK, 0 rows affected, 1 warning (0.07 sec)
4. The master turns on the binary log and checks the binary log file after restarting.
It should be noted that server_id must be unique.
[root@master ~]# vim /etc/my.cnf
#添加下面内容
log-bin=mysql-bin
service_id=1
[root@master ~]# service mysqld restart
Shutting down MySQL..                                      [  确定  ]
Starting MySQL.                                            [  确定  ]
[root@master ~]# mysql -uroot -p123 -e "show master status"
mysql: [Warning] Using a password on the command line interface can be insecure.
+------------------+----------+--------------+------------------+-------------------+
| File             | Position | Binlog_Do_DB | Binlog_Ignore_DB | Executed_Gtid_Set |
+------------------+----------+--------------+------------------+-------------------+
| mysql-bin.000001 |      154 |              |                  |                   |
+------------------+----------+--------------+------------------+-------------------+
5. Firewall configuration. You can turn off the firewall in the experimental environment. In the production environment, you need to configure firewall rules to allow port 3306.
[root@master ~]# firewall-cmd --permanent --add-port=3306/tcp
success
[root@master ~]# firewall-cmd --reload
success
6. Copy the ssl file to slave
[root@master data]# scp ca.pem client-cert.pem client-key.pem root@192.168.8.3:/usr/local/mysql/data
The authenticity of host '192.168.8.3 (192.168.8.3)' can't be established.
ECDSA key fingerprint is SHA256:LFby9KMDz/kkPfOESbeJ7Qh+3hmQaX2W5gkDDMwSGHA.
ECDSA key fingerprint is MD5:03:32:64:b4:c2:5b:6c:a4:e2:f0:7f:df:7a:35:19:80.
Are you sure you want to continue connecting (yes/no)? yes
Warning: Permanently added '192.168.8.3' (ECDSA) to the list of known hosts.
root@192.168.8.3's password:
ca.pem                             100% 1112   232.5KB/s   00:00
client-cert.pem                    100% 1112   240.4KB/s   00:00
client-key.pem                     100% 1676   205.0KB/s   00:00
Deploy slave
1. Enable ssl and relay logs, grant read permission to the ssl file and restart mysql.
[root@slave ~]# vim /etc/my.cnf
#添加下面内容
server_id=2
relay-log=relay-log
ssl_ca=ca.pem
ssl_cert=client-cert.pem
ssl_key=client-key.pem

[root@slave ~]# cd /usr/local/mysql/data
[root@slave data]# ll ca.pem client-cert.pem client-key.pem
-rw-r--r--. 1 mysql mysql 1112 3月  31 14:31 ca.pem
-rw-r--r--. 1 mysql mysql 1112 3月  31 14:31 client-cert.pem
-rw-------. 1 mysql mysql 1676 3月  31 14:31 client-key.pem
[root@slave data]# chmod +r client-key.pem
[root@slave ~]# service mysqld restart
Shutting down MySQL..                                      [  确定  ]
Starting MySQL.                                            [  确定  ]
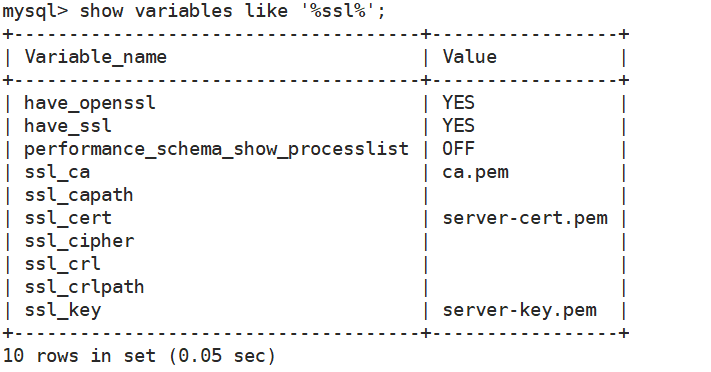
2. Confirm that SSL is enabled successfully
[root@slave ~]# mysql -uroot -p123 -e "show variables like '%ssl%'"
mysql: [Warning] Using a password on the command line interface can be insecure.
+-------------------------------------+-----------------+
| Variable_name                       | Value           |
+-------------------------------------+-----------------+
| have_openssl                        | YES             |
| have_ssl                            | YES             |
| performance_schema_show_processlist | OFF             |
| ssl_ca                              | ca.pem          |
| ssl_capath                          |                 |
| ssl_cert                            | client-cert.pem |
| ssl_cipher                          |                 |
| ssl_crl                             |                 |
| ssl_crlpath                         |                 |
| ssl_key                             | client-key.pem  |
+-------------------------------------+-----------------+
3. Before configuring master-slave replication, you can try using SSL to connect to the master server on the slave mysql.
Pay attention to the IP, 8.2 is the Master's IP. You can see the SSL protocol CIPHER in use is Ecdhe-RSA-AES128-GCM-SHA256
[root@slave ~]# cd /usr/local/mysql/data
[root@slave data]# mysql --ssl-ca=ca.pem --ssl-cert=client-cert.pem --ssl-key=client-key.pem -u rep -p123 -h 192.168.8.2
mysql: [Warning] Using a password on the command line interface can be insecure.
Welcome to the MySQL monitor.  Commands end with ; or \g.
Your MySQL connection id is 3
Server version: 5.7.40-log MySQL Community Server (GPL)

Copyright (c) 2000, 2022, Oracle and/or its affiliates.

Oracle is a registered trademark of Oracle Corporation and/or its
affiliates. Other names may be trademarks of their respective
owners.

Type 'help;' or '\h' for help. Type '\c' to clear the current input statement.

mysql>
mysql> \s
--------------
mysql  Ver 14.14 Distrib 5.7.40, for linux-glibc2.12 (x86_64) using  EditLine wrapper

Connection id:		3
Current database:
Current user:		rep@192.168.8.3
SSL:			Cipher in use is ECDHE-RSA-AES128-GCM-SHA256
Current pager:		stdout
Using outfile:		''
Using delimiter:	;
Server version:		5.7.40-log MySQL Community Server (GPL)
Protocol version:	10
Connection:		192.168.8.2 via TCP/IP
Server characterset:	latin1
Db     characterset:	latin1
Client characterset:	utf8
Conn.  characterset:	utf8
TCP port:		3306
Uptime:			22 min 19 sec

Threads: 1  Questions: 8  Slow queries: 0  Opens: 109  Flush tables: 1  Open tables: 102  Queries per second avg: 0.005
--------------
1. replicate
Remember to exit the connection first and log in to the slave's mysql service.
mysql> exit
Bye
[root@slave data]# mysql -uroot -p123
#省略部分登录信息
mysql> change master to
-> master_host='192.168.8.2', #masterIP
-> master_user='rep', #master用户
-> master_password='123', #master密码
-> master_log_file='mysql-bin.000001', #master二进制日志文件
-> master_log_pos=154, #master位置
-> master_ssl=1, #masterssl
-> master_ssl_cert='client-cert.pem',
-> master_ssl_key='client-key.pem',
-> master_ssl_ca='ca.pem';
Query OK, 0 rows affected, 2 warnings (0.07 sec)
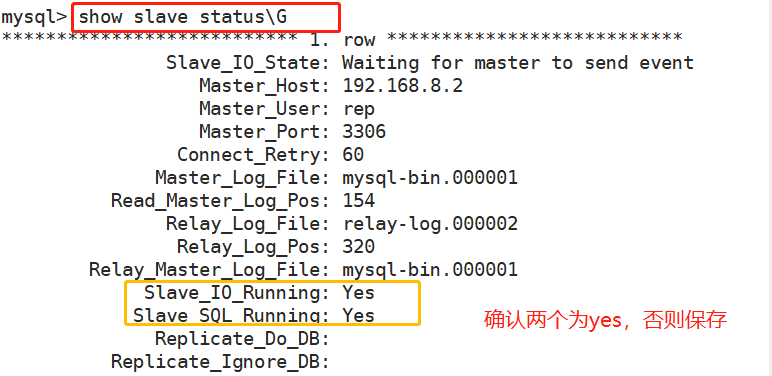
mysql> start slave; #启用从
Query OK, 0 rows affected (0.02 sec)Confirm that the activation is successful.
Test SSL master-slave replication
1. Log in to the master and write some data
[root@master ~]# mysql -uroot -p123
#省略部分内容
mysql> create database bbs;
Query OK, 1 row affected (0.01 sec)

mysql> use bbs;
Database changed
mysql> create table tb1(id int,
    -> name varchar(20));
Query OK, 0 rows affected (0.02 sec)

mysql> insert into tb1 values(1,'z3');
Query OK, 1 row affected (0.02 sec)2. Log in to the slave and view the data
[root@slave ~]# mysql -uroot -p123
#省略部分内容
mysql> select * from bbs.tb1;
+------+------+
| id   | name |
+------+------+
|    1 | z3   |
+------+------+
1 row in set (0.01 sec)
Finally you can see z3, the master and slave are successful.
The above is the detailed content of How to implement MySQL master-slave replication based on SSL secure connection. For more information, please follow other related articles on the PHP Chinese website!

Hot AI Tools

Undresser.AI Undress
AI-powered app for creating realistic nude photos

AI Clothes Remover
Online AI tool for removing clothes from photos.

Undress AI Tool
Undress images for free

Clothoff.io
AI clothes remover

Video Face Swap
Swap faces in any video effortlessly with our completely free AI face swap tool!

Hot Article
Hot Tools

Notepad++7.3.1
Easy-to-use and free code editor

SublimeText3 Chinese version
Chinese version, very easy to use

Zend Studio 13.0.1
Powerful PHP integrated development environment

Dreamweaver CS6
Visual web development tools

SublimeText3 Mac version
God-level code editing software (SublimeText3)
Hot Topics


 MySQL's Role: Databases in Web Applications
Apr 17, 2025 am 12:23 AM
MySQL's Role: Databases in Web Applications
Apr 17, 2025 am 12:23 AM
The main role of MySQL in web applications is to store and manage data. 1.MySQL efficiently processes user information, product catalogs, transaction records and other data. 2. Through SQL query, developers can extract information from the database to generate dynamic content. 3.MySQL works based on the client-server model to ensure acceptable query speed.
 How to start mysql by docker
Apr 15, 2025 pm 12:09 PM
How to start mysql by docker
Apr 15, 2025 pm 12:09 PM
The process of starting MySQL in Docker consists of the following steps: Pull the MySQL image to create and start the container, set the root user password, and map the port verification connection Create the database and the user grants all permissions to the database
 Laravel Introduction Example
Apr 18, 2025 pm 12:45 PM
Laravel Introduction Example
Apr 18, 2025 pm 12:45 PM
Laravel is a PHP framework for easy building of web applications. It provides a range of powerful features including: Installation: Install the Laravel CLI globally with Composer and create applications in the project directory. Routing: Define the relationship between the URL and the handler in routes/web.php. View: Create a view in resources/views to render the application's interface. Database Integration: Provides out-of-the-box integration with databases such as MySQL and uses migration to create and modify tables. Model and Controller: The model represents the database entity and the controller processes HTTP requests.
 Solve database connection problem: a practical case of using minii/db library
Apr 18, 2025 am 07:09 AM
Solve database connection problem: a practical case of using minii/db library
Apr 18, 2025 am 07:09 AM
I encountered a tricky problem when developing a small application: the need to quickly integrate a lightweight database operation library. After trying multiple libraries, I found that they either have too much functionality or are not very compatible. Eventually, I found minii/db, a simplified version based on Yii2 that solved my problem perfectly.
 How to install mysql in centos7
Apr 14, 2025 pm 08:30 PM
How to install mysql in centos7
Apr 14, 2025 pm 08:30 PM
The key to installing MySQL elegantly is to add the official MySQL repository. The specific steps are as follows: Download the MySQL official GPG key to prevent phishing attacks. Add MySQL repository file: rpm -Uvh https://dev.mysql.com/get/mysql80-community-release-el7-3.noarch.rpm Update yum repository cache: yum update installation MySQL: yum install mysql-server startup MySQL service: systemctl start mysqld set up booting
 Centos install mysql
Apr 14, 2025 pm 08:09 PM
Centos install mysql
Apr 14, 2025 pm 08:09 PM
Installing MySQL on CentOS involves the following steps: Adding the appropriate MySQL yum source. Execute the yum install mysql-server command to install the MySQL server. Use the mysql_secure_installation command to make security settings, such as setting the root user password. Customize the MySQL configuration file as needed. Tune MySQL parameters and optimize databases for performance.
 Laravel framework installation method
Apr 18, 2025 pm 12:54 PM
Laravel framework installation method
Apr 18, 2025 pm 12:54 PM
Article summary: This article provides detailed step-by-step instructions to guide readers on how to easily install the Laravel framework. Laravel is a powerful PHP framework that speeds up the development process of web applications. This tutorial covers the installation process from system requirements to configuring databases and setting up routing. By following these steps, readers can quickly and efficiently lay a solid foundation for their Laravel project.
 MySQL and phpMyAdmin: Core Features and Functions
Apr 22, 2025 am 12:12 AM
MySQL and phpMyAdmin: Core Features and Functions
Apr 22, 2025 am 12:12 AM
MySQL and phpMyAdmin are powerful database management tools. 1) MySQL is used to create databases and tables, and to execute DML and SQL queries. 2) phpMyAdmin provides an intuitive interface for database management, table structure management, data operations and user permission management.
