

How SpringBoot+nginx implements resource upload function

1.nginx installation and configuration
The server used by the editor is Alibaba Cloud's lightweight application server, and the system uses Ubuntu. Remember to open the 9090tcp port. If you do not use the 9090 port as the server port, you do not need to use it.
Installation
First of all, it is necessary to obtain the installation package. Here is nginx-1.11.3-ubuntu.tar.gz https://pan.baidu .com/s/1vvb41qkoj4vqfyfckxbkja (password 45wz)
The editor puts the installation package in /usr/nginx, enters the directory and executes tar -zxvf nginx-1.11.3.tar.gz Decompress
Configuration
Modify /usr/nginx/conf/nginx.conf:
server {
 listen  9090;
 server_name localhost;

 location ~ .(jpg|png|jpeg|gif|bmp)$ { #可识别的文件后缀
 root /usr/nginx/image/; #图片的映射路径
  autoindex on; #开启自动索引
 expires 1h; #过期时间
 }
 location ~ .(css|js)$ {
  root /usr/nginx/static/;
  autoindex on;
  expires 1h;
 }
 location ~ .(avi|mov|rmvb|rm|flv|mp4|3gp)$ {
  root /usr/nginx/video/;
  autoindex on;
  expires 1h;
}This modification should be added. increase, remember not to delete randomly
The last step is to start nginx and execute ./usr/nginx/sbin/nginx
At this point the server nginx is ready
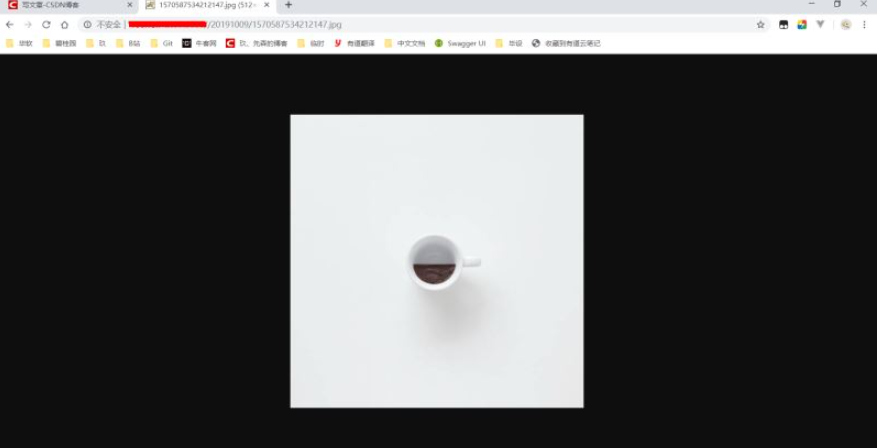
You You can try to download picture 01.jpg in /usr/nginx/image, and then see if the picture can be accessed locally
2. Springboot implements resource upload
pom.xml:
<parent>
 <groupid>org.springframework.boot</groupid>
 <artifactid>spring-boot-starter-parent</artifactid>
 <version>2.1.7.release</version>
</parent>
<dependencies>
 <dependency>
  <groupid>org.springframework.boot</groupid>
  <artifactid>spring-boot-starter-web</artifactid>
  <version>2.1.7.release</version>
 </dependency>
 <dependency>
  <groupid>org.springframework.boot</groupid>
  <artifactid>spring-boot-starter-test</artifactid>
  <version>2.1.7.release</version>
  <scope>test</scope>
 </dependency>
 <!-- apache工具组件 -->
 <dependency>
  <groupid>org.apache.commons</groupid>
  <artifactid>commons-lang3</artifactid>
  <version>3.8.1</version>
 </dependency>
 <dependency>
  <groupid>org.apache.commons</groupid>
  <artifactid>commons-io</artifactid>
  <version>1.3.2</version>
 </dependency>
 <dependency>
  <groupid>commons-net</groupid>
  <artifactid>commons-net</artifactid>
  <version>3.6</version>
 </dependency>
 <!-- 文件上传组件 -->
 <dependency>
  <groupid>commons-fileupload</groupid>
  <artifactid>commons-fileupload</artifactid>
  <version>1.3.3</version>
 </dependency>
 <dependency>
  <groupid>org.projectlombok</groupid>
  <artifactid>lombok</artifactid>
  <version>1.16.22</version>
 </dependency>
 <dependency>
  <groupid>com.jcraft</groupid>
  <artifactid>jsch</artifactid>
  <version>0.1.54</version>
 </dependency>
 <dependency>
  <groupid>joda-time</groupid>
  <artifactid>joda-time</artifactid>
  <version>2.10.3</version>
 </dependency>
</dependencies>
appilcation.yml:
ftp:
 host: 自己服务器ip
 username: 服务器账号
 password: 服务器密码
 port: 22
 rootpath: /usr/nginx/image
 img:
 url: http://ip:9090/  # ftp.img.url 可以不添加,这里只是为了上传文件成功后返回文件路径
Tool class ftputil.class:
import com.jcraft.jsch.*;
import org.slf4j.logger;
import org.slf4j.loggerfactory;
import org.springframework.beans.factory.annotation.value;
import org.springframework.stereotype.component;
import java.io.inputstream;
import java.util.properties;
@component
public class ftputil {
 private static logger logger = loggerfactory.getlogger(ftputil.class);
 /**
  * ftp服务器ip地址
  */
 private static string host;
 @value("${ftp.host}")
 public void sethost(string val){
  ftputil.host = val;
 }
 /**
  * 端口
  */
 private static int port;
 @value("${ftp.port}")
 public void setport(int val){
  ftputil.port = val;
 }
 /**
  * 用户名
  */
 private static string username;
 @value("${ftp.username}")
 public void setusername(string val){
  ftputil.username = val;
 }
 /**
  * 密码
  */
 private static string password;
 @value("${ftp.password}")
 public void setpassword(string val){
  ftputil.password = val;
 }
 /**
  * 存放图片的根目录
  */
 private static string rootpath;
 @value("${ftp.rootpath}")
 public void setrootpath(string val){
  ftputil.rootpath = val;
 }
 /**
  * 存放图片的路径
  */
 private static string imgurl;
 @value("${ftp.img.url}")
 public void setimgurl(string val){
  ftputil.imgurl = val;
 }
 /**
  * 获取连接
  */
 private static channelsftp getchannel() throws exception{
  jsch jsch = new jsch();
  //->ssh root@host:port
  session sshsession = jsch.getsession(username,host,port);
  //密码
  sshsession.setpassword(password);
  properties sshconfig = new properties();
  sshconfig.put("stricthostkeychecking", "no");
  sshsession.setconfig(sshconfig);
  sshsession.connect();
  channel channel = sshsession.openchannel("sftp");
  channel.connect();
  return (channelsftp) channel;
 }
 /**
  * ftp上传图片
  * @param inputstream 图片io流
  * @param imagepath 路径,不存在就创建目录
  * @param imagesname 图片名称
  * @return urlstr 图片的存放路径
  */
 public static string putimages(inputstream inputstream, string imagepath, string imagesname){
  try {
   channelsftp sftp = getchannel();
   string path = rootpath + imagepath + "/";
   createdir(path,sftp);
   //上传文件
   sftp.put(inputstream, path + imagesname);
   logger.info("上传成功!");
   sftp.quit();
   sftp.exit();
   //处理返回的路径
   string resultfile;
   resultfile = imgurl + imagepath + imagesname;
   return resultfile;
  } catch (exception e) {
   logger.error("上传失败:" + e.getmessage());
  }
  return "";
 }
 /**
  * 创建目录
  */
 private static void createdir(string path,channelsftp sftp) throws sftpexception {
  string[] folders = path.split("/");
  sftp.cd("/");
  for ( string folder : folders ) {
   if ( folder.length() > 0 ) {
    try {
     sftp.cd( folder );
    }catch ( sftpexception e ) {
     sftp.mkdir( folder );
     sftp.cd( folder );
    }
   }
  }
 }
 /**
  * 删除图片
  */
 public static void delimages(string imagesname){
  try {
   channelsftp sftp = getchannel();
   string path = rootpath + imagesname;
   sftp.rm(path);
   sftp.quit();
   sftp.exit();
  } catch (exception e) {
   e.printstacktrace();
  }
 }
}Tool class idutils.class (modify the uploaded image name):
import java.util.random;
public class idutils {
 /**
  * 生成随机图片名
  */
 public static string genimagename() {
  //取当前时间的长整形值包含毫秒
  long millis = system.currenttimemillis();
  //加上三位随机数
  random random = new random();
  int end3 = random.nextint(999);
  //如果不足三位前面补0
  string str = millis + string.format("%03d", end3);
  return str;
 }
}nginxservice.class:
import com.wzy.util.ftputil;
import com.wzy.util.idutils;
import lombok.extern.slf4j.slf4j;
import org.joda.time.datetime;
import org.springframework.stereotype.service;
import org.springframework.web.multipart.multipartfile;
import java.io.ioexception;
import java.io.inputstream;
/**
 * @package: com.wzy.service
 * @author: clarence1
 * @date: 2019/10/4 21:34
 */
@service
@slf4j
public class nginxservice {
 public object uploadpicture(multipartfile uploadfile) {
  //1、给上传的图片生成新的文件名
  //1.1获取原始文件名
  string oldname = uploadfile.getoriginalfilename();
  //1.2使用idutils工具类生成新的文件名,新文件名 = newname + 文件后缀
  string newname = idutils.genimagename();
  assert oldname != null;
  newname = newname + oldname.substring(oldname.lastindexof("."));
  //1.3生成文件在服务器端存储的子目录
  string filepath = new datetime().tostring("/yyyymmdd/");
  //2、把图片上传到图片服务器
  //2.1获取上传的io流
  inputstream input = null;
  try {
   input = uploadfile.getinputstream();
  } catch (ioexception e) {
   e.printstacktrace();
  }
  //2.2调用ftputil工具类进行上传
  return ftputil.putimages(input, filepath, newname);
 }
}nginxcontroller.class:
import com.fasterxml.jackson.core.jsonprocessingexception;
import com.fasterxml.jackson.databind.objectmapper;
import com.wzy.service.nginxservice;
import lombok.extern.slf4j.slf4j;
import org.springframework.beans.factory.annotation.autowired;
import org.springframework.web.bind.annotation.postmapping;
import org.springframework.web.bind.annotation.requestparam;
import org.springframework.web.bind.annotation.restcontroller;
import org.springframework.web.multipart.multipartfile;
import java.util.hashmap;
import java.util.map;
@restcontroller
@slf4j
public class nginxcontroller {
 @autowired
 private nginxservice nginxservice;
 /**
  * 可上传图片、视频,只需在nginx配置中配置可识别的后缀
  */
 @postmapping("/upload")
 public string pictureupload(@requestparam(value = "file") multipartfile uploadfile) {
  long begin = system.currenttimemillis();
  string json = "";
  try {
   object result = nginxservice.uploadpicture(uploadfile);
   json = new objectmapper().writevalueasstring(result);
  } catch (jsonprocessingexception e) {
   e.printstacktrace();
  }
  long end = system.currenttimemillis();
  log.info("任务结束,共耗时:[" + (end-begin) + "]毫秒");
  return json;
 }
 @postmapping("/uploads")
 public object picturesupload(@requestparam(value = "file") multipartfile[] uploadfile) {
  long begin = system.currenttimemillis();
  map<object, object> map = new hashmap<>(10);
  int count = 0;
  for (multipartfile file : uploadfile) {
   object result = nginxservice.uploadpicture(file);
   map.put(count, result);
   count++;
  }
  long end = system.currenttimemillis();
  log.info("任务结束,共耗时:[" + (end-begin) + "]毫秒");
  return map;
 }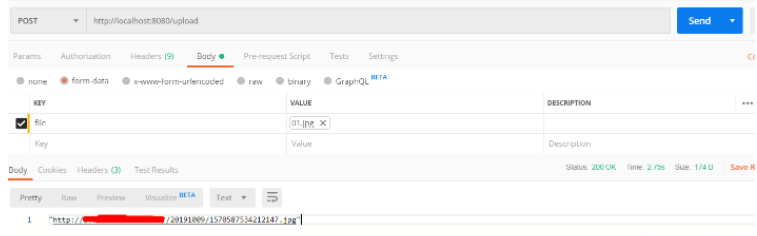
}Start the project, a wave of postman artifacts
Note:
1. If you want to upload videos together with pictures, just modify the nginx.conf configuration file and add the corresponding video suffix. However, the code has not changed. After uploading, it is also placed under /usr/image. Otherwise, the file can be uploaded but cannot be accessed
2. The uploads interface of the above code is to implement multiple file uploads
The above is the detailed content of How SpringBoot+nginx implements resource upload function. For more information, please follow other related articles on the PHP Chinese website!

Hot AI Tools

Undresser.AI Undress
AI-powered app for creating realistic nude photos

AI Clothes Remover
Online AI tool for removing clothes from photos.

Undress AI Tool
Undress images for free

Clothoff.io
AI clothes remover

Video Face Swap
Swap faces in any video effortlessly with our completely free AI face swap tool!

Hot Article
Hot Tools

Notepad++7.3.1
Easy-to-use and free code editor

SublimeText3 Chinese version
Chinese version, very easy to use

Zend Studio 13.0.1
Powerful PHP integrated development environment

Dreamweaver CS6
Visual web development tools

SublimeText3 Mac version
God-level code editing software (SublimeText3)
Hot Topics
 1655
1655
 14
1413
52
1306
25
1252
29
1226
24
14
1413
52
1306
25
1252
29
1226
24

 How to configure nginx in Windows
Apr 14, 2025 pm 12:57 PM
How to configure nginx in Windows
Apr 14, 2025 pm 12:57 PM
How to configure Nginx in Windows? Install Nginx and create a virtual host configuration. Modify the main configuration file and include the virtual host configuration. Start or reload Nginx. Test the configuration and view the website. Selectively enable SSL and configure SSL certificates. Selectively set the firewall to allow port 80 and 443 traffic.
 How to check the name of the docker container
Apr 15, 2025 pm 12:21 PM
How to check the name of the docker container
Apr 15, 2025 pm 12:21 PM
You can query the Docker container name by following the steps: List all containers (docker ps). Filter the container list (using the grep command). Gets the container name (located in the "NAMES" column).
 How to start containers by docker
Apr 15, 2025 pm 12:27 PM
How to start containers by docker
Apr 15, 2025 pm 12:27 PM
Docker container startup steps: Pull the container image: Run "docker pull [mirror name]". Create a container: Use "docker create [options] [mirror name] [commands and parameters]". Start the container: Execute "docker start [Container name or ID]". Check container status: Verify that the container is running with "docker ps".
 How to check whether nginx is started
Apr 14, 2025 pm 01:03 PM
How to check whether nginx is started
Apr 14, 2025 pm 01:03 PM
How to confirm whether Nginx is started: 1. Use the command line: systemctl status nginx (Linux/Unix), netstat -ano | findstr 80 (Windows); 2. Check whether port 80 is open; 3. Check the Nginx startup message in the system log; 4. Use third-party tools, such as Nagios, Zabbix, and Icinga.
 How to create containers for docker
Apr 15, 2025 pm 12:18 PM
How to create containers for docker
Apr 15, 2025 pm 12:18 PM
Create a container in Docker: 1. Pull the image: docker pull [mirror name] 2. Create a container: docker run [Options] [mirror name] [Command] 3. Start the container: docker start [Container name]
 How to check nginx version
Apr 14, 2025 am 11:57 AM
How to check nginx version
Apr 14, 2025 am 11:57 AM
The methods that can query the Nginx version are: use the nginx -v command; view the version directive in the nginx.conf file; open the Nginx error page and view the page title.
 How to configure cloud server domain name in nginx
Apr 14, 2025 pm 12:18 PM
How to configure cloud server domain name in nginx
Apr 14, 2025 pm 12:18 PM
How to configure an Nginx domain name on a cloud server: Create an A record pointing to the public IP address of the cloud server. Add virtual host blocks in the Nginx configuration file, specifying the listening port, domain name, and website root directory. Restart Nginx to apply the changes. Access the domain name test configuration. Other notes: Install the SSL certificate to enable HTTPS, ensure that the firewall allows port 80 traffic, and wait for DNS resolution to take effect.
 What to do if nginx server is hung
Apr 14, 2025 am 11:42 AM
What to do if nginx server is hung
Apr 14, 2025 am 11:42 AM
When the Nginx server goes down, you can perform the following troubleshooting steps: Check that the nginx process is running. View the error log for error messages. Check the syntax of nginx configuration. Make sure nginx has the permissions you need to access the file. Check file descriptor to open limits. Confirm that nginx is listening on the correct port. Add firewall rules to allow nginx traffic. Check reverse proxy settings, including backend server availability. For further assistance, please contact technical support.
