

How to install and deploy Nginx in Centos6.5 64-bit

1. Introduction to nginx
nginx is a web server that can also be used for load balancing and reverse proxy. The most commonly used one at present is load balancing.
2. nginx installation
1. Download nginx and related components
The Linux system is centos 6.5 64-bit, I switched directly to the root user Installation

Enter the user directory to download the program

Download related components
[root@localhost src]# wget http://nginx.org/download/nginx-1.10.2.tar.gz
省略安装内容...
[root@localhost src]# wget http://www.openssl.org/source/openssl-fips-2.0.10.tar.gz
省略安装内容...
[root@localhost src]# wget http://zlib.net/zlib-1.2.11.tar.gz
省略安装内容...
[root@localhost src]# wget ftp://ftp.csx.cam.ac.uk/pub/software/programming/pcre/pcre-8.40.tar.gz
省略安装内容...
Install c compilation environment , if it is already installed, you can skip it
[root@localhost src]# yum install gcc-c++
省略安装内容...
期间会有确认提示输入y回车
is this ok [y/n]:y
省略安装内容...
2. Install nginx and related components
openssl installation
[root@localhost src]# tar zxvf openssl-fips-2.0.10.tar.gz
省略安装内容...
[root@localhost src]# cd openssl-fips-2.0.10
[root@localhost openssl-fips-2.0.10]# ./config && make && make install
省略安装内容...
pcre installation
[root@localhost src]# tar zxvf pcre-8.40.tar.gz
省略安装内容...
[root@localhost src]# cd pcre-8.40
[root@localhost pcre-8.40]# ./configure && make && make install
省略安装内容...
zlib installation
[root@localhost src]# tar zxvf zlib-1.2.11.tar.gz
省略安装内容...
[root@localhost src]# cd zlib-1.2.11
[root@localhost zlib-1.2.11]# ./configure && make && make install
省略安装内容...
nginx installation
[root@localhost src]# tar zxvf nginx-1.10.2.tar.gz
省略安装内容...
[root@localhost src]# cd nginx-1.10.2
[root@localhost nginx-1.10.2]# ./configure && make && make install
省略安装内容...
3. Start nginx
First find out where nginx is installed

Enter the nginx directory and start

1.用whereis libpcre.so.1命令找到libpcre.so.1在哪里
2.用ln -s /usr/local/lib/libpcre.so.1 /lib64命令做个软连接就可以了
3.用sbin/nginx启动nginx
4.用ps -aux | grep nginx查看状态

[root@localhost nginx]# whereis libpcre.so.1
[root@localhost nginx]# ln -s /usr/local/lib/libpcre.so.1 /lib64
[root@localhost nginx]# sbin/nginx
[root@localhost nginx]# ps -aux | grep nginx


启动
[root@localhost ~]# /usr/local/nginx/sbin/nginx
停止/重启
[root@localhost ~]# /usr/local/nginx/sbin/nginx -s stop(quit、reload)
命令帮助
[root@localhost ~]# /usr/local/nginx/sbin/nginx -h
验证配置文件
[root@localhost ~]# /usr/local/nginx/sbin/nginx -t
配置文件
[root@localhost ~]# vim /usr/local/nginx/conf/nginx.conf
4. Simple configuration of nginx
Open the nginx configuration file located in the conf folder in the nginx directory

5. Enable external network access
In the Linux system, by default, all ports of the firewall iptables manager are enabled. Only the default remote connection port 22 is enabled and the others are closed. The 80 and so on we set above are also closed, so we need to first apply Open the portMethod 1Close the firewall directly, which has better performance but poor security. If there is a front-end firewall, you can use this method
关闭防火墙
[root@localhost ~]# service iptables stop
关闭开机自启动防火墙
[root@localhost ~]# chkconfig iptables off
[root@localhost ~]# chkconfig --list|grep ipt
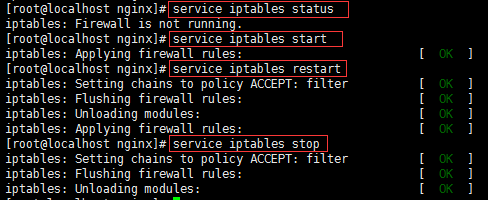
Method 2Add the opened port to the firewall whitelist. This method is safer but the performance is relatively poor
编辑防火墙白名单
[root@localhost ~]# vim /etc/sysconfig/iptables
增加下面一行代码
-a input -p tcp -m state -- state new -m tcp --dport 80 -j accept
保存退出,重启防火墙
[root@localhost ~]# service iptables restart
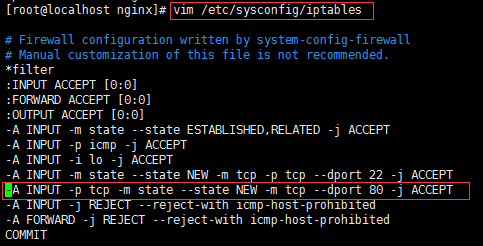

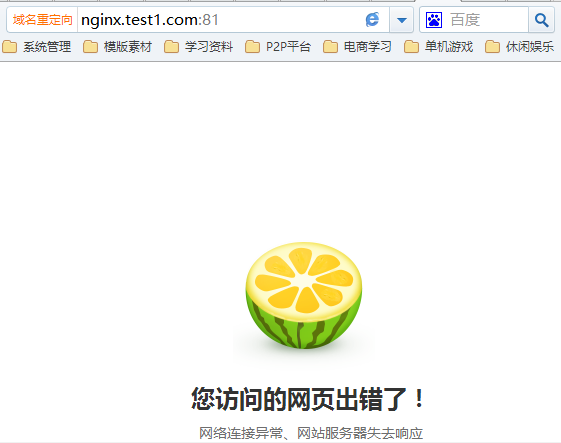
如果防火墙你依然启用,只是设置了启用端口,那我们访问81那个端口会发现无法访问,因为我并没有加入白名单
到此nginx服务器雏形部署完成。
6、nginx负载均衡配置
nginx集反向代理和负载均衡于一身,在配置文件中修改配就可以实现
首先我们打开配置文件
[root@localhost nginx]# vim conf/nginx.conf
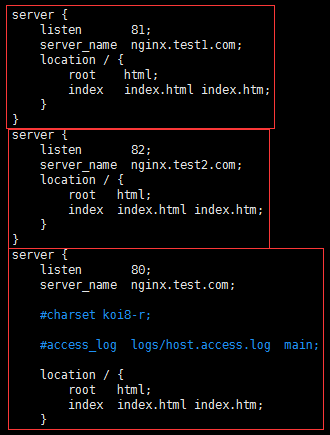
每一个server就是一个虚拟主机,我们有一个当作web服务器来使用
listen 80;代表监听80端口
server_name xxx.com;代表外网访问的域名
location / {};代表一个过滤器,/匹配所有请求,我们还可以根据自己的情况定义不同的过滤,比如对静态文件js、css、image制定专属过滤
root html;代表站点根目录
index index.html;代表默认主页 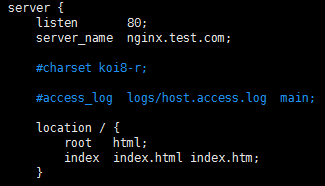
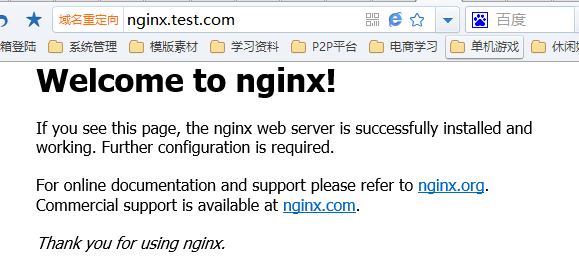
这样配置完毕我们输入域名就可以访问到该站点了。
负载均衡功能往往在接收到某个请求后分配到后端的多台服务器上,那我们就需要upstream{}块来配合使用
upstream xxx{};upstream模块是命名一个后端服务器组,组名必须为后端服务器站点域名,内部可以写多台服务器ip和port,还可以设置跳转规则及权重等等
ip_hash;代表使用ip地址方式分配跳转后端服务器,同一ip请求每次都会访问同一台后端服务器
server;代表后端服务器地址

server{};server模块依然是接收外部请求的部分
server_name;代表外网访问域名
location / {};同样代表过滤器,用于制定不同请求的不同操作
proxy_pass;代表后端服务器组名,此组名必须为后端服务器站点域名

server_name和upstream{}的组名可以不一致,server_name是外网访问接收请求的域名,upstream{}的组名是跳转后端服务器时站点访问的域名 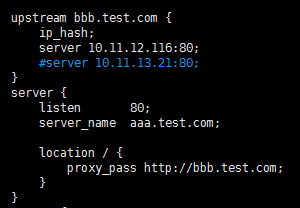
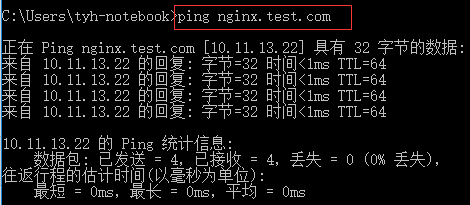
配置一下windows的host将我们要访问的域名aaa.test.com指向linux

因为硬件有限,我是将windows中的iis作为nginx的后端服务器,所以配置一下iis的站点域名
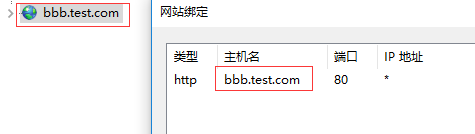
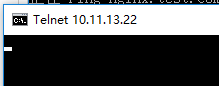
打开cmd再ping一下aaa.test.com确实指向linux系统了,再打开浏览器输入aaa.test.com会显示bbb这个站点就代表负载成功了。

The above is the detailed content of How to install and deploy Nginx in Centos6.5 64-bit. For more information, please follow other related articles on the PHP Chinese website!

Hot AI Tools

Undresser.AI Undress
AI-powered app for creating realistic nude photos

AI Clothes Remover
Online AI tool for removing clothes from photos.

Undress AI Tool
Undress images for free

Clothoff.io
AI clothes remover

Video Face Swap
Swap faces in any video effortlessly with our completely free AI face swap tool!

Hot Article
Hot Tools

Notepad++7.3.1
Easy-to-use and free code editor

SublimeText3 Chinese version
Chinese version, very easy to use

Zend Studio 13.0.1
Powerful PHP integrated development environment

Dreamweaver CS6
Visual web development tools

SublimeText3 Mac version
God-level code editing software (SublimeText3)
Hot Topics


 How to check the name of the docker container
Apr 15, 2025 pm 12:21 PM
How to check the name of the docker container
Apr 15, 2025 pm 12:21 PM
You can query the Docker container name by following the steps: List all containers (docker ps). Filter the container list (using the grep command). Gets the container name (located in the "NAMES" column).
 Centos shutdown command line
Apr 14, 2025 pm 09:12 PM
Centos shutdown command line
Apr 14, 2025 pm 09:12 PM
The CentOS shutdown command is shutdown, and the syntax is shutdown [Options] Time [Information]. Options include: -h Stop the system immediately; -P Turn off the power after shutdown; -r restart; -t Waiting time. Times can be specified as immediate (now), minutes ( minutes), or a specific time (hh:mm). Added information can be displayed in system messages.
 How to start containers by docker
Apr 15, 2025 pm 12:27 PM
How to start containers by docker
Apr 15, 2025 pm 12:27 PM
Docker container startup steps: Pull the container image: Run "docker pull [mirror name]". Create a container: Use "docker create [options] [mirror name] [commands and parameters]". Start the container: Execute "docker start [Container name or ID]". Check container status: Verify that the container is running with "docker ps".
 How to optimize CentOS HDFS configuration
Apr 14, 2025 pm 07:15 PM
How to optimize CentOS HDFS configuration
Apr 14, 2025 pm 07:15 PM
Improve HDFS performance on CentOS: A comprehensive optimization guide to optimize HDFS (Hadoop distributed file system) on CentOS requires comprehensive consideration of hardware, system configuration and network settings. This article provides a series of optimization strategies to help you improve HDFS performance. 1. Hardware upgrade and selection resource expansion: Increase the CPU, memory and storage capacity of the server as much as possible. High-performance hardware: adopts high-performance network cards and switches to improve network throughput. 2. System configuration fine-tuning kernel parameter adjustment: Modify /etc/sysctl.conf file to optimize kernel parameters such as TCP connection number, file handle number and memory management. For example, adjust TCP connection status and buffer size
 How to create containers for docker
Apr 15, 2025 pm 12:18 PM
How to create containers for docker
Apr 15, 2025 pm 12:18 PM
Create a container in Docker: 1. Pull the image: docker pull [mirror name] 2. Create a container: docker run [Options] [mirror name] [Command] 3. Start the container: docker start [Container name]
 Difference between centos and ubuntu
Apr 14, 2025 pm 09:09 PM
Difference between centos and ubuntu
Apr 14, 2025 pm 09:09 PM
The key differences between CentOS and Ubuntu are: origin (CentOS originates from Red Hat, for enterprises; Ubuntu originates from Debian, for individuals), package management (CentOS uses yum, focusing on stability; Ubuntu uses apt, for high update frequency), support cycle (CentOS provides 10 years of support, Ubuntu provides 5 years of LTS support), community support (CentOS focuses on stability, Ubuntu provides a wide range of tutorials and documents), uses (CentOS is biased towards servers, Ubuntu is suitable for servers and desktops), other differences include installation simplicity (CentOS is thin)
 Centos configuration IP address
Apr 14, 2025 pm 09:06 PM
Centos configuration IP address
Apr 14, 2025 pm 09:06 PM
Steps to configure IP address in CentOS: View the current network configuration: ip addr Edit the network configuration file: sudo vi /etc/sysconfig/network-scripts/ifcfg-eth0 Change IP address: Edit IPADDR= Line changes the subnet mask and gateway (optional): Edit NETMASK= and GATEWAY= Lines Restart the network service: sudo systemctl restart network verification IP address: ip addr
 What are the common misunderstandings in CentOS HDFS configuration?
Apr 14, 2025 pm 07:12 PM
What are the common misunderstandings in CentOS HDFS configuration?
Apr 14, 2025 pm 07:12 PM
Common problems and solutions for Hadoop Distributed File System (HDFS) configuration under CentOS When building a HadoopHDFS cluster on CentOS, some common misconfigurations may lead to performance degradation, data loss and even the cluster cannot start. This article summarizes these common problems and their solutions to help you avoid these pitfalls and ensure the stability and efficient operation of your HDFS cluster. Rack-aware configuration error: Problem: Rack-aware information is not configured correctly, resulting in uneven distribution of data block replicas and increasing network load. Solution: Double check the rack-aware configuration in the hdfs-site.xml file and use hdfsdfsadmin-printTopo
