
 Backend Development
Python Tutorial
How to implement Huffman coding using Python and C language respectively
Backend Development
Python Tutorial
How to implement Huffman coding using Python and C language respectively
How to implement Huffman coding using Python and C language respectively

1.C语言实现
1.1代码说明
a 创建双向链表:
在创建哈夫曼树的过程中,需要不断对结点进行更改和删除,所以选用双向链表的结构更容易
'''C
#include <stdlib.h>
#include <stdio.h>
#include <windows.h>
//哈夫曼树结构体,数据域存储字符及其权重
typedef struct node
{
char c;
int weight;
struct node *lchild, *rchild;
}Huffman, *Tree;
//双向链表结构体,数据域存储哈夫曼树结点
typedef struct list
{
Tree root;
struct list *pre;
struct list *next;
}List, *pList;
//创建双向链表,返回头结点指针
pList creatList()
{
pList head = (pList)malloc(sizeof(List));
pList temp1 = head;
pList temp2 = (pList)malloc(sizeof(List));
temp1->pre = NULL;
temp1->next = temp2;
temp1->root = (Tree)malloc(sizeof(Huffman));
temp1->root->c = 'a';
temp1->root->weight = 22;
temp1->root->lchild = NULL;
temp1->root->rchild = NULL;
temp2->pre = temp1;
temp1 = temp2;
temp2 = (pList)malloc(sizeof(List));
temp1->next = temp2;
temp1->root = (Tree)malloc(sizeof(Huffman));
temp1->root->c = 'b';
temp1->root->weight = 5;
temp1->root->lchild = NULL;
temp1->root->rchild = NULL;
temp2->pre = temp1;
temp1 = temp2;
temp2 = (pList)malloc(sizeof(List));
temp1->next = temp2;
temp1->root = (Tree)malloc(sizeof(Huffman));
temp1->root->c = 'c';
temp1->root->weight = 38;
temp1->root->lchild = NULL;
temp1->root->rchild = NULL;
temp2->pre = temp1;
temp1 = temp2;
temp2 = (pList)malloc(sizeof(List));
temp1->next = temp2;
temp1->root = (Tree)malloc(sizeof(Huffman));
temp1->root->c = 'd';
temp1->root->weight = 9;
temp1->root->lchild = NULL;
temp1->root->rchild = NULL;
temp2->pre = temp1;
temp1 = temp2;
temp2 = (pList)malloc(sizeof(List));
temp1->next = temp2;
temp1->root = (Tree)malloc(sizeof(Huffman));
temp1->root->c = 'e';
temp1->root->weight = 44;
temp1->root->lchild = NULL;
temp1->root->rchild = NULL;
temp2->pre = temp1;
temp1 = temp2;
temp2 = (pList)malloc(sizeof(List));
temp1->next = temp2;
temp1->root = (Tree)malloc(sizeof(Huffman));
temp1->root->c = 'f';
temp1->root->weight = 12;
temp1->root->lchild = NULL;
temp1->root->rchild = NULL;
temp2->pre = temp1;
temp1 = temp2;
temp1->next = NULL;
temp1->root = (Tree)malloc(sizeof(Huffman));
temp1->root->c = 'g';
temp1->root->weight = 65;
temp1->root->lchild = NULL;
temp1->root->rchild = NULL;
return head;
}b创建栈结构:
解码过程需要用到两个栈,一个用来存放树结点,一个用来存放码0和1
'''C
#define STACK_INIT_SIZE 100   //栈初始开辟空间大小
#define STACK_INCREMENT 10    //栈追加空间大小

//字符栈结构体,存放编码'0'和'1'
typedef struct {
    char *base;
    char *top;
    int size;
}charStack;


//栈初始化
charStack charStackInit()
{
    charStack s;
    s.base = (char *)malloc(sizeof(char)*STACK_INIT_SIZE);
    s.top = s.base;
    s.size = STACK_INIT_SIZE;
    return s;
}

//入栈
void charPush(charStack *s, char e)
{
    if(s->top - s->base >= s->size)
    {
        s->size += STACK_INCREMENT;
        s->base = realloc(s->base, sizeof(char)*s->size);
    }
    *s->top = e;
    s->top++;
}

//出栈
char charPop(charStack *s)
{
    if(s->top != s->base)
    {
        s->top--;
        return *s->top;
    }
    return -1;
}

//得到栈顶元素,但不出栈
char charGetTop(charStack *s)
{
    s->top--;
    char temp = *s->top;
    s->top++;
    return temp;
}

//栈结构体,存放哈夫曼树结点
typedef struct
{
    Huffman *base;
    Huffman *top;
    int size;
}BiStack;

//栈初始化
BiStack stackInit()
{
    BiStack s;
    s.base = (Huffman *)malloc(sizeof(Huffman)*STACK_INIT_SIZE);
    s.top = s.base;
    s.size =STACK_INIT_SIZE;
    return s;
}

//入栈
void push(BiStack *s, Huffman e)
{
    if(s->top - s->base >= s->size)
    {
        s->size += STACK_INCREMENT;
        s->base = (Huffman *)realloc(s->base, sizeof(Huffman)*s->size);
    }
    *s->top = e;
    s->top++;
}

//出栈
Huffman pop(BiStack *s)
{
    Huffman temp;
    s->top--;
    temp = *s->top;
    return temp;
}

//得到栈顶元素,但不出栈
Huffman getTop(BiStack s)
{
    Huffman temp;
    s.top--;
    temp = *s.top;
    return temp;
}

char stack[7][10];             //记录a~g的编码
//遍历栈,得到字符c的编码
void traverseStack(charStack s, char c)
{
    int index = c - 'a';
    int i = 0;
    while(s.base != s.top)
    {
        stack[index][i] = *s.base;
        i++;
        s.base++;
    }
}c 创建哈夫曼树:
'''C
//通过双向链表创建哈夫曼树,返回根结点指针
Tree creatHuffman(pList head)
{
    pList list1 = NULL;
    pList list2 = NULL;
    pList index = NULL;
    Tree root = NULL;
    while(head->next != NULL)   //链表只剩一个结点时循环结束,此结点数据域即为哈夫曼树的根结点
    {
        list1 = head;
        list2 = head->next;
        index = list2->next;
        root = (Tree)malloc(sizeof(Huffman));
        while(index != NULL)    //找到链表中权重最小的两个结点list1,list2
        {
            if(list1->root->weight > index->root->weight || list2->root->weight > index->root->weight)
            {
                if(list1->root->weight > list2->root->weight) list1 = index;
                else list2 = index;
            }
            index = index->next;
        }
        //list1和list2设为新结点的左右孩子
        if(list2->root->weight > list1->root->weight)
        {
            root->lchild = list1->root;
            root->rchild = list2->root;
        }
        else
        {
            root->lchild = list2->root;
            root->rchild = list1->root;
        }
        //新结点字符统一设为空格,权重设为list1与list2权重之和
        root->c = ' ';
        root->weight = list1->root->weight + list2->root->weight;
        //list1数据域替换成新结点,并删除list2
        list1->root = root;
        list2->pre->next = list2->next;
        if(list2->next != NULL)
            list2->next->pre = list2->pre;
    }
    return head->root;
}d编码:
'''C
char stack[7][10];             //记录a~g的编码
//遍历栈,得到字符c的编码
void traverseStack(charStack s, char c)
{
    int index = c - 'a';
    int i = 0;
    while(s.base != s.top)
    {
        stack[index][i] = *s.base;
        i++;
        s.base++;
    }
}


//通过哈夫曼树编码
void encodeHuffman(Tree T)
{
    BiStack bs = stackInit();
    charStack cs = charStackInit();
    Huffman root = *T;
    Tree temp = NULL;
    push(&bs, root);      //根结点入栈
    while(bs.top != bs.base)      //栈空表示遍历结束
    {
        root = getTop(bs);
        temp = root.lchild;       //先访问左孩子
        while(temp != NULL)       //左孩子不为空
        {
            //将结点左孩子设为空,代表已访问其左孩子
            root.lchild = NULL;
            pop(&bs);
            push(&bs, root);
            //左孩子入栈
            root = *temp;
            temp = root.lchild;
            push(&bs, root);
            //'0'入字符栈
            charPush(&cs, '0');
        }
        temp = root.rchild;     //后访问右孩子
        while(temp == NULL)     //右孩子为空,代表左右孩子均已访问,结点可以出栈
        {
            //结点出栈
            root = pop(&bs);
            //寻到叶子结点,可以得到结点中字符的编码
            if(root.c != ' ')
                traverseStack(cs, root.c);
            charPop(&cs);       //字符栈出栈
            if(bs.top == bs.base) break;    //根结点出栈,遍历结束
            //查看上一级结点是否访问完左右孩子
            root = getTop(bs);
            temp = root.rchild;
        }
        if(bs.top != bs.base)
        {
            //将结点右孩子设为空,代表已访问其右孩子
            root.rchild = NULL;
            pop(&bs);
            push(&bs, root);
            //右孩子入栈
            root = *temp;
            push(&bs, root);
            //'1'入字符栈
            charPush(&cs, '1');
        }
    }
}e解码:
'''C
char decode[100];   //记录解码得到的字符串
//通过哈夫曼树解码
void decodeHuffman(Tree T, char *code)
{
    int cnt = 0;
    Tree root;
    while(*code != '\0')                  //01编码字符串读完,解码结束
    {
        root = T;
        while(root->lchild != NULL)       //找到叶子结点
        {
            if(*code != '\0')
            {
                if(*code == '0')
                    root = root->lchild;
                else
                    root = root->rchild;
                code++;
            }
            else break;
        }
        decode[cnt] = root->c;             //叶子结点存放的字符即为解码得到的字符
        cnt++;
    }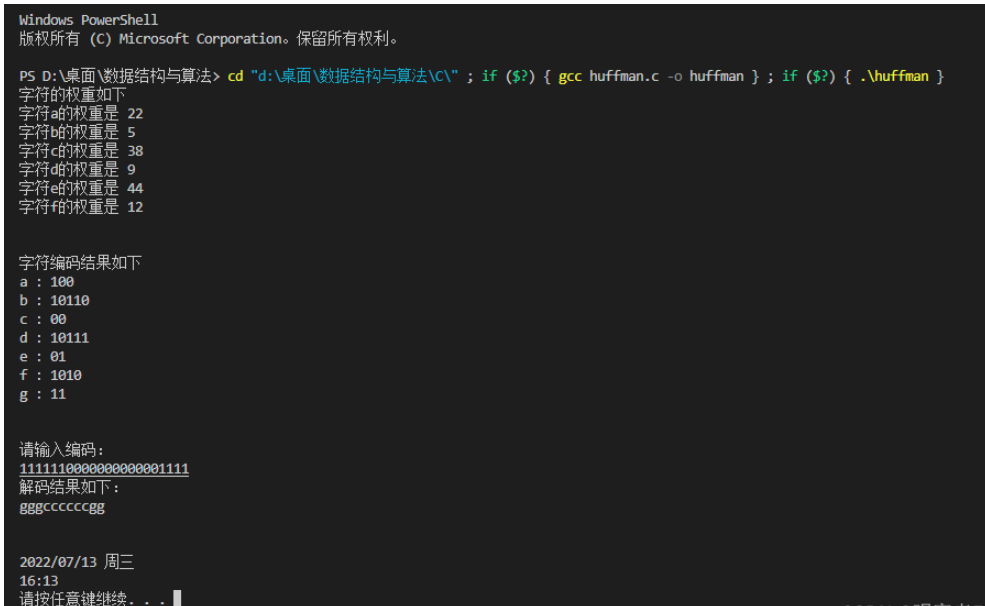
}f主函数:
'''C
void main()
{
pList pl = creatList();
printf("字符的权重如下\n");
for(pList l = pl; l->next != NULL; l = l->next)
printf("字符%c的权重是 %d\n", l->root->c, l->root->weight);
Tree T = creatHuffman(pl);
encodeHuffman(T);
printf("\n\n字符编码结果如下\n");
for(int i = 0; i < 7; i++)
printf("%c : %s\n", i+'a', stack[i]);
char code[100];
printf("\n\n请输入编码:\n");
scanf("%s", code);
printf("解码结果如下:\n");
decodeHuffman(T, code);
printf("%s\n", decode);
printf("\n\n");
system("date /T");
system("TIME /T");
system("pause");
exit(0);
}1.2运行结果
2.Python实现
2.1代码说明
a创建哈夫曼树:
#coding=gbk
import datetime
import time
from pip._vendor.distlib.compat import raw_input
#哈夫曼树结点类
class Huffman:
def __init__(self, c, weight):
self.c = c
self.weight = weight
self.lchild = None
self.rchild = None
#创建结点左右孩子
def creat(self, lchild, rchild):
self.lchild = lchild
self.rchild = rchild
#创建列表
def creatList():
list = []
list.append(Huffman('a', 22))
list.append(Huffman('b', 5))
list.append(Huffman('c', 38))
list.append(Huffman('d', 9))
list.append(Huffman('e', 44))
list.append(Huffman('f', 12))
list.append(Huffman('g', 65))
return list
#通过列表创建哈夫曼树,返回树的根结点
def creatHuffman(list):
while len(list) > 1: #列表只剩一个结点时循环结束,此结点即为哈夫曼树的根结点
i = 0
j = 1
k = 2
while k < len(list): #找到列表中权重最小的两个结点list1,list2
if list[i].weight > list[k].weight or list[j].weight > list[k].weight:
if list[i].weight > list[j].weight:
i = k
else:
j = k
k += 1
root = Huffman(' ', list[i].weight + list[j].weight) #新结点字符统一设为空格,权重设为list1与list2权重之和
if list[i].weight < list[j].weight: #list1和list2设为新结点的左右孩子
root.creat(list[i], list[j])
else:
root.creat(list[j], list[i])
#list1数据域替换成新结点,并删除list2
list[i] = root
list.remove(list[j])
return list[0]b编码:
#通过哈夫曼树编码
def encodeHuffman(T):
    code = [[], [], [], [], [], [], []]
    #列表实现栈结构
    treeStack = []
    codeStack = []
    treeStack.append(T)
    while treeStack != []:        #栈空代表遍历结束
        root = treeStack[-1]
        temp = root.lchild
        while temp != None:
            #将结点左孩子设为空,代表已访问其左孩子
            root.lchild = None
            #左孩子入栈
            treeStack.append(temp)
            root = temp
            temp = root.lchild
            #0入编码栈
            codeStack.append(0)
        temp = root.rchild            #后访问右孩子
        while temp == None:           #右孩子为空,代表左右孩子均已访问,结点可以出栈
            root = treeStack.pop()           #结点出栈
            #寻到叶子结点,可以得到结点中字符的编码
            if root.c != ' ':
                codeTemp = codeStack.copy()
                code[ord(root.c) - 97] = codeTemp
            if treeStack == []:    #根结点出栈,遍历结束
                break
            codeStack.pop()        #编码栈出栈
            #查看上一级结点是否访问完左右孩子
            root = treeStack[-1]
            temp = root.rchild
        if treeStack != []:
            treeStack.append(temp)     #右孩子入栈
            root.rchild = None         #将结点右孩子设为空,代表已访问其右孩子
            codeStack.append(1)        #1入编码栈
return codec解码:
#通过哈夫曼树解码
def decodeHuffman(T, strCode):
decode = []
index = 0
while index < len(strCode): #01编码字符串读完,解码结束
root = T
while root.lchild != None: #找到叶子结点
if index < len(strCode):
if strCode[index] == '0':
root = root.lchild
else:
root = root.rchild
index += 1
else:
break
decode.append(root.c) #叶子结点存放的字符即为解码得到的字符
return decoded主函数:
if __name__ == '__main__':
    list = creatList()
    print("字符的权重如下")
    for i in range(len(list)):
        print("字符{}的权重为: {}".format(chr(i+97), list[i].weight))
    T = creatHuffman(list)
    code = encodeHuffman(T)
    print("\n字符编码结果如下")
    for i in range(len(code)):
        print(chr(i+97), end=' : ')
        for j in range(len(code[i])):
            print(code[i][j], end='')
        print("")
    strCode = input("\n请输入编码:\n")
    #哈夫曼树在编码时被破坏,必须重建哈夫曼树
    list = creatList()
    T = creatHuffman(list)
    decode = decodeHuffman(T, strCode)
    print("解码结果如下:")
    for i in range(len(decode)):
        print(decode[i], end='')
    print("\n\n")
    datetime = datetime.datetime.now()
    print(datetime.strftime("%Y-%m-%d\n%H:%M:%S"))
input("Press Enter to exit…")2.2运行结果

The above is the detailed content of How to implement Huffman coding using Python and C language respectively. For more information, please follow other related articles on the PHP Chinese website!

Hot AI Tools

Undresser.AI Undress
AI-powered app for creating realistic nude photos

AI Clothes Remover
Online AI tool for removing clothes from photos.

Undress AI Tool
Undress images for free

Clothoff.io
AI clothes remover

Video Face Swap
Swap faces in any video effortlessly with our completely free AI face swap tool!

Hot Article
Hot Tools

Notepad++7.3.1
Easy-to-use and free code editor

SublimeText3 Chinese version
Chinese version, very easy to use

Zend Studio 13.0.1
Powerful PHP integrated development environment

Dreamweaver CS6
Visual web development tools

SublimeText3 Mac version
God-level code editing software (SublimeText3)
Hot Topics


 PHP and Python: Different Paradigms Explained
Apr 18, 2025 am 12:26 AM
PHP and Python: Different Paradigms Explained
Apr 18, 2025 am 12:26 AM
PHP is mainly procedural programming, but also supports object-oriented programming (OOP); Python supports a variety of paradigms, including OOP, functional and procedural programming. PHP is suitable for web development, and Python is suitable for a variety of applications such as data analysis and machine learning.
 Choosing Between PHP and Python: A Guide
Apr 18, 2025 am 12:24 AM
Choosing Between PHP and Python: A Guide
Apr 18, 2025 am 12:24 AM
PHP is suitable for web development and rapid prototyping, and Python is suitable for data science and machine learning. 1.PHP is used for dynamic web development, with simple syntax and suitable for rapid development. 2. Python has concise syntax, is suitable for multiple fields, and has a strong library ecosystem.
 PHP and Python: A Deep Dive into Their History
Apr 18, 2025 am 12:25 AM
PHP and Python: A Deep Dive into Their History
Apr 18, 2025 am 12:25 AM
PHP originated in 1994 and was developed by RasmusLerdorf. It was originally used to track website visitors and gradually evolved into a server-side scripting language and was widely used in web development. Python was developed by Guidovan Rossum in the late 1980s and was first released in 1991. It emphasizes code readability and simplicity, and is suitable for scientific computing, data analysis and other fields.
 Python vs. JavaScript: The Learning Curve and Ease of Use
Apr 16, 2025 am 12:12 AM
Python vs. JavaScript: The Learning Curve and Ease of Use
Apr 16, 2025 am 12:12 AM
Python is more suitable for beginners, with a smooth learning curve and concise syntax; JavaScript is suitable for front-end development, with a steep learning curve and flexible syntax. 1. Python syntax is intuitive and suitable for data science and back-end development. 2. JavaScript is flexible and widely used in front-end and server-side programming.
 How to run sublime code python
Apr 16, 2025 am 08:48 AM
How to run sublime code python
Apr 16, 2025 am 08:48 AM
To run Python code in Sublime Text, you need to install the Python plug-in first, then create a .py file and write the code, and finally press Ctrl B to run the code, and the output will be displayed in the console.
 Where to write code in vscode
Apr 15, 2025 pm 09:54 PM
Where to write code in vscode
Apr 15, 2025 pm 09:54 PM
Writing code in Visual Studio Code (VSCode) is simple and easy to use. Just install VSCode, create a project, select a language, create a file, write code, save and run it. The advantages of VSCode include cross-platform, free and open source, powerful features, rich extensions, and lightweight and fast.
 Can visual studio code be used in python
Apr 15, 2025 pm 08:18 PM
Can visual studio code be used in python
Apr 15, 2025 pm 08:18 PM
VS Code can be used to write Python and provides many features that make it an ideal tool for developing Python applications. It allows users to: install Python extensions to get functions such as code completion, syntax highlighting, and debugging. Use the debugger to track code step by step, find and fix errors. Integrate Git for version control. Use code formatting tools to maintain code consistency. Use the Linting tool to spot potential problems ahead of time.
 How to run python with notepad
Apr 16, 2025 pm 07:33 PM
How to run python with notepad
Apr 16, 2025 pm 07:33 PM
Running Python code in Notepad requires the Python executable and NppExec plug-in to be installed. After installing Python and adding PATH to it, configure the command "python" and the parameter "{CURRENT_DIRECTORY}{FILE_NAME}" in the NppExec plug-in to run Python code in Notepad through the shortcut key "F6".
