具体的需求: 在客户信息表格的操作栏中,点击修改支付密码按钮,会跳转到6位支付密码输入框组件页面。同时,要求输入框密文显示、不可编辑、不可回退、即时显示;到达6位数,自动进入确认支付密码;确认支付密码到达6位数,自动检验两次输入密码的一致性,显示确定按钮。此功能是为了用于在银行中,客户用设备输入密码,柜员不可见密码,但柜员可以进行提示操作。
具体的问题: 1、如何实现密文显示,且每个框只能输入1位数字;2、如何实现输入框不可编辑、不可回退;3、如何检验两次输入密码的一致性;4、如果自己的业务需要对键盘按键做限制,该怎么处理。
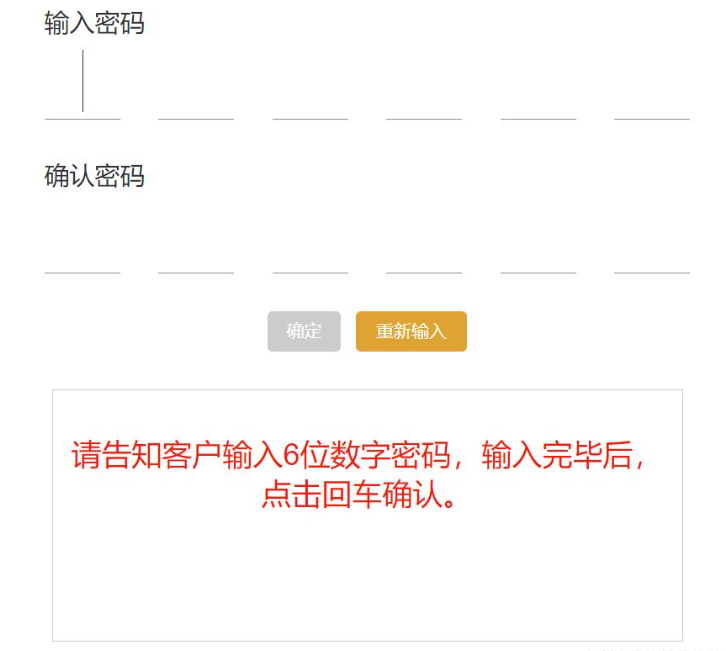
一、代码总览
实现6位支付密码输入框组件的代码如下,复制即可直接使用!
<template>
  <div >
    <!-- 密码输入框 -->
    <div class="input-box" >
      <!-- 输入密码 -->
      <div >{{ "输入密码" }}</div>
      <div class="input-content" @keyup="keyup" @input="inputEvent">
        <input max="9" min="0" maxlength="1" data-index="0" v-model.number="state.input[0]" type="password"
          ref="firstinput" :disabled="state.disabledInput[0]" />
        <input max="9" min="0" maxlength="1" data-index="1" v-model.number="state.input[1]" type="password"
          :disabled="state.disabledInput[1]" />
        <input max="9" min="0" maxlength="1" data-index="2" v-model.number="state.input[2]" type="password"
          :disabled="state.disabledInput[2]" />
        <input max="9" min="0" maxlength="1" data-index="3" v-model.number="state.input[3]" type="password"
          :disabled="state.disabledInput[3]" />
        <input max="9" min="0" maxlength="1" data-index="4" v-model.number="state.input[4]" type="password"
          :disabled="state.disabledInput[4]" />
        <input max="9" min="0" maxlength="1" data-index="5" v-model.number="state.input[5]" type="password"
          :disabled="state.disabledInput[5]" />
      </div>
      <!-- 确认密码 -->
      <div >{{ "确认密码" }}</div>
      <div class="input-content" @keyup="confirmKeyUp" @input="confirmInputEvent">
        <input max="9" min="0" maxlength="1" data-index="0" v-model.number="state.confirmInput[0]" type="password"
          ref="confirmfirstinput" :disabled="state.disabledConfirmInput[0]" />
        <input max="9" min="0" maxlength="1" data-index="1" v-model.number="state.confirmInput[1]" type="password"
          :disabled="state.disabledConfirmInput[1]" />
        <input max="9" min="0" maxlength="1" data-index="2" v-model.number="state.confirmInput[2]" type="password"
          :disabled="state.disabledConfirmInput[2]" />
        <input max="9" min="0" maxlength="1" data-index="3" v-model.number="state.confirmInput[3]" type="password"
          :disabled="state.disabledConfirmInput[3]" />
        <input max="9" min="0" maxlength="1" data-index="4" v-model.number="state.confirmInput[4]" type="password"
          :disabled="state.disabledConfirmInput[4]" />
        <input max="9" min="0" maxlength="1" data-index="5" v-model.number="state.confirmInput[5]" type="password"
          :disabled="state.disabledConfirmInput[5]" />
      </div>
    </div>
    <!-- 按钮 -->
    <div >
      <el-button type="info" :disabled="state.disabledConfirm" @click="reConfirm"
        :class="[state.disabledConfirm ? 'noActive' : 'active']">{{ "确定" }}</el-button>
      <el-button type="warning" @click="reset">{{ "重新输入" }}</el-button>
    </div>
    <!-- 提示区 -->
    <div
      >
      <p>{{ state.tipContent }}</p>
    </div>
  </div>
</template>
<script lang="ts" setup>
import { nextTick, reactive, ref, onMounted } from "vue";
import { ElMessage, ElMessageBox } from 'element-plus'
const state = reactive({
  // 输入数组
  input: ["", "", "", "", "", ""],
  // 确认输入数组
  confirmInput: ["", "", "", "", "", ""],
  // 存放粘贴进来的数字
  pasteResult: [],
  confirmPasteResult: [],
  // 一上来禁用确定按钮
  disabledConfirm: true,
  // 输入框是否禁用
  disabledInput: [false, false, false, false, false, false],
  disabledConfirmInput: [false, false, false, false, false, false],
  // 提示内容
  tipContent: "请告知客户输入6位数字密码,输入完毕后,点击回车确认。"
})
// 获取第一个元素的ref
const firstinput = ref()
const confirmfirstinput = ref()
// 页面一加载就使第一个框聚焦
onMounted(() => {
  // 等待dom渲染完成,在执行focus,否则无法获取到焦点
  nextTick(() => {
    firstinput.value.focus();
  });
})
// @input的处理方法
// 解决一个输入框输入多个字符
const inputEvent = (e) => {
  var index = e.target.dataset.index * 1;
  var el = e.target;
  // 限制只能输入数字
  el.value = el.value.replace(/[^\d]/g, "");
  if (el.value.length >= 1) {
    // 密文显示、不可编辑、不可回退、即时显示
    state.disabledInput[index] = true;
    if (el.nextElementSibling) {
      el.nextElementSibling.focus();
    }
  }
  // 到达6位数,自动进入确认支付密码
  if (!el.nextElementSibling) {
    confirmfirstinput.value.focus();
    state.tipContent = "请告知客户再次输入6位数字密码,输入完毕后,点击回车确认。";
  }
}
// @keydown的处理方法,根据业务需要添加
// 此示例没有使用
const keydown = (e) => {
  var index = e.target.dataset.index * 1;
  var el = e.target;
  // 回退键
  if (e.key === 'Backspace') {
    if (state.input[index].length > 0) {
      state.input[index] = ''
    } else {
      if (el.previousElementSibling) {
        el.previousElementSibling.focus()
        state.input[index - 1] = ''
      }
    }
  }
  // 删除键
  else if (e.key === 'Delete') {
    if (state.input[index].length > 0) {
      state.input[index] = ''
    } else {
      if (el.nextElementSibling) {
        state.input[1] = ''
      }
    }
    if (el.nextElementSibling) {
      el.nextElementSibling.focus()
    }
  }
  // 左键
  else if (e.key === 'ArrowLeft') {
    if (el.previousElementSibling) {
      el.previousElementSibling.focus()
    }
  }
  // 右键
  else if (e.key === 'ArrowRight') {
    if (el.nextElementSibling) {
      el.nextElementSibling.focus()
    }
  }
  // 上键
  else if (e.key === 'ArrowUp') {
    if (Number(state.input[index]) * 1 < 9) {
      state.input[index] = (Number(state.input[index]) * 1 + 1).toString()
    }
  }
  // 下键
  else if (e.key === 'ArrowDown') {
    if (Number(state.input[index]) * 1 > 0) {
      state.input[index] = (Number(state.input[index]) * 1 - 1).toString()
    }
  }
}
// @keyup的处理方法
const keyup = (e) => {
  var index = e.target.dataset.index * 1;
  // 如果为最后一个框,则输入框全部失焦
  if (index === 5) {
    if (state.input.join("").length === 6) {
      document.activeElement.blur();
    }
  }
}
// @input的处理方法
// 解决一个输入框输入多个字符
const confirmInputEvent = (e) => {
  var index = e.target.dataset.index * 1;
  var el = e.target;
  if (el.value.length >= 1) {
    // 密文显示、不可编辑、不可回退、即时显示
    state.disabledConfirmInput[index] = true;
    if (el.nextElementSibling) {
      el.nextElementSibling.focus();
    }
  }
  // 到达6位数,自动检验两次输入密码的一致性
  if (!el.nextElementSibling) {
    // 一一比较元素值,有一个不相等就不等
    for (let i = 0; i < state.input.length; i++) {
      if (state.input[i] !== state.confirmInput[i]) {
        state.tipContent = "请告知客户两次密码输入不一致,柜员点击重新输入,清空密码后请告知客户重新输入。";
        return;
      }
    }
    state.tipContent = "密码合规,点击确定按钮进行修改。";
    // 确定按钮变为可用
    state.disabledConfirm = false;
  }
}
// @keydown的处理方法,根据业务需要添加
// 此示例没有使用
const confirmKeydown = (e) => {
  var index = e.target.dataset.index * 1;
  var el = e.target;
  // 回退键
  if (e.key === 'Backspace') {
    if (state.confirmInput[index].length > 0) {
      state.confirmInput[index] = ''
    } else {
      if (el.previousElementSibling) {
        el.previousElementSibling.focus()
        state.confirmInput[index - 1] = ''
      }
    }
  }
  // 删除键
  else if (e.key === 'Delete') {
    if (state.confirmInput[index].length > 0) {
      state.confirmInput[index] = ''
    } else {
      if (el.nextElementSibling) {
        state.confirmInput[1] = ''
      }
    }
    if (el.nextElementSibling) {
      el.nextElementSibling.focus()
    }
  }
  // 左键
  else if (e.key === 'ArrowLeft') {
    if (el.previousElementSibling) {
      el.previousElementSibling.focus()
    }
  }
  // 右键
  else if (e.key === 'ArrowRight') {
    if (el.nextElementSibling) {
      el.nextElementSibling.focus()
    }
  }
  // 上键
  else if (e.key === 'ArrowUp') {
    if (Number(state.confirmInput[index]) * 1 < 9) {
      state.confirmInput[index] = (Number(state.confirmInput[index]) * 1 + 1).toString()
    }
  }
  // 下键
  else if (e.key === 'ArrowDown') {
    if (Number(state.confirmInput[index]) * 1 > 0) {
      state.confirmInput[index] = (Number(state.confirmInput[index]) * 1 - 1).toString()
    }
  }
}
// @keyup的处理方法
const confirmKeyUp = (e) => {
  var index = e.target.dataset.index * 1;
  // 如果为最后一个框,则输入框全部失焦
  if (index === 5) {
    if (state.confirmInput.join("").length === 6) {
      document.activeElement.blur();
    }
  }
}
// 重新输入
const reset = () => {
  state.disabledConfirm = true;
  state.tipContent = "请告知客户输入6位数字密码,输入完毕后,点击回车确认。";
  state.input = ["", "", "", "", "", ""];
  state.confirmInput = ["", "", "", "", "", ""];
  state.disabledInput = [false, false, false, false, false, false];
  state.disabledConfirmInput = [false, false, false, false, false, false];
  // 等待dom渲染完成,在执行focus,否则无法获取到焦点
  nextTick(() => {
    firstinput.value.focus();
  });
}
// 确认修改
const reConfirm = () => {
  ElMessageBox.confirm(
    '是否确定修改?',
    '温馨提示',
    {
      confirmButtonText: '确定',
      cancelButtonText: '取消',
      type: 'warning',
    }
  )
    .then(() => {
      // 此处调修改支付密码接口
      ElMessage({
        type: 'success',
        message: '修改成功!',
      })
    })
    .catch(() => {
      ElMessage({
        type: 'info',
        message: '已取消修改!',
      })
    })
}
</script>
<style lang="scss" scoped>
.input-box {
  .input-content {
    width: 512px;
    height: 60px;
    display: flex;
    align-items: center;
    justify-content: space-between;
    input {
      color: inherit;
      font-family: inherit;
      border: 0;
      outline: 0;
      border-bottom: 1px solid #919191;
      height: 60px;
      width: 60px;
      font-size: 44px;
      text-align: center;
    }
  }
  input::-webkit-outer-spin-button,
  input::-webkit-inner-spin-button {
    appearance: none;
    margin: 0;
  }
}
.noActive {
  color: #fff !important;
  border-width: 0px !important;
  background-color: #ccc !important;
}
.active {
  color: #fff !important;
  border-width: 0px !important;
  background-color: #67c23a !important;
}
</style>
二、问题解析
1、问:如何实现密文显示,且每个框只能输入1位数字?
立即学习“前端免费学习笔记(深入)”;
如果想要进行密文输入,只需要将输入框的类型设置为"password"即可。对于实现每个框只能输入1位数字,这里只使用输入框的maxlength属性效果并不完美,可能会出现限制不住的情况,需要在@input事件中,判断当前元素值的长度,如果大于等于1,则通过nextElementSibling.focus(),让光标聚焦到下一个兄弟元素上去。

2、问:如何实现输入框不可编辑、不可回退?
答:使用了输入框的disabled属性,通过在@input事件中,将当前输入元素的disabled属性变为true即可。为了方便后续的获取和修改,我们将输入框的disabled属性值分别存储在一个数组中。
3、问:如何检验两次输入密码的一致性?
答:使用了最简单的for循环,遍历输入密码数组和确认密码数组,一一比较它们的元素值,有一个不相等就不等,通过return;结束整个函数的执行。
4、问:如果自己的业务需要对键盘按键做限制,该怎么处理?
答:可以为输入框添加@keydown或@keyup事件,在回调内部通过对key做判断,来对不同的按键做一些业务的处理。