

How to configure Nginx reverse proxy on CentOS


1. Reverse proxy and demonstration environment description
1. Reverse proxy
Reverse proxy A proxy server that retrieves resources from one or more servers on behalf of a client. Resend these resources to the client as if they were returned from the web server itself. In contrast to a forward proxy, which is an intermediary through which clients associated with it contact any server, a reverse proxy is an intermediary through which any client contacts its associated server.
For information about forward proxy, please refer to: Configuring Nginx forward proxy based on CentOS 7
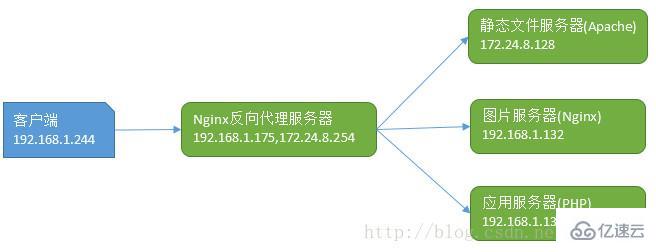
2. Several servers in this demonstration
2. General reverse proxy configuration
1. Backend server configuration (Apache)
Backend Apache server host name and IP
# hostname centos7-web.example.com# more /etc/redhat-release CentOS Linux release 7.2.1511 (Core)# ip addr|grep inet|grep global inet 172.24.8.128/24 brd 172.24.8.255 scope global eno16777728# systemctl start httpd.service# echo "This is a httpd test page.">/var/www/html/index.html# curl http://localhost This is a httpd test page.
2. Front-end Nginx reverse proxy server configuration
Front-end Nginx server host name and IP
# hostname centos7-router

 # more /etc/redhat-release CentOS Linux release 7.2.1511 (Core)
 # ip addr |grep inet|grep global inet 172.24.8.254/24 brd 172.24.8.255 scope global eno16777728
 inet 192.168.1.175/24 brd 192.168.1.255 scope global dynamic eno33554960
Nginx version
# nginx -V nginx version: nginx/1.10.2
Add a new configuration file to be used as a reverse proxy
# vim /etc/nginx/conf.d/reverse_proxy.conf server {
   listen 8090;
   server_name localhost;

 location / {
   proxy_pass http://172.24.8.128; ###反向代理核心指令   proxy_buffers 256 4k;
   proxy_max_temp_file_size 0;
   proxy_connect_timeout 30;

   proxy_cache_valid 200 302 10m;
   proxy_cache_valid 301 1h;
   proxy_cache_valid any 1m;
   }
}# systemctl reload nginx# ss -nltp|grep nginx|grep 8090LISTEN 0 128 *:8090 *:* users:(("nginx",pid=78023,fd=8),("nginx",pid=78021,fd=8))# curl http://localhost:8090 ##基于本地测试This is a httpd test page.View Apache server log
# more /var/log/httpd/access_log ##请求IP地址为172.24.8.254,当从其他机器请求时也是172.24.8.254这个IP172.24.8.254 - - [30/Oct/2017:14:02:38 +0800] "GET / HTTP/1.0" 200 27 "-" "curl/7.29.0"
3. Reverse proxy server and backend server log format settings
Add the proxy_set_header directive to the Nginx server and modify it as follows
# grep proxy_set_header -B2 /etc/nginx/conf.d/reverse_proxy.conf location / {
   proxy_pass http://172.24.8.128;
   proxy_set_header X-Real-IP $remote_addr;
}# systemctl reload nginx.serviceBackend server Apache log format setting
# vim /etc/http/conf/httpd.conf# LogFormat "%h %l %u %t \"%r\" %>s %b \"%{Referer}i\" \"%{User-Agent}i\"" combined #注释此行,添加下一行   LogFormat "%{X-Real-IP}i %l %u %t \"%r\" %>s %b \"%{Referer}i\" \"%{User-Agent}i\"" combined #关键描述 {X-Real-IP}i# ip addr|grep inet|grep global    #从1.132主机访问 inet 192.168.1.244/24 brd 192.168.1.255 scope global eth0# curl http://192.168.1.175:8090  #从1.244主机访问 This is a httpd test page#再次查看apache访问日志,如下,不再是代理服务器IP地址,此时显示为1.244 192.168.1.244 - - [30/Oct/2017:15:49:07 +0800] "GET / HTTP/1.0" 200 27 "-" "curl/7.19.7 (x86_64-redhat-linux-gnu)
libcurl/7.19.7 NSS/3.14.0.0 zlib/1.2.3 libidn/1.18 libssh3/1.4.2"3. Based on directory matching reverse proxy
After The end server adopts Nginx configuration
# more /etc/redhat-release ##os平台及ip地址 CentOS release 6.7 (Final)# ip addr|grep eth0|grep global inet 192.168.1.132/24 brd 192.168.1.255 scope global eth0# nginx -v ##nginx版本 nginx version: nginx/1.10.2# mkdir -pv /usr/share/nginx/html/images ##创建图片目录 mkdir: created directory `/usr/share/nginx/html/images'

# cp /usr/share/backgrounds/nature/*.jpg /usr/share/nginx/html/images/. ##复制图片文件

# cp /etc/nginx/conf.d/default.conf /etc/nginx/conf.d/default.conf.bk
# vim /etc/nginx/conf.d/default.conf ##此处直接修改缺省配置文件

 server {
 listen 80 default_server;
 listen [::]:80 default_server;
 server_name _;
 root /usr/share/nginx/html;

# Load configuration files for the default server block.
 include /etc/nginx/default.d/*.conf;

 location / {
   }

 location /images {
   alias /usr/share/nginx/html/images; ##此处配置了别名
   }

 error_page 404 /404.html;
 location = /40x.html {
   }

 error_page 500 502 503 504 /50x.html;
 location = /50x.html {
   }
 }

# /etc/init.d/nginx reload
Reloading nginx: [ OK ]Front-end Nginx configuration
# vim /etc/nginx/conf.d/reverse_proxy.conf server { listen 8090; server_name localhost; location / { proxy_pass http://172.24.8.128; proxy_set_header X-Real-IP $remote_addr; } location /images { ##将images目录下的文件代理至192.168.1.132 proxy_pass http://192.168.1.132; proxy_set_header X-Real-IP $remote_addr; } }# systemctl reload nginxVerify the proxy situation and test the jpg file request in the images directory at IP 192.168.1.244
# ip addr|grep inet|grep global inet 192.168.1.244/24 brd 192.168.1.255 scope global eth0# curl -I http://192.168.1.175:8090/images/Garden.jpg HTTP/1.1 200 OK Server: nginx/1.12.2 Date: Tue, 31 Oct 2017 01:48:18 GMT Content-Type: image/jpeg Content-Length: 264831 Connection: keep-alive Last-Modified: Mon, 30 Oct 2017 08:21:28 GMT ETag: "59f6e108-40a7f" Accept-Ranges: bytes
four , Reverse proxy configuration based on specific file types
php server-side configuration (ip 192.168.1.132)
# ss -nltp|grep php LISTEN 0 128 192.168.1.132:9000 *:* users:(("php-fpm",7147,8),("php-fpm",7148,0),("php-fpm",7149,0))# mkdir -pv /data ###存放php代码# echo "/data 192.168.1.0/24(rw)" >/etc/exports# /etc/init.d/rpcbind start# /etc/init.d/nfslock start# /etc/init.d/nfs start # echo "" > /data/index.phpNginx agent-side configuration (ip 192.168.1.175)
# mkdir /data# mount -t nfs 192.168.1.132:/data /data# ls /data index.php# vim /etc/nginx/conf.d/reverse_proxy.conf server { listen 8090; server_name localhost; location / { proxy_pass http://172.24.8.128; proxy_set_header X-Real-IP $remote_addr; } location /images { proxy_pass http://192.168.1.132; proxy_set_header X-Real-IP $remote_addr; } location ~ \.php$ { root /data; fastcgi_pass 192.168.1.132:9000; fastcgi_index index.php; fastcgi_param SCRIPT_FILENAME /scripts$fastcgi_script_name; include fastcgi_params; } }# systemctl restart nginxTest the reverse proxy to php
[root@ydq05 ~]# ip addr|grep inet|grep global inet 192.168.1.244/24 brd 192.168.1.255 scope global eth0 [root@ydq05 ~]# curl -I http://192.168.1.175:8090/index.php HTTP/1.1 200 OK Server: nginx/1.12.2 Date: Tue, 31 Oct 2017 03:22:59 GMT Content-Type: text/html; charset=UTF-8 Connection: keep-alive X-Powered-By: PHP/5.6.0
5. Configure the reverse proxy to tomcat based on upstream
Nginx The upstream command can also proxy the request to the back-end server. The following example is combined with the upstream command to demonstrate it. Proxy to tomcat
# vim /etc/nginx/conf.d/tomcat.confupstream app {
               server localhost:8080;
               keepalive 32;
}

server {
   listen 80;
   server_name localhost;
   location / {
       proxy_set_header Host $host;
       proxy_set_header x-for $remote_addr;
       proxy_set_header x-server $host;
       proxy_set_header x-agent $http_user_agent;
       proxy_pass http://app;
   }
}

[root@node132 conf.d]# ss -nltp|grep javaLISTEN    0  1    ::ffff:127.0.0.1:8005  :::*      users:(("java",39559,45))
LISTEN    0  100                :::8009  :::*      users:(("java",39559,43))
LISTEN    0  100                :::8080  :::*      users:(("java",39559,42))

tomcat版本
[root@node132 conf.d]# /usr/local/tomcat/bin/catalina.sh versionUsing CATALINA_BASE:  /usr/local/tomcat
Using CATALINA_HOME:  /usr/local/tomcat
           ....
Server version: Apache Tomcat/7.0.69
Server built:  Apr 11 2016 07:57:09 UTC
Server number:  7.0.69.0
OS Name:        Linux
OS Version:    2.6.32-573.el6.x86_64
Architecture:  amd64
JVM Version:    1.7.0_79-b15
JVM Vendor:    Oracle Corporation

验证结果# curl http://localhost


......6. Proxy module instruction description
There are many configuration instructions available for the proxy module. They are used to define many properties of the proxy module when it works, such as connection timeout, proxy When using the http protocol version, etc. The following is a brief explanation of commonly used instructions.
proxy_read_timeout The maximum interval between two read operations received from the receiving upstream server before the connection is disconnected;
As an example below:
proxy_redirect off;
   proxy_set_header Host $host;
   proxy_set_header X-Real-IP $remote_addr;
   proxy_set_header X-Forwarded-For $proxy_add_x_forwarded_for;
   client_max_body_size 10m;
   client_body_buffer_size 128k;
   proxy_connect_timeout 30;
   proxy_send_timeout 15;
   proxy_read_timeout 15;
The above is the detailed content of How to configure Nginx reverse proxy on CentOS. For more information, please follow other related articles on the PHP Chinese website!

Hot AI Tools

Undresser.AI Undress
AI-powered app for creating realistic nude photos

AI Clothes Remover
Online AI tool for removing clothes from photos.

Undress AI Tool
Undress images for free

Clothoff.io
AI clothes remover

Video Face Swap
Swap faces in any video effortlessly with our completely free AI face swap tool!

Hot Article
Hot Tools

Notepad++7.3.1
Easy-to-use and free code editor

SublimeText3 Chinese version
Chinese version, very easy to use

Zend Studio 13.0.1
Powerful PHP integrated development environment

Dreamweaver CS6
Visual web development tools

SublimeText3 Mac version
God-level code editing software (SublimeText3)
Hot Topics


 How to check the name of the docker container
Apr 15, 2025 pm 12:21 PM
How to check the name of the docker container
Apr 15, 2025 pm 12:21 PM
You can query the Docker container name by following the steps: List all containers (docker ps). Filter the container list (using the grep command). Gets the container name (located in the "NAMES" column).
 How to optimize CentOS HDFS configuration
Apr 14, 2025 pm 07:15 PM
How to optimize CentOS HDFS configuration
Apr 14, 2025 pm 07:15 PM
Improve HDFS performance on CentOS: A comprehensive optimization guide to optimize HDFS (Hadoop distributed file system) on CentOS requires comprehensive consideration of hardware, system configuration and network settings. This article provides a series of optimization strategies to help you improve HDFS performance. 1. Hardware upgrade and selection resource expansion: Increase the CPU, memory and storage capacity of the server as much as possible. High-performance hardware: adopts high-performance network cards and switches to improve network throughput. 2. System configuration fine-tuning kernel parameter adjustment: Modify /etc/sysctl.conf file to optimize kernel parameters such as TCP connection number, file handle number and memory management. For example, adjust TCP connection status and buffer size
 Centos shutdown command line
Apr 14, 2025 pm 09:12 PM
Centos shutdown command line
Apr 14, 2025 pm 09:12 PM
The CentOS shutdown command is shutdown, and the syntax is shutdown [Options] Time [Information]. Options include: -h Stop the system immediately; -P Turn off the power after shutdown; -r restart; -t Waiting time. Times can be specified as immediate (now), minutes ( minutes), or a specific time (hh:mm). Added information can be displayed in system messages.
 How to start containers by docker
Apr 15, 2025 pm 12:27 PM
How to start containers by docker
Apr 15, 2025 pm 12:27 PM
Docker container startup steps: Pull the container image: Run "docker pull [mirror name]". Create a container: Use "docker create [options] [mirror name] [commands and parameters]". Start the container: Execute "docker start [Container name or ID]". Check container status: Verify that the container is running with "docker ps".
 How to create containers for docker
Apr 15, 2025 pm 12:18 PM
How to create containers for docker
Apr 15, 2025 pm 12:18 PM
Create a container in Docker: 1. Pull the image: docker pull [mirror name] 2. Create a container: docker run [Options] [mirror name] [Command] 3. Start the container: docker start [Container name]
 What are the common misunderstandings in CentOS HDFS configuration?
Apr 14, 2025 pm 07:12 PM
What are the common misunderstandings in CentOS HDFS configuration?
Apr 14, 2025 pm 07:12 PM
Common problems and solutions for Hadoop Distributed File System (HDFS) configuration under CentOS When building a HadoopHDFS cluster on CentOS, some common misconfigurations may lead to performance degradation, data loss and even the cluster cannot start. This article summarizes these common problems and their solutions to help you avoid these pitfalls and ensure the stability and efficient operation of your HDFS cluster. Rack-aware configuration error: Problem: Rack-aware information is not configured correctly, resulting in uneven distribution of data block replicas and increasing network load. Solution: Double check the rack-aware configuration in the hdfs-site.xml file and use hdfsdfsadmin-printTopo
 How to install mysql in centos7
Apr 14, 2025 pm 08:30 PM
How to install mysql in centos7
Apr 14, 2025 pm 08:30 PM
The key to installing MySQL elegantly is to add the official MySQL repository. The specific steps are as follows: Download the MySQL official GPG key to prevent phishing attacks. Add MySQL repository file: rpm -Uvh https://dev.mysql.com/get/mysql80-community-release-el7-3.noarch.rpm Update yum repository cache: yum update installation MySQL: yum install mysql-server startup MySQL service: systemctl start mysqld set up booting
 What steps are required to configure CentOS in HDFS
Apr 14, 2025 pm 06:42 PM
What steps are required to configure CentOS in HDFS
Apr 14, 2025 pm 06:42 PM
Building a Hadoop Distributed File System (HDFS) on a CentOS system requires multiple steps. This article provides a brief configuration guide. 1. Prepare to install JDK in the early stage: Install JavaDevelopmentKit (JDK) on all nodes, and the version must be compatible with Hadoop. The installation package can be downloaded from the Oracle official website. Environment variable configuration: Edit /etc/profile file, set Java and Hadoop environment variables, so that the system can find the installation path of JDK and Hadoop. 2. Security configuration: SSH password-free login to generate SSH key: Use the ssh-keygen command on each node
