
 Operation and Maintenance
Nginx
How to use Nginx as a Perl program server and its Perl module under Linux
Operation and Maintenance
Nginx
How to use Nginx as a Perl program server and its Perl module under Linux
How to use Nginx as a Perl program server and its Perl module under Linux

perl + fastcgi + nginx搭建
nginx + fastcgi是php下最流行的一套环境了,那perl会不会也有fastcgi呢,当然有,今天来搭建下nginx下perl的fastcgi.性能方面也不亚于php,但是现在web程序php的流行程度perl无法比拟了,性能再好也枉然,但是部分小功能可以考虑使用perl的fastcgi来搞定.进入正题.
1. 准备软件环境:
nginx
perl:系统自带
fastcgi
1.2 perl安装
一般linux都有自带perl,可以不用安装,如果确实没有,请执行:
# yum install perl
1.3 perl-fastcgi安装
# cd /usr/local/src
# wget http://www.cpan.org/modules/by-module/fcgi/fcgi-0.74.tar.gz
# tar -xzvf fcgi-0.74.tar.gz
# cd fcgi-0.74
# perl makefile.pl
# make
# make install
2. nginx虚拟主机配置
server {

  listen  80;
  server_name test.jb51.net;
  #access_log /data/logs/nginx/test.jb51.net.access.log main;

  index index.html index.php index.html;
  root /data/site/test.jb51.net;

  location /
  {

  }

  location ~ \.pl$
  {
   include fastcgi_params;
   fastcgi_pass 127.0.0.1:8999;
   #fastcgi_pass unix:/var/run/jb51.net.perl.sock;
   fastcgi_index index.pl;
  }
}如果想把tcp/ip方式改为socket方式,可以修改fastcgi-wrapper.pl.
$socket = fcgi::opensocket( "127.0.0.1:8999", 10 ); #use ip sockets
改为
$socket = fcgi::opensocket( "/var/run/jb51.net.perl.sock", 10 ); #use ip sockets
3. 配置脚本
3.1 fastcgi监听脚本
文件路径:/usr/bin/fastcgi-wrapper.pl
#!/usr/bin/perl

use fcgi;
use socket;
use posix qw(setsid);

require 'syscall.ph';

&daemonize;

#this keeps the program alive or something after exec'ing perl scripts
end() { } begin() { }
*core::global::exit = sub { die "fakeexit\nrc=".shift()."\n"; };
eval q{exit};
if ($@) {
 exit unless $@ =~ /^fakeexit/;
};

&main;

sub daemonize() {
 chdir '/'     or die "can't chdir to /: $!";
 defined(my $pid = fork) or die "can't fork: $!";
 exit if $pid;
 setsid     or die "can't start a new session: $!";
 umask 0;
}

sub main {
  $socket = fcgi::opensocket( "127.0.0.1:8999", 10 ); #use ip sockets
  $request = fcgi::request( \*stdin, \*stdout, \*stderr, \%req_params, $socket );
  if ($request) { request_loop()};
   fcgi::closesocket( $socket );
}

sub request_loop {
  while( $request->accept() >= 0 ) {

   #processing any stdin input from webserver (for cgi-post actions)
   $stdin_passthrough ='';
   $req_len = 0 + $req_params{'content_length'};
   if (($req_params{'request_method'} eq 'post') && ($req_len != 0) ){
    my $bytes_read = 0;
    while ($bytes_read < $req_len) {
      my $data = '';
      my $bytes = read(stdin, $data, ($req_len - $bytes_read));
      last if ($bytes == 0 || !defined($bytes));
      $stdin_passthrough .= $data;
      $bytes_read += $bytes;
    }
   }

   #running the cgi app
   if ( (-x $req_params{script_filename}) && #can i execute this?
     (-s $req_params{script_filename}) && #is this file empty?
     (-r $req_params{script_filename})  #can i read this file?
   ){
  pipe(child_rd, parent_wr);
  my $pid = open(kid_to_read, "-|");
  unless(defined($pid)) {
   print("content-type: text/plain\r\n\r\n");
      print "error: cgi app returned no output - ";
      print "executing $req_params{script_filename} failed !\n";
   next;
  }
  if ($pid > 0) {
   close(child_rd);
   print parent_wr $stdin_passthrough;
   close(parent_wr);

   while(my $s = ) { print $s; }
   close kid_to_read;
   waitpid($pid, 0);
  } else {
     foreach $key ( keys %req_params){
      $env{$key} = $req_params{$key};
     }
     # cd to the script's local directory
     if ($req_params{script_filename} =~ /^(.*)\/[^\/]+$/) {
       chdir $1;
     }

   close(parent_wr);
   close(stdin);
   #fcntl(child_rd, f_dupfd, 0);
   syscall(&sys_dup2, fileno(child_rd), 0);
   #open(stdin, "<&child_rd");
   exec($req_params{script_filename});
   die("exec failed");
  }
   }
   else {
    print("content-type: text/plain\r\n\r\n");
    print "error: no such cgi app - $req_params{script_filename} may not ";
    print "exist or is not executable by this process.\n";
   }

  }
} 3.2 fastcgi自启动服务脚本:
文件路径:/etc/rc.d/init.d/perl-fastcgi
文件路径:/etc/rc.d/init.d/perl-fastcgi
#!/bin/sh
#
# nginx – this script starts and stops the nginx daemon
#
# chkconfig: - 85 15
# description: nginx is an http(s) server, http(s) reverse \
# proxy and imap/pop3 proxy server
# processname: nginx
# config: /opt/nginx/conf/nginx.conf
# pidfile: /opt/nginx/logs/nginx.pid

# source function library.
. /etc/rc.d/init.d/functions

# source networking configuration.
. /etc/sysconfig/network

# check that networking is up.
[ "$networking" = "no" ] && exit 0

perlfastcgi="/usr/bin/fastcgi-wrapper.pl"
prog=$(basename perl)

lockfile=/var/lock/subsys/perl-fastcgi

start() {
 [ -x $perlfastcgi ] || exit 5
 echo -n $"starting $prog: "
 daemon $perlfastcgi
 retval=$?
 echo
 [ $retval -eq 0 ] && touch $lockfile
 return $retval
}

stop() {
 echo -n $"stopping $prog: "
 killproc $prog -quit
 retval=$?
 echo
 [ $retval -eq 0 ] && rm -f $lockfile
 return $retval
}

restart() {
 stop
 start
}

reload() {
 echo -n $”reloading $prog: ”
 killproc $nginx -hup
 retval=$?
 echo
}

force_reload() {
 restart
}
rh_status() {
 status $prog
}

rh_status_q() {
 rh_status >/dev/null 2>&1
}

case "$1" in
 start)
  rh_status_q && exit 0
  $1
  ;;
 stop)
  rh_status_q || exit 0
  $1
  ;;
 restart)
  $1
  ;;
 reload)
  rh_status_q || exit 7
  $1
  ;;
 force-reload)
  force_reload
  ;;
 status)
  rh_status
  ;;
 condrestart|try-restart)
  rh_status_q || exit 0
  ;;
 *)
  echo $"usage: $0 {start|stop|status|restart|condrestart|try-restart|reload|force-reload}"
  exit 2
esac3.3 设置脚本权限
# chmod a+x /usr/bin/fastcgi-wrapper.pl
# chmod a+x /etc/rc.d/init.d/perl-fastcgi
4. fastcgi测试
4.1 启动nginx与fastcgi
# /usr/local/nginx-1.4.2/sbin/nginx
# /etc/init.d/perl-fastcgi start
4.2 perl测试文件:
文件路径/data/site/test.jb51.net/test.pl
#!/usr/bin/perl

print "content-type:text/html\n\n";
print <<endofhtml;
<html><head><title>perl environment variables</title></head>
<body>
<h1 id="perl-nbsp-environment-nbsp-variables">perl environment variables</h1>
endofhtml

foreach $key (sort(keys %env)) {
 print "$key = $env{$key}<br>\n";
}

print "</body></html>";5. 访问测试
5.1 访问
http://http:test.jb51.net/test.pl,出现内容表示ok.
6. 简单压力测试:
6.1 使用tcp/ip方式
ab -n 1000 -c 10 http://test.jb51.net/test.pl
他是在是太慢了,只好用10个并发,共计100个请求来测试.

6.2 使用socket方式:
ab -n 100000 -c 500 http://test.jb51.net/test.pl
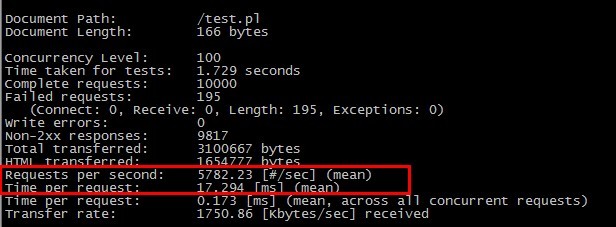
很奇怪,使用tcp/ip方式,每秒就140多个请求,而使用socket方式却有5800个请求/秒。差距不是一般的大。顺便测试了一下php的fastcgi,大概请求在3000(tcp/ip方式),4800(socket方式)。
perl模块的使用
如果对于一个绝大部分内容是静态的网站,只有极少数的地方需要动态显示,碰巧你又了解一点perl知识,那么nginx + perl的结合就能很好解决问题。要想nginx支持perl脚本,在编译nginx时候需要如下参数:
./configure --with-http_perl_module
如果make时候出现如下类似错误:
can't locate extutils/embed.pm in @inc (@inc contains: /usr/lib/perl5/5.10.0/i386-linux-thread-multi /usr/lib/perl5/5.10.0 /usr/local/lib/perl5/site_perl/5.10.0/i386-linux-thread-multi /usr/local/lib/perl5/site_perl/5.10.0 /usr/lib/perl5/vendor_perl/5.10.0/i386-linux-thread-multi /usr/lib/perl5/vendor_perl/5.10.0 /usr/lib/perl5/vendor_perl /usr/local/lib/perl5/site_perl .)
你的机器上可能需要安装perl-devel perl-extutils-embed,对于centos系统,直接使用yum搞定,例如:
yum -y install perl-devel perl-extutils-embed
nginx中使用perl有两种方法,一种是直接在配置文件写,还有一种是把perl脚本写在外部文件中,下面主要介绍一下第二种用法。
假设nginx的根目录为/usr/local/nginx,perl脚本存放的目录为nginx的根目录下的perl/lib下,脚本名字为test.pm,nginx配置为:
#位于http配置中
 perl_modules perl/lib;
 perl_require test.pm;

#位于server配置中
 location /user/ {
 perl pkg_name::process;
}上述配置是把所有来自http://servername/user/下的请求交由test.pm脚本中定义的process方法来处理。
test.pm脚本的内容如下:
package pkg_name;
use time::local;
use nginx;
sub process {
my $r = shift;
$r->send_http_header('text/html; charset=utf-8');
my @arr = split('/', $r->uri);
my $username = @arr[2];
if (!$username || ($username eq "")) {
$username = "anonymous";
}
$r->print('hello, you name is : <strong>' . $username . '</strong>');
$r->rflush();
return;
}
1;
__end__当你访问http://servername/user/netingcn,你应该可以在网页上看到:
hello, you name is : netingcn
另外:当使用 use nginx 时,会有如下的对象可以调用,可以看到上面 shift 一个对象到 $r 上,然后就可以用 $r 调用那些对象了:
$r->args – 请求的参数 .
$r->discard_request_body – 这个参数是让 nginx 放弃 request 的 body 的内容.
$r->filename – 返回合适的请求文件的名字
$r->has_request_body(function) – 如果没有请求主体,返回0,但是如果请求主体存在,那么建立传递的函数并返回1,在程序的最后,nginx将调用指定的处理器.
$r->header_in(header) – 查找请求头的信息
$r->header_only – 如果我们只要返回一个响应的头
$r->header_out(header, value) – 设置响应的头
$r->internal_redirect(uri) – 使内部重定向到指定的uri,重定向仅在完成perl脚本后发生.可以使用 header_out(location….的方法来让浏览器自己重定向
$r->print(args, …) – 发送数据给客户端
$r->request_body – 得到客户端提交过来的内容 (body 的参数,可能需要修改 nginx 的 client_body_buffer_size. )
$r->request_body_file —给客户的 body 存成文件,并返回文件名
$r->request_method — 得到请求 http method.
$r->remote_addr – 得到客户端的 ip 地址.
$r->rflush – Immediately transmit data to the client
$r->sendfile(file [, displacement [, length ] ) – Transmit the content of the specified file to the client. The optional parameters indicate that only the offset and length of the data are transmitted. The precise transmission only takes effect after the perl script is executed. This is the so-called advanced function
$r->send_http_header(type) – Add a response http header information
- ##$r->sleep(milliseconds, handler) – Set to The request uses the specified processing method and stops processing at the specified time. During this period, nginx will continue to process other requests. After the specified time, nginx will run the installed processing method. Note that you need to pass a reference for the processing method. To forward data between processors, you can use $r->variable().
- $r->status(code) – Set the http response code
- $r->unescape(text) – Use the http method to encrypt content such as %xx
- $r->uri – Get the requested url.
- $r->variable(name[, value]) – Set the value of a variable
The above is the detailed content of How to use Nginx as a Perl program server and its Perl module under Linux. For more information, please follow other related articles on the PHP Chinese website!

Hot AI Tools

Undresser.AI Undress
AI-powered app for creating realistic nude photos

AI Clothes Remover
Online AI tool for removing clothes from photos.

Undress AI Tool
Undress images for free

Clothoff.io
AI clothes remover

Video Face Swap
Swap faces in any video effortlessly with our completely free AI face swap tool!

Hot Article
Hot Tools

Notepad++7.3.1
Easy-to-use and free code editor

SublimeText3 Chinese version
Chinese version, very easy to use

Zend Studio 13.0.1
Powerful PHP integrated development environment

Dreamweaver CS6
Visual web development tools

SublimeText3 Mac version
God-level code editing software (SublimeText3)
Hot Topics


 Linux Architecture: Unveiling the 5 Basic Components
Apr 20, 2025 am 12:04 AM
Linux Architecture: Unveiling the 5 Basic Components
Apr 20, 2025 am 12:04 AM
The five basic components of the Linux system are: 1. Kernel, 2. System library, 3. System utilities, 4. Graphical user interface, 5. Applications. The kernel manages hardware resources, the system library provides precompiled functions, system utilities are used for system management, the GUI provides visual interaction, and applications use these components to implement functions.
 How to check the warehouse address of git
Apr 17, 2025 pm 01:54 PM
How to check the warehouse address of git
Apr 17, 2025 pm 01:54 PM
To view the Git repository address, perform the following steps: 1. Open the command line and navigate to the repository directory; 2. Run the "git remote -v" command; 3. View the repository name in the output and its corresponding address.
 How to run java code in notepad
Apr 16, 2025 pm 07:39 PM
How to run java code in notepad
Apr 16, 2025 pm 07:39 PM
Although Notepad cannot run Java code directly, it can be achieved by using other tools: using the command line compiler (javac) to generate a bytecode file (filename.class). Use the Java interpreter (java) to interpret bytecode, execute the code, and output the result.
 What is the main purpose of Linux?
Apr 16, 2025 am 12:19 AM
What is the main purpose of Linux?
Apr 16, 2025 am 12:19 AM
The main uses of Linux include: 1. Server operating system, 2. Embedded system, 3. Desktop operating system, 4. Development and testing environment. Linux excels in these areas, providing stability, security and efficient development tools.
 How to run sublime after writing the code
Apr 16, 2025 am 08:51 AM
How to run sublime after writing the code
Apr 16, 2025 am 08:51 AM
There are six ways to run code in Sublime: through hotkeys, menus, build systems, command lines, set default build systems, and custom build commands, and run individual files/projects by right-clicking on projects/files. The build system availability depends on the installation of Sublime Text.
 How to use VSCode
Apr 15, 2025 pm 11:21 PM
How to use VSCode
Apr 15, 2025 pm 11:21 PM
Visual Studio Code (VSCode) is a cross-platform, open source and free code editor developed by Microsoft. It is known for its lightweight, scalability and support for a wide range of programming languages. To install VSCode, please visit the official website to download and run the installer. When using VSCode, you can create new projects, edit code, debug code, navigate projects, expand VSCode, and manage settings. VSCode is available for Windows, macOS, and Linux, supports multiple programming languages and provides various extensions through Marketplace. Its advantages include lightweight, scalability, extensive language support, rich features and version
 laravel installation code
Apr 18, 2025 pm 12:30 PM
laravel installation code
Apr 18, 2025 pm 12:30 PM
To install Laravel, follow these steps in sequence: Install Composer (for macOS/Linux and Windows) Install Laravel Installer Create a new project Start Service Access Application (URL: http://127.0.0.1:8000) Set up the database connection (if required)
 vscode Previous Next Shortcut Key
Apr 15, 2025 pm 10:51 PM
vscode Previous Next Shortcut Key
Apr 15, 2025 pm 10:51 PM
VS Code One-step/Next step shortcut key usage: One-step (backward): Windows/Linux: Ctrl ←; macOS: Cmd ←Next step (forward): Windows/Linux: Ctrl →; macOS: Cmd →
