

How to use Python Flask JinJa2 syntax

1. Overview
Flask is a lightweight Python web framework that supports Jinja2 template engine. Jinja2 is a popular Python template engine that can be used to create dynamic web applications using Flask.
Web pages generally require html, css and js. Maybe when you first learn python web, you may write like this:
from flask import Flask
app = Flask(__name__)
@app.route('/')
def hello():
return '<h2 id="hello">hello</h2><p >hello world!!!</p>'
if __name__ == '__main__':
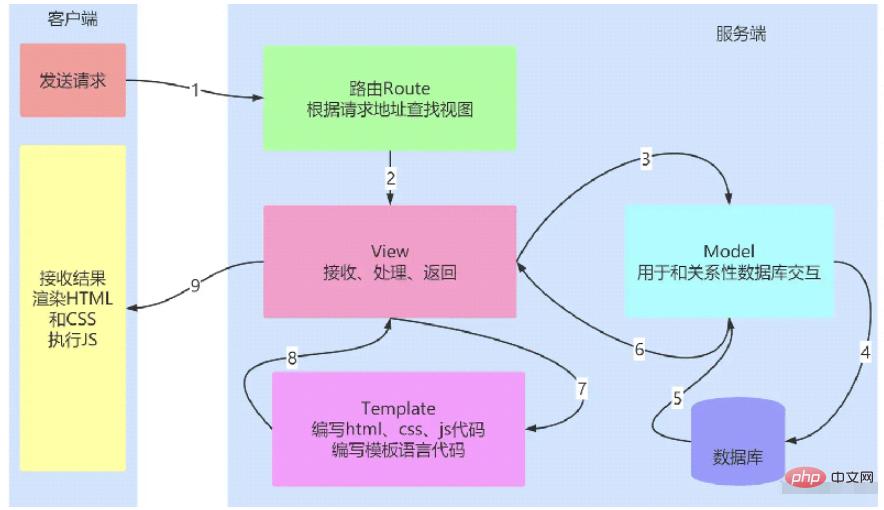
app.run(host='0.0.0.0', port=8000, debug=True)Although the above code can also be executed, it is not beautiful. Now programming is basic All above are front-end and back-end separation, and front-end code will not be embedded in the back-end proxy. In order to achieve front-end and front-end separation, the MVT design plan is used:
M is spelled out as Model, has the same function as M in MVC, and is responsible for interacting with the database and performing data processing.
V is spelled out as View, which has the same function as C in MVC. It receives requests, performs business processing, and returns responses.
T is spelled out as Template, which has the same function as V in MVC and is responsible for encapsulating and constructing the html to be returned.
2. JinJa2 syntax introduction and example explanation
JinJa2 syntax introduction and example explanation:
1) Variable
In Jinja2, use {{ }} to include a variable. In Flask, you can display variables by passing them to the template. The sample code is as follows:
# variable.py
# Flask中将变量传递给模板
from flask import Flask, render_template
app = Flask(__name__)
# 也可指定模板目录
# app = Flask(__name__, template_folder="/opt/python-projects/flask")
@app.route('/')
def hello():
    name = "Alice"
    return render_template('variable.html', name=name)
if __name__ == '__main__':
app.run(host='0.0.0.0', port=8000, debug=True)In the above code, the variable name is passed to the hello.html template.
<!-- templates/variable.html模板 -->
<!DOCTYPE html>
<html>
<head>
    <title>variable</title>
</head>
<body>
    <h2 id="hello-nbsp-nbsp-name-nbsp">hello {{ name }}!</h2>
</body>
</html>Execution
python3 variable.py
Access
curl http://192.168.182.110:8000/
2) Control structure
In Jinja2, you can use if, Statements such as for and while are used to control the output in the template. The sample code is as follows:
# if.py
# Flask中使用if控制结构
from flask import Flask, render_template
app = Flask(__name__)
@app.route('/')
def hello():
    user = {"name": "Alice", "age": 25}
    return render_template('if.html', user=user)
if __name__ == '__main__':
app.run(host='0.0.0.0', port=8000, debug=True)templates/if.html Template file
<!-- if.html模板 -->
<!DOCTYPE html>
<html>
<head>
    <title>Hello</title>
</head>
<body>
    {% if user %}
        {% if user.age >= 18 %}
            <h2 id="Hello-nbsp-nbsp-user-name-nbsp-nbsp-you-nbsp-are-nbsp-an-nbsp-adult">Hello {{ user.name }}, you are an adult!</h2>
        {% else %}
            <h2 id="Hello-nbsp-nbsp-user-name-nbsp-nbsp-you-nbsp-are-nbsp-a-nbsp-minor">Hello {{ user.name }}, you are a minor!</h2>
        {% endif %}
    {% else %}
        <h2 id="Hello-nbsp-anonymous-nbsp-user">Hello, anonymous user!</h2>
    {% endif %}
</body>
</html>In the above code, use the if statement to control the output and display it differently according to the user's age news.
3) Loop structure
In Jinja2, you can use the for statement to loop the content in the output template. The sample code is as follows:
# for.py
# Flask中使用for循环结构
from flask import Flask, render_template
app = Flask(__name__)
@app.route('/')
def hello():
    users = [{"name": "Alice", "age": 25}, {"name": "Bob", "age": 30}]
    return render_template('for.html', users=users)
if __name__ == '__main__':
app.run(host='0.0.0.0', port=8000, debug=True)templates/for.html Template file
<!-- for.html模板 -->
<!DOCTYPE html>
<html>
<head>
    <title>Hello</title>
</head>
<body>
    {% for user in users %}
        <h2 id="Hello-nbsp-nbsp-user-name-nbsp">Hello {{ user.name }}!</h2>
        <p>You are {{ user.age }} years old.</p>
    {% endfor %}
</body>
</html>In the above code, use the for loop to iterate through the user list , and output the information of each user.
4) Macro
In Jinja2, you can use macros to define a code block that can be reused. The sample code is as follows:
# great.py
# Flask中使用宏
from flask import Flask, render_template
app = Flask(__name__)
@app.route('/')
def hello():
    users = [{"name": "Alice", "age": 25}, {"name": "Bob", "age": 30}]
    return render_template('great.html', users=users)
if __name__ == '__main__':
app.run(host='0.0.0.0', port=8000, debug=True)Define a macrotemplates /macros.html Template
# 定义一个宏
{% macro print_user(user) %}
    <h2 id="Hello-nbsp-nbsp-user-name-nbsp">Hello {{ user.name }}!</h2>
    <p>You are {{ user.age }} years old.</p>
{% endmacro %}In the above code, a macro named print_user is defined. The macro can be imported in the template through import , and use macros to output user information. Template templates/great.html
<!-- great.html模板 -->
<!DOCTYPE html>
<html>
<head>
<title>Hello</title>
</head>
<body>
{% for user in users %}
{% import 'macros.html' as macros %}
{{ macros.print_user(user) }}
{% endfor %}
</body>
</html>In the above code, a macro named print_user is defined to output user information.
5) Filter
In Jinja2, filters can process variables, such as formatting dates, converting case, etc. The sample code is as follows:
# filter.py
# Flask中使用过滤器
from flask import Flask, render_template
import datetime
app = Flask(__name__)
@app.route('/')
def hello():
    now = datetime.datetime.now()
    return render_template('filter.html', now=now)
# 自定义过滤器
@app.template_filter('datetimeformat')
def datetimeformat(value, format='%Y-%m-%d %H:%M:%S'):
    return value.strftime(format)
if __name__ == '__main__':
app.run(host='0.0.0.0', port=8000, debug=True)Template filetemplates/filter.html
<!-- filter.html模板 -->
<!DOCTYPE html>
<html>
<head>
    <title>Hello</title>
</head>
<body>
    <p>The current date and time is: {{ now|datetimeformat }}</p>
</body>
</html>In the above code, a file named datetimeformat is defined Filter for formatting dates and times. Here are custom filters. In fact, JinJa2 also has some built-in filters. Built-in filters in Jinja2: jinja.palletsprojects.com/en/3.0.x/te…
| 过滤器名 | 解释 | 举例 |
|---|---|---|
| abs(value) | 返回一个数值的绝对值 | {{ -1|abs }} |
| int(value) | 将值转换为int类型 | {{ param | int }} |
| float(value) | 将值转换为float类型 | |
| string(value) | 将变量转换成字符串 | |
| default(value,default_value,boolean=false) | 如果当前变量没有值,则会使用参数中的值来代替。如果想使用python的形式判断是否为false,则可以传递boolean=true。也可以使用or来替换 | {{ name|default('xiaotuo') }} |
| safe(value) | 如果开启了全局转义,那么safe过滤器会将变量关掉转义 | {{ content_html|safe }} |
| escape(value)或e | 转义字符,会将<、>等符号转义成HTML中的符号 | {{ content|escape或content|e }} |
| first(value) | 返回一个序列的第一个元素 | {{ names|first }} |
| format(value,*arags,**kwargs) | 格式化字符串 | %s"-"%s"|format('Hello?',"Foo!") }} 输出 Hello?-Fool! |
| last(value) | 返回一个序列的最后一个元素。 | {{ names|last }} |
| length(value) | 返回一个序列或者字典的长度。 | {{ names|length }} |
| join(value,d='+') | 将一个序列用d这个参数的值拼接成字符串 | |
| lower(value) | 将字符串转换为小写 | |
| upper(value) | 将字符串转换为小写 | |
| replace(value,old,new) | 替换将old替换为new的字符串 | |
| truncate(value,length=255,killwords=False) | 截取length长度的字符串 | |
| striptags(value) | 删除字符串中所有的HTML标签,如果出现多个空格,将替换成一个空格 | |
| trim | 截取字符串前面和后面的空白字符 | {{ str123 | trim }} |
| wordcount(s) | 计算一个长字符串中单词的个数 |
6)继承
在Jinja2中,可以使用继承来创建一个包含共同元素的模板,并通过继承该模板来创建更具体的模板。示例代码如下:
# extend.py
# Flask中使用继承
from flask import Flask, render_template
app = Flask(__name__)
@app.route('/')
def hello():
    return render_template('extend.html')
if __name__ == '__main__':
app.run(host='0.0.0.0', port=8000, debug=True)模板文件 templates/base.html
<!-- base.html模板 -->
<!DOCTYPE html>
<html>
<head>
    <title>{% block title %}{% endblock %}</title>
</head>
<body>
    {% block content %}{% endblock %}
</body>
</html>模板文件 templates/extend.html
<!-- extend.html模板 -->
{% extends "base.html" %}
{% block title %}Hello{% endblock %}
{% block content %}
    <h2 id="Hello-nbsp-World">Hello World!</h2>
{% endblock %}在上面的代码中,定义了一个名为 base.html 的模板,并在 extend.html 模板中继承了该模板。extend.html 模板中可以重写 base.html 模板中的块,并在其中添加新的内容。
7)包含
在Jinja2中,可以使用包含来将一个模板包含到另一个模板中。示例代码如下:
# contain.py
# Flask中使用包含
from flask import Flask, render_template
app = Flask(__name__)
@app.route('/')
def hello():
    return render_template('contain.html')
if __name__ == '__main__':
app.run(host='0.0.0.0', port=8000, debug=True)模板文件 templates/contain.html
<!-- contain.html模板 -->
<!DOCTYPE html>
<html>
<head>
    <title>{% block title %}{% endblock %}</title>
</head>
<body>
    {% block content %}{% endblock %}
    {% include "footer.html" %}
</body>
</html>模板文件 templates/footer.html
<!-- footer.html模板 -->
<footer>
<p>© 2023</p>
</footer>在上面的代码中,定义了一个名为 footer.html 的模板,并在 contain.html 模板中使用包含将 footer.html 模板包含到页面底部。这样,可以避免在每个页面中重复添加相同的页脚。
The above is the detailed content of How to use Python Flask JinJa2 syntax. For more information, please follow other related articles on the PHP Chinese website!

Hot AI Tools

Undresser.AI Undress
AI-powered app for creating realistic nude photos

AI Clothes Remover
Online AI tool for removing clothes from photos.

Undress AI Tool
Undress images for free

Clothoff.io
AI clothes remover

Video Face Swap
Swap faces in any video effortlessly with our completely free AI face swap tool!

Hot Article
Hot Tools

Notepad++7.3.1
Easy-to-use and free code editor

SublimeText3 Chinese version
Chinese version, very easy to use

Zend Studio 13.0.1
Powerful PHP integrated development environment

Dreamweaver CS6
Visual web development tools

SublimeText3 Mac version
God-level code editing software (SublimeText3)
Hot Topics
 1658
1658
 14
1415
52
1309
25
1257
29
1231
24
14
1415
52
1309
25
1257
29
1231
24

 PHP and Python: Different Paradigms Explained
Apr 18, 2025 am 12:26 AM
PHP and Python: Different Paradigms Explained
Apr 18, 2025 am 12:26 AM
PHP is mainly procedural programming, but also supports object-oriented programming (OOP); Python supports a variety of paradigms, including OOP, functional and procedural programming. PHP is suitable for web development, and Python is suitable for a variety of applications such as data analysis and machine learning.
 Choosing Between PHP and Python: A Guide
Apr 18, 2025 am 12:24 AM
Choosing Between PHP and Python: A Guide
Apr 18, 2025 am 12:24 AM
PHP is suitable for web development and rapid prototyping, and Python is suitable for data science and machine learning. 1.PHP is used for dynamic web development, with simple syntax and suitable for rapid development. 2. Python has concise syntax, is suitable for multiple fields, and has a strong library ecosystem.
 PHP and Python: A Deep Dive into Their History
Apr 18, 2025 am 12:25 AM
PHP and Python: A Deep Dive into Their History
Apr 18, 2025 am 12:25 AM
PHP originated in 1994 and was developed by RasmusLerdorf. It was originally used to track website visitors and gradually evolved into a server-side scripting language and was widely used in web development. Python was developed by Guidovan Rossum in the late 1980s and was first released in 1991. It emphasizes code readability and simplicity, and is suitable for scientific computing, data analysis and other fields.
 Python vs. JavaScript: The Learning Curve and Ease of Use
Apr 16, 2025 am 12:12 AM
Python vs. JavaScript: The Learning Curve and Ease of Use
Apr 16, 2025 am 12:12 AM
Python is more suitable for beginners, with a smooth learning curve and concise syntax; JavaScript is suitable for front-end development, with a steep learning curve and flexible syntax. 1. Python syntax is intuitive and suitable for data science and back-end development. 2. JavaScript is flexible and widely used in front-end and server-side programming.
 How to run sublime code python
Apr 16, 2025 am 08:48 AM
How to run sublime code python
Apr 16, 2025 am 08:48 AM
To run Python code in Sublime Text, you need to install the Python plug-in first, then create a .py file and write the code, and finally press Ctrl B to run the code, and the output will be displayed in the console.
 Where to write code in vscode
Apr 15, 2025 pm 09:54 PM
Where to write code in vscode
Apr 15, 2025 pm 09:54 PM
Writing code in Visual Studio Code (VSCode) is simple and easy to use. Just install VSCode, create a project, select a language, create a file, write code, save and run it. The advantages of VSCode include cross-platform, free and open source, powerful features, rich extensions, and lightweight and fast.
 Can visual studio code be used in python
Apr 15, 2025 pm 08:18 PM
Can visual studio code be used in python
Apr 15, 2025 pm 08:18 PM
VS Code can be used to write Python and provides many features that make it an ideal tool for developing Python applications. It allows users to: install Python extensions to get functions such as code completion, syntax highlighting, and debugging. Use the debugger to track code step by step, find and fix errors. Integrate Git for version control. Use code formatting tools to maintain code consistency. Use the Linting tool to spot potential problems ahead of time.
 How to run python with notepad
Apr 16, 2025 pm 07:33 PM
How to run python with notepad
Apr 16, 2025 pm 07:33 PM
Running Python code in Notepad requires the Python executable and NppExec plug-in to be installed. After installing Python and adding PATH to it, configure the command "python" and the parameter "{CURRENT_DIRECTORY}{FILE_NAME}" in the NppExec plug-in to run Python code in Notepad through the shortcut key "F6".
