
 Operation and Maintenance
Nginx
How to implement access control and connection restrictions based on Nginx
Operation and Maintenance
Nginx
How to implement access control and connection restrictions based on Nginx
How to implement access control and connection restrictions based on Nginx

1. Default configuration syntax
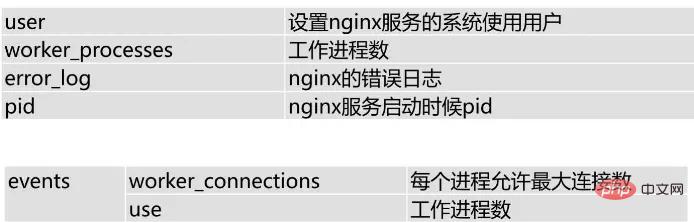
user 设置使用用户
worker_processes 进行增大并发连接数的处理 跟cpu保持一致 八核设置八个
error_log nginx的错误日志
pid nginx服务启动时候pid
worker_connections一个进程允许处理的最大连接数
use定义使用的内核模型
root 首页的路径
index 首页默认访问哪个页面
error_page 500 502 503 504 /50x.html 错误页面 前面的500是**`http状态码`**
systemctl restart nginx.service 重启nginx
systemctl reload nginx.service 不关闭服务柔和地重启
2. http
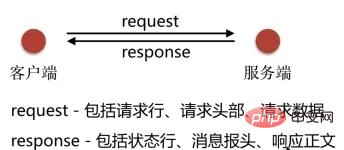
curl-v http://www.baidu.com >/dev/null #-v 同时显示状态码等信息
nginx -v #显示nginx版本及配置文件等信息
3. Log
Log type: error.log and access.logerror.log(记录处理http请求的错误状态以及nginx本身服务的错误状态) access.log(每次http请求的访问状态)
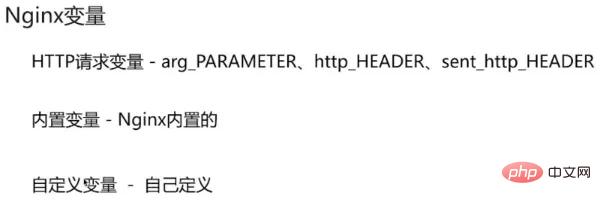
4. Variables
#Connection limit limit_conn_module
limit_conn_module: Tcp connection frequency limit, one TCP connection can establish multiple http requests. Configuration syntax:
| Range | Description | |
|---|---|---|
| http | Used to declare a storage space | |
| http, server or location | Used to limit the number of concurrencies of a certain storage space | |
| http, server or location | When the maximum number of connection limits is reached, the level of the log is recorded | |
| http, server Or location | When the limit is exceeded, the response status code returned, the default is 503 |
space to record the connection status , to limit the quantity. zone is a space that stores connection status, stored in key-value pairs, usually using the client address $binary_remote_addr as key to identify each connection. When
zone space is exhausted, the server will return 503 (service temporarily unavailable) error to all subsequent requests.
Request limit limit_req_mudule
##limit_req_mudule:httpRequest frequency limit, one tcp connection can Create multiple http requests. Configuration syntax:
| Range | Description | |
|---|---|---|
| http | Used to declare a storage space | |
| http, server or location | Used to limit the number of concurrencies of a certain storage space |
| http_access_module语法 | 范围 | 说明 |
|---|---|---|
| allow ip地址 | cidr网段 | unix: | all; | http、server、location和limit_except | 允许ip地址、cidr格式的网段、unix套接字或所有来源访问 |
| deny ip地址 | cidr网段 | unix: | all; | http、server、location和limit_except | 禁止ip地址、cidr格式的网段、unix套接字或所有来源访问 |
allow和deny会按照顺序, 从上往下, 找到第一个匹配规则, 判断是否允许访问, 所以一般把all放最后
location / {
 deny 192.168.1.1;
 allow 192.168.1.0/24;
 allow 10.1.1.0/16;
 allow 2001:0db8::/32;
 deny all;
}基于用户密码的访问控制
http_auth_basic_module: 基于文件匹配用户密码的登录
| http_auth_basic_module语法 | 范围 | 说明 |
|---|---|---|
| auth_basic 请输入你的帐号密码 | off; | http、server、location和limit_except | 显示用户登录提示 (有些浏览器不显示提示) |
| auth_basic_user_file 存储帐号密码的文件路径; | http、server、location和limit_except | 从文件中匹配帐号密码 |
密码文件可以通过htpasswd生成,htpasswd需要安装yum install -y httpd-tools。
# -c 创建新文件, -b在参数中直接输入密码
$ htpasswd -bc /etc/nginx/conf.d/passwd user1 pw1
adding password for user user1
$ htpasswd -b /etc/nginx/conf.d/passwd user2 pw2
adding password for user user2
$ cat /etc/nginx/conf.d/passwd
user1:$apr1$7v/m0.if$2kpm9nvvxbav.jsuvuqr01
user2:$apr1$xmoo4zzy$df76u0gzxbd7.5vxe0use0
The above is the detailed content of How to implement access control and connection restrictions based on Nginx. For more information, please follow other related articles on the PHP Chinese website!

Hot AI Tools

Undresser.AI Undress
AI-powered app for creating realistic nude photos

AI Clothes Remover
Online AI tool for removing clothes from photos.

Undress AI Tool
Undress images for free

Clothoff.io
AI clothes remover

Video Face Swap
Swap faces in any video effortlessly with our completely free AI face swap tool!

Hot Article
Hot Tools

Notepad++7.3.1
Easy-to-use and free code editor

SublimeText3 Chinese version
Chinese version, very easy to use

Zend Studio 13.0.1
Powerful PHP integrated development environment

Dreamweaver CS6
Visual web development tools

SublimeText3 Mac version
God-level code editing software (SublimeText3)
Hot Topics


 How to configure nginx in Windows
Apr 14, 2025 pm 12:57 PM
How to configure nginx in Windows
Apr 14, 2025 pm 12:57 PM
How to configure Nginx in Windows? Install Nginx and create a virtual host configuration. Modify the main configuration file and include the virtual host configuration. Start or reload Nginx. Test the configuration and view the website. Selectively enable SSL and configure SSL certificates. Selectively set the firewall to allow port 80 and 443 traffic.
 How to check the name of the docker container
Apr 15, 2025 pm 12:21 PM
How to check the name of the docker container
Apr 15, 2025 pm 12:21 PM
You can query the Docker container name by following the steps: List all containers (docker ps). Filter the container list (using the grep command). Gets the container name (located in the "NAMES" column).
 How to check whether nginx is started
Apr 14, 2025 pm 01:03 PM
How to check whether nginx is started
Apr 14, 2025 pm 01:03 PM
How to confirm whether Nginx is started: 1. Use the command line: systemctl status nginx (Linux/Unix), netstat -ano | findstr 80 (Windows); 2. Check whether port 80 is open; 3. Check the Nginx startup message in the system log; 4. Use third-party tools, such as Nagios, Zabbix, and Icinga.
 How to start containers by docker
Apr 15, 2025 pm 12:27 PM
How to start containers by docker
Apr 15, 2025 pm 12:27 PM
Docker container startup steps: Pull the container image: Run "docker pull [mirror name]". Create a container: Use "docker create [options] [mirror name] [commands and parameters]". Start the container: Execute "docker start [Container name or ID]". Check container status: Verify that the container is running with "docker ps".
 How to create containers for docker
Apr 15, 2025 pm 12:18 PM
How to create containers for docker
Apr 15, 2025 pm 12:18 PM
Create a container in Docker: 1. Pull the image: docker pull [mirror name] 2. Create a container: docker run [Options] [mirror name] [Command] 3. Start the container: docker start [Container name]
 How to check nginx version
Apr 14, 2025 am 11:57 AM
How to check nginx version
Apr 14, 2025 am 11:57 AM
The methods that can query the Nginx version are: use the nginx -v command; view the version directive in the nginx.conf file; open the Nginx error page and view the page title.
 How to configure cloud server domain name in nginx
Apr 14, 2025 pm 12:18 PM
How to configure cloud server domain name in nginx
Apr 14, 2025 pm 12:18 PM
How to configure an Nginx domain name on a cloud server: Create an A record pointing to the public IP address of the cloud server. Add virtual host blocks in the Nginx configuration file, specifying the listening port, domain name, and website root directory. Restart Nginx to apply the changes. Access the domain name test configuration. Other notes: Install the SSL certificate to enable HTTPS, ensure that the firewall allows port 80 traffic, and wait for DNS resolution to take effect.
 How to start nginx server
Apr 14, 2025 pm 12:27 PM
How to start nginx server
Apr 14, 2025 pm 12:27 PM
Starting an Nginx server requires different steps according to different operating systems: Linux/Unix system: Install the Nginx package (for example, using apt-get or yum). Use systemctl to start an Nginx service (for example, sudo systemctl start nginx). Windows system: Download and install Windows binary files. Start Nginx using the nginx.exe executable (for example, nginx.exe -c conf\nginx.conf). No matter which operating system you use, you can access the server IP
