

How to configure the server-side environment of Nginx+Tomcat

1. Java jdk installation:
#Download the corresponding jdk software package, then unzip and install it. The name of my package here is: jdk-7u25-linux-x64.tar.gz
tar -xzf jdk-7u25-linux-x64.tar.gz ;mkdir -p /usr/java/ ;mv jdk1.7.0_25/ /usr/java/ 下.
#Then configure the environment variables so that jdk can be referenced anywhere, configure as follows:
#vi /etc/profile Finally add the following statement:
export java_home=/usr/java/jdk1.7.0_25

export classpath=$classpath:$java_home/lib:$java_home/jre/lib

export path=$java_home/bin:$java_home/jre/bin:$path:$homr/bin
#source /etc/profile #Make the environment variables take effect immediately
#java --version #Check the java version and see jdk1.7.0_25 The version means that java jdk is successfully installed.
2. nginx installation:
wget http://nginx.org/download/nginx-1.2.6.tar.gz

useradd www

tar zxvf nginx-1.2.6.tar.gz

cd nginx-1.2.6/

./configure --user=www --group=www --prefix=/usr/local/nginx
 \--with-http_stub_status_module --with-http_ssl_module

make && make install
#nginx is installed, then use the command:/usr/local/nginx/sbin/nginx -t to test ok, which represents nginx Successful installation.
/usr/local/nginx/sbin/nginx Press Enter to start nginx. You can see the nginx default page by accessing http://ip/.
3. Tomcat installation:
# Official website to download tomcat 6.0.30 or other versions:
cd /usr/src && tar xzf apache-tomcat-6.0.30.tar.gz
#Directly After decompression, you can use it. After decompression is completed, copy two tomcats at the same time and name them tomcat1 tomcat2
mv apache-tomcat-6.0.30 /usr/local/tomcat1

cp /usr/local/tomcat1 /usr/local/tomcat2 -r
#Modify the tomcat1 and tomcat2 ports respectively. There are three ports that need to be modified. They are as follows:
shutdown port: 8005 is mainly responsible for startup and shutdown.
ajp port: 8009 is mainly responsible for balancing through ajp (commonly used for apache and tomcat integration)
http port: 8080 can be accessed directly through the web page (nginx tomcata integration)
#Note* If the three ports of tomcat1 are: 8005 8009 8080, then the tomcat2 port will be 1 on this basis, which is: 8006 8010 8081
#On a server, the port cannot be repeated, otherwise an error will be reported.
#After modifying the port, then start two tomcats. The startup command is:
#How to prompt that there is no such file or insufficient permissions. You need to grant execution permissions to the sh file in the bin directory of tomcat: chmod o You can use http://ip:8080 http://ip:8081 to access the tomcat default page.
#If you need to modify the tomcat release directory to your own directory, you need to make the following adjustments and create two release directories:
/usr/local/tomcat1/bin/startup.sh

/usr/local/tomcat2/bin/startup.sh
mkdir -p /usr/webapps/{www1,www2}Edit vi /usr/local/tomcat2/conf/server.xml and add the content in the last line before :
<context path="" docbase="/usr/webapps/www1" reloadable="false"/>
<context path="" docbase="/usr/webapps/www2" reloadable="false"/>
<html>
<body>
<h1 id="tomcat-nbsp-jsp-nbsp-test-nbsp-page">tomcat_1 jsp test page</h1>
<%=new java.util.date()%>
</body>
</html>
4. nginx tomcat integration:
Integration is mainly to modify the nginx.conf configuration and give a complete nginx.conf online configuration. Some parameters can be customized according to the actual situation. Requirement modification:<html> <body> <h1 id="tomcat-nbsp-jsp-nbsp-test-nbsp-page">tomcat_2 jsp test page</h1> <%=new java.util.date()%> </body> </html>
user www www;
worker_processes 8;
pid /usr/local/nginx/nginx.pid;
worker_rlimit_nofile 102400;
events
{
use epoll;
worker_connections 102400;
}
http
{
 include  mime.types;
 default_type application/octet-stream;
 fastcgi_intercept_errors on;
 charset utf-8;
 server_names_hash_bucket_size 128;
 client_header_buffer_size 4k;
 large_client_header_buffers 4 32k;
 client_max_body_size 300m;
 sendfile on;
 tcp_nopush  on;

 keepalive_timeout 60;

 tcp_nodelay on;
 client_body_buffer_size 512k;

 proxy_connect_timeout 5;
 proxy_read_timeout  60;
 proxy_send_timeout  5;
 proxy_buffer_size  16k;
 proxy_buffers   4 64k;
 proxy_busy_buffers_size 128k;
 proxy_temp_file_write_size 128k;

 gzip on;
 gzip_min_length 1k;
 gzip_buffers  4 16k;
 gzip_http_version 1.1;
 gzip_comp_level 2;
 gzip_types  text/plain application/x-javascript text/css application/xml;
 gzip_vary on;

###2012-12-19 change nginx logs
log_format main '$http_x_forwarded_for - $remote_user [$time_local] "$request" '
    '$status $body_bytes_sent "$http_referer" '
    '"$http_user_agent" $request_time $remote_addr';

upstream web_app {
 server 127.0.0.1:8080 weight=1 max_fails=2 fail_timeout=30s;
 server 127.0.0.1:8081 weight=1 max_fails=2 fail_timeout=30s;
}

####chinaapp.sinaapp.com
server {
 listen 80;
 server_name chinaapp.sinaapp.com;
 index index.jsp index.html index.htm;
 #发布目录/data/www
 root /data/www;

 location /
 {
 proxy_next_upstream http_502 http_504 error timeout invalid_header;
 proxy_set_header host $host;
 proxy_set_header x-real-ip $remote_addr;
 proxy_set_header x-forwarded-for $proxy_add_x_forwarded_for;
 proxy_pass http://web_app;
 expires  3d;
 }

 }

}5. Turn on nginx monitoring
1), nginx simple status monitoring
Add the following code in nginx.conf to monitor the current status of nginx, and then access http://serverip/status to access location ~ .*\.(html|htm|gif|jpg|jpeg|bmp|png|ico|txt|js|css)$
{
root /data/www;
#expires定义用户浏览器缓存的时间为3天,如果静态页面不常更新,可以设置更长,这样可以节省带宽和缓解服务器的压力
expires 3d;
}
Generally displayed as
location /status {
stub_status on;
access_log off;
}Note that this module will not be compiled into nginx by default. If you want to use this module , you need to specify when compiling and installing nginx:
active connections: 16
server accepts handled requests
191226 191226 305915
reading: 0 writing: 1 waiting: 15
./configure –with-http_stub_status_module
#/usr/local/nginx/sbin/nginx -v
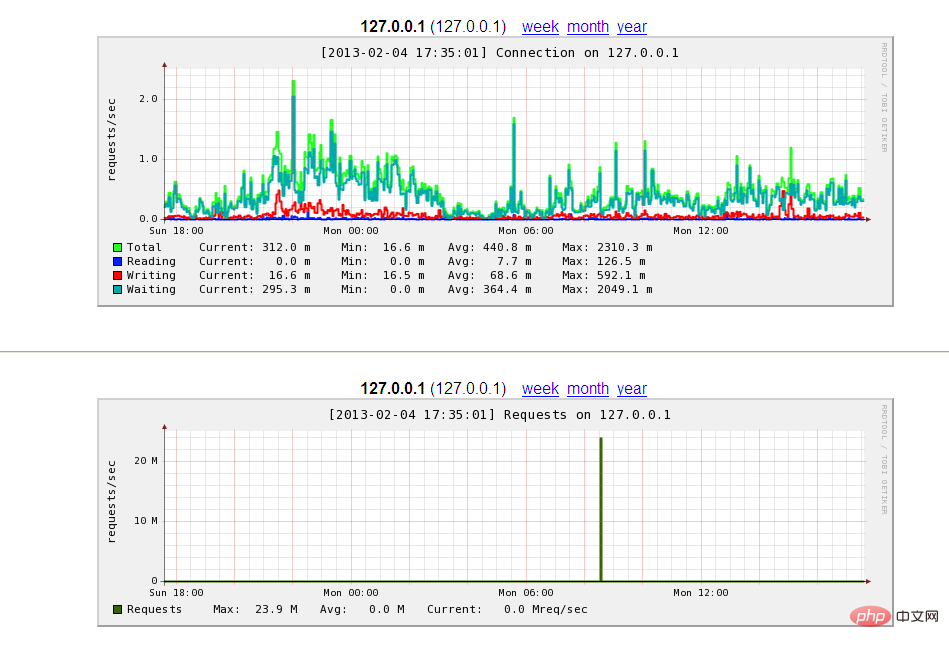
2), graphical monitoring of nginx -nginx-rrd stats
nginx-rrd is an nginx monitoring tool officially recommended by nginx. nginx-rrd can be used to easily generate charts for us to view.
在安装前需要安装好rrdtool这个画图工具和相应的perl模块,可以先运行:
yum install rrdtool libhtml-parser-perl libwww-perl librrds-perl librrd2-dev
确保rrdtool和相应的perl被安装上。
b、安装配置
下载:
wget http://soft.vpser.net/status/nginx-rrd/nginx-rrd-0.1.4.tgz
解压:
tar zxvf nginx-rrd-0.1.4.tgz
进入nginx-rrd目录,
cd nginx-rrd-0.1.4/
复制主程序:
cp usr/sbin/* /usr/sbin
复制配置文件
cp etc/nginx-rrd.conf /etc
复制定时执行文件:
cp etc/cron.d/nginx-rrd.cron /etc/cron.d
创建nginx-rrd生成目录:
mkdir /home/wwwroot/nginx && mkdir /home/wwwroot/nginx/rrd

cp html/index.php /home/wwwroot/nginx
编辑/home/wwwroot/nginx/index.php修改登录密码
<?php
header("content-type: text/html; charset=utf-8");

$password = "admin";

.........编辑配置文件nginx-rrd.conf,修改完成后如下:
#####################################################
#
# dir where rrd databases are stored
rrd_dir="/home/wwwroot/nginx-rrd/";
# dir where png images are presented
www_dir="/home/wwwroot/nginx/";
# process nice level
nice_level="-19";
# bin dir
bin_dir="/usr/sbin";
# servers to test
# server_utl;server_name
servers_url="http://127.0.0.1/status;127.0.0.1"
多个server,可以servers_url中空格分开,前部分为nginx_status的地址,后面为被监控主机的域名。
severs_url 格式
注意,nginx.conf虚拟主机server{}中,需要已经加入:
location /status {
stub_status on;
access_log off;
}以上设置就完成,可以自行运行一下:/usr/sbin/nginx-collect ,启动收集程序。cron会15分钟生成一次数据。
如果没有定时执行生成数据,可以在/etc/crontab最后面加上:
* * * * * root /usr/sbin/nginx-collect
*/15 * * * * root /usr/sbin/nginx-graph
然后输入然后访问http://serverip/nginx/即可访问。
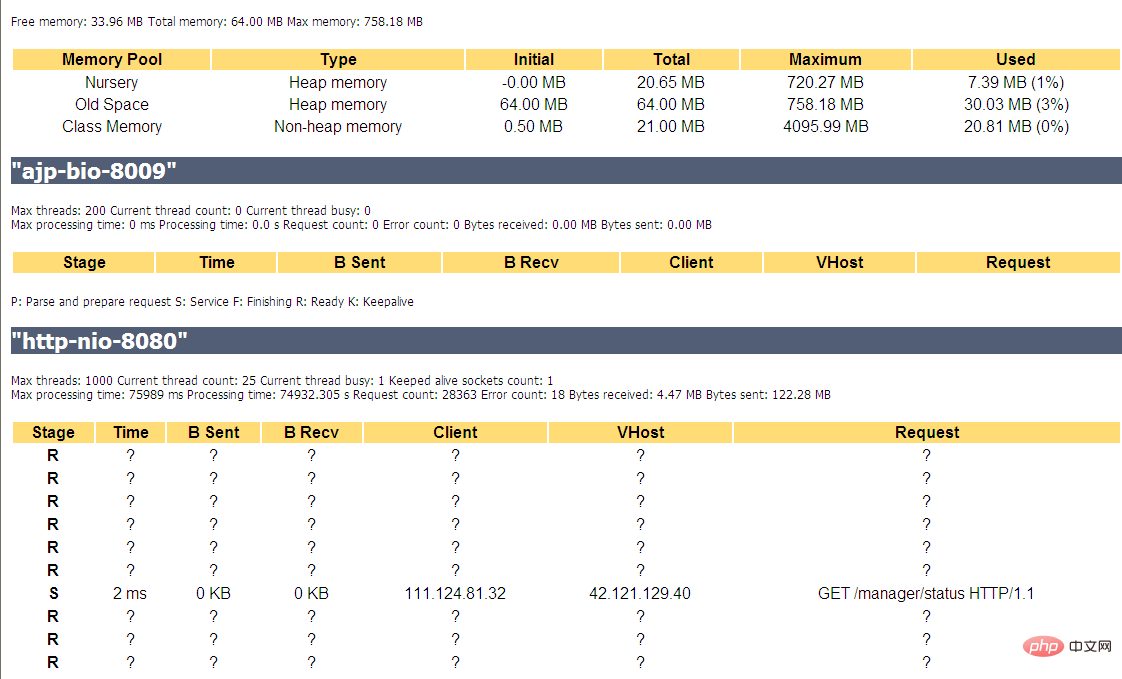
6、开启tomcat的监控
1)、tomcat6的配置
修改tomcat/conftomcat-users.xml文件中节点之前添加如下代码即可。
<user username="admin" password="admin" roles="manager"/>
然后输入然后访问http://serverip:8080/manager/status即可访问。
2)tomcat7的配置
修改tomcat/conftomcat-users.xml文件中节点之前添加如下代码即可。
<role rolename="manager-gui"/>
<user username="tomcat" admin="admin" roles="manager-gui"/>
然后输入然后访问http://serverip:8080/manager/status即可访问。
The above is the detailed content of How to configure the server-side environment of Nginx+Tomcat. For more information, please follow other related articles on the PHP Chinese website!

Hot AI Tools

Undresser.AI Undress
AI-powered app for creating realistic nude photos

AI Clothes Remover
Online AI tool for removing clothes from photos.

Undress AI Tool
Undress images for free

Clothoff.io
AI clothes remover

Video Face Swap
Swap faces in any video effortlessly with our completely free AI face swap tool!

Hot Article
Hot Tools

Notepad++7.3.1
Easy-to-use and free code editor

SublimeText3 Chinese version
Chinese version, very easy to use

Zend Studio 13.0.1
Powerful PHP integrated development environment

Dreamweaver CS6
Visual web development tools

SublimeText3 Mac version
God-level code editing software (SublimeText3)
Hot Topics


 How to check the name of the docker container
Apr 15, 2025 pm 12:21 PM
How to check the name of the docker container
Apr 15, 2025 pm 12:21 PM
You can query the Docker container name by following the steps: List all containers (docker ps). Filter the container list (using the grep command). Gets the container name (located in the "NAMES" column).
 How to configure nginx in Windows
Apr 14, 2025 pm 12:57 PM
How to configure nginx in Windows
Apr 14, 2025 pm 12:57 PM
How to configure Nginx in Windows? Install Nginx and create a virtual host configuration. Modify the main configuration file and include the virtual host configuration. Start or reload Nginx. Test the configuration and view the website. Selectively enable SSL and configure SSL certificates. Selectively set the firewall to allow port 80 and 443 traffic.
 How to check whether nginx is started
Apr 14, 2025 pm 01:03 PM
How to check whether nginx is started
Apr 14, 2025 pm 01:03 PM
How to confirm whether Nginx is started: 1. Use the command line: systemctl status nginx (Linux/Unix), netstat -ano | findstr 80 (Windows); 2. Check whether port 80 is open; 3. Check the Nginx startup message in the system log; 4. Use third-party tools, such as Nagios, Zabbix, and Icinga.
 How to start containers by docker
Apr 15, 2025 pm 12:27 PM
How to start containers by docker
Apr 15, 2025 pm 12:27 PM
Docker container startup steps: Pull the container image: Run "docker pull [mirror name]". Create a container: Use "docker create [options] [mirror name] [commands and parameters]". Start the container: Execute "docker start [Container name or ID]". Check container status: Verify that the container is running with "docker ps".
 How to configure cloud server domain name in nginx
Apr 14, 2025 pm 12:18 PM
How to configure cloud server domain name in nginx
Apr 14, 2025 pm 12:18 PM
How to configure an Nginx domain name on a cloud server: Create an A record pointing to the public IP address of the cloud server. Add virtual host blocks in the Nginx configuration file, specifying the listening port, domain name, and website root directory. Restart Nginx to apply the changes. Access the domain name test configuration. Other notes: Install the SSL certificate to enable HTTPS, ensure that the firewall allows port 80 traffic, and wait for DNS resolution to take effect.
 How to create containers for docker
Apr 15, 2025 pm 12:18 PM
How to create containers for docker
Apr 15, 2025 pm 12:18 PM
Create a container in Docker: 1. Pull the image: docker pull [mirror name] 2. Create a container: docker run [Options] [mirror name] [Command] 3. Start the container: docker start [Container name]
 How to check nginx version
Apr 14, 2025 am 11:57 AM
How to check nginx version
Apr 14, 2025 am 11:57 AM
The methods that can query the Nginx version are: use the nginx -v command; view the version directive in the nginx.conf file; open the Nginx error page and view the page title.
 How to start nginx server
Apr 14, 2025 pm 12:27 PM
How to start nginx server
Apr 14, 2025 pm 12:27 PM
Starting an Nginx server requires different steps according to different operating systems: Linux/Unix system: Install the Nginx package (for example, using apt-get or yum). Use systemctl to start an Nginx service (for example, sudo systemctl start nginx). Windows system: Download and install Windows binary files. Start Nginx using the nginx.exe executable (for example, nginx.exe -c conf\nginx.conf). No matter which operating system you use, you can access the server IP
