
 Operation and Maintenance
Nginx
How to implement Nginx dynamic and static separation configuration
Operation and Maintenance
Nginx
How to implement Nginx dynamic and static separation configuration
How to implement Nginx dynamic and static separation configuration

1. Overview
1.1 The difference between dynamic pages and static pages
Static resources: When the user accesses this resource multiple times, the source code of the resource will never change H.
Dynamic resources: When a user accesses this resource multiple times, the source code of the resource may send changes.
1.2 What is dynamic and static separation
Dynamic and static separation allows dynamic web pages in dynamic websites to separate constant resources and frequently changing resources according to certain rules. After the dynamic and static resources are split, we can cache the static resources according to their characteristics. This is the core idea of website static processing
A simple summary of dynamic and static separation is: the separation of dynamic files and static files.
Pseudo-static: If the website wants to be searched by search engines, dynamic page static technology freemarker and other template engine technologies
1.3 Why use it Separation of dynamic and static
In our software development, some requests require background processing (such as: .jsp, .do, etc.), and some requests do not require background processing ( Such as: css, html, jpg, js, etc. files), these files that do not need to be processed in the background are called static files, otherwise they are dynamic files. Therefore our background processing ignores static files. Some people will say that if I ignore the static files in the background, it will be over. Of course this is possible, but the number of background requests will significantly increase. When we have requirements for resource response speed, we should use this dynamic and static separation strategy to solve the problem.
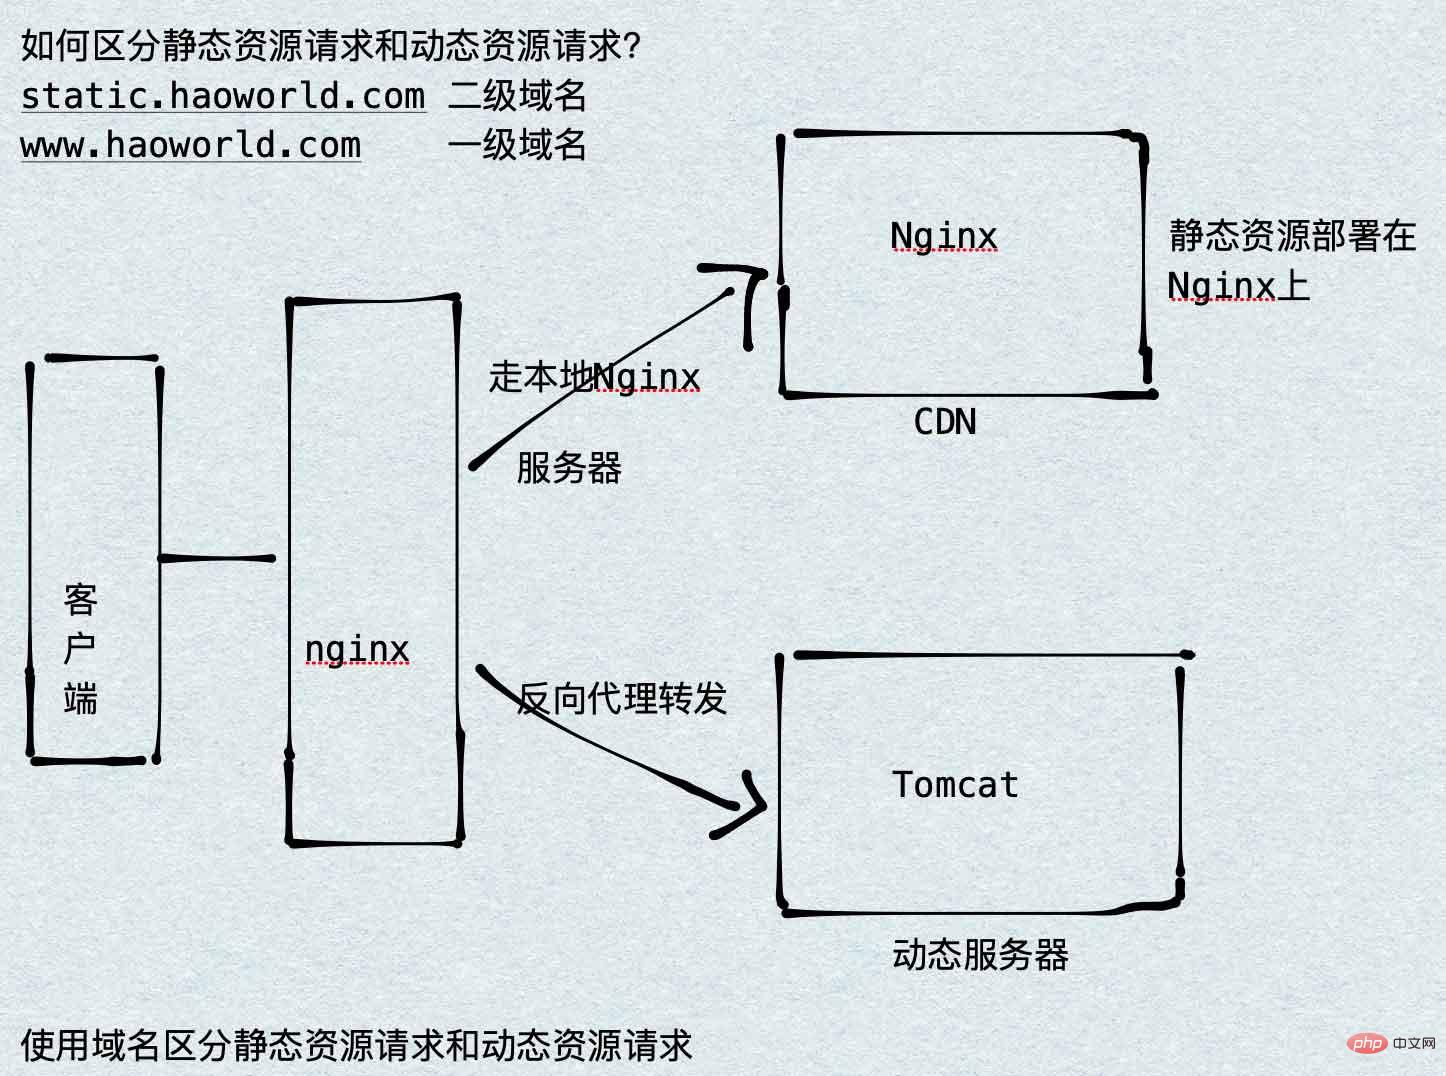
Separation of static and dynamic resources deploys website static resources (HTML, JavaScript, CSS, img and other files) separately from background applications to increase the speed of user access to static code and reduce access to background applications. Here we put the static resources into nginx and forward the dynamic resources to the tomcat server.
Therefore, to forward dynamic resources to the tomcat server, we use the reverse proxy mentioned earlier.
2. Nginx realizes dynamic and static separation
2.1 Architecture analysis
2.2 Configuration
The principle of dynamic and static separation is very simple. Just match the request URL through location. Create /static/imgs under /Users/Hao/Desktop/Test (any directory) and configure it as follows :
###静态资源访问
server {
  listen       80;
  server_name  static.jb51.com;
  location /static/imgs {
       root /Users/Hao/Desktop/Test;
       index  index.html index.htm;
   }
}
###动态资源访问
 server {
  listen       80;
  server_name  www.jb51.com;

  location / {
    proxy_pass http://127.0.0.1:8080;
     index  index.html index.htm;
   }
}Another kind of resource configuration by access
server {
        listen 80;
        server_name  jb51.net;
        access_log  /data/nginx/logs/jb51.net-access.log main;
        error_log  /data/nginx/logs/jb51.net-error.log;

        #动态访问请求转给tomcat应用处理
        location ~ .(jsp|page|do)?$ {      #以这些文件结尾的
           proxy_set_header  Host $host;
           proxy_set_header  X-Real-IP  $remote_addr;
           proxy_pass http://tomcat地址;
        }

        #设定访问静态文件直接读取不经过tomcat
        location ~ .*.(htm|html|gif|jpg|jpeg|png|bmp|swf|ioc|rar|zip|txt|flv|mid|doc|ppt|pdf|xls|mp3|wma)$  {     #以这些文件结尾的
           expires      30d;
           root /data/web/html ;
        }
}3. The difference between dynamic and static separation and front and rear separation:
dynamic and static separation of dynamic resources and static resources Separate and will not be deployed on the same server.
Separation of front and back: website architecture model, microservice development is based on
SOAand is oriented to server development, both the backend and the front end adopt the calling interface method. Split a project into a controlWeb(front-end) and interface (back-end), and finally use rpc remote calling technology. The view layer and business logic layer are split, andRPCremote calling technology is used in the middle
4. Some questions
Why In Internet company projects, a timestamp will be added after the static resource
url? His role: control cachingPurpose: The ultimate purpose is to When the control project goes online, the static resources are cached by old browsers to avoid conflicts.
Solution: Add timestamp specification t = project online
- ##304 Principle of local cache status code:
- The default browser image cache is 7 days.
- When downloading resources for the first time, the client saves the modified resource time
- When downloading resources for the second time, the server determines whether the client Whether the last modified time on the client needs to return 200 or 304
- When downloading the resource for the second time, the server determines whether the current resource file and the client’s last modified time need to return 200 Still 304 The client downloaded the resource for the second time and the last modification time was 2018/6/28 11:07:11 pm
- The last modification time of the server was greater than the last modification time of the client 200 Reload resources
- If the last modified time on the server is less than the last modified time on the client, return 304 and go to local cache
conflict between the last modification time of js css in the environment and the last modification time of the client cache. The server went online on May 22, 2018, and the user accessed it on June 1, 2018. The last modification time of the user's new js file online on June 5, 2018 still retains the last online time. So generally speaking, when the server goes online, a timestamp will be added to the static resources to force the latest resources
The above is the detailed content of How to implement Nginx dynamic and static separation configuration. For more information, please follow other related articles on the PHP Chinese website!

Hot AI Tools

Undresser.AI Undress
AI-powered app for creating realistic nude photos

AI Clothes Remover
Online AI tool for removing clothes from photos.

Undress AI Tool
Undress images for free

Clothoff.io
AI clothes remover

Video Face Swap
Swap faces in any video effortlessly with our completely free AI face swap tool!

Hot Article
Hot Tools

Notepad++7.3.1
Easy-to-use and free code editor

SublimeText3 Chinese version
Chinese version, very easy to use

Zend Studio 13.0.1
Powerful PHP integrated development environment

Dreamweaver CS6
Visual web development tools

SublimeText3 Mac version
God-level code editing software (SublimeText3)
Hot Topics


 How to check the name of the docker container
Apr 15, 2025 pm 12:21 PM
How to check the name of the docker container
Apr 15, 2025 pm 12:21 PM
You can query the Docker container name by following the steps: List all containers (docker ps). Filter the container list (using the grep command). Gets the container name (located in the "NAMES" column).
 How to configure nginx in Windows
Apr 14, 2025 pm 12:57 PM
How to configure nginx in Windows
Apr 14, 2025 pm 12:57 PM
How to configure Nginx in Windows? Install Nginx and create a virtual host configuration. Modify the main configuration file and include the virtual host configuration. Start or reload Nginx. Test the configuration and view the website. Selectively enable SSL and configure SSL certificates. Selectively set the firewall to allow port 80 and 443 traffic.
 How to check whether nginx is started
Apr 14, 2025 pm 01:03 PM
How to check whether nginx is started
Apr 14, 2025 pm 01:03 PM
How to confirm whether Nginx is started: 1. Use the command line: systemctl status nginx (Linux/Unix), netstat -ano | findstr 80 (Windows); 2. Check whether port 80 is open; 3. Check the Nginx startup message in the system log; 4. Use third-party tools, such as Nagios, Zabbix, and Icinga.
 How to start containers by docker
Apr 15, 2025 pm 12:27 PM
How to start containers by docker
Apr 15, 2025 pm 12:27 PM
Docker container startup steps: Pull the container image: Run "docker pull [mirror name]". Create a container: Use "docker create [options] [mirror name] [commands and parameters]". Start the container: Execute "docker start [Container name or ID]". Check container status: Verify that the container is running with "docker ps".
 How to configure cloud server domain name in nginx
Apr 14, 2025 pm 12:18 PM
How to configure cloud server domain name in nginx
Apr 14, 2025 pm 12:18 PM
How to configure an Nginx domain name on a cloud server: Create an A record pointing to the public IP address of the cloud server. Add virtual host blocks in the Nginx configuration file, specifying the listening port, domain name, and website root directory. Restart Nginx to apply the changes. Access the domain name test configuration. Other notes: Install the SSL certificate to enable HTTPS, ensure that the firewall allows port 80 traffic, and wait for DNS resolution to take effect.
 How to check nginx version
Apr 14, 2025 am 11:57 AM
How to check nginx version
Apr 14, 2025 am 11:57 AM
The methods that can query the Nginx version are: use the nginx -v command; view the version directive in the nginx.conf file; open the Nginx error page and view the page title.
 How to create containers for docker
Apr 15, 2025 pm 12:18 PM
How to create containers for docker
Apr 15, 2025 pm 12:18 PM
Create a container in Docker: 1. Pull the image: docker pull [mirror name] 2. Create a container: docker run [Options] [mirror name] [Command] 3. Start the container: docker start [Container name]
 How to start nginx server
Apr 14, 2025 pm 12:27 PM
How to start nginx server
Apr 14, 2025 pm 12:27 PM
Starting an Nginx server requires different steps according to different operating systems: Linux/Unix system: Install the Nginx package (for example, using apt-get or yum). Use systemctl to start an Nginx service (for example, sudo systemctl start nginx). Windows system: Download and install Windows binary files. Start Nginx using the nginx.exe executable (for example, nginx.exe -c conf\nginx.conf). No matter which operating system you use, you can access the server IP
