

How to use Tomcat container to achieve self-starting in springboot

1. Spring imports beans through annotations, which can be roughly divided into four ways. We mainly talk about the following two implementation methods of Import:
1. Implement Bean loading by implementing the ImportSerlector interface:
public class TestServiceImpl {
 public void testImpl() {
 System.out.println("我是通过importSelector导入进来的service");
 }
}
public class TestService implements ImportSelector {
 @Override
 public String[] selectImports(AnnotationMetadata annotationMetadata) {
 return new String[]{"com.ycdhz.service.TestServiceImpl"};
 }
}
@Configuration
@Import(value = {TestService.class})
public class TestConfig {
}
public class TestController {
 @Autowired
 private TestServiceImpl testServiceImpl;

 @RequestMapping("testImpl")
 public String testTuling() {
 testServiceImpl.testImpl();
 return "Ok";
 }
}2. Implement Bean loading by implementing the ImportSerlector interface:
public class TestService {
 public TestService() {
 System.out.println("我是通过ImportBeanDefinitionRegistrar导入进来的组件");
 }
}
public class TestImportBeanDefinitionRegistrar implements ImportBeanDefinitionRegistrar {
 @Override
 public void registerBeanDefinitions(AnnotationMetadata importingClassMetadata, BeanDefinitionRegistry registry) {
 //定义一个BeanDefinition
 RootBeanDefinition beanDefinition = new RootBeanDefinition(TestService.class);
 //把自定义的bean定义导入到容器中
 registry.registerBeanDefinition("testService",beanDefinition);
 }
}
@Configuration
@Import(TestImportBeanDefinitionRegistrar.class)
public class TestConfig {
}2. Springboot will be automatically assembled during startup
We start from spring-boot-autoconfigure-2.0.6.RELEASE I searched for the relevant configuration of Tomcat under .jar and found two automatic assembly classes, each containing three customizers (object-oriented single responsibility principle) and a factory class.

2.1. TomcatWebServerFactoryCustomizer: Customize Tomcat-specific functions common to Servlets and Reactive servers.
public class TomcatWebServerFactoryCustomizer implements
 WebServerFactoryCustomizer<configurabletomcatwebserverfactory>, Ordered {
 @Override
 public void customize(ConfigurableTomcatWebServerFactory factory) {
 ServerProperties properties = this.serverProperties;
 ServerProperties.Tomcat tomcatProperties = properties.getTomcat();
 PropertyMapper propertyMapper = PropertyMapper.get();
 propertyMapper.from(tomcatProperties::getBasedir).whenNonNull()
 .to(factory::setBaseDirectory);
 propertyMapper.from(tomcatProperties::getBackgroundProcessorDelay).whenNonNull()
 .as(Duration::getSeconds).as(Long::intValue)
 .to(factory::setBackgroundProcessorDelay);
 customizeRemoteIpValve(factory);
 propertyMapper.from(tomcatProperties::getMaxThreads).when(this::isPositive)
 .to((maxThreads) -> customizeMaxThreads(factory,
  tomcatProperties.getMaxThreads()));
 propertyMapper.from(tomcatProperties::getMinSpareThreads).when(this::isPositive)
 .to((minSpareThreads) -> customizeMinThreads(factory, minSpareThreads));
 propertyMapper.from(() -> determineMaxHttpHeaderSize()).when(this::isPositive)
 .to((maxHttpHeaderSize) -> customizeMaxHttpHeaderSize(factory,
  maxHttpHeaderSize));
 propertyMapper.from(tomcatProperties::getMaxHttpPostSize)
 .when((maxHttpPostSize) -> maxHttpPostSize != 0)
 .to((maxHttpPostSize) -> customizeMaxHttpPostSize(factory,
  maxHttpPostSize));
 propertyMapper.from(tomcatProperties::getAccesslog)
 .when(ServerProperties.Tomcat.Accesslog::isEnabled)
 .to((enabled) -> customizeAccessLog(factory));
 propertyMapper.from(tomcatProperties::getUriEncoding).whenNonNull()
 .to(factory::setUriEncoding);
 propertyMapper.from(properties::getConnectionTimeout).whenNonNull()
 .to((connectionTimeout) -> customizeConnectionTimeout(factory,
  connectionTimeout));
 propertyMapper.from(tomcatProperties::getMaxConnections).when(this::isPositive)
 .to((maxConnections) -> customizeMaxConnections(factory, maxConnections));
 propertyMapper.from(tomcatProperties::getAcceptCount).when(this::isPositive)
 .to((acceptCount) -> customizeAcceptCount(factory, acceptCount));
 customizeStaticResources(factory);
 customizeErrorReportValve(properties.getError(), factory);
 }
}</configurabletomcatwebserverfactory>2.2. ServletWebServerFactoryCustomizer: WebServerFactoryCustomizer applies the ServerProperties properties to the Tomcat web server.
public class ServletWebServerFactoryCustomizer implements
 WebServerFactoryCustomizer<configurableservletwebserverfactory>, Ordered {
 private final ServerProperties serverProperties;
 public ServletWebServerFactoryCustomizer(ServerProperties serverProperties) {
 this.serverProperties = serverProperties;
 }
 @Override
 public int getOrder() {
 return 0;
 }
 @Override
 public void customize(ConfigurableServletWebServerFactory factory) {
 PropertyMapper map = PropertyMapper.get().alwaysApplyingWhenNonNull();
 map.from(this.serverProperties::getPort).to(factory::setPort);
 map.from(this.serverProperties::getAddress).to(factory::setAddress);
 map.from(this.serverProperties.getServlet()::getContextPath)
 .to(factory::setContextPath);
 map.from(this.serverProperties.getServlet()::getApplicationDisplayName)
 .to(factory::setDisplayName);
 map.from(this.serverProperties.getServlet()::getSession).to(factory::setSession);
 map.from(this.serverProperties::getSsl).to(factory::setSsl);
 map.from(this.serverProperties.getServlet()::getJsp).to(factory::setJsp);
 map.from(this.serverProperties::getCompression).to(factory::setCompression);
 map.from(this.serverProperties::getHttp2).to(factory::setHttp2);
 map.from(this.serverProperties::getServerHeader).to(factory::setServerHeader);
 map.from(this.serverProperties.getServlet()::getContextParameters)
 .to(factory::setInitParameters);
 }
}</configurableservletwebserverfactory>2.3. ServletWebServerFactoryCustomizer: WebServerFactoryCustomizer applies ServerProperties properties to the Tomcat web server.
public class TomcatServletWebServerFactoryCustomizer
 implements WebServerFactoryCustomizer<tomcatservletwebserverfactory>, Ordered {
 private final ServerProperties serverProperties;
 public TomcatServletWebServerFactoryCustomizer(ServerProperties serverProperties) {
 this.serverProperties = serverProperties;
 }
 @Override
 public void customize(TomcatServletWebServerFactory factory) {
 ServerProperties.Tomcat tomcatProperties = this.serverProperties.getTomcat();
 if (!ObjectUtils.isEmpty(tomcatProperties.getAdditionalTldSkipPatterns())) {
 factory.getTldSkipPatterns()
  .addAll(tomcatProperties.getAdditionalTldSkipPatterns());
 }
 if (tomcatProperties.getRedirectContextRoot() != null) {
 customizeRedirectContextRoot(factory,
  tomcatProperties.getRedirectContextRoot());
 }
 if (tomcatProperties.getUseRelativeRedirects() != null) {
 customizeUseRelativeRedirects(factory,
  tomcatProperties.getUseRelativeRedirects());
 }
 }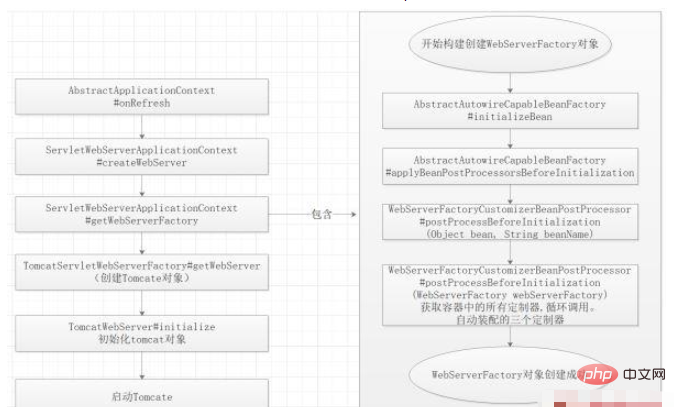
}</tomcatservletwebserverfactory>3. With TomcatServletWebServerFactory, it is equivalent to having the entrance for Spring loading.
Drive tomcat to start in the IOC container through AbstractApplicationContext#onReFresh(), and then execute other parts of the ioc container. step.
We can observe the entire life cycle of Tomcat loading through breakpoints, as well as the loading process of the three customizers.
@Override
public WebServer getWebServer(ServletContextInitializer... initializers) {
 Tomcat tomcat = new Tomcat();
 File baseDir = (this.baseDirectory != null) ? this.baseDirectory
 : createTempDir("tomcat");
 tomcat.setBaseDir(baseDir.getAbsolutePath());
 Connector connector = new Connector(this.protocol);
 tomcat.getService().addConnector(connector);
 customizeConnector(connector);
 tomcat.setConnector(connector);
 //设置是否自动启动
 tomcat.getHost().setAutoDeploy(false);
 //创建Tomcat引擎
 configureEngine(tomcat.getEngine());
 for (Connector additionalConnector : this.additionalTomcatConnectors) {
 tomcat.getService().addConnector(additionalConnector);
 }
 //刷新上下文
 prepareContext(tomcat.getHost(), initializers);
 //准备启动
 return getTomcatWebServer(tomcat);
}private void initialize() throws WebServerException {
TomcatWebServer.logger
.info("Tomcat initialized with port(s): " + getPortsDescription(false));
synchronized (this.monitor) {
try {
addInstanceIdToEngineName();
Context context = findContext();
context.addLifecycleListener((event) -> {
if (context.equals(event.getSource())
&& Lifecycle.START_EVENT.equals(event.getType())) {
// Remove service connectors so that protocol binding doesn't
// happen when the service is started.
removeServiceConnectors();
}
});
// Start the server to trigger initialization listeners
this.tomcat.start();
// We can re-throw failure exception directly in the main thread
rethrowDeferredStartupExceptions();
try {
ContextBindings.bindClassLoader(context, context.getNamingToken(),
getClass().getClassLoader());
}
catch (NamingException ex) {
// Naming is not enabled. Continue
}
// Unlike Jetty, all Tomcat threads are daemon threads. We create a
// blocking non-daemon to stop immediate shutdown
startDaemonAwaitThread();
}
catch (Exception ex) {
stopSilently();
throw new WebServerException("Unable to start embedded Tomcat", ex);
}
}
}Note: In this process, we need to understand the life cycle of the Bean. Tomcat's three customizers are loaded in the BeanPostProcessorsRegistrar (Bean post-processor) process;
Constructor method-->Bean post-processorBefore-->InitializingBean-->init-method-->Bean post-processorAfter
org.springframework.beans.factory.support.AbstractAutowireCapableBeanFactory#doCreateBean
  org.springframework.beans.factory.support.AbstractAutowireCapableBeanFactory#initializeBean
protected Object doCreateBean(final String beanName, final RootBeanDefinition mbd, final @Nullable Object[] args)
 throws BeanCreationException {
 // Instantiate the bean.
 BeanWrapper instanceWrapper = null;
 if (mbd.isSingleton()) {
 instanceWrapper = this.factoryBeanInstanceCache.remove(beanName);
 }
 if (instanceWrapper == null) {
 //构造方法
 instanceWrapper = createBeanInstance(beanName, mbd, args);
 }
 final Object bean = instanceWrapper.getWrappedInstance();
 Class> beanType = instanceWrapper.getWrappedClass();
 if (beanType != NullBean.class) {
 mbd.resolvedTargetType = beanType;
 }
 // Initialize the bean instance.
 ......
 return exposedObject;
}
protected Object initializeBean(final String beanName, final Object bean, @Nullable RootBeanDefinition mbd) {
 if (System.getSecurityManager() != null) {
 AccessController.doPrivileged((PrivilegedAction<object>) () -> {
 invokeAwareMethods(beanName, bean);
 return null;
 }, getAccessControlContext());
 }
 else {
 invokeAwareMethods(beanName, bean);
 }
 Object wrappedBean = bean;
 if (mbd == null || !mbd.isSynthetic()) {
 //Bean后置处理器Before
 wrappedBean = applyBeanPostProcessorsBeforeInitialization(wrappedBean, beanName);
 }
 try {
 invokeInitMethods(beanName, wrappedBean, mbd);
 }
 catch (Throwable ex) {
 throw new BeanCreationException(
 (mbd != null ? mbd.getResourceDescription() : null),
 beanName, "Invocation of init method failed", ex);
 }
 if (mbd == null || !mbd.isSynthetic()) {
 //Bean后置处理器After
 wrappedBean = applyBeanPostProcessorsAfterInitialization(wrappedBean, beanName);
 }
 return wrappedBean;
}</object>The above is the detailed content of How to use Tomcat container to achieve self-starting in springboot. For more information, please follow other related articles on the PHP Chinese website!

Hot AI Tools

Undresser.AI Undress
AI-powered app for creating realistic nude photos

AI Clothes Remover
Online AI tool for removing clothes from photos.

Undress AI Tool
Undress images for free

Clothoff.io
AI clothes remover

Video Face Swap
Swap faces in any video effortlessly with our completely free AI face swap tool!

Hot Article
Hot Tools

Notepad++7.3.1
Easy-to-use and free code editor

SublimeText3 Chinese version
Chinese version, very easy to use

Zend Studio 13.0.1
Powerful PHP integrated development environment

Dreamweaver CS6
Visual web development tools

SublimeText3 Mac version
God-level code editing software (SublimeText3)
Hot Topics
 1666
1666
 14
1425
52
1327
25
1273
29
1253
24
14
1425
52
1327
25
1273
29
1253
24

 How to deploy jar project in tomcat
Apr 21, 2024 am 07:27 AM
How to deploy jar project in tomcat
Apr 21, 2024 am 07:27 AM
To deploy a JAR project to Tomcat, follow these steps: Download and unzip Tomcat. Configure the server.xml file, set the port and project deployment path. Copies the JAR file to the specified deployment path. Start Tomcat. Access the deployed project using the provided URL.
 How to allow external network access to tomcat server
Apr 21, 2024 am 07:22 AM
How to allow external network access to tomcat server
Apr 21, 2024 am 07:22 AM
To allow the Tomcat server to access the external network, you need to: modify the Tomcat configuration file to allow external connections. Add a firewall rule to allow access to the Tomcat server port. Create a DNS record pointing the domain name to the Tomcat server public IP. Optional: Use a reverse proxy to improve security and performance. Optional: Set up HTTPS for increased security.
 Where is the tomcat installation directory?
Apr 21, 2024 am 07:48 AM
Where is the tomcat installation directory?
Apr 21, 2024 am 07:48 AM
Tomcat installation directory: Default path: Windows: C:\Program Files\Apache Software Foundation\Tomcat 9.0macOS:/Library/Tomcat/Tomcat 9.0Linux:/opt/tomcat/tomcat9 Custom path: You can specify it during installation. Find the installation directory: use whereis or locate command.
 How to deploy multiple projects in tomcat
Apr 21, 2024 am 09:33 AM
How to deploy multiple projects in tomcat
Apr 21, 2024 am 09:33 AM
To deploy multiple projects through Tomcat, you need to create a webapp directory for each project and then: Automatic deployment: Place the webapp directory in Tomcat's webapps directory. Manual deployment: Manually deploy the project in Tomcat's manager application. Once the project is deployed, it can be accessed by its deployment name, for example: http://localhost:8080/project1.
 How to check the number of concurrent connections in tomcat
Apr 21, 2024 am 08:12 AM
How to check the number of concurrent connections in tomcat
Apr 21, 2024 am 08:12 AM
How to check the number of concurrent Tomcat connections: Visit the Tomcat Manager page (http://localhost:8080/manager/html) and enter your user name and password. Click Status->Sessions in the left navigation bar to see the number of concurrent connections at the top of the page.
 Where is the root directory of the tomcat website?
Apr 21, 2024 am 09:27 AM
Where is the root directory of the tomcat website?
Apr 21, 2024 am 09:27 AM
The Tomcat website root directory is located in Tomcat's webapps subdirectory and is used to store web application files, static resources, and the WEB-INF directory; it can be found by looking for the docBase attribute in the Tomcat configuration file.
 How to check the port number of tomcat
Apr 21, 2024 am 08:00 AM
How to check the port number of tomcat
Apr 21, 2024 am 08:00 AM
The Tomcat port number can be viewed by checking the port attribute of the <Connector> element in the server.xml file. Visit the Tomcat management interface (http://localhost:8080/manager/html) and view the "Status" tab. Run "catalina.sh version" from the command line and look at the "Port:" line.
 How to configure domain name in tomcat
Apr 21, 2024 am 09:52 AM
How to configure domain name in tomcat
Apr 21, 2024 am 09:52 AM
To configure Tomcat to use a domain name, follow these steps: Create a server.xml backup. Open server.xml and add the Host element, replacing example.com with your domain name. Create an SSL certificate for the domain name (if required). Add an SSL connector in server.xml, change the port, keystore file, and password. Save server.xml. Restart Tomcat.
