
 Operation and Maintenance
Nginx
How to configure the multi-site function of WordPress in Nginx environment
Operation and Maintenance
Nginx
How to configure the multi-site function of WordPress in Nginx environment
How to configure the multi-site function of WordPress in Nginx environment

The multi-site function of wordpress allows multiple sites to be implemented by installing a wordpress program (that is, a set of programs can be bound to multiple domain names or sub-domain names).
Each site has independent themes, plug-ins, articles and pages.
This can greatly reduce the trouble of maintaining and updating multiple wordpress installation programs,
and each site can be independent of each other without affecting each other.
Wordpress multisite has two methods: subdirectory and subdomain name. Here we mainly introduce the subdomain name method.
That is to say, based on the main domain name, we will create a subdomain name, for example: http://shop.jb51.com.
At the same time, we can map this subdomain name to a first-level domain name such as: http://shop.com,
For visitors, they access an independent first-level domain name.
1. Preparation
wordpress introduces its multi-site function page: site network management page
Next, we prepare several domain names, as follows:
site One: www.jb51.com (primary domain name), this is the domain name used when installing wordpress
Site two: blog.jb51.com, secondary domain name
Site three: news.com, mapped secondary domain name news.jb51.com
Site 4: shop.com, mapped second-level domain name shop.jb51.com
Note: After WordPress is installed, please do not modify the domain name in the background without authorization, even if you change the www to no www , or vice versa, may cause redirected you too many times. Error
Then, log in to the domain name service provider's resolution page, and set all a records of the above domain names to the server IP of WordPress installation.
You can also test on a local computer. You can directly modify the hosts file and add the following line:
127.0.0.1 www.jb51.com blog.jb51.com news.com shop.com
2. nginx configuration
Create a new configuration file in the nginx configuration directory, as follows :
$ sudo vi /etc/nginx/conf.d/jb51.conf
The content is:
server {
listen 80;
server_name www.jb51.com blog.jb51.com news.com shop.com;

root /usr/share/nginx/wordpress;
index index.php;

location / {
try_files $uri $uri/ /index.php?$args ;
}

location ~ /favicon.ico {
access_log off;
log_not_found off;
}

location ~ \.php$ {
try_files $uri /index.php;
include fastcgi_params;
fastcgi_pass 127.0.0.1:9000;
fastcgi_index index.php;
fastcgi_param script_filename $document_root$fastcgi_script_name;
}

access_log /var/log/nginx/$host-access.log;
error_log /var/log/nginx/wpms-error.log;
}Here we use the $host variable to allow nginx to generate independent access logs for each domain name,
such as: news. com-access.log and shop.com-access.log.
But the error log cannot use the $host variable, so all errors will be recorded in a file.
Restart the nginx server:
$ nginx -s reload
3. Install wordpress
Follow the normal installation steps of wordpress to install wordpress.
4. Enable multi-site function
Open the wp-config.php file with a text editor and comment: "/* OK! Please do not continue editing. . Please save this file. Happy using it! */" before adding the following line:
/* multisite settings */
define( 'wp_allow_multisite', true );
We will edit this file a few times.
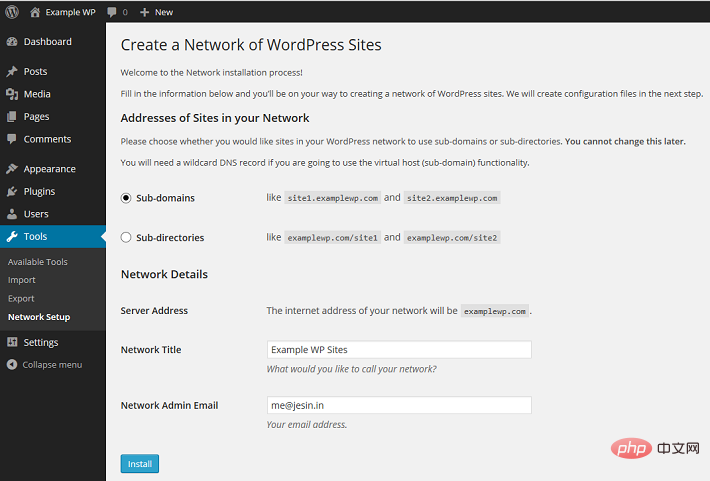
After saving, log in to the WordPress backend, click: Tools > Network Settings, select the subdomain name, network title and network administrator’s email address and enter them as desired.
Then install the terminal.
After waiting for a while, two code blocks will appear on the interface, prompting you to add wp-config.php and .htaccesss files respectively.
We are using nginx here, so we don’t need to worry about the .htaccess part.
Open the wp-config.php file and add the following lines before commenting: "/* Okay! Please do not continue editing. Please save this file. Happy using! */":
define('multisite', true);
define('subdomain_install', true);
define('domain_current_site', 'www.jb51.com');
define('path_current_site', '/');
define('site_id_current_site', 1);
define('blog_id_current_site', 1);
log out of the wordpress admin panel, and log in again.
Log out of the WordPress backend and log in again.
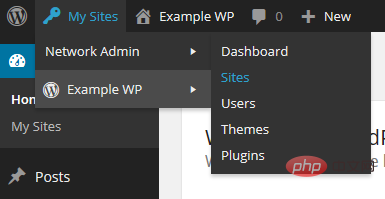
Open My Site > Network Management > Site in the upper left corner of the panel.
Click the Add New button to open the add new site form and add three subdomains: blog, news, and shop.
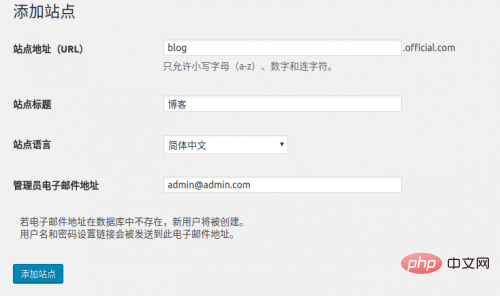
After the addition is completed, select all sites and edit the two subdomains of news.jb51.com and shop.jb51.com. The site titles are News and Mall respectively,
Change the site addresses (url) to: news.com and shop.com respectively.
After this step is completed, we can access blog.jb51.com. It is already an independent site with independent resources.
But to access news.com and shop.com, you need to continue reading.
5. Set up domain name mapping
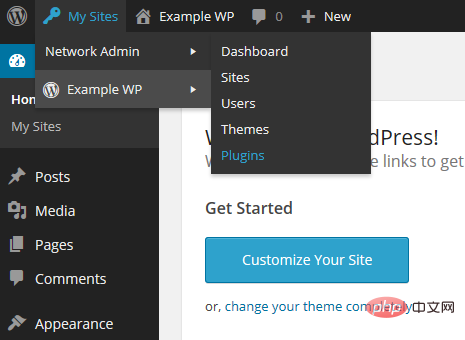
Open My Site > Network Management > Plug-in in the upper left corner of the panel.
Install the wordpress mu domain mapping plug-in here. You can directly search or download and install it, and then enable it.
Then copy the sunrise.php file in the plug-in directory (directory wp-content/plugins/wordpress-mu-domain-mapping) to the wp-content directory.
Open the wp-config.php file and add the following line before the comment: "/* Okay! Please do not continue editing. Please save this file. Happy using! */":
define('sunrise', 'on');
Save, then return to the browser, open My Site > Network Management > Settings in the upper left corner of the panel in the background.
Then select domain mapping and modify the domain options as shown below:
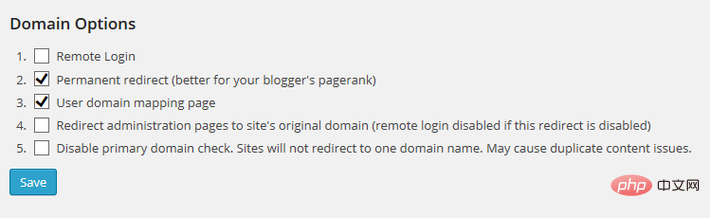
然后保存。
这里的配置的功能是:重定向所有二级域名(如 news.jb51.com )到各自的外部域名(如 news.com),包括管理页面(/wp-admin)。
接下来,我们要映射一级域名到各个站点id。
默认在后台不显示站点id,所以我们用一个最简单的方法让后台直接显示站点id。
这个方法就是用wordpress的 must-use plugin。
在 wp-content 目录下创建一个 mu-plugins 目录,再在新建的目录下创建一个名为 wpms_blogid.php 的文件,
这个php文件的内容为:
<?php
add_filter( 'wpmu_blogs_columns', 'do_get_id' );
add_action( 'manage_sites_custom_column', 'do_add_columns', 10, 2 );
add_action( 'manage_blogs_custom_column', 'do_add_columns', 10, 2 );
function do_add_columns( $column_name, $blog_id ) {
if ( 'blog_id' === $column_name )
echo $blog_id;
return $column_name;
}
function do_get_id( $columns ) {
$columns['blog_id'] = 'id';
return $columns;
}保存后再访问后台的 站点 > 所有站点,在站点列表中就会多一列id,下一步就会用到。
后台控制面板切换到 设置 > domains,加入两个域名:
site id:3(以自己实际为主)
domian:news.com
primary:√
以及:
site id:4(以自己实际为主)
domian:shop.com
primary:√
如果域名是有www的,一样的操作方式。
The above is the detailed content of How to configure the multi-site function of WordPress in Nginx environment. For more information, please follow other related articles on the PHP Chinese website!

Hot AI Tools

Undresser.AI Undress
AI-powered app for creating realistic nude photos

AI Clothes Remover
Online AI tool for removing clothes from photos.

Undress AI Tool
Undress images for free

Clothoff.io
AI clothes remover

Video Face Swap
Swap faces in any video effortlessly with our completely free AI face swap tool!

Hot Article
Hot Tools

Notepad++7.3.1
Easy-to-use and free code editor

SublimeText3 Chinese version
Chinese version, very easy to use

Zend Studio 13.0.1
Powerful PHP integrated development environment

Dreamweaver CS6
Visual web development tools

SublimeText3 Mac version
God-level code editing software (SublimeText3)
Hot Topics
 1655
1655
 14
1413
52
1306
25
1252
29
1226
24
14
1413
52
1306
25
1252
29
1226
24

 How to adjust the wordpress article list
Apr 20, 2025 am 10:48 AM
How to adjust the wordpress article list
Apr 20, 2025 am 10:48 AM
There are four ways to adjust the WordPress article list: use theme options, use plugins (such as Post Types Order, WP Post List, Boxy Stuff), use code (add settings in the functions.php file), or modify the WordPress database directly.
 How to build a website for wordpress host
Apr 20, 2025 am 11:12 AM
How to build a website for wordpress host
Apr 20, 2025 am 11:12 AM
To build a website using WordPress hosting, you need to: select a reliable hosting provider. Buy a domain name. Set up a WordPress hosting account. Select a topic. Add pages and articles. Install the plug-in. Customize your website. Publish your website.
 What are the plugins for wordpress blocking ip
Apr 20, 2025 am 08:27 AM
What are the plugins for wordpress blocking ip
Apr 20, 2025 am 08:27 AM
WordPress IP blocking plugin selection is crucial. The following types can be considered: based on .htaccess: efficient, but complex operation; database operation: flexible, but low efficiency; firewall: high security performance, but complex configuration; self-written: highest control, but requires more technical level.
 How to change the head image of the wordpress theme
Apr 20, 2025 am 10:00 AM
How to change the head image of the wordpress theme
Apr 20, 2025 am 10:00 AM
A step-by-step guide to replacing a header image of WordPress: Log in to the WordPress dashboard and navigate to Appearance >Theme. Select the topic you want to edit and click Customize. Open the Theme Options panel and look for the Site Header or Header Image options. Click the Select Image button and upload a new head image. Crop the image and click Save and Crop. Click the Save and Publish button to update the changes.
 How to cancel the editing date of wordpress
Apr 20, 2025 am 10:54 AM
How to cancel the editing date of wordpress
Apr 20, 2025 am 10:54 AM
WordPress editing dates can be canceled in three ways: 1. Install the Enable Post Date Disable plug-in; 2. Add code in the functions.php file; 3. Manually edit the post_modified column in the wp_posts table.
 How to write a header of a wordpress
Apr 20, 2025 pm 12:09 PM
How to write a header of a wordpress
Apr 20, 2025 pm 12:09 PM
The steps to create a custom header in WordPress are as follows: Edit the theme file "header.php". Add your website name and description. Create a navigation menu. Add a search bar. Save changes and view your custom header.
 How to import the source code of wordpress
Apr 20, 2025 am 11:24 AM
How to import the source code of wordpress
Apr 20, 2025 am 11:24 AM
Importing WordPress source code requires the following steps: Create a sub-theme for theme modification. Import the source code and overwrite the files in the sub-topic. Activate the sub-theme to make it effective. Test the changes to make sure everything works.
 What to do if there is an error in wordpress
Apr 20, 2025 am 11:57 AM
What to do if there is an error in wordpress
Apr 20, 2025 am 11:57 AM
WordPress Error Resolution Guide: 500 Internal Server Error: Disable the plug-in or check the server error log. 404 Page not found: Check permalink and make sure the page link is correct. White Screen of Death: Increase the server PHP memory limit. Database connection error: Check the database server status and WordPress configuration. Other tips: enable debug mode, check error logs, and seek support. Prevent errors: regularly update WordPress, install only necessary plugins, regularly back up your website, and optimize website performance.
