How to install Nagios on CentOS 9 Stream
We have a disk drive in our PC dedicated to all Windows operating system related installations. This drive is usually the C drive.
If you also have the latest Windows 11 operating system installed on the C drive of your PC, then all system updates (and most likely all the software you install) will store all their files in the C drive.
Therefore, it becomes very important to keep this drive free of junk files and have enough storage space in C drive because the more space this drive has, the smoother your Windows 11 operating system will run.
But there are limits on how much space you can add on a disk drive and how many files you can delete.
In this case, the option to extend C drive in Windows 11 may come in handy. Extended drive is a built-in option of Windows operating system provided by Microsoft to its users that allows you to expand the storage space in the created disk drive.
For example, if you wish to extend your C drive storage by 10 GB, then using the drive expansion process you can easily add more space to a specific drive.
This is exactly what we will discuss in this tutorial. Here, we will show you the different methods you can use to extend C drive in Windows 11 PC.
Why is the C drive full in my Windows 11 PC?
Windows 11, while new, does bring with it all the different computing issues that Windows 10 users have faced in the past.
Some problems are common and easy to solve, while others are difficult to solve. The issue of C drive getting full is nothing new and there are several reasons behind this issue.
We have listed some of the most common reasons why C drive is full in Windows 11 PC:
- You have recently upgraded your PC from Windows 10 to Windows 11, then Old system files are still present on your PC.
- Windows 11 PC is infected with viruses or malware that generate unnecessary files and fill up the storage space.
- Windows 11 update files can also clog storage space.
- If you haven't cleared the Recycle Bin or Temporary folders in a while, they may be taking up a lot of storage space in your drive.
- You have installed too many software on the C drive.
- Documents folder or Downloads folder are the most common folders where all downloaded files are kept and they can take up space.
While a better option is to expand the overall disk capacity of your PC, if you already have enough free storage space for another disk drive, you can use this tutorial and expand your C drive.
How to extend C drive in Windows 11?
1. Use Disk Management
- to open the Start menu.
- Search Disk Management and open it.
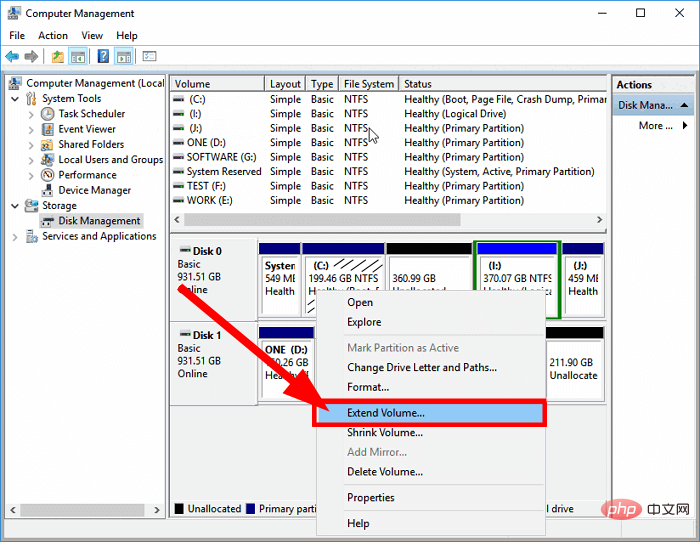
- Right-click on C drive and select Extend Volume.

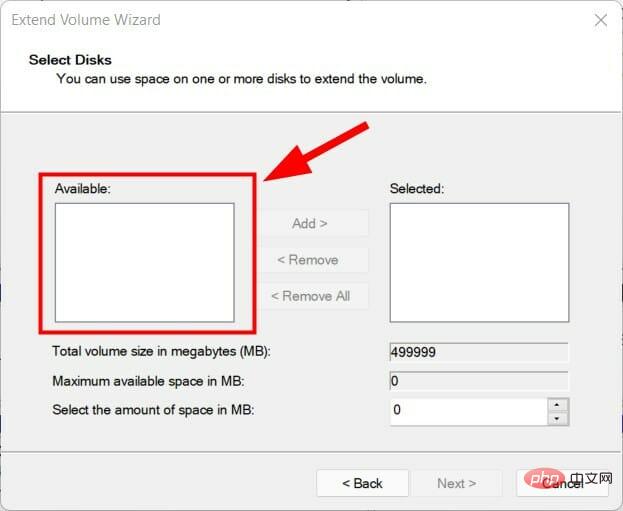
- Select the number of disks in the Available section and click Add.

- Click Next.
- The wizard will start the expansion process.
- Click FinishClose the disk management tool.

Tip If you don’t have unallocated space in your Windows 11 PC, then you can follow the steps mentioned below.
- Open the Start menu.
- Search Disk Management and open it.
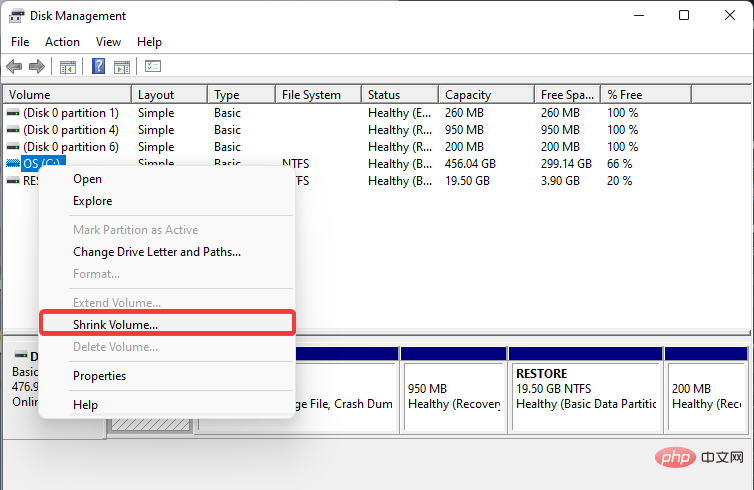
- Right-click a drive that has enough free space and select Shrink Volume from the list.

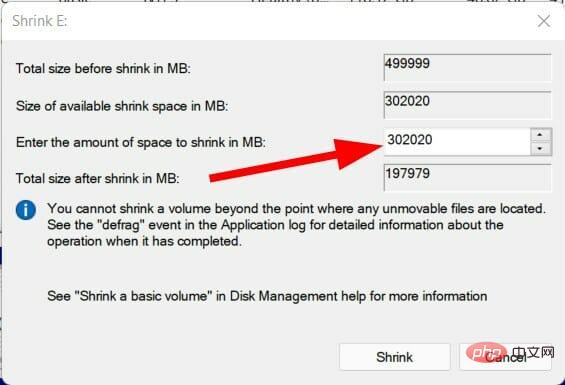
- Enter the shrink size in MB, which is the amount of space you wish to add to your C drive, and click the Shrink button to confirm.

- Now right click on C drive.
- SelectExtended volume.

- Click the number of disks in the Available section and click Add.

- Select Next step.
- The wizard will start the expansion process.
- Click FinishClose the disk management tool.
You can easily add extra space to the C drive on your Windows 11 PC using the Disk Management tool, which is fairly easy to use and understand.
But if you still think that the above process is a bit complicated for you, there is a simple tool you can use and you need to check out the next method.
2. Use specialized software
- Download AOMEI Partition Assistant.
- to install the software on your PC.
- Open AOMEI Partition Assistant.
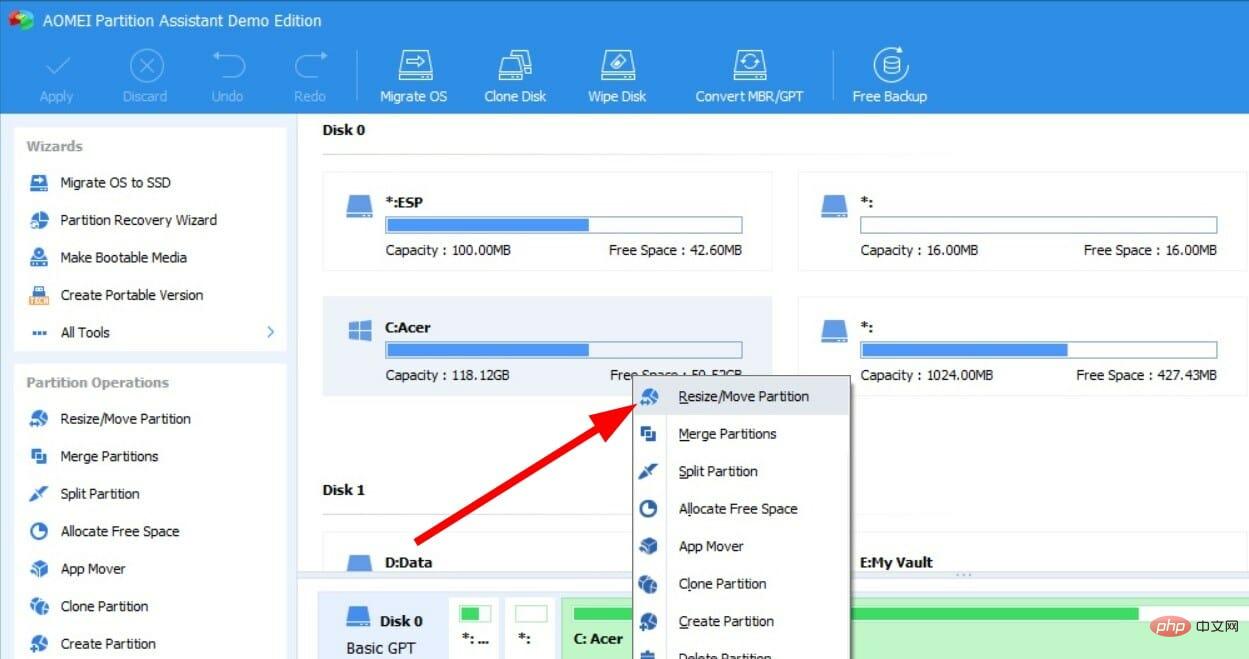
- Right-click on the C drive and select Resize/Move Partition.

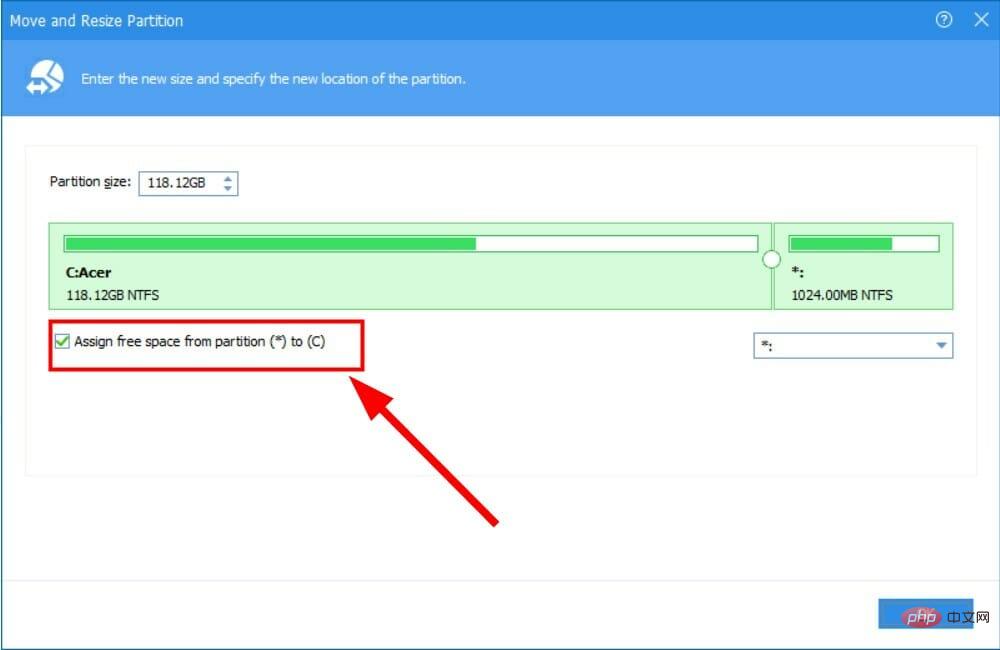
- Check the box next to Allocate free space from partition (*) to (C).

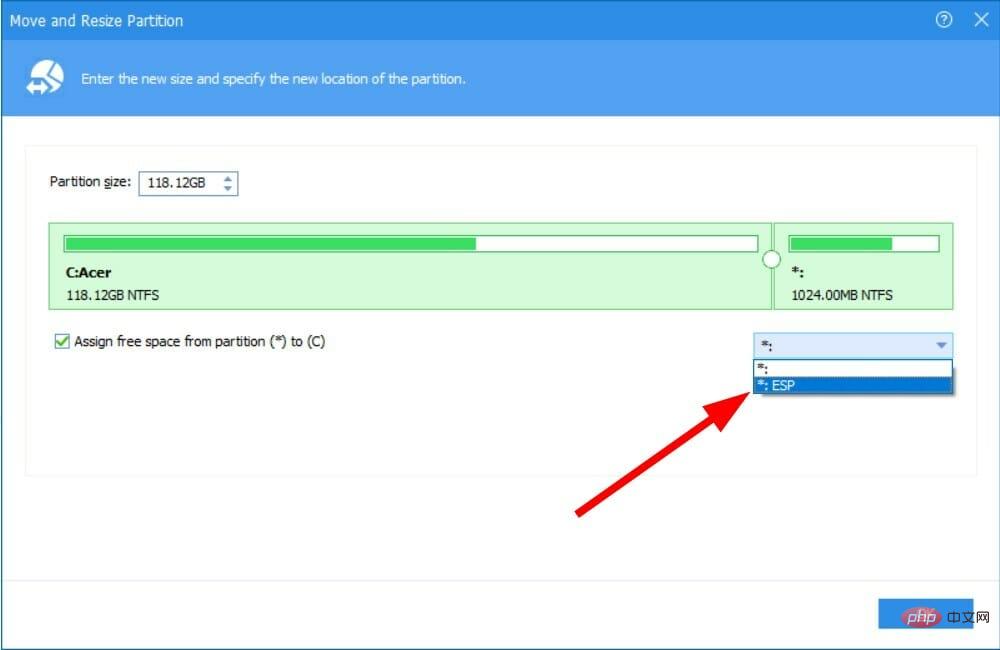
- Select the drive to which you wish to allocate free space from the drop-down menu.

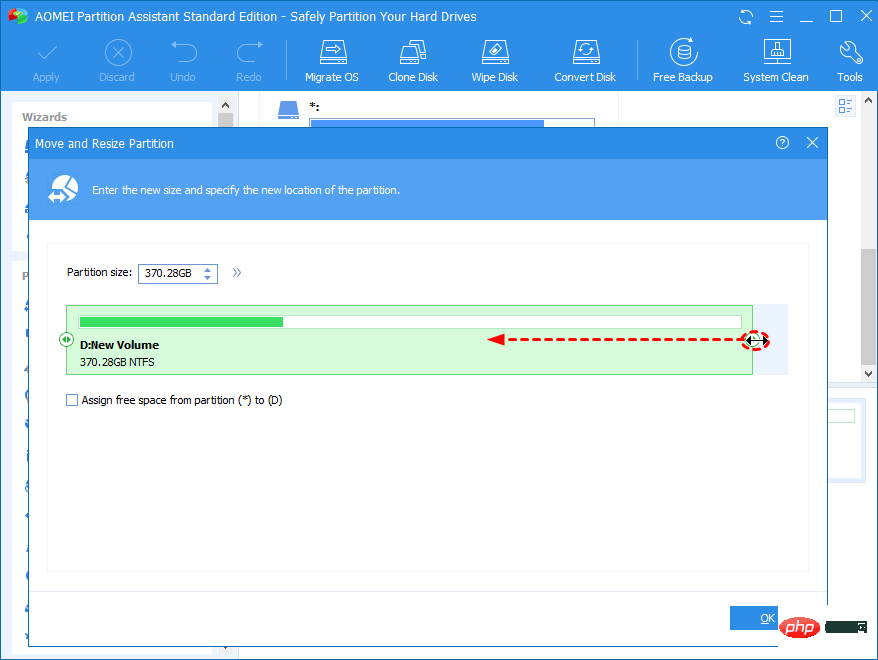
- Use the slider to adjust the amount of space to add to the C drive.

- Click OK.
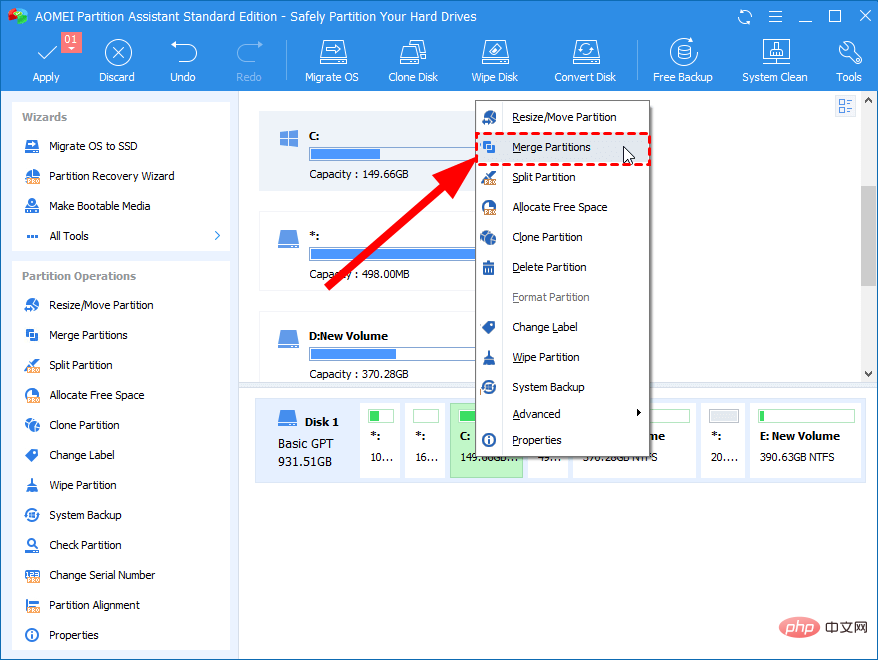
- Right-click on the C drive and select Merge partitions.

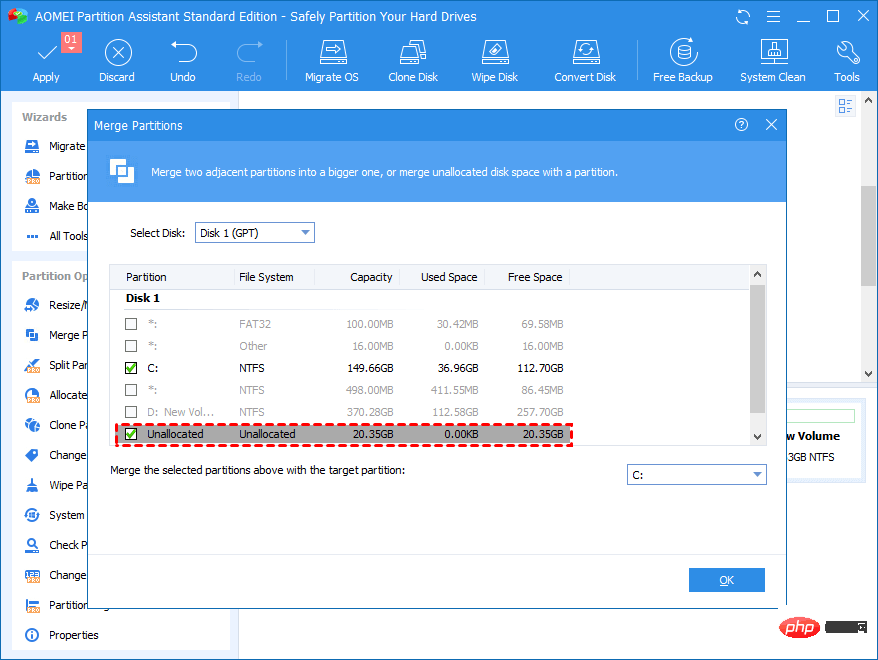
- Select the unallocated space and click OK.

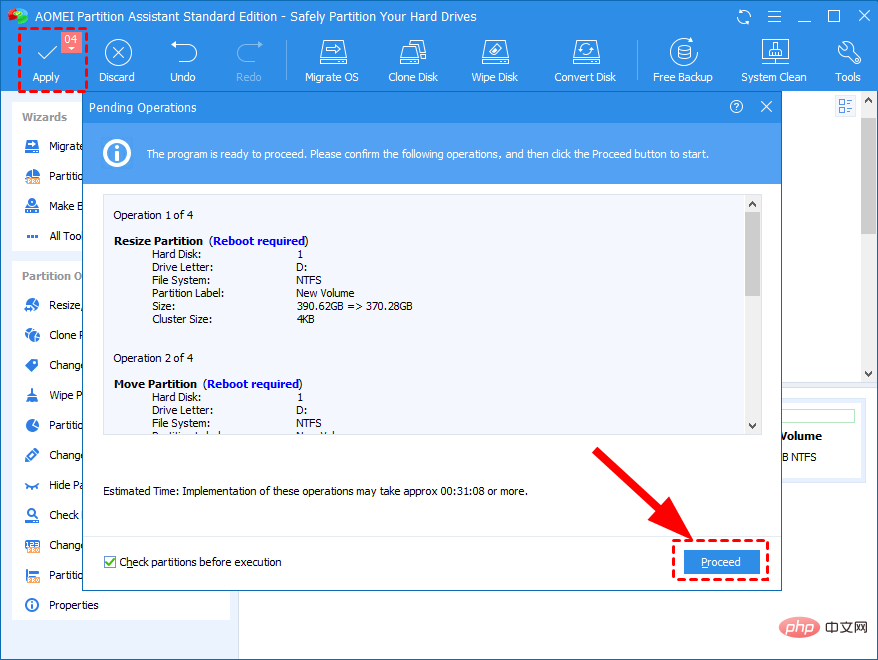
- Click Apply and submit the pending operation.

- The software will show you a preview of the output.
- To finish, press the Apply button.
AOMEI Partition Assistant is one of the most trustworthy and secure ways to manage certain tasks related to disk management.
With just a few clicks, you can perform various tasks such as expanding, shrinking and even merging partitions. All this happens without any data loss.
There are other additional features including partition formatting and partition deletion. Therefore, we recommend you to use this tool to resolve your issues on how to extend C drive in Windows 11.
3. Use the command prompt
- to open the Start menu.
- Search for Command Prompt and click Run as administrator.
- Type the following command and press Enter.
diskpart - Execute the following commands one by one.
list volumeselect volume 0- In the second command, you need to enter the disk drive letter you want to increment, not 0. For us, it's the C drive. So enter the number corresponding to the C drive mentioned in the list.
- Type the following command and press Enter.
extend[size=n]- Instead of n, you need to enter the amount of storage you want to extend. For example, enter 10 to add 10 GB.
What else can you do to fix C drive complete issue on Windows 11 PC?
The above process helps you extend C drive in Windows 11 PC. But what if even after extending the C drive, it still gets filled up?
This could be due to a virus, malware, or corrupted file. You can check out some other tips that you can follow to resolve the C drive full issue.
➡ Check for viruses and malware
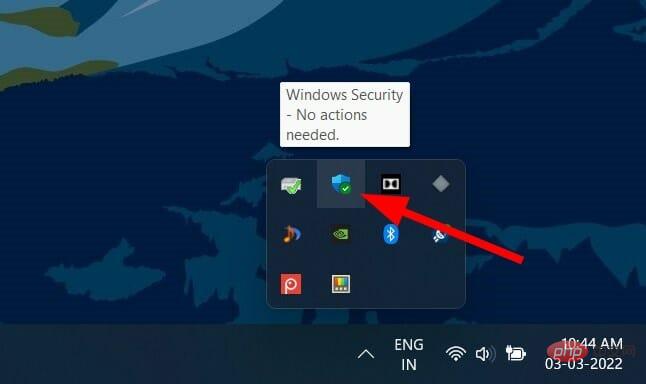
- Click the Up Arrow button on the taskbar in the lower right corner.

- Select Windows Security.

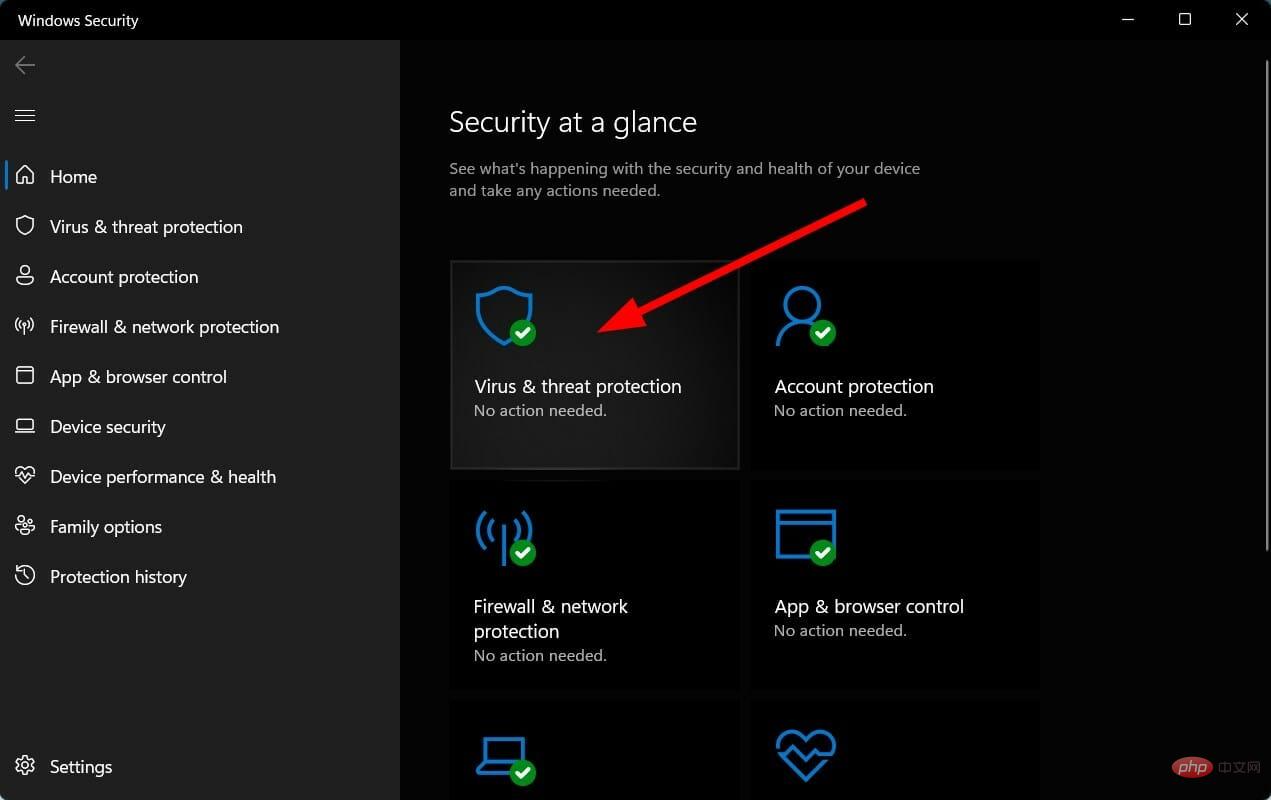
- Click on Virus and Threat Protection.

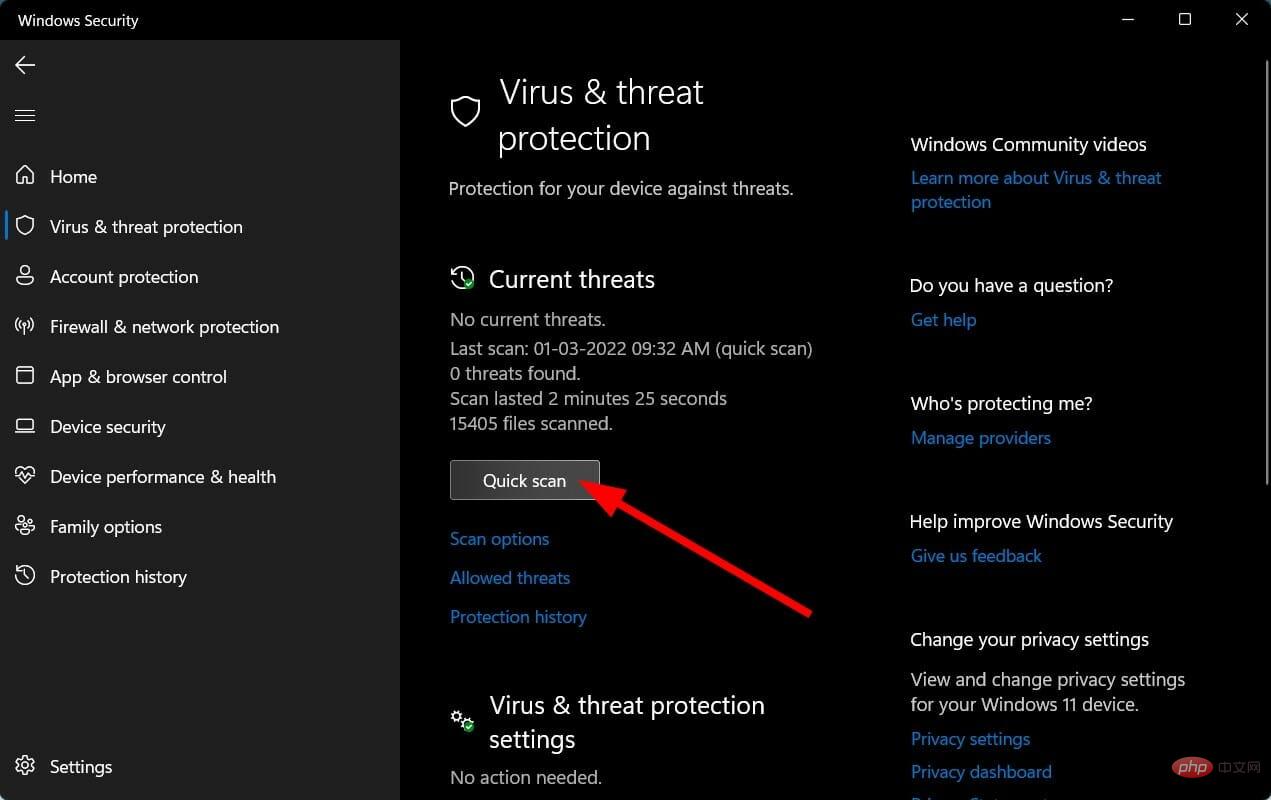
- Click the Quick Scan button to let Windows Security scan your PC for viruses and malware.

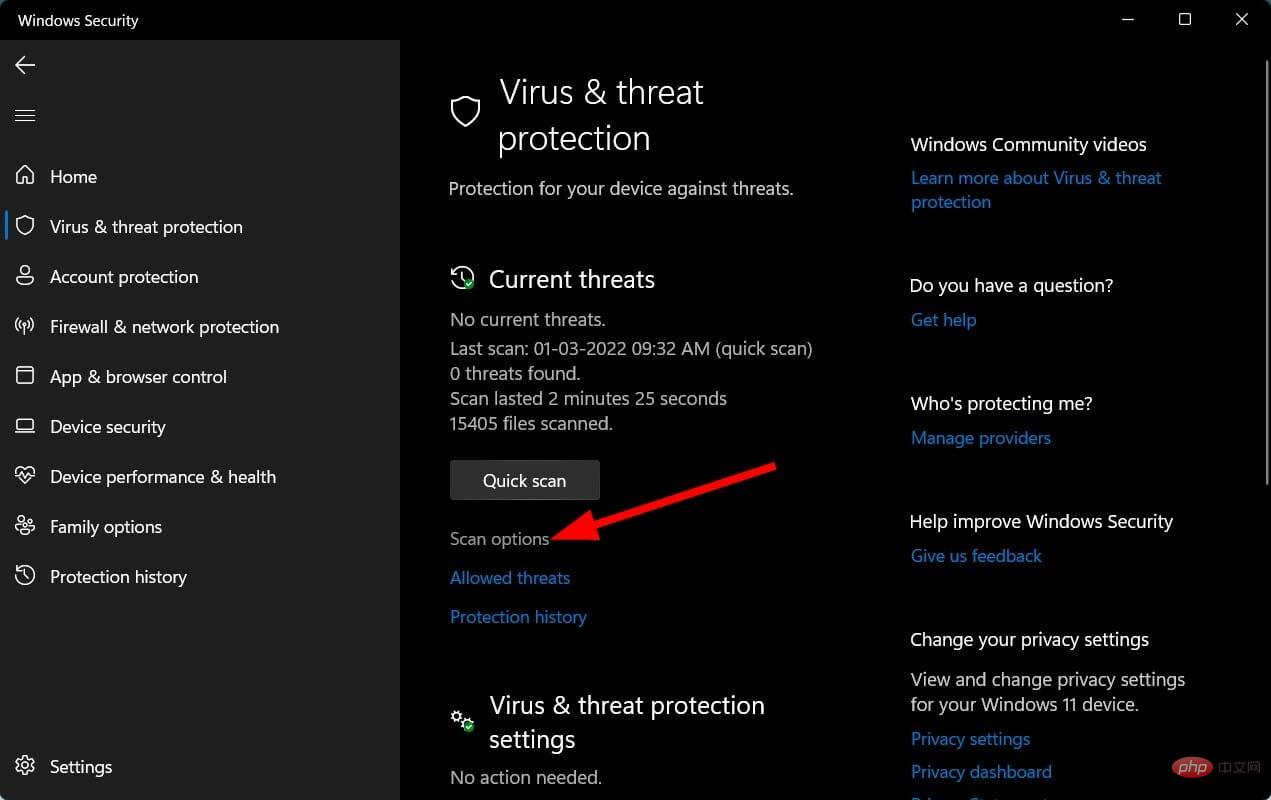
- You can also select the Scan Options button.

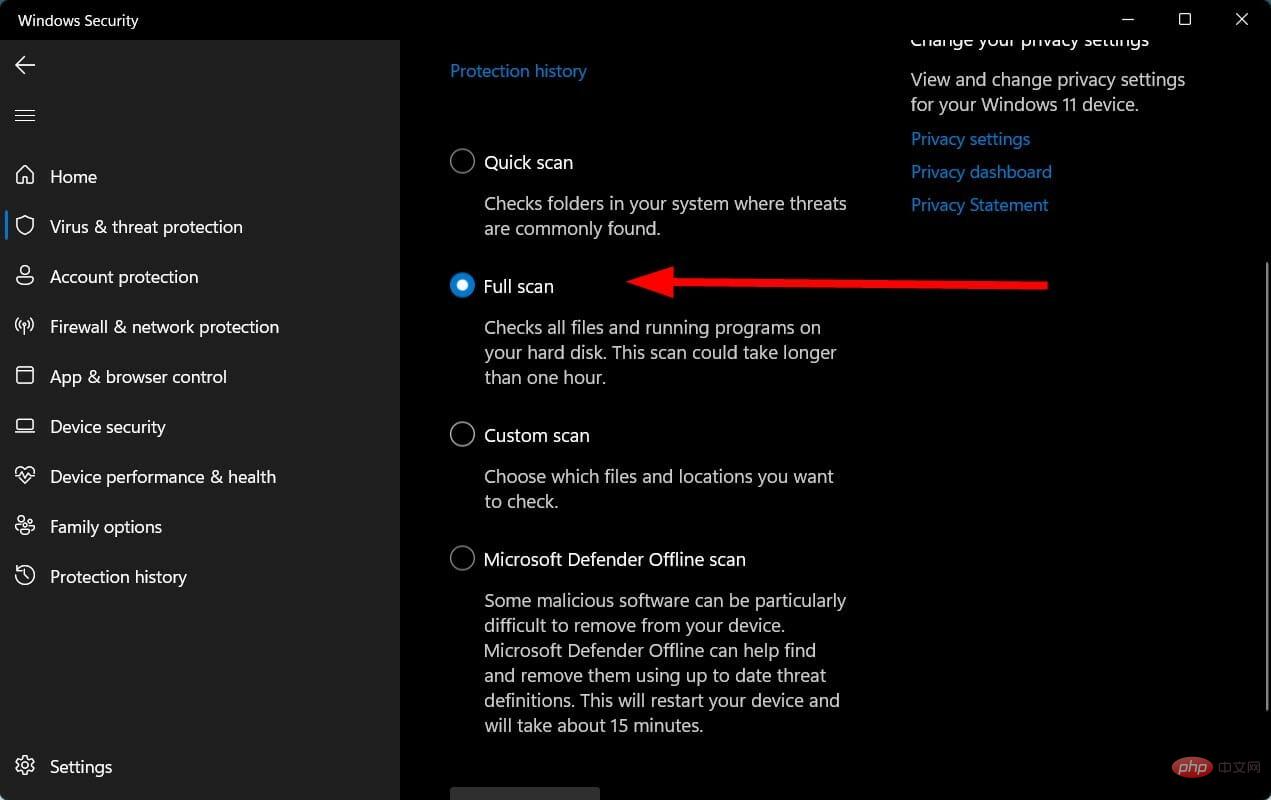
- Under Scan Options, select Full Scan to deeply scan your PC for viruses or malware.

We use Windows Security Defender to check our Windows 11 PC for viruses or malware since we do not have any third-party antivirus applications installed on our PC.
But the above steps will let you know that you need to perform a scan to check if there are any viruses or malware on your PC.
➡Run Disk Cleanup
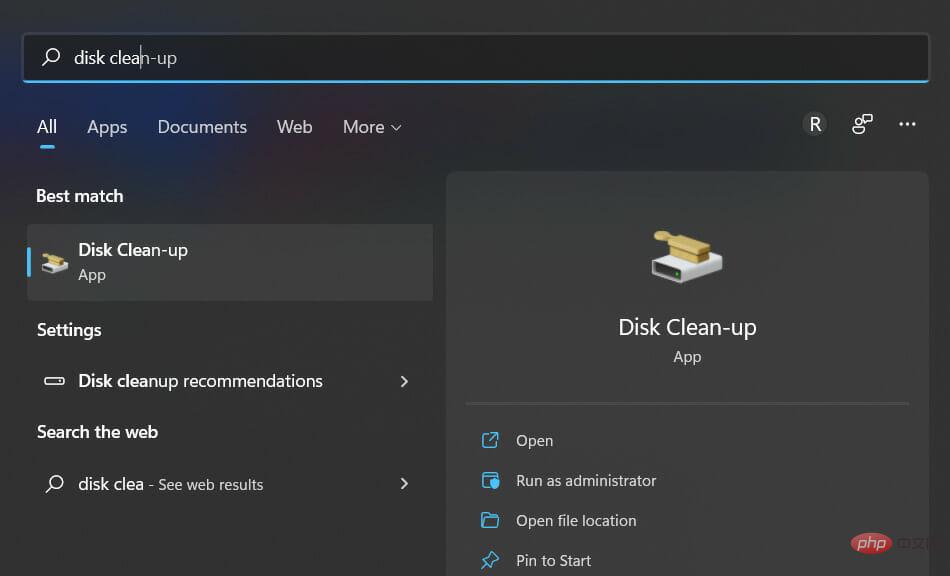
- Open the Start menu.
- Search Disk Cleanup and open it.

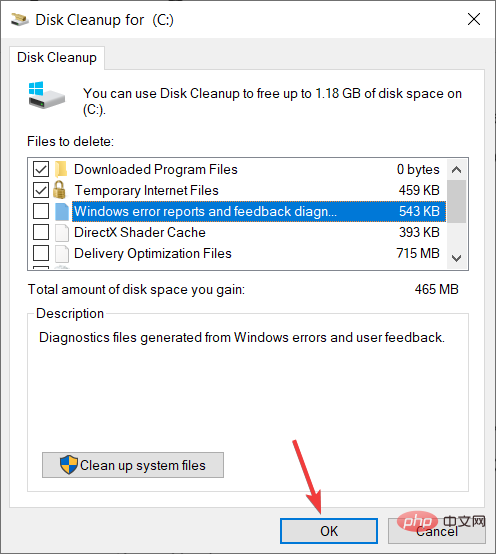
- SelectC drive from the drop-down menu.
-
Check all the boxes you want to delete.

- You will be asked to confirm.
- Click the OK button.
Disk Cleanup is a very handy Windows 11 built-in tool that allows you to easily clean out all the junk present in the C drive of your PC.
The above method is enough to solve your problem of how to extend C drive in Windows 11.
The above is the detailed content of How to install Nagios on CentOS 9 Stream. For more information, please follow other related articles on the PHP Chinese website!

Hot AI Tools

Undresser.AI Undress
AI-powered app for creating realistic nude photos

AI Clothes Remover
Online AI tool for removing clothes from photos.

Undress AI Tool
Undress images for free

Clothoff.io
AI clothes remover

Video Face Swap
Swap faces in any video effortlessly with our completely free AI face swap tool!

Hot Article

Hot Tools

Notepad++7.3.1
Easy-to-use and free code editor

SublimeText3 Chinese version
Chinese version, very easy to use

Zend Studio 13.0.1
Powerful PHP integrated development environment

Dreamweaver CS6
Visual web development tools

SublimeText3 Mac version
God-level code editing software (SublimeText3)

Hot Topics
 1664
1664
 14
14
 1423
1423
 52
52
 1317
1317
 25
25
 1268
1268
 29
29
 1245
1245
 24
24
 What are the backup methods for GitLab on CentOS
Apr 14, 2025 pm 05:33 PM
Backup and Recovery Policy of GitLab under CentOS System In order to ensure data security and recoverability, GitLab on CentOS provides a variety of backup methods. This article will introduce several common backup methods, configuration parameters and recovery processes in detail to help you establish a complete GitLab backup and recovery strategy. 1. Manual backup Use the gitlab-rakegitlab:backup:create command to execute manual backup. This command backs up key information such as GitLab repository, database, users, user groups, keys, and permissions. The default backup file is stored in the /var/opt/gitlab/backups directory. You can modify /etc/gitlab
 Centos shutdown command line
Apr 14, 2025 pm 09:12 PM
The CentOS shutdown command is shutdown, and the syntax is shutdown [Options] Time [Information]. Options include: -h Stop the system immediately; -P Turn off the power after shutdown; -r restart; -t Waiting time. Times can be specified as immediate (now), minutes ( minutes), or a specific time (hh:mm). Added information can be displayed in system messages.
 Difference between centos and ubuntu
Apr 14, 2025 pm 09:09 PM
The key differences between CentOS and Ubuntu are: origin (CentOS originates from Red Hat, for enterprises; Ubuntu originates from Debian, for individuals), package management (CentOS uses yum, focusing on stability; Ubuntu uses apt, for high update frequency), support cycle (CentOS provides 10 years of support, Ubuntu provides 5 years of LTS support), community support (CentOS focuses on stability, Ubuntu provides a wide range of tutorials and documents), uses (CentOS is biased towards servers, Ubuntu is suitable for servers and desktops), other differences include installation simplicity (CentOS is thin)
 How to optimize CentOS HDFS configuration
Apr 14, 2025 pm 07:15 PM
Improve HDFS performance on CentOS: A comprehensive optimization guide to optimize HDFS (Hadoop distributed file system) on CentOS requires comprehensive consideration of hardware, system configuration and network settings. This article provides a series of optimization strategies to help you improve HDFS performance. 1. Hardware upgrade and selection resource expansion: Increase the CPU, memory and storage capacity of the server as much as possible. High-performance hardware: adopts high-performance network cards and switches to improve network throughput. 2. System configuration fine-tuning kernel parameter adjustment: Modify /etc/sysctl.conf file to optimize kernel parameters such as TCP connection number, file handle number and memory management. For example, adjust TCP connection status and buffer size
 Centos configuration IP address
Apr 14, 2025 pm 09:06 PM
Steps to configure IP address in CentOS: View the current network configuration: ip addr Edit the network configuration file: sudo vi /etc/sysconfig/network-scripts/ifcfg-eth0 Change IP address: Edit IPADDR= Line changes the subnet mask and gateway (optional): Edit NETMASK= and GATEWAY= Lines Restart the network service: sudo systemctl restart network verification IP address: ip addr
 What are the common misunderstandings in CentOS HDFS configuration?
Apr 14, 2025 pm 07:12 PM
Common problems and solutions for Hadoop Distributed File System (HDFS) configuration under CentOS When building a HadoopHDFS cluster on CentOS, some common misconfigurations may lead to performance degradation, data loss and even the cluster cannot start. This article summarizes these common problems and their solutions to help you avoid these pitfalls and ensure the stability and efficient operation of your HDFS cluster. Rack-aware configuration error: Problem: Rack-aware information is not configured correctly, resulting in uneven distribution of data block replicas and increasing network load. Solution: Double check the rack-aware configuration in the hdfs-site.xml file and use hdfsdfsadmin-printTopo
 What steps are required to configure CentOS in HDFS
Apr 14, 2025 pm 06:42 PM
Building a Hadoop Distributed File System (HDFS) on a CentOS system requires multiple steps. This article provides a brief configuration guide. 1. Prepare to install JDK in the early stage: Install JavaDevelopmentKit (JDK) on all nodes, and the version must be compatible with Hadoop. The installation package can be downloaded from the Oracle official website. Environment variable configuration: Edit /etc/profile file, set Java and Hadoop environment variables, so that the system can find the installation path of JDK and Hadoop. 2. Security configuration: SSH password-free login to generate SSH key: Use the ssh-keygen command on each node
 How to install mysql in centos7
Apr 14, 2025 pm 08:30 PM
The key to installing MySQL elegantly is to add the official MySQL repository. The specific steps are as follows: Download the MySQL official GPG key to prevent phishing attacks. Add MySQL repository file: rpm -Uvh https://dev.mysql.com/get/mysql80-community-release-el7-3.noarch.rpm Update yum repository cache: yum update installation MySQL: yum install mysql-server startup MySQL service: systemctl start mysqld set up booting


