

How Vue3+Vite uses dual tokens to achieve senseless refresh

1. Token login authentication
jwt: JSON Web Token. It is an authentication protocol that is generally used to verify the requested identity information and identity permissions. It consists of three parts: Header, Hayload, Signature
header: that is, the header information, which is the basic information describing this token. json format
{
  "alg": "HS256", // 表示签名的算法,默认是 HMAC SHA256(写成 HS256)
  "type": "JWT" // 表示Token的类型,JWT 令牌统一写为JWT
}payload: payload, which is also a JSON object. Used to store the actual data that needs to be transferred. It is not recommended to store sensitive information such as passwords.
{
  "iss": "a.com", // 签发人
  "exp": "1d", // expiration time 过期时间
  "sub": "test", // 主题
  "aud": "", // 受众
  "nbf": "", // Not Before 生效时间
  "iat": "", // Issued At 签发时间
  "jti": "", // JWT ID 编号
  // 可以定义私有字段
  "name": "",
  "admin": ""
}Signature is a signature of the first two parts to prevent data from being tampered with. A key needs to be specified. This key is known only to the server and cannot be leaked. Use the signature algorithm specified in the Header to generate a signature according to the formula.
After calculating the signature, combine the three parts of Header, Payload, and Signature into a string, and separate each part with . This generates a token
2. What is a double token
accessToken: User access to datarefreshToken: Used to obtain a new accessToken
Double token verification mechanism, where accessToken has a shorter expiration time and refreshToken has a longer expiration time. When the accessToken expires, use refreshToken to request a new token.
Double token verification process
The user logs in and sends the account password to the server. If the login fails, return to the client to log in again. After successful login, the server generates accessToken and refreshToken, and returns the generated token to the client.
In the request interceptor, the request header carries the accessToken request data, and the server verifies whether the accessToken has expired. If the token is valid, continue to request data. If the token is invalid, invalidation information will be returned to the client.
The client receives the request information sent by the server, and determines whether there is accessToken invalidation information in the twice-encapsulated axios response interceptor, but no response data is returned. If there is invalid information, bring refreshToken to request a new accessToken.
The server verifies whether the refreshToken is valid. If valid, the token will be regenerated and the new token and prompt information will be returned to the client. If invalid, invalid information will be returned to the client.
The client response interceptor determines whether the response information has a refreshToken that is valid or invalid. Invalid, log out of current login. Valid, re-store the new token and continue to request the data of the last request.
Notes
The short token is invalid. The server rejects the request and returns the token invalidation information. How can the front end request a new short token again? data to achieve the effect of non-sensitive refresh.
Server side whitelist, the token has not been requested before successful login, so if the server intercepts the request, you will not be able to log in. Customize the whitelist so that login does not require token verification.
3. Server code
1. Build koa2 server
Install koa scaffolding globally
npm install koa-generator -g
Create the server directly koa2 Project name
koa2 server
cd server Enter the project to install jwt
npm i jsonwebtoken
In order to facilitate the use of koa-cors directly on the server side cross-domain
npm i koa-cors
Introduce application cors in app.js
const cors=require('koa-cors')
...
app.use(cors())
2. Double token
New utils/token.js
const jwt=require('jsonwebtoken')

const secret='2023F_Ycb/wp_sd'  // 密钥
/*
expiresIn:5 过期时间,时间单位是秒
也可以这么写 expiresIn:1d 代表一天
1h 代表一小时
*/
// 本次是为了测试,所以设置时间 短token5秒 长token15秒
const accessTokenTime=5
const refreshTokenTime=15

// 生成accessToken
const setAccessToken=(payload={})=>{  // payload 携带用户信息
    return jwt.sign(payload,secret,{expireIn:accessTokenTime})
}
//生成refreshToken
const setRefreshToken=(payload={})=>{
    return jwt.sign(payload,secret,{expireIn:refreshTokenTime})
}

module.exports={
    secret,
    setAccessToken,
    setRefreshToken
}3. Routing
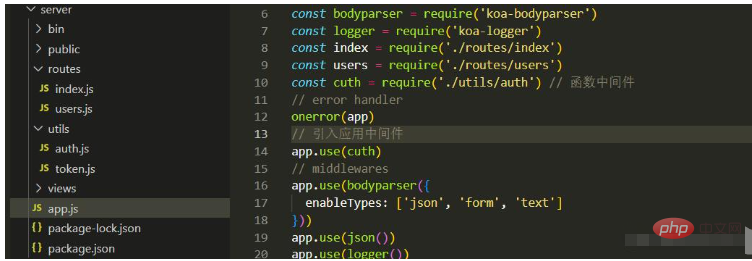
The project created directly using scaffolding is already in app.js Use routing middleware to create an interface in router/index.js
const router = require('koa-router')()
const jwt = require('jsonwebtoken')
const { getAccesstoken, getRefreshtoken, secret }=require('../utils/token')

/*登录接口*/
router.get('/login',()=>{
    let code,msg,data=null
    code=2000
    msg='登录成功,获取到token'
    data={
        accessToken:getAccessToken(),
        refreshToken:getReferToken()
    }
    ctx.body={
        code,
        msg,
        data
    }
})

/*用于测试的获取数据接口*/
router.get('/getTestData',(ctx)=>{
    let code,msg,data=null
    code=2000
    msg='获取数据成功'
    ctx.body={
        code,
        msg,
        data
    }
})

/*验证长token是否有效,刷新短token
  这里要注意,在刷新短token的时候回也返回新的长token,延续长token,
  这样活跃用户在持续操作过程中不会被迫退出登录。长时间无操作的非活
  跃用户长token过期重新登录
*/
router.get('/refresh',(ctx)=>{
    let code,msg,data=null
    //获取请求头中携带的长token
    let r_tk=ctx.request.headers['pass']
    //解析token 参数 token 密钥 回调函数返回信息
    jwt.verify(r_tk,secret,(error)=>{
        if(error){
            code=4006,
            msg='长token无效,请重新登录'
        } else{
            code=2000,
            msg='长token有效,返回新的token',
            data={
                accessToken:getAccessToken(),
                refreshToken:getReferToken()
            }
        }
    })
})4. Application middleware
utils/auth.js
const { secret } = require('./token')
const jwt = require('jsonwebtoken')

/*白名单,登录、刷新短token不受限制,也就不用token验证*/
const whiteList=['/login','/refresh']
const isWhiteList=(url,whiteList)=>{
        return whiteList.find(item => item === url) ? true : false
}

/*中间件
 验证短token是否有效
*/
const cuth = async (ctx,next)=>{
    let code, msg, data = null
    let url = ctx.path
    if(isWhiteList(url,whiteList)){
        // 执行下一步
        return await next()
    } else {
        // 获取请求头携带的短token
        const a_tk=ctx.request.headers['authorization']
        if(!a_tk){
            code=4003
            msg='accessToken无效,无权限'
            ctx.body={
                code,
                msg,
                data
            }
        } else{
            // 解析token
            await jwt.verify(a_tk,secret.(error)=>{
                if(error)=>{
                      code=4003
                      msg='accessToken无效,无权限'
                      ctx.body={
                          code,
                          msg,
                          datta
                      }
                } else {
                    // token有效
                    return await next()
                }
            })
        }
    }
}
module.exports=authIntroduce the application in app.js Middleware
const auth=requier(./utils/auth)
···
app.use(auth)
In fact, if you just do a simple double-token verification, many middlewares are not necessary, such as parsing static resources. However, in order to save time and convenience, I directly used koa2 scaffolding.
Final directory structure:
4. Front-end code
1. Vue3 Vite framework
The front-end uses Vue3 Vite’s framework depends on personal usage habits.
npm init vite@latest client_side
Install axios
npm i axios
2. Define the constants used
config/constants.js
export const ACCESS_TOKEN = 'a_tk' // 短token字段
export const REFRESH_TOKEN = 'r_tk' // 短token字段
export const AUTH = 'Authorization'  // header头部 携带短token
export const PASS = 'pass' // header头部 携带长token
3. Store and call expired requests
Key point: Use Promise to store requests carrying expired tokens in the array and keep them in the pending state, that is, do not call resolve(). When a new token is obtained, request again. utils/refresh.js
export {REFRESH_TOKEN,PASS} from '../config/constants.js'
import { getRefreshToken, removeRefreshToken, setAccessToken, setRefreshToken} from '../config/storage'

let subsequent=[]
let flag=false // 设置开关,保证一次只能请求一次短token,防止客户多此操作,多次请求

/*把过期请求添加在数组中*/
export const addRequest = (request) => {
    subscribes.push(request)
}

/*调用过期请求*/
export const retryRequest = () => {
    console.log('重新请求上次中断的数据');
    subscribes.forEach(request => request())
    subscribes = []
}

/*短token过期,携带token去重新请求token*/
export const refreshToken=()=>{
    if(!flag){
        flag = true;
        let r_tk = getRefershToken() // 获取长token
        if(r_tk){
            server.get('/refresh',Object.assign({},{
                headers:{[PASS]=r_tk}
            })).then((res)=>{
                //长token失效,退出登录
                if(res.code===4006){
                    flag = false
                    removeRefershToken(REFRESH_TOKEN)
                } else if(res.code===2000){
                    // 存储新的token
                    setAccessToken(res.data.accessToken)
                    setRefreshToken(res.data.refreshToken)
                    flag = false
                    // 重新请求数据
                    retryRequest()
                }
            })
        }
    }
}4. Encapsulation axios
utlis/server.js
import axios from "axios";
import * as storage from "../config/storage"
import * as constants from '../config/constants'
import { addRequest, refreshToken } from "./refresh";

const server = axios.create({
    baseURL: 'http://localhost:3004', // 你的服务器
    timeout: 1000 * 10,
    headers: {
        "Content-type": "application/json"
    }
})

/*请求拦截器*/
server.interceptors.request.use(config => {
    // 获取短token,携带到请求头,服务端校验
    let aToken = storage.getAccessToken(constants.ACCESS_TOKEN)
    config.headers[constants.AUTH] = aToken
    return config
})

/*响应拦截器*/
server.interceptors.response.use(
    async response => {
        // 获取到配置和后端响应的数据
        let { config, data } = response
        console.log('响应提示信息:', data.msg);
        return new Promise((resolve, reject) => {
            // 短token失效
            if (data.code === 4003) {
                // 移除失效的短token
                storage.removeAccessToken(constants.ACCESS_TOKEN)
                // 把过期请求存储起来,用于请求到新的短token,再次请求,达到无感刷新
                addRequest(() => resolve(server(config)))
                // 携带长token去请求新的token
                refreshToken()
            } else {
                // 有效返回相应的数据
                resolve(data)
            }

        })

    },
    error => {
        return Promise.reject(error)
    }
)5. Reuse encapsulation
import * as constants from "./constants"

// 存储短token
export const setAccessToken = (token) => localStorage.setItem(constanst.ACCESS_TOKEN, token)
// 存储长token
export const setRefershToken = (token) => localStorage.setItem(constants.REFRESH_TOKEN, token)
// 获取短token
export const getAccessToken = () => localStorage.getItem(constants.ACCESS_TOKEN)
// 获取长token
export const getRefershToken = () => localStorage.getItem(constants.REFRESH_TOKEN)
// 删除短token
export const removeAccessToken = () => localStorage.removeItem(constants.ACCESS_TOKEN)
// 删除长token
export const removeRefershToken = () => localStorage.removeItem(constants.REFRESH_TOKEN)
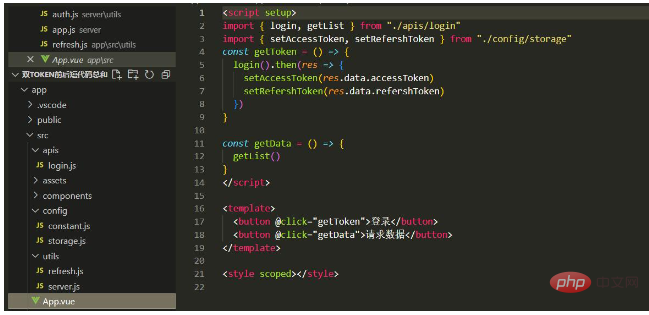
6. Interface encapsulation
apis/index.js
import server from "../utils/server";
/*登录*/
export const login = () => {
    return server({
        url: '/login',
        method: 'get'
    })
}
/*请求数据*/
export const getData = () => {
    return server({
        url: '/getList',
        method: 'get'
    })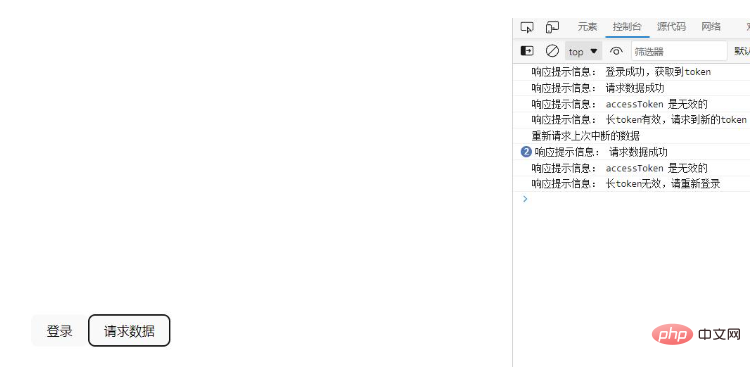
}Project running
Finally, run the project and check the short token5 set by the backend. seconds, the length of the token is 10 seconds. After the login request reaches the token, the request data can be requested normally. If the request is made again after five seconds, the short token will become invalid. At this time, the long token will be valid. When a new token is requested, the refresh interface is only called once. After the long token expires, you need to log in again.
The above is the detailed content of How Vue3+Vite uses dual tokens to achieve senseless refresh. For more information, please follow other related articles on the PHP Chinese website!

Hot AI Tools

Undresser.AI Undress
AI-powered app for creating realistic nude photos

AI Clothes Remover
Online AI tool for removing clothes from photos.

Undress AI Tool
Undress images for free

Clothoff.io
AI clothes remover

Video Face Swap
Swap faces in any video effortlessly with our completely free AI face swap tool!

Hot Article
Hot Tools

Notepad++7.3.1
Easy-to-use and free code editor

SublimeText3 Chinese version
Chinese version, very easy to use

Zend Studio 13.0.1
Powerful PHP integrated development environment

Dreamweaver CS6
Visual web development tools

SublimeText3 Mac version
God-level code editing software (SublimeText3)
Hot Topics


 Vue3+TS+Vite development skills: how to optimize SEO
Sep 10, 2023 pm 07:33 PM
Vue3+TS+Vite development skills: how to optimize SEO
Sep 10, 2023 pm 07:33 PM
Vue3+TS+Vite development skills: How to perform SEO optimization SEO (SearchEngineOptimization) refers to optimizing the structure, content and keywords of the website to rank it higher in search engines, thereby increasing the website's traffic and exposure. . In the development of modern front-end technologies such as Vue3+TS+Vite, how to optimize SEO is a very important issue. This article will introduce some Vue3+TS+Vite development techniques and methods to help
 vue3+vite: How to solve the error when using require to dynamically import images in src
May 21, 2023 pm 03:16 PM
vue3+vite: How to solve the error when using require to dynamically import images in src
May 21, 2023 pm 03:16 PM
vue3+vite:src uses require to dynamically import images and error reports and solutions. vue3+vite dynamically imports multiple images. If vue3 is using typescript development, require will introduce image errors. requireisnotdefined cannot be used like vue2 such as imgUrl:require(' .../assets/test.png') is imported because typescript does not support require, so import is used. Here is how to solve it: use awaitimport
 How to refresh partial content of the page in Vue3
May 26, 2023 pm 05:31 PM
How to refresh partial content of the page in Vue3
May 26, 2023 pm 05:31 PM
To achieve partial refresh of the page, we only need to implement the re-rendering of the local component (dom). In Vue, the easiest way to achieve this effect is to use the v-if directive. In Vue2, in addition to using the v-if instruction to re-render the local dom, we can also create a new blank component. When we need to refresh the local page, jump to this blank component page, and then jump back in the beforeRouteEnter guard in the blank component. original page. As shown in the figure below, how to click the refresh button in Vue3.X to reload the DOM within the red box and display the corresponding loading status. Since the guard in the component in the scriptsetup syntax in Vue3.X only has o
 Vue3+TS+Vite development skills: how to carry out front-end security protection
Sep 09, 2023 pm 04:19 PM
Vue3+TS+Vite development skills: how to carry out front-end security protection
Sep 09, 2023 pm 04:19 PM
Vue3+TS+Vite development skills: How to carry out front-end security protection. With the continuous development of front-end technology, more and more companies and individuals are beginning to use Vue3+TS+Vite for front-end development. However, the security risks that come with it have also attracted people's attention. In this article, we will discuss some common front-end security issues and share some tips on how to protect front-end security during the development process of Vue3+TS+Vite. Input validation User input is often one of the main sources of front-end security vulnerabilities. exist
 What to do if the login token is invalid
Sep 14, 2023 am 11:33 AM
What to do if the login token is invalid
Sep 14, 2023 am 11:33 AM
Solutions to invalid login token include checking whether the Token has expired, checking whether the Token is correct, checking whether the Token has been tampered with, checking whether the Token matches the user, clearing the cache or cookies, checking the network connection and server status, logging in again or requesting a new Token. Contact technical support or developers, etc. Detailed introduction: 1. Check whether the Token has expired. The login Token usually has a validity period set. Once the validity period exceeds, it will be considered invalid, etc.
 Vue3+TS+Vite development skills: how to optimize cross-domain requests and network requests
Sep 09, 2023 pm 04:40 PM
Vue3+TS+Vite development skills: how to optimize cross-domain requests and network requests
Sep 09, 2023 pm 04:40 PM
Vue3+TS+Vite development skills: How to optimize cross-domain requests and network requests Introduction: In front-end development, network requests are a very common operation. How to optimize network requests to improve page loading speed and user experience is one of the issues that our developers need to think about. At the same time, for some scenarios that require sending requests to different domain names, we need to solve cross-domain issues. This article will introduce how to make cross-domain requests and optimization techniques for network requests in the Vue3+TS+Vite development environment. 1. Cross-domain request solution
 How to solve the problem of invalid login token
Sep 14, 2023 am 10:57 AM
How to solve the problem of invalid login token
Sep 14, 2023 am 10:57 AM
The problem of invalid login token can be solved by checking the network connection, checking the token validity period, clearing cache and cookies, checking login status, contacting the application developer and strengthening account security. Detailed introduction: 1. Check the network connection, reconnect to the network or change the network environment; 2. Check the token validity period, obtain a new token, or contact the developer of the application; 3. Clear cache and cookies, clear browser cache and Cookie, and then log in to the application again; 4. Check the login status.
 Vue3+TS+Vite development skills: how to encrypt and store data
Sep 10, 2023 pm 04:51 PM
Vue3+TS+Vite development skills: how to encrypt and store data
Sep 10, 2023 pm 04:51 PM
Vue3+TS+Vite development tips: How to encrypt and store data. With the rapid development of Internet technology, data security and privacy protection are becoming more and more important. In the Vue3+TS+Vite development environment, how to encrypt and store data is a problem that every developer needs to face. This article will introduce some common data encryption and storage techniques to help developers improve application security and user experience. 1. Data Encryption Front-end Data Encryption Front-end encryption is an important part of protecting data security. Commonly used
