

How to use Python for xpath, JsonPath, and bs4?

1.xpath
1.1 Use xpath
Google installs the xpath plug-in in advance, press ctrl shift x and a small black box will appear
-
Install lxml library
pip install lxml ‐i https://pypi.douban.com/simple Import lxml.etree
from lxml import etreeetree.parse() parses local files
html_tree = etree.parse('XX.html')etree.HTML() Server response file
html_tree = etree.HTML(response.read().decode('utf‐8').html_tree.xpath(xpath path)
- Find all descendant nodes , regardless of hierarchical relationship
- Find direct child nodes
//div[@id]
//div[@id="maincontent"]
//@class
//div[contains(@id, "he")]
//div[starts‐with(@id, "he")]
//div/h2/text()
//div[@id="head" and @class="s_down"]
//title | //price
xpath .html
<!DOCTYPE html>
<html lang="en">
<head>
    <meta charset="UTF-8"/>
    <title>Title</title>
</head>
<body>
    <ul>
        <li id="l1" class="class1">北京</li>
        <li id="l2" class="class2">上海</li>
        <li id="d1">广州</li>
        <li>深圳</li>
    </ul>
</body>
</html>from lxml import etree # xpath解析 # 本地文件: etree.parse # 服务器相应的数据 response.read().decode('utf-8') etree.HTML() tree = etree.parse('xpath.html') # 查找url下边的li li_list = tree.xpath('//body/ul/li') print(len(li_list)) # 4 # 获取标签中的内容 li_list = tree.xpath('//body/ul/li/text()') print(li_list) # ['北京', '上海', '广州', '深圳'] # 获取带id属性的li li_list = tree.xpath('//ul/li[@id]') print(len(li_list)) # 3 # 获取id为l1的标签内容 li_list = tree.xpath('//ul/li[@id="l1"]/text()') print(li_list) # ['北京'] # 获取id为l1的class属性值 c1 = tree.xpath('//ul/li[@id="l1"]/@class') print(c1) # ['class1'] # 获取id中包含l的标签 li_list = tree.xpath('//ul/li[contains(@id, "l")]/text()') print(li_list) # ['北京', '上海'] # 获取id以d开头的标签 li_list = tree.xpath('//ul/li[starts-with(@id,"d")]/text()') print(li_list) # ['广州'] # 获取id为l2并且class为class2的标签 li_list = tree.xpath('//ul/li[@id="l2" and @class="class2"]/text()') print(li_list) # ['上海'] # 获取id为l2或id为d1的标签 li_list = tree.xpath('//ul/li[@id="l2"]/text() | //ul/li[@id="d1"]/text()') print(li_list) # ['上海', '广州']
Crawling the value of Baidu search buttonimport urllib.request
from lxml import etree
url = 'http://www.baidu.com'
headers = {
'User-Agent': 'Mozilla/5.0 (Windows NT 10.0; Win64; x64) AppleWebKit/537.36 (KHTML, like Gecko) Chrome/103.0.0.0 Safari/537.36'
}
request = urllib.request.Request(url=url, headers=headers)
response = urllib.request.urlopen(request)
content = response.read().decode('utf-8')
tree = etree.HTML(content)
value = tree.xpath('//input[@id="su"]/@value')
print(value)Copy after login
import urllib.request
from lxml import etree
url = 'http://www.baidu.com'
headers = {
    'User-Agent': 'Mozilla/5.0 (Windows NT 10.0; Win64; x64) AppleWebKit/537.36 (KHTML, like Gecko) Chrome/103.0.0.0 Safari/537.36'
}
request = urllib.request.Request(url=url, headers=headers)
response = urllib.request.urlopen(request)
content = response.read().decode('utf-8')
tree = etree.HTML(content)
value = tree.xpath('//input[@id="su"]/@value')
print(value)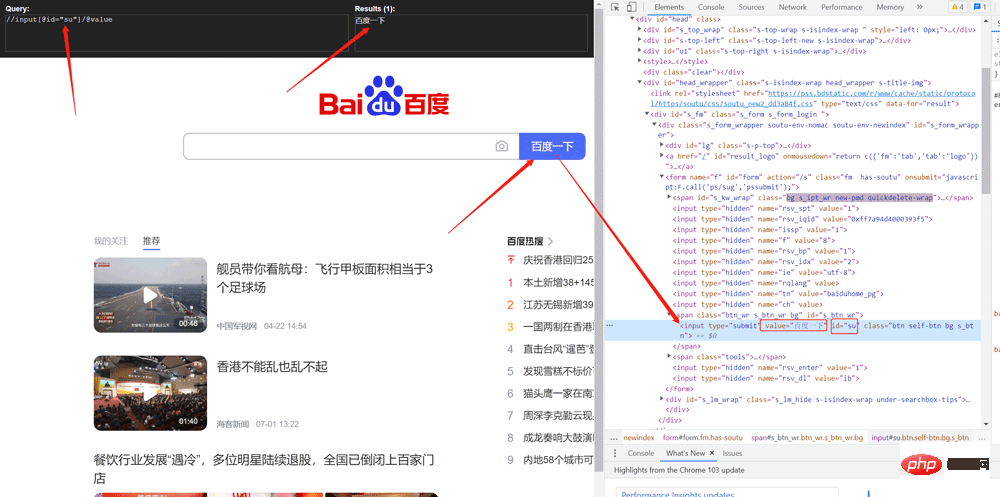
# 需求 下载的前十页的图片
# https://sc.chinaz.com/tupian/qinglvtupian.html   1
# https://sc.chinaz.com/tupian/qinglvtupian_page.html
import urllib.request
from lxml import etree
def create_request(page):
    if (page == 1):
        url = 'https://sc.chinaz.com/tupian/qinglvtupian.html'
    else:
        url = 'https://sc.chinaz.com/tupian/qinglvtupian_' + str(page) + '.html'
    headers = {
        'User-Agent': 'Mozilla/5.0 (Windows NT 10.0; Win64; x64) AppleWebKit/537.36 (KHTML, like Gecko) Chrome/92.0.4515.159 Safari/537.36',
    }
    request = urllib.request.Request(url=url, headers=headers)
    return request
def get_content(request):
    response = urllib.request.urlopen(request)
    content = response.read().decode('utf-8')
    return content
def down_load(content):
    #     下载图片
    # urllib.request.urlretrieve('图片地址','文件的名字')
    tree = etree.HTML(content)
    name_list = tree.xpath('//div[@id="container"]//a/img/@alt')
    # 一般设计图片的网站都会进行懒加载
    src_list = tree.xpath('//div[@id="container"]//a/img/@src2')
    print(src_list)
    for i in range(len(name_list)):
        name = name_list[i]
        src = src_list[i]
        url = 'https:' + src
        urllib.request.urlretrieve(url=url, filename='./loveImg/' + name + '.jpg')
if __name__ == '__main__':
    start_page = int(input('请输入起始页码'))
    end_page = int(input('请输入结束页码'))

    for page in range(start_page, end_page + 1):
        # (1) 请求对象的定制
        request = create_request(page)
        # (2)获取网页的源码
        content = get_content(request)
        # (3)下载
down_load(content)pip install jsonpath
Copy after login
2.2 Use of jsonpathpip install jsonpath
obj = json.load(open('json文件', 'r', encoding='utf‐8'))
ret = jsonpath.jsonpath(obj, 'jsonpath语法')
Copy after login
obj = json.load(open('json文件', 'r', encoding='utf‐8')) ret = jsonpath.jsonpath(obj, 'jsonpath语法')
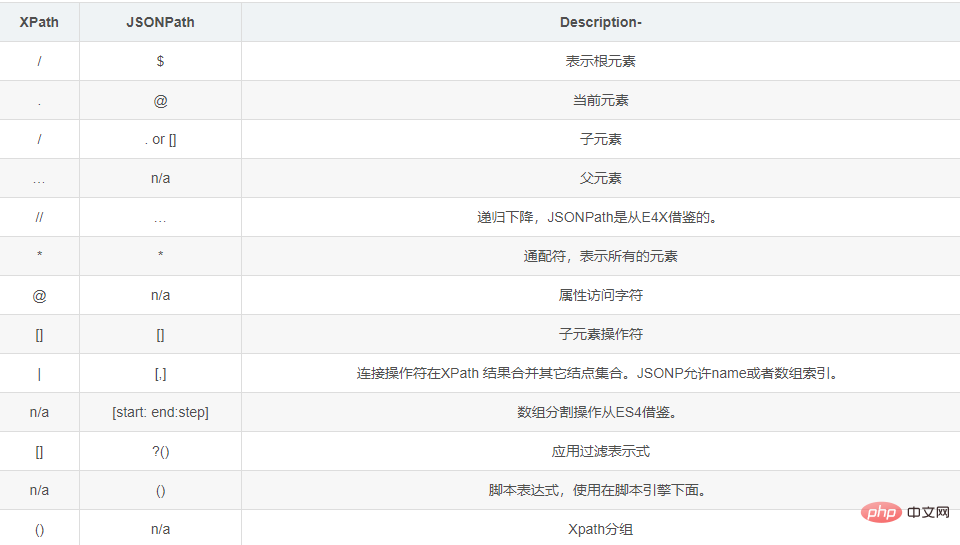
Comparison of JSONPath syntax elements and corresponding XPath elements:
Example:
jsonpath.json
{ "store": {
    "book": [
      { "category": "修真",
        "author": "六道",
        "title": "坏蛋是怎样练成的",
        "price": 8.95
      },
      { "category": "修真",
        "author": "天蚕土豆",
        "title": "斗破苍穹",
        "price": 12.99
      },
      { "category": "修真",
        "author": "唐家三少",
        "title": "斗罗大陆",
        "isbn": "0-553-21311-3",
        "price": 8.99
      },
      { "category": "修真",
        "author": "南派三叔",
        "title": "星辰变",
        "isbn": "0-395-19395-8",
        "price": 22.99
      }
    ],
    "bicycle": {
      "author": "老马",
      "color": "黑色",
      "price": 19.95
    }
  }
}import json
import jsonpath
obj = json.load(open('jsonpath.json', 'r', encoding='utf-8'))
# 书店所有书的作者
author_list = jsonpath.jsonpath(obj, '$.store.book[*].author')
print(author_list) # ['六道', '天蚕土豆', '唐家三少', '南派三叔']
# 所有的作者
author_list = jsonpath.jsonpath(obj, '$..author')
print(author_list) # ['六道', '天蚕土豆', '唐家三少', '南派三叔', '老马']
# store下面的所有的元素
tag_list = jsonpath.jsonpath(obj, '$.store.*')
print(
tag_list) # [[{'category': '修真', 'author': '六道', 'title': '坏蛋是怎样练成的', 'price': 8.95}, {'category': '修真', 'author': '天蚕土豆', 'title': '斗破苍穹', 'price': 12.99}, {'category': '修真', 'author': '唐家三少', 'title': '斗罗大陆', 'isbn': '0-553-21311-3', 'price': 8.99}, {'category': '修真', 'author': '南派三叔', 'title': '星辰变', 'isbn': '0-395-19395-8', 'price': 22.99}], {'author': '老马', 'color': '黑色', 'price': 19.95}]
# store里面所有东西的price
price_list = jsonpath.jsonpath(obj, '$.store..price')
print(price_list) # [8.95, 12.99, 8.99, 22.99, 19.95]
# 第三个书
book = jsonpath.jsonpath(obj, '$..book[2]')
print(book) # [{'category': '修真', 'author': '唐家三少', 'title': '斗罗大陆', 'isbn': '0-553-21311-3', 'price': 8.99}]
# 最后一本书
book = jsonpath.jsonpath(obj, '$..book[(@.length-1)]')
print(book) # [{'category': '修真', 'author': '南派三叔', 'title': '星辰变', 'isbn': '0-395-19395-8', 'price': 22.99}]
# 前面的两本书
book_list = jsonpath.jsonpath(obj, '$..book[0,1]')
# book_list = jsonpath.jsonpath(obj,'$..book[:2]')
print(
book_list) # [{'category': '修真', 'author': '六道', 'title': '坏蛋是怎样练成的', 'price': 8.95}, {'category': '修真', 'author': '天蚕土豆', 'title': '斗破苍穹', 'price': 12.99}]
# 条件过滤需要在()的前面添加一个?
# 过滤出所有的包含isbn的书。
book_list = jsonpath.jsonpath(obj, '$..book[?(@.isbn)]')
print(
book_list) # [{'category': '修真', 'author': '唐家三少', 'title': '斗罗大陆', 'isbn': '0-553-21311-3', 'price': 8.99}, {'category': '修真', 'author': '南派三叔', 'title': '星辰变', 'isbn': '0-395-19395-8', 'price': 22.99}]
# 哪本书超过了10块钱
book_list = jsonpath.jsonpath(obj, '$..book[?(@.price>10)]')
print(
book_list) # [{'category': '修真', 'author': '天蚕土豆', 'title': '斗破苍穹', 'price': 12.99}, {'category': '修真', 'author': '南派三叔', 'title': '星辰变', 'isbn': '0-395-19395-8', 'price': 22.99}]pip install bs42.Import
from bs4 import BeautifulSoup3. Create object
- The file generated by the server response object soup = BeautifulSoup(response.read().decode() , 'lxml')
- Local file generation object soup = BeautifulSoup(open('1.html'), 'lxml')
3.2 Installation and creationNote: The default encoding format for opening files is gbk, so you need to specify the opening encoding format utf-8
1.根据标签名查找节点
	soup.a 【注】只能找到第一个a
		soup.a.name
		soup.a.attrs
2.函数
	(1).find(返回一个对象)
		find('a'):只找到第一个a标签
		find('a', title='名字')
		find('a', class_='名字')
	(2).find_all(返回一个列表)
		find_all('a') 查找到所有的a
		find_all(['a', 'span']) 返回所有的a和span
		find_all('a', limit=2) 只找前两个a
	(3).select(根据选择器得到节点对象)【推荐】
		1.element
			eg:p
		2..class
			eg:.firstname
		3.#id
			eg:#firstname
		4.属性选择器
			[attribute]
				eg:li = soup.select('li[class]')
			[attribute=value]
				eg:li = soup.select('li[class="hengheng1"]')
		5.层级选择器
			element element
				div p
			element>element
				div>p
			element,element
				div,p
					eg:soup = soup.select('a,span')
Copy after loginCopy after login
3.3 Node positioning 1.根据标签名查找节点 soup.a 【注】只能找到第一个a soup.a.name soup.a.attrs 2.函数 (1).find(返回一个对象) find('a'):只找到第一个a标签 find('a', title='名字') find('a', class_='名字') (2).find_all(返回一个列表) find_all('a') 查找到所有的a find_all(['a', 'span']) 返回所有的a和span find_all('a', limit=2) 只找前两个a (3).select(根据选择器得到节点对象)【推荐】 1.element eg:p 2..class eg:.firstname 3.#id eg:#firstname 4.属性选择器 [attribute] eg:li = soup.select('li[class]') [attribute=value] eg:li = soup.select('li[class="hengheng1"]') 5.层级选择器 element element div p element>element div>p element,element div,p eg:soup = soup.select('a,span')
1.根据标签名查找节点
	soup.a 【注】只能找到第一个a
		soup.a.name
		soup.a.attrs
2.函数
	(1).find(返回一个对象)
		find('a'):只找到第一个a标签
		find('a', title='名字')
		find('a', class_='名字')
	(2).find_all(返回一个列表)
		find_all('a') 查找到所有的a
		find_all(['a', 'span']) 返回所有的a和span
		find_all('a', limit=2) 只找前两个a
	(3).select(根据选择器得到节点对象)【推荐】
		1.element
			eg:p
		2..class
			eg:.firstname
		3.#id
			eg:#firstname
		4.属性选择器
			[attribute]
				eg:li = soup.select('li[class]')
			[attribute=value]
				eg:li = soup.select('li[class="hengheng1"]')
		5.层级选择器
			element element
				div p
			element>element
				div>p
			element,element
				div,p
					eg:soup = soup.select('a,span')
Copy after loginCopy after login
3.5 Node information 1.根据标签名查找节点 soup.a 【注】只能找到第一个a soup.a.name soup.a.attrs 2.函数 (1).find(返回一个对象) find('a'):只找到第一个a标签 find('a', title='名字') find('a', class_='名字') (2).find_all(返回一个列表) find_all('a') 查找到所有的a find_all(['a', 'span']) 返回所有的a和span find_all('a', limit=2) 只找前两个a (3).select(根据选择器得到节点对象)【推荐】 1.element eg:p 2..class eg:.firstname 3.#id eg:#firstname 4.属性选择器 [attribute] eg:li = soup.select('li[class]') [attribute=value] eg:li = soup.select('li[class="hengheng1"]') 5.层级选择器 element element div p element>element div>p element,element div,p eg:soup = soup.select('a,span')
(1).获取节点内容:适用于标签中嵌套标签的结构
	obj.string
	obj.get_text()【推荐】
(2).节点的属性
	tag.name 获取标签名
		eg:tag = find('li)
			print(tag.name)
	tag.attrs将属性值作为一个字典返回
(3).获取节点属性
	obj.attrs.get('title')【常用】
	obj.get('title')
	obj['title']
Copy after loginCopy after login(1).获取节点内容:适用于标签中嵌套标签的结构
obj.string
obj.get_text()【推荐】
(2).节点的属性
tag.name 获取标签名
eg:tag = find('li)
print(tag.name)
tag.attrs将属性值作为一个字典返回
(3).获取节点属性
obj.attrs.get('title')【常用】
obj.get('title')
obj['title']
Copy after loginCopy after login
3.6 Usage example(1).获取节点内容:适用于标签中嵌套标签的结构 obj.string obj.get_text()【推荐】 (2).节点的属性 tag.name 获取标签名 eg:tag = find('li) print(tag.name) tag.attrs将属性值作为一个字典返回 (3).获取节点属性 obj.attrs.get('title')【常用】 obj.get('title') obj['title']
(1).获取节点内容:适用于标签中嵌套标签的结构
	obj.string
	obj.get_text()【推荐】
(2).节点的属性
	tag.name 获取标签名
		eg:tag = find('li)
			print(tag.name)
	tag.attrs将属性值作为一个字典返回
(3).获取节点属性
	obj.attrs.get('title')【常用】
	obj.get('title')
	obj['title']
bs4.html
<!DOCTYPE html>
<html lang="en">
<head>
    <meta charset="UTF-8">
    <title>Title</title>
</head>
<body>

    <div>
        <ul>
            <li id="l1">张三</li>
            <li id="l2">李四</li>
            <li>王五</li>
            <a href="" id=" rel="external nofollow"  rel="external nofollow"  rel="external nofollow"  rel="external nofollow"  rel="external nofollow"  rel="external nofollow"  rel="external nofollow"  rel="external nofollow"  rel="external nofollow" " class="a1">google</a>
            <span>嘿嘿嘿</span>
        </ul>
    </div>


    <a href="" title=" rel="external nofollow"  rel="external nofollow"  rel="external nofollow"  rel="external nofollow"  rel="external nofollow"  rel="external nofollow" a2">百度</a>

    <div id="d1">
        <span>
            哈哈哈
        </span>
    </div>

    <p id="p1" class="p1">呵呵呵</p>
</body>
</html>from bs4 import BeautifulSoup
# 通过解析本地文件 来将bs4的基础语法进行讲解
# 默认打开的文件的编码格式是gbk 所以在打开文件的时候需要指定编码
soup = BeautifulSoup(open('bs4.html', encoding='utf-8'), 'lxml')
# 根据标签名查找节点
# 找到的是第一个符合条件的数据
print(soup.a) # <a class="a1" href="" id=" rel="external nofollow" rel="external nofollow" rel="external nofollow" rel="external nofollow" rel="external nofollow" rel="external nofollow" rel="external nofollow" rel="external nofollow" rel="external nofollow" ">google</a>
# 获取标签的属性和属性值
print(soup.a.attrs) # {'href': '', 'id': '', 'class': ['a1']}
# bs4的一些函数
# (1)find
# 返回的是第一个符合条件的数据
print(soup.find('a')) # <a class="a1" href="" id=" rel="external nofollow" rel="external nofollow" rel="external nofollow" rel="external nofollow" rel="external nofollow" rel="external nofollow" rel="external nofollow" rel="external nofollow" rel="external nofollow" ">google</a>
# 根据title的值来找到对应的标签对象
print(soup.find('a', title="a2")) # <a href="" title=" rel="external nofollow" rel="external nofollow" rel="external nofollow" rel="external nofollow" rel="external nofollow" rel="external nofollow" a2">百度</a>
# 根据class的值来找到对应的标签对象 注意的是class需要添加下划线
print(soup.find('a', class_="a1")) # <a class="a1" href="" id=" rel="external nofollow" rel="external nofollow" rel="external nofollow" rel="external nofollow" rel="external nofollow" rel="external nofollow" rel="external nofollow" rel="external nofollow" rel="external nofollow" ">google</a>
# (2)find_all 返回的是一个列表 并且返回了所有的a标签
print(soup.find_all('a')) # [<a class="a1" href="" id=" rel="external nofollow" rel="external nofollow" rel="external nofollow" rel="external nofollow" rel="external nofollow" rel="external nofollow" rel="external nofollow" rel="external nofollow" rel="external nofollow" ">google</a>, <a href="" title=" rel="external nofollow" rel="external nofollow" rel="external nofollow" rel="external nofollow" rel="external nofollow" rel="external nofollow" a2">百度</a>]
# 如果想获取的是多个标签的数据 那么需要在find_all的参数中添加的是列表的数据
print(soup.find_all(['a','span'])) # [<a class="a1" href="" id=" rel="external nofollow" rel="external nofollow" rel="external nofollow" rel="external nofollow" rel="external nofollow" rel="external nofollow" rel="external nofollow" rel="external nofollow" rel="external nofollow" ">google</a>, <span>嘿嘿嘿</span>, <a href="" title=" rel="external nofollow" rel="external nofollow" rel="external nofollow" rel="external nofollow" rel="external nofollow" rel="external nofollow" a2">百</a><spa哈</span>]
# limit的作用是查找前几个数据
print(soup.find_all('li', limit=2)) # [<li id="l1">张三</li>, <li id="l2">李四</li>]
# (3)select(推荐)
# select方法返回的是一个列表 并且会返回多个数据
print(soup.select('a')) # [<a class="a1" href="" id=" rel="external nofollow" rel="external nofollow" rel="external nofollow" rel="external nofollow" rel="external nofollow" rel="external nofollow" rel="external nofollow" rel="external nofollow" rel="external nofollow" ">google</a>, <a href="" title=" rel="external nofollow" rel="external nofollow" rel="external nofollow" rel="external nofollow" rel="external nofollow" rel="external nofollow" a2">百度</a>]
# 可以通过.代表class 我们把这种操作叫做类选择器
print(soup.select('.a1')) # [<a class="a1" href="" id=" rel="external nofollow" rel="external nofollow" rel="external nofollow" rel="external nofollow" rel="external nofollow" rel="external nofollow" rel="external nofollow" rel="external nofollow" rel="external nofollow" ">google</a>]
print(soup.select('#l1')) # [<li id="l1">张三</li>]
# 属性选择器---通过属性来寻找对应的标签
# 查找到li标签中有id的标签
print(soup.select('li[id]')) # [<li id="l1">张三</li>, <li id="l2">李四</li>]
# 查找到li标签中id为l2的标签
print(soup.select('li[id="l2"]')) # [<li id="l2">李四</li>]
# 层级选择器
# 后代选择器
# 找到的是div下面的li
print(soup.select('div li')) # [<li id="l1">张三</li>, <li id="l2">李四</li>, <li>王五</li>]
# 子代选择器
# 某标签的第一级子标签
# 注意:很多的计算机编程语言中 如果不加空格不会输出内容 但是在bs4中 不会报错 会显示内容
print(soup.select('div > ul > li')) # [<li id="l1">张三</li>, <li id="l2">李四</li>, <li>王五</li>]
# 找到a标签和li标签的所有的对象
print(soup.select(
'a,li')) # [<li id="l1">张三</li>, <li id="l2">李四</li>, <li>王五</li>, <a class="a1" href="" id=" rel="external nofollow" rel="external nofollow" rel="external nofollow" rel="external nofollow" rel="external nofollow" rel="external nofollow" rel="external nofollow" rel="external nofollow" rel="external nofollow" ">google</a>, <a href="" title=" rel="external nofollow" rel="external nofollow" rel="external nofollow" rel="external nofollow" rel="external nofollow" rel="external nofollow" a2">百度</a>]
# 节点信息
# 获取节点内容
obj = soup.select('#d1')[0]
# 如果标签对象中 只有内容 那么string和get_text()都可以使用
# 如果标签对象中 除了内容还有标签 那么string就获取不到数据 而get_text()是可以获取数据
# 我们一般情况下 推荐使用get_text()
print(obj.string) # None
print(obj.get_text()) # 哈哈哈
# 节点的属性
obj = soup.select('#p1')[0]
# name是标签的名字
print(obj.name) # p
# 将属性值左右一个字典返回
print(obj.attrs) # {'id': 'p1', 'class': ['p1']}
# 获取节点的属性
obj = soup.select('#p1')[0]
#
print(obj.attrs.get('class')) # ['p1']
print(obj.get('class')) # ['p1']
print(obj['class']) # ['p1'] import urllib.request
url = 'https://www.starbucks.com.cn/menu/'
response = urllib.request.urlopen(url)
content = response.read().decode('utf-8')
from bs4 import BeautifulSoup
soup = BeautifulSoup(content,'lxml')
# //ul[@class="grid padded-3 product"]//strong/text()
# 一般先用xpath方式通过google插件写好解析的表达式
name_list = soup.select('ul[class="grid padded-3 product"] strong')
for name in name_list:
print(name.get_text())Copy after login
import urllib.request
url = 'https://www.starbucks.com.cn/menu/'
response = urllib.request.urlopen(url)
content = response.read().decode('utf-8')
from bs4 import BeautifulSoup
soup = BeautifulSoup(content,'lxml')
# //ul[@class="grid padded-3 product"]//strong/text()
# 一般先用xpath方式通过google插件写好解析的表达式
name_list = soup.select('ul[class="grid padded-3 product"] strong')
for name in name_list:
    print(name.get_text())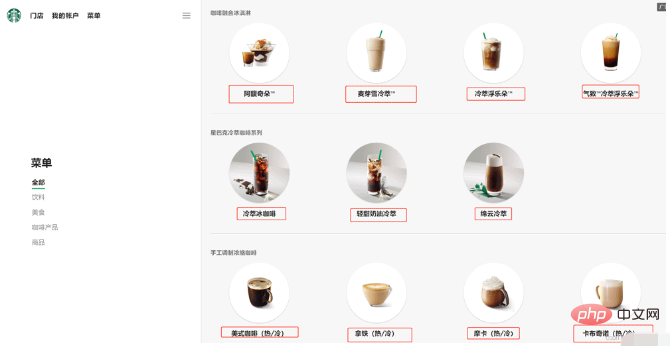
The above is the detailed content of How to use Python for xpath, JsonPath, and bs4?. For more information, please follow other related articles on the PHP Chinese website!

Hot AI Tools

Undresser.AI Undress
AI-powered app for creating realistic nude photos

AI Clothes Remover
Online AI tool for removing clothes from photos.

Undress AI Tool
Undress images for free

Clothoff.io
AI clothes remover

Video Face Swap
Swap faces in any video effortlessly with our completely free AI face swap tool!

Hot Article
Hot Tools

Notepad++7.3.1
Easy-to-use and free code editor

SublimeText3 Chinese version
Chinese version, very easy to use

Zend Studio 13.0.1
Powerful PHP integrated development environment

Dreamweaver CS6
Visual web development tools

SublimeText3 Mac version
God-level code editing software (SublimeText3)
Hot Topics
 1660
1660
 14
1416
52
1311
25
1261
29
1234
24
14
1416
52
1311
25
1261
29
1234
24

 PHP and Python: Different Paradigms Explained
Apr 18, 2025 am 12:26 AM
PHP and Python: Different Paradigms Explained
Apr 18, 2025 am 12:26 AM
PHP is mainly procedural programming, but also supports object-oriented programming (OOP); Python supports a variety of paradigms, including OOP, functional and procedural programming. PHP is suitable for web development, and Python is suitable for a variety of applications such as data analysis and machine learning.
 Choosing Between PHP and Python: A Guide
Apr 18, 2025 am 12:24 AM
Choosing Between PHP and Python: A Guide
Apr 18, 2025 am 12:24 AM
PHP is suitable for web development and rapid prototyping, and Python is suitable for data science and machine learning. 1.PHP is used for dynamic web development, with simple syntax and suitable for rapid development. 2. Python has concise syntax, is suitable for multiple fields, and has a strong library ecosystem.
 PHP and Python: A Deep Dive into Their History
Apr 18, 2025 am 12:25 AM
PHP and Python: A Deep Dive into Their History
Apr 18, 2025 am 12:25 AM
PHP originated in 1994 and was developed by RasmusLerdorf. It was originally used to track website visitors and gradually evolved into a server-side scripting language and was widely used in web development. Python was developed by Guidovan Rossum in the late 1980s and was first released in 1991. It emphasizes code readability and simplicity, and is suitable for scientific computing, data analysis and other fields.
 Python vs. JavaScript: The Learning Curve and Ease of Use
Apr 16, 2025 am 12:12 AM
Python vs. JavaScript: The Learning Curve and Ease of Use
Apr 16, 2025 am 12:12 AM
Python is more suitable for beginners, with a smooth learning curve and concise syntax; JavaScript is suitable for front-end development, with a steep learning curve and flexible syntax. 1. Python syntax is intuitive and suitable for data science and back-end development. 2. JavaScript is flexible and widely used in front-end and server-side programming.
 How to run sublime code python
Apr 16, 2025 am 08:48 AM
How to run sublime code python
Apr 16, 2025 am 08:48 AM
To run Python code in Sublime Text, you need to install the Python plug-in first, then create a .py file and write the code, and finally press Ctrl B to run the code, and the output will be displayed in the console.
 Where to write code in vscode
Apr 15, 2025 pm 09:54 PM
Where to write code in vscode
Apr 15, 2025 pm 09:54 PM
Writing code in Visual Studio Code (VSCode) is simple and easy to use. Just install VSCode, create a project, select a language, create a file, write code, save and run it. The advantages of VSCode include cross-platform, free and open source, powerful features, rich extensions, and lightweight and fast.
 Can visual studio code be used in python
Apr 15, 2025 pm 08:18 PM
Can visual studio code be used in python
Apr 15, 2025 pm 08:18 PM
VS Code can be used to write Python and provides many features that make it an ideal tool for developing Python applications. It allows users to: install Python extensions to get functions such as code completion, syntax highlighting, and debugging. Use the debugger to track code step by step, find and fix errors. Integrate Git for version control. Use code formatting tools to maintain code consistency. Use the Linting tool to spot potential problems ahead of time.
 How to run python with notepad
Apr 16, 2025 pm 07:33 PM
How to run python with notepad
Apr 16, 2025 pm 07:33 PM
Running Python code in Notepad requires the Python executable and NppExec plug-in to be installed. After installing Python and adding PATH to it, configure the command "python" and the parameter "{CURRENT_DIRECTORY}{FILE_NAME}" in the NppExec plug-in to run Python code in Notepad through the shortcut key "F6".
