

How to use Python's namespaces, scopes and decorators?

1. Namespace and scope
1. Namespace(Namespace)
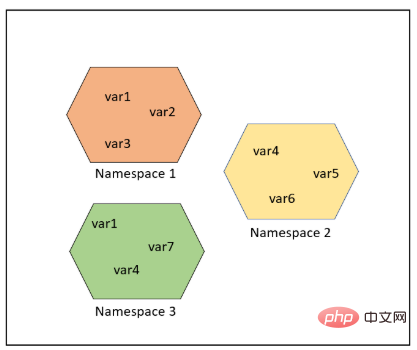
The namespace is From name to object mapping, most namespaces are implemented through Python dictionaries.
Namespaces provide a way to avoid name conflicts in projects. Each namespace is independent and has no relationship, so there cannot be duplicate names in one namespace, but different namespaces can have duplicate names without any impact.
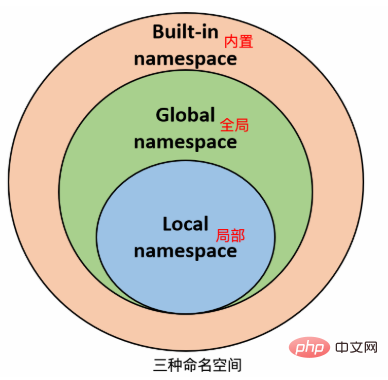
1. There are generally three namespaces:
Built-in namespace (built-in names): stores built-in names, such as
len/eval/enumerate/bytes/max/min/sorted/map/filter....- ##Global namespace
(global names) : The name defined in the module records the variables of the module, including functions, classes, other imported modules, module-level variables and constants.
- Local name space
(local names): The names inside the function are all local name spaces, and the names inside different functions do not interfere with each other.
NameError: name 'runoob' is not defined。
- Search order: Suppose we want to use the variable runoob, then Python’s search order is:
Go to local namespace-> Global namespace-> Built-in naming space.
- Execution order: built-in first (will be generated when the Python interpreter is started) -> global (will be generated when the file is executed) -> local (when the function is called) will be generated)
There may be variables with the same name in the global namespace and local namespace, but these two variables do not affect each other.
In Python, program variables are not accessible everywhere. Access permissions depend on where the variable is assigned a value. The scope of a variable determines which part of the program can access which specific variable name. There are 4 types of Python scopes, which are:L (Local) : The innermost layer, including local variables, such as Inside a function/method.
E (Enclosing) : Contains non-local (non-local) and non-global (non-global) variables. For example, if there are two nested functions, and a function (or class) A contains a function B, then for the name in B, the scope in A is nonlocal.
G (Global) : The outermost layer of the current script, such as the global variables of the current module.
B(Built-in): Contains built-in variables/keywords, etc. , and was finally searched
L –> E –> G –>B.
If it cannot be found locally, it will look for it in a part outside the local area (such as a closure). If it cannot find it, it will look for it globally, and then it will look for it in the built-in.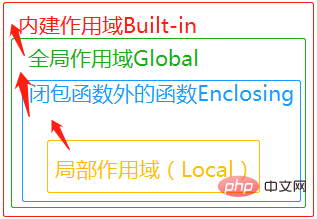
x = 1

def func():
    print(x)  #10

x = 10
func()import builtins print(dir(builtins))
if True:
    msg = 'I am from Runoob'
print(msg)
# 'I am from Runoob'局部变量只能在其被声明的函数内部访问,而全局变量可以在整个程序范围内访问。调用函数时,所有在函数内声明的变量名称都将被加入到作用域中。
# 作用域注意点
x = 1

def f1():  # 定义阶段x=1
    print(x)  #1

def f2():
    x = 2  #此x为f2函数的局部变量,f1无法直接访问
    f1()

f2()4、函数对象+作用域应用
def f1():
    def inner():
        print('from inner')
    return inner

f = f1()  # from inner   。把局部定义的函数inner()放在全局之中

def bar():
    f()

bar()5、global关键字修改全局作用域中的变量
函数内可以访问全局变量,但不能直接更新(修改)其值,可以加上 global 引用以更新变量值 :
x = 1

def f1():
    x = 2

    def f2():
        global x  # 修改全局
        x = 3

    f2()

f1()
print(x) # 36、nonlocal关键字修改嵌套作用域中的变量。
如果要修改嵌套作用域(enclosing 作用域,外层非全局作用域)中的变量则需要 nonlocal 关键字了
x = 1

def f1():
    x = 2

    def f2():
        nonlocal x
        x = 3

    f2()
    print(x)  # 3

f1()二、闭包函数
闭包:闭是封闭(函数内部函数),包是包含(该内部函数对外部作用域而非全局作用域的变量的引用)。
闭包指的是:函数内部函数对外部作用域而非全局作用域的引用。
def outter(x):
    x = 1

    def inner():
        print(x)

    return inner #返回的是函数名(函数对象)


f = outter(2)

f()  # 1
f()  # 1
f()  # 1
# 查看闭包的元素
print(f.__closure__[0].cell_contents) # 1闭包的意义:返回的函数对象,不仅仅是一个函数对象,在该函数外还包裹了一层作用域,这使得,该函数无论在何处调用,优先使用自己外层包裹的作用域。
应用领域:
延迟计算(原来我们是传参,现在我们是包起来)、爬虫领域。
import requests


def outter(url):
    def get():
        response = requests.get(url)
        print(f"done: {url}")

    return get


baidu = outter('https://www.baidu.com')
python = outter('https://www.python.org')

baidu()
baidu()

python()
python()三、函数装饰器
装饰器指的是为被装饰器对象添加额外功能。因此定义装饰器就是定义一个函数,只不过该函数的功能是用来为其他函数添加额外的功能。装饰器的实现必须遵循两大原则:
不修改被装饰对象的源代码
不修改被装饰对象的调用方式
装饰器其实就是在遵循以上两个原则的前提下为被装饰对象添加新功能。
不改变函数体代码,并且不改变函数调用方式,它本质就是一个闭包函数。
def f1(x):
    def f2():
        print(x)  # 10
    return f2

f2 = f1()
f2() # f2()在不改变当前函数的情况下, 给其增加新的功能:
def log(pr):  # 将被装饰函数传入
    def wrapper():
        print("**********")
        return pr()  # 执行被装饰的函数

    return wrapper  # 将装饰完之后的函数返回(返回的是函数名)


@log
def pr():
    print("我是小小洋")


pr()

# **********
# 我是小小洋回调函数和返回函数的实例就是装饰器。
四、无参装饰器
举例:
import time


def index():
    print('welcome to index')
    time.sleep(1)


def time_count(func):
    # func = 最原始的index
    def wrapper():
        start = time.time()
        func()
        end = time.time()
        print(f"{func} time is {start - end}")  #  time is -1.0038220882415771

    return wrapper


index = time_count(index)  # index为被装饰函数index的内存地址,即index = wrapper
index() # wrapper()1、被装饰函数有返回值:
如果原始的被装饰函数index()有返回值的时候,wrapper()函数的返回值应该和index()的返回值相同,也就是说,我们需要同步原始的index()和wrapper()方法的返回值。
import time


def index():
    print('welcome to index')
    time.sleep(1)
    return 123


def time_count(func):
    # func = 最原始的index
    def wrapper():
        start = time.time()
        res1 = func()
        end = time.time()
        print(f"{func} time is {start - end}")  #  time is -1.0050289630889893
        return res1

    return wrapper


index = time_count(index)
res = index()
print(f"res: {res}")  #
res: 1232、被装饰函数需要传参:
如果原始的被装饰函数index()方法需要传参,那么我们之前的装饰器是无法实现该功能的,由于有wrapper()=index(),所以给wrapper()方法传参即可。
import time


def index():
    print('welcome to index')
    time.sleep(1)
    return 123


def home(name):
    print(f"welcome {name} to home page")
    time.sleep(1)
    return name


def time_count(func):
    def wrapper(*args, **kwargs):
        start = time.time()
        res = func(*args, **kwargs)
        end = time.time()
        print(f"{func} time is {start-end}") #  time is -1.0039079189300537
        return res

    return wrapper


home = time_count(home)

res = home('egon')
print(f"res: {res}") #res: egon3、装饰器模板
def deco(func):
    def wrapper(*args,**kwargs):
        res = func(*args,**kwargs)
        return res
return wrapper4、装饰器语法糖:
在被装饰函数正上方,并且是单独一行写上@装饰器名
import time


def time_count(func): #装饰器
    # func = 最原始的index
    def wrapper(*args, **kwargs):
        start = time.time()
        res = func(*args, **kwargs)
        end = time.time()
        print(f"{func} time is {start-end}") # time is -1.0005171298980713
        return res

    return wrapper


@time_count  # home = time_count(home)
def home(name):
    print(f"welcome {name} to home page") #welcome egon to home page
    time.sleep(1)
    return name


res = home('egon')
print(f"res: {res}") #res: egon五、带参数的装饰器
注意无参装饰器只套两层。
import time

current_user = {'username': None}


def login(func):
    # func = 最原始的index
    def wrapper(*args, **kwargs):
        if current_user['username']:
            res1 = func(*args, **kwargs)
            return res1

        user = input('username: ').strip()
        pwd = input('password: ').strip()

        if user == 'nick' and pwd == '123':
            print('login successful')
            current_user['username'] = user
            res1 = func(*args, **kwargs)
            return res1
        else:
            print('user or password error')

    return wrapper


@login
def index():
    print('welcome to index')
    time.sleep(1)


res = index()

#username: nick
#password: 123
#login successful
#welcome to index我们首先看看三层闭包怎么运用。
def f1(y):
    def f2():
        x = 1

        def f3():
            print(f"x: {x}")  # x: 1
            print(f"y: {y}")  # x: 1

        return f3
    return f2


f2 = f1(2)
f3 = f2()
f3()3、有参三层装饰器:
在函数中嵌入装饰器
import time

current_user = {'username': None}


def auth(engine='file'):
    def login(func):
        def wrapper(*args, **kwargs):
            if current_user['username']:
                res = func(*args, **kwargs)
                return res

            user = input('username: ').strip()
            pwd = input('password: ').strip()

            if engine == 'file':
                print('base of file')
                if user == 'nick' and pwd == '123':
                    print('login successful')
                    current_user['username'] = user
                    res = func(*args, **kwargs)
                    return res
                else:
                    print('user or password error')
            elif engine == 'mysql':
                print('base of mysql, please base of file')
        return wrapper
    return login


@auth(engine='file')
def index():
    print('welcome to index')
    time.sleep(1)


res = index()username: nick
password: 123
base of file
login successful
welcome to index
六、类装饰器
没错,装饰器不仅可以是函数,还可以是类,相比函数装饰器,类装饰器具有灵活度大、高内聚、封装性等优点。使用类装饰器主要依靠类的__call__方法,当使用 @ 形式将装饰器附加到函数上时,就会调用此方法。
class Foo(object):
    def __init__(self, func):
        self._func = func

    def __call__(self):
        print ('class decorator runing')
        self._func()
        print ('class decorator ending')

@Foo
def bar():
    print ('bar')

bar()

functools.wraps使用装饰器极大地复用了代码,但是他有一个缺点就是原函数的元信息不见了,比如函数的docstring、__name__、参数列表,先看例子:
# 装饰器
def logged(func):
    def with_logging(*args, **kwargs):
        print func.__name__      # 输出 'with_logging'
        print func.__doc__       # 输出 None
        return func(*args, **kwargs)
    return with_logging

# 函数
@logged
def f(x):
   """does some math"""
   return x + x * x

logged(f)不难发现,函数 f 被with_logging取代了,当然它的docstring,__name__就是变成了with_logging函数的信息了。好在我们有functools.wraps,wraps本身也是一个装饰器,它能把原函数的元信息拷贝到装饰器里面的 func 函数中,这使得装饰器里面的 func 函数也有和原函数 foo 一样的元信息了。
from functools import wraps

def logged(func):
    @wraps(func)
    def with_logging(*args, **kwargs):
        print func.__name__      # 输出 'f'
        print func.__doc__       # 输出 'does some math'
        return func(*args, **kwargs)
    return with_logging

@logged
def f(x):
   """does some math"""
return x + x * x七、装饰器顺序
一个函数还可以同时定义多个装饰器,比如:
@a
@b
@c
def f ():
pass它的执行顺序是从里到外,最先调用最里层的装饰器,最后调用最外层的装饰器,它等效于
f = a(b(c(f)))
八、装饰器使用场景
现在我们来看一下装饰器在哪些地方特别耀眼,以及使用它可以让一些事情管理起来变得更简单。
授权(Authorization)
装饰器能有助于检查某个人是否被授权去使用一个web应用的端点(endpoint)。它们被大量使用于Flask和Django web框架中。这里是一个例子来使用基于装饰器的授权:
from functools import wraps

def requires_auth(f):
    @wraps(f)
    def decorated(*args, **kwargs):
        auth = request.authorization
        if not auth or not check_auth(auth.username, auth.password):
            authenticate()
        return f(*args, **kwargs)
return decorated日志(Logging)
日志是装饰器运用的另一个亮点。这是个例子:
from functools import wraps

def logit(func):
    @wraps(func)
    def with_logging(*args, **kwargs):
        print(func.__name__ + " was called")
        return func(*args, **kwargs)
    return with_logging

@logit
def addition_func(x):
   """Do some math."""
   return x + x


result = addition_func(4)
# Output: addition_func was calledThe above is the detailed content of How to use Python's namespaces, scopes and decorators?. For more information, please follow other related articles on the PHP Chinese website!

Hot AI Tools

Undresser.AI Undress
AI-powered app for creating realistic nude photos

AI Clothes Remover
Online AI tool for removing clothes from photos.

Undress AI Tool
Undress images for free

Clothoff.io
AI clothes remover

Video Face Swap
Swap faces in any video effortlessly with our completely free AI face swap tool!

Hot Article
Hot Tools

Notepad++7.3.1
Easy-to-use and free code editor

SublimeText3 Chinese version
Chinese version, very easy to use

Zend Studio 13.0.1
Powerful PHP integrated development environment

Dreamweaver CS6
Visual web development tools

SublimeText3 Mac version
God-level code editing software (SublimeText3)
Hot Topics
 1664
1664
 14
1422
52
1316
25
1268
29
1240
24
14
1422
52
1316
25
1268
29
1240
24

 PHP and Python: Different Paradigms Explained
Apr 18, 2025 am 12:26 AM
PHP and Python: Different Paradigms Explained
Apr 18, 2025 am 12:26 AM
PHP is mainly procedural programming, but also supports object-oriented programming (OOP); Python supports a variety of paradigms, including OOP, functional and procedural programming. PHP is suitable for web development, and Python is suitable for a variety of applications such as data analysis and machine learning.
 Choosing Between PHP and Python: A Guide
Apr 18, 2025 am 12:24 AM
Choosing Between PHP and Python: A Guide
Apr 18, 2025 am 12:24 AM
PHP is suitable for web development and rapid prototyping, and Python is suitable for data science and machine learning. 1.PHP is used for dynamic web development, with simple syntax and suitable for rapid development. 2. Python has concise syntax, is suitable for multiple fields, and has a strong library ecosystem.
 PHP and Python: A Deep Dive into Their History
Apr 18, 2025 am 12:25 AM
PHP and Python: A Deep Dive into Their History
Apr 18, 2025 am 12:25 AM
PHP originated in 1994 and was developed by RasmusLerdorf. It was originally used to track website visitors and gradually evolved into a server-side scripting language and was widely used in web development. Python was developed by Guidovan Rossum in the late 1980s and was first released in 1991. It emphasizes code readability and simplicity, and is suitable for scientific computing, data analysis and other fields.
 Python vs. JavaScript: The Learning Curve and Ease of Use
Apr 16, 2025 am 12:12 AM
Python vs. JavaScript: The Learning Curve and Ease of Use
Apr 16, 2025 am 12:12 AM
Python is more suitable for beginners, with a smooth learning curve and concise syntax; JavaScript is suitable for front-end development, with a steep learning curve and flexible syntax. 1. Python syntax is intuitive and suitable for data science and back-end development. 2. JavaScript is flexible and widely used in front-end and server-side programming.
 How to run sublime code python
Apr 16, 2025 am 08:48 AM
How to run sublime code python
Apr 16, 2025 am 08:48 AM
To run Python code in Sublime Text, you need to install the Python plug-in first, then create a .py file and write the code, and finally press Ctrl B to run the code, and the output will be displayed in the console.
 Golang vs. Python: Performance and Scalability
Apr 19, 2025 am 12:18 AM
Golang vs. Python: Performance and Scalability
Apr 19, 2025 am 12:18 AM
Golang is better than Python in terms of performance and scalability. 1) Golang's compilation-type characteristics and efficient concurrency model make it perform well in high concurrency scenarios. 2) Python, as an interpreted language, executes slowly, but can optimize performance through tools such as Cython.
 Where to write code in vscode
Apr 15, 2025 pm 09:54 PM
Where to write code in vscode
Apr 15, 2025 pm 09:54 PM
Writing code in Visual Studio Code (VSCode) is simple and easy to use. Just install VSCode, create a project, select a language, create a file, write code, save and run it. The advantages of VSCode include cross-platform, free and open source, powerful features, rich extensions, and lightweight and fast.
 How to run python with notepad
Apr 16, 2025 pm 07:33 PM
How to run python with notepad
Apr 16, 2025 pm 07:33 PM
Running Python code in Notepad requires the Python executable and NppExec plug-in to be installed. After installing Python and adding PATH to it, configure the command "python" and the parameter "{CURRENT_DIRECTORY}{FILE_NAME}" in the NppExec plug-in to run Python code in Notepad through the shortcut key "F6".
