

How to configure python virtual environment with conda

1. Create a python virtual environment
First select the file to configure the environment
as follows:
Enter cmd here and press Enter
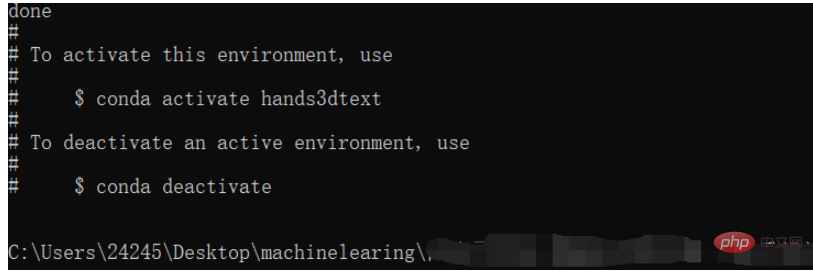
Here I create an environment named hands3dtext, the environment version is the initial environment of 3.7.2
conda create -n hands3dtext python==3.7.2

The creation is successful as follows:
2. Configure the just created virtual environment
First activate the just created virtual environment
conda activate hands3dtext

As shown above, the parentheses in front of it indicate successful activation, and you are in the virtual environment at this time.
You can then install all the required packages and libraries
Be sure to confirm whether to install the cpu or gpu version before installation.
Here I need to install mediapipe
Note: To install mediapipe, first install opencv, and execute the terminal
conda install opencv-contrib-python
The previous article may be wrong, you can use the following domestic Tsinghua mirror source
pip install opencv-python -i https://pypi.tuna.tsinghua.edu.cn/simple
Then Install mediapipe, execute the terminal
conda install mediapipe
I also need to install the tqdm module (according to personal needs)
conda install tqdm
If you feel that the installation is too slow, you can switch to the domestic mirror source for installation and execute the following command
conda config --remove-key channels
conda config --add channels https://mirrors.ustc.edu.cn/anaconda/pkgs/main/
conda config --add channels https://mirrors.ustc.edu.cn/anaconda/pkgs/free/
conda config --add channels https://mirrors.bfsu.edu.cn/anaconda/cloud/pytorch/
conda config --set show_channel_urls yes
pip config set global.index-url https://mirrors.ustc.edu.cn/pypi/web/simple
pytorch installation (gpu version and cpu version installation)
For specific steps of GPU version installation, please refer to this article: Installing the GPU version of Tensorflow and Pytorch under Windows in 2021_dejahu's blog-CSDN blog
You need to pay attention to the following points:
1. Be sure to update your graphics card driver before installation. Go to the official website to download the driver installation of the corresponding model.
2. 30 series graphics cards can only be used. cuda11 version
3. Be sure to create a virtual environment so that there is no conflict between the deep learning frameworks
conda install pytorch==1.8.0 torchvision torchaudio cudatoolkit=10.2
# 注意这条命令指定Pytorch的版本和cuda的版本
conda install pytorch==1.8.0 torchvision==0.9.0 torchaudio==0.8.0 cpuonly
# CPU的小伙伴直接执行这条命令即可
Installation of pycocotools
pip install pycocotools-windows
Installation of other packages
pip install -r requirements.txt
pip install pyqt5
pip install labelme
3. Configure the virtual environment to the corresponding project
First open the corresponding project and follow the icon guidance to find the newly created virtual environment
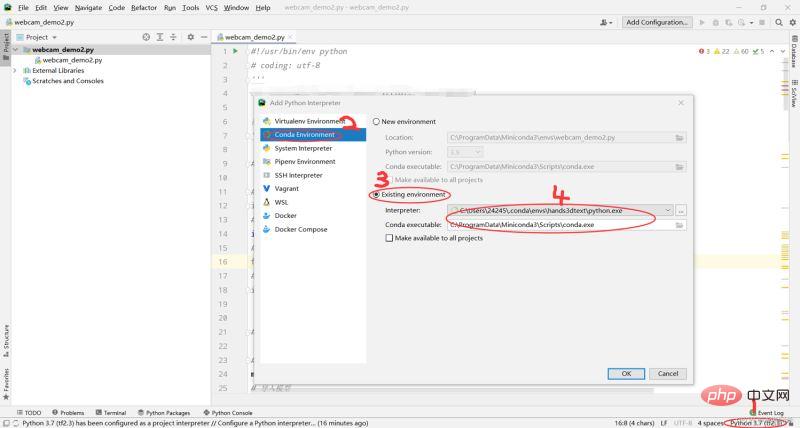
Click OK. Wait for the configuration to be completed
The above is the detailed content of How to configure python virtual environment with conda. For more information, please follow other related articles on the PHP Chinese website!

Hot AI Tools

Undresser.AI Undress
AI-powered app for creating realistic nude photos

AI Clothes Remover
Online AI tool for removing clothes from photos.

Undress AI Tool
Undress images for free

Clothoff.io
AI clothes remover

Video Face Swap
Swap faces in any video effortlessly with our completely free AI face swap tool!

Hot Article
Hot Tools

Notepad++7.3.1
Easy-to-use and free code editor

SublimeText3 Chinese version
Chinese version, very easy to use

Zend Studio 13.0.1
Powerful PHP integrated development environment

Dreamweaver CS6
Visual web development tools

SublimeText3 Mac version
God-level code editing software (SublimeText3)
Hot Topics
 1664
1664
 14
1423
52
1317
25
1268
29
1242
24
14
1423
52
1317
25
1268
29
1242
24

 PHP and Python: Different Paradigms Explained
Apr 18, 2025 am 12:26 AM
PHP and Python: Different Paradigms Explained
Apr 18, 2025 am 12:26 AM
PHP is mainly procedural programming, but also supports object-oriented programming (OOP); Python supports a variety of paradigms, including OOP, functional and procedural programming. PHP is suitable for web development, and Python is suitable for a variety of applications such as data analysis and machine learning.
 Choosing Between PHP and Python: A Guide
Apr 18, 2025 am 12:24 AM
Choosing Between PHP and Python: A Guide
Apr 18, 2025 am 12:24 AM
PHP is suitable for web development and rapid prototyping, and Python is suitable for data science and machine learning. 1.PHP is used for dynamic web development, with simple syntax and suitable for rapid development. 2. Python has concise syntax, is suitable for multiple fields, and has a strong library ecosystem.
 PHP and Python: A Deep Dive into Their History
Apr 18, 2025 am 12:25 AM
PHP and Python: A Deep Dive into Their History
Apr 18, 2025 am 12:25 AM
PHP originated in 1994 and was developed by RasmusLerdorf. It was originally used to track website visitors and gradually evolved into a server-side scripting language and was widely used in web development. Python was developed by Guidovan Rossum in the late 1980s and was first released in 1991. It emphasizes code readability and simplicity, and is suitable for scientific computing, data analysis and other fields.
 Python vs. JavaScript: The Learning Curve and Ease of Use
Apr 16, 2025 am 12:12 AM
Python vs. JavaScript: The Learning Curve and Ease of Use
Apr 16, 2025 am 12:12 AM
Python is more suitable for beginners, with a smooth learning curve and concise syntax; JavaScript is suitable for front-end development, with a steep learning curve and flexible syntax. 1. Python syntax is intuitive and suitable for data science and back-end development. 2. JavaScript is flexible and widely used in front-end and server-side programming.
 How to run sublime code python
Apr 16, 2025 am 08:48 AM
How to run sublime code python
Apr 16, 2025 am 08:48 AM
To run Python code in Sublime Text, you need to install the Python plug-in first, then create a .py file and write the code, and finally press Ctrl B to run the code, and the output will be displayed in the console.
 Golang vs. Python: Performance and Scalability
Apr 19, 2025 am 12:18 AM
Golang vs. Python: Performance and Scalability
Apr 19, 2025 am 12:18 AM
Golang is better than Python in terms of performance and scalability. 1) Golang's compilation-type characteristics and efficient concurrency model make it perform well in high concurrency scenarios. 2) Python, as an interpreted language, executes slowly, but can optimize performance through tools such as Cython.
 Where to write code in vscode
Apr 15, 2025 pm 09:54 PM
Where to write code in vscode
Apr 15, 2025 pm 09:54 PM
Writing code in Visual Studio Code (VSCode) is simple and easy to use. Just install VSCode, create a project, select a language, create a file, write code, save and run it. The advantages of VSCode include cross-platform, free and open source, powerful features, rich extensions, and lightweight and fast.
 How to run python with notepad
Apr 16, 2025 pm 07:33 PM
How to run python with notepad
Apr 16, 2025 pm 07:33 PM
Running Python code in Notepad requires the Python executable and NppExec plug-in to be installed. After installing Python and adding PATH to it, configure the command "python" and the parameter "{CURRENT_DIRECTORY}{FILE_NAME}" in the NppExec plug-in to run Python code in Notepad through the shortcut key "F6".
