

How to implement batch data extraction through Python

Configuration requirements
1.ImageMagick
2.tesseract-OCR
3.Python3.7
4.from PIL import Image as PI
5.import io
6.import os
7.import pyocr.builders
8.from cnocr import CnOcr
import The data is converted into a digital format. Based on this, we need to first complete the conversion of uppercase Chinese characters and numbers.
def chineseNumber2Int(strNum: str):
    result = 0
    temp = 1  # 存放一个单位的数字如:十万
    count = 0  # 判断是否有chArr
    cnArr = ['壹', '贰', '叁', '肆', '伍', '陆', '柒', '捌', '玖']
    chArr = ['拾', '佰', '仟', '万', '亿']
    for i in range(len(strNum)):
        b = True
        c = strNum[i]
        for j in range(len(cnArr)):
            if c == cnArr[j]:
                if count != 0:
                    result += temp
                    count = 0
                temp = j + 1
                b = False
                break
        if b:
            for j in range(len(chArr)):
                if c == chArr[j]:
                    if j == 0:
                        temp *= 10
                    elif j == 1:
                        temp *= 100
                    elif j == 2:
                        temp *= 1000
                    elif j == 3:
                        temp *= 10000
                    elif j == 4:
                        temp *= 100000000
                count += 1
        if i == len(strNum) - 1:
            result += temp
return resultThe above code can be used to convert uppercase letters and numbers. For example, input "Twenty thousand yuan" to export "200000", and then convert it into numbers to greatly simplify the table. Operations can also be beneficial to data archiving while completing table operations. 
As shown in the picture, the small black dot is where the mouse is, and the lower left corner of the drawing software is its coordinates.
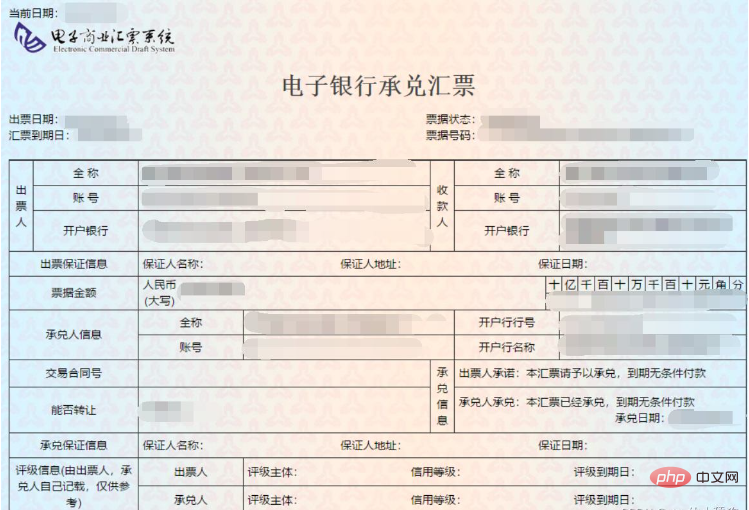
Extract the issue date
def text1(new_img):
    #提取出票日期
    left = 80
    top = 143
    right = 162
    bottom = 162
    image_text1 = new_img.crop((left, top, right, bottom))
    #展示图片
    #image_text1.show()
    txt1 = tool.image_to_string(image_text1)
    print(txt1)
return str(txt1)Withdraw the amount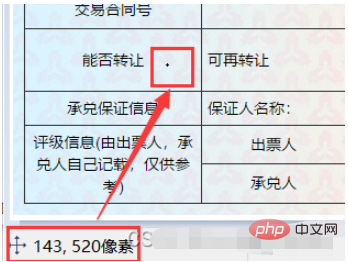
def text2(new_img):
    #提取金额
    left = 224
    top = 355
    right = 585
    bottom = 380
    image_text2 = new_img.crop((left, top, right, bottom))
    #展示图片
    #image_text2.show()
    image_text2.save("img/tmp.png")
    temp = ocr.ocr("img/tmp.png")
    temp="".join(temp[0])
    txt2=chineseNumber2Int(temp)
    print(txt2)
return txt2def text3(new_img):
#提取出票人
left = 177
top = 207
right = 506
bottom = 231
image_text3 = new_img.crop((left, top, right, bottom))
#展示图片
#image_text3.show()
image_text3.save("img/tmp.png")
temp = ocr.ocr("img/tmp.png")
txt3="".join(temp[0])
print(txt3)
return txt3Copy after login
Extract the payment bankdef text3(new_img):
#提取出票人
left = 177
top = 207
right = 506
bottom = 231
image_text3 = new_img.crop((left, top, right, bottom))
#展示图片
#image_text3.show()
image_text3.save("img/tmp.png")
temp = ocr.ocr("img/tmp.png")
txt3="".join(temp[0])
print(txt3)
return txt3def text4(new_img):
#提取付款行
left = 177
top = 274
right = 492
bottom = 311
image_text4 = new_img.crop((left, top, right, bottom))
#展示图片
#image_text4.show()
image_text4.save("img/tmp.png")
temp = ocr.ocr("img/tmp.png")
txt4="".join(temp[0])
print(txt4)
return txt4Copy after login
Extract the bill of exchange arrival datedef text4(new_img):
#提取付款行
left = 177
top = 274
right = 492
bottom = 311
image_text4 = new_img.crop((left, top, right, bottom))
#展示图片
#image_text4.show()
image_text4.save("img/tmp.png")
temp = ocr.ocr("img/tmp.png")
txt4="".join(temp[0])
print(txt4)
return txt4def text5(new_img):
#提取汇票到日期
left = 92
top = 166
right = 176
bottom = 184
image_text5 = new_img.crop((left, top, right, bottom))
#展示图片
#image_text5.show()
txt5 = tool.image_to_string(image_text5)
print(txt5)
return txt5Copy after login
Extract the bill documentdef text5(new_img):
#提取汇票到日期
left = 92
top = 166
right = 176
bottom = 184
image_text5 = new_img.crop((left, top, right, bottom))
#展示图片
#image_text5.show()
txt5 = tool.image_to_string(image_text5)
print(txt5)
return txt5def text6(new_img):
#提取票据号码
left = 598
top = 166
right = 870
bottom = 182
image_text6 = new_img.crop((left, top, right, bottom))
#展示图片
#image_text6.show()
txt6 = tool.image_to_string(image_text6)
print(txt6)
return txt6Copy after login
After all the data is extracted, we enter the setting process. We need to extract all the bill files first , get their file names and paths. def text6(new_img):
#提取票据号码
left = 598
top = 166
right = 870
bottom = 182
image_text6 = new_img.crop((left, top, right, bottom))
#展示图片
#image_text6.show()
txt6 = tool.image_to_string(image_text6)
print(txt6)
return txt6ocr=CnOcr()
tool = pyocr.get_available_tools()[0]
filePath='img'
img_name=[]
for i,j,name in os.walk(filePath):
img_name=nameCopy after login
After obtaining the complete data, you can import the data into Excel. ocr=CnOcr()
tool = pyocr.get_available_tools()[0]
filePath='img'
img_name=[]
for i,j,name in os.walk(filePath):
img_name=namecount=1
book = xlwt.Workbook(encoding='utf-8',style_compression=0)
sheet = book.add_sheet('test',cell_overwrite_ok=True)
for i in img_name:
img_url = filePath+"/"+i
with open(img_url, 'rb') as f:
a = f.read()
new_img = PI.open(io.BytesIO(a))
## 写入csv
col = ('年份','出票日期','金额','出票人','付款行全称','汇票到日期','备注')
for j in range(0,7):
sheet.write(0,j,col[j])
book.save('1.csv')
shijian=text1(new_img)
sheet.write(count,0,shijian[0:4])
sheet.write(count,1,shijian[5:])
sheet.write(count,2,text2(new_img))
sheet.write(count,3,text3(new_img))
sheet.write(count,4,text4(new_img))
sheet.write(count,5,text5(new_img))
sheet.write(count,6,text6(new_img))
count = count + 1Copy after login
At this point, the complete process is over. Attached are all source codescount=1
book = xlwt.Workbook(encoding='utf-8',style_compression=0)
sheet = book.add_sheet('test',cell_overwrite_ok=True)
for i in img_name:
img_url = filePath+"/"+i
with open(img_url, 'rb') as f:
a = f.read()
new_img = PI.open(io.BytesIO(a))
## 写入csv
col = ('年份','出票日期','金额','出票人','付款行全称','汇票到日期','备注')
for j in range(0,7):
sheet.write(0,j,col[j])
book.save('1.csv')
shijian=text1(new_img)
sheet.write(count,0,shijian[0:4])
sheet.write(count,1,shijian[5:])
sheet.write(count,2,text2(new_img))
sheet.write(count,3,text3(new_img))
sheet.write(count,4,text4(new_img))
sheet.write(count,5,text5(new_img))
sheet.write(count,6,text6(new_img))
count = count + 1from wand.image import Image
from PIL import Image as PI
import pyocr
import io
import re
import os
import shutil
import pyocr.builders
from cnocr import CnOcr
import requests
import xlrd
import xlwt
from openpyxl import load_workbook
def chineseNumber2Int(strNum: str):
result = 0
temp = 1 # 存放一个单位的数字如:十万
count = 0 # 判断是否有chArr
cnArr = ['壹', '贰', '叁', '肆', '伍', '陆', '柒', '捌', '玖']
chArr = ['拾', '佰', '仟', '万', '亿']
for i in range(len(strNum)):
b = True
c = strNum[i]
for j in range(len(cnArr)):
if c == cnArr[j]:
if count != 0:
result += temp
count = 0
temp = j + 1
b = False
break
if b:
for j in range(len(chArr)):
if c == chArr[j]:
if j == 0:
temp *= 10
elif j == 1:
temp *= 100
elif j == 2:
temp *= 1000
elif j == 3:
temp *= 10000
elif j == 4:
temp *= 100000000
count += 1
if i == len(strNum) - 1:
result += temp
return result
def text1(new_img):
#提取出票日期
left = 80
top = 143
right = 162
bottom = 162
image_text1 = new_img.crop((left, top, right, bottom))
#展示图片
#image_text1.show()
txt1 = tool.image_to_string(image_text1)
print(txt1)
return str(txt1)
def text2(new_img):
#提取金额
left = 224
top = 355
right = 585
bottom = 380
image_text2 = new_img.crop((left, top, right, bottom))
#展示图片
#image_text2.show()
image_text2.save("img/tmp.png")
temp = ocr.ocr("img/tmp.png")
temp="".join(temp[0])
txt2=chineseNumber2Int(temp)
print(txt2)
return txt2
def text3(new_img):
    #提取出票人
    left = 177
    top = 207
    right = 506
    bottom = 231
    image_text3 = new_img.crop((left, top, right, bottom))
    #展示图片
    #image_text3.show()
    image_text3.save("img/tmp.png")
    temp = ocr.ocr("img/tmp.png")
    txt3="".join(temp[0])
    print(txt3)
    return txt3
def text4(new_img):
    #提取付款行
    left = 177
    top = 274
    right = 492
    bottom = 311
    image_text4 = new_img.crop((left, top, right, bottom))
    #展示图片
    #image_text4.show()
    image_text4.save("img/tmp.png")
    temp = ocr.ocr("img/tmp.png")
    txt4="".join(temp[0])
    print(txt4)
    return txt4
def text5(new_img):
    #提取汇票到日期
    left = 92
    top = 166
    right = 176
    bottom = 184
    image_text5 = new_img.crop((left, top, right, bottom))
    #展示图片
    #image_text5.show()
    txt5 = tool.image_to_string(image_text5)
    print(txt5)
    return txt5
def text6(new_img):
    #提取票据号码
    left = 598
    top = 166
    right = 870
    bottom = 182
    image_text6 = new_img.crop((left, top, right, bottom))
    #展示图片
    #image_text6.show()
    txt6 = tool.image_to_string(image_text6)
    print(txt6)
    return txt6
ocr=CnOcr()
tool = pyocr.get_available_tools()[0]
filePath='img'
img_name=[]
for i,j,name in os.walk(filePath):
    img_name=name
count=1
book = xlwt.Workbook(encoding='utf-8',style_compression=0)
sheet = book.add_sheet('test',cell_overwrite_ok=True)
for i in img_name:
    img_url = filePath+"/"+i
    with open(img_url, 'rb') as f:
        a = f.read()
    new_img = PI.open(io.BytesIO(a))
    ## 写入csv
    col = ('年份','出票日期','金额','出票人','付款行全称','汇票到日期','备注')
    for j in range(0,7):
        sheet.write(0,j,col[j])
    book.save('1.csv')
    shijian=text1(new_img)
    sheet.write(count,0,shijian[0:4])
    sheet.write(count,1,shijian[5:])
    sheet.write(count,2,text2(new_img))
    sheet.write(count,3,text3(new_img))
    sheet.write(count,4,text4(new_img))
    sheet.write(count,5,text5(new_img))
    sheet.write(count,6,text6(new_img))
count = count + 1The above is the detailed content of How to implement batch data extraction through Python. For more information, please follow other related articles on the PHP Chinese website!

Hot AI Tools

Undresser.AI Undress
AI-powered app for creating realistic nude photos

AI Clothes Remover
Online AI tool for removing clothes from photos.

Undress AI Tool
Undress images for free

Clothoff.io
AI clothes remover

Video Face Swap
Swap faces in any video effortlessly with our completely free AI face swap tool!

Hot Article
Hot Tools

Notepad++7.3.1
Easy-to-use and free code editor

SublimeText3 Chinese version
Chinese version, very easy to use

Zend Studio 13.0.1
Powerful PHP integrated development environment

Dreamweaver CS6
Visual web development tools

SublimeText3 Mac version
God-level code editing software (SublimeText3)
Hot Topics
 1670
1670
 14
1428
52
1329
25
1273
29
1256
24
14
1428
52
1329
25
1273
29
1256
24

 PHP and Python: Different Paradigms Explained
Apr 18, 2025 am 12:26 AM
PHP and Python: Different Paradigms Explained
Apr 18, 2025 am 12:26 AM
PHP is mainly procedural programming, but also supports object-oriented programming (OOP); Python supports a variety of paradigms, including OOP, functional and procedural programming. PHP is suitable for web development, and Python is suitable for a variety of applications such as data analysis and machine learning.
 Choosing Between PHP and Python: A Guide
Apr 18, 2025 am 12:24 AM
Choosing Between PHP and Python: A Guide
Apr 18, 2025 am 12:24 AM
PHP is suitable for web development and rapid prototyping, and Python is suitable for data science and machine learning. 1.PHP is used for dynamic web development, with simple syntax and suitable for rapid development. 2. Python has concise syntax, is suitable for multiple fields, and has a strong library ecosystem.
 How to run sublime code python
Apr 16, 2025 am 08:48 AM
How to run sublime code python
Apr 16, 2025 am 08:48 AM
To run Python code in Sublime Text, you need to install the Python plug-in first, then create a .py file and write the code, and finally press Ctrl B to run the code, and the output will be displayed in the console.
 PHP and Python: A Deep Dive into Their History
Apr 18, 2025 am 12:25 AM
PHP and Python: A Deep Dive into Their History
Apr 18, 2025 am 12:25 AM
PHP originated in 1994 and was developed by RasmusLerdorf. It was originally used to track website visitors and gradually evolved into a server-side scripting language and was widely used in web development. Python was developed by Guidovan Rossum in the late 1980s and was first released in 1991. It emphasizes code readability and simplicity, and is suitable for scientific computing, data analysis and other fields.
 Python vs. JavaScript: The Learning Curve and Ease of Use
Apr 16, 2025 am 12:12 AM
Python vs. JavaScript: The Learning Curve and Ease of Use
Apr 16, 2025 am 12:12 AM
Python is more suitable for beginners, with a smooth learning curve and concise syntax; JavaScript is suitable for front-end development, with a steep learning curve and flexible syntax. 1. Python syntax is intuitive and suitable for data science and back-end development. 2. JavaScript is flexible and widely used in front-end and server-side programming.
 Golang vs. Python: Performance and Scalability
Apr 19, 2025 am 12:18 AM
Golang vs. Python: Performance and Scalability
Apr 19, 2025 am 12:18 AM
Golang is better than Python in terms of performance and scalability. 1) Golang's compilation-type characteristics and efficient concurrency model make it perform well in high concurrency scenarios. 2) Python, as an interpreted language, executes slowly, but can optimize performance through tools such as Cython.
 Where to write code in vscode
Apr 15, 2025 pm 09:54 PM
Where to write code in vscode
Apr 15, 2025 pm 09:54 PM
Writing code in Visual Studio Code (VSCode) is simple and easy to use. Just install VSCode, create a project, select a language, create a file, write code, save and run it. The advantages of VSCode include cross-platform, free and open source, powerful features, rich extensions, and lightweight and fast.
 How to run python with notepad
Apr 16, 2025 pm 07:33 PM
How to run python with notepad
Apr 16, 2025 pm 07:33 PM
Running Python code in Notepad requires the Python executable and NppExec plug-in to be installed. After installing Python and adding PATH to it, configure the command "python" and the parameter "{CURRENT_DIRECTORY}{FILE_NAME}" in the NppExec plug-in to run Python code in Notepad through the shortcut key "F6".
