

How to build a document scanner in Python?

Translator | Bugatti
Reviewer | Sun Shujuan
You may want to digitize documents to save physical space or create backups. In any case, writing a program to convert photos of paper documents into a quasi-format is exactly what Python is good at.
Using a combination of appropriate libraries, you can build a small application to digitize documents. Your program will take an image of a physical document as input, apply several image processing techniques to it, and output a scanned version of the input.
1. Prepare the environment
First of all, you should be familiar with the basics of Python, and you also need to know how to use the NumPy Python library.
Open any Python IDE and create two Python files. Name one main.py and the other transform.py. Then execute the following command on the terminal to install the required libraries.
pip install OpenCV-Python imutils scikit-image NumPy
You will use OpenCV-Python to take image input and do some image processing, use Imutils to resize the input and output images, and use scikit-image to threshold the images. NumPy will help you with arrays.
Wait for the installation to complete and for the IDE to update the backbone of the project. Once the backbone content is updated, you can start programming. The complete source code can be found in the GitHub repository.
2. Import the installed library
Open the main.py file and import the installed library. This will enable you to call and use their functions when necessary.
import cv2
import imutils
from skimage.filters import threshold_local
from transform import perspective_transform
Ignore errors thrown by perspective_transform. Once you've finished processing the transform.py file, the error will disappear.
3. Obtain and adjust the input size
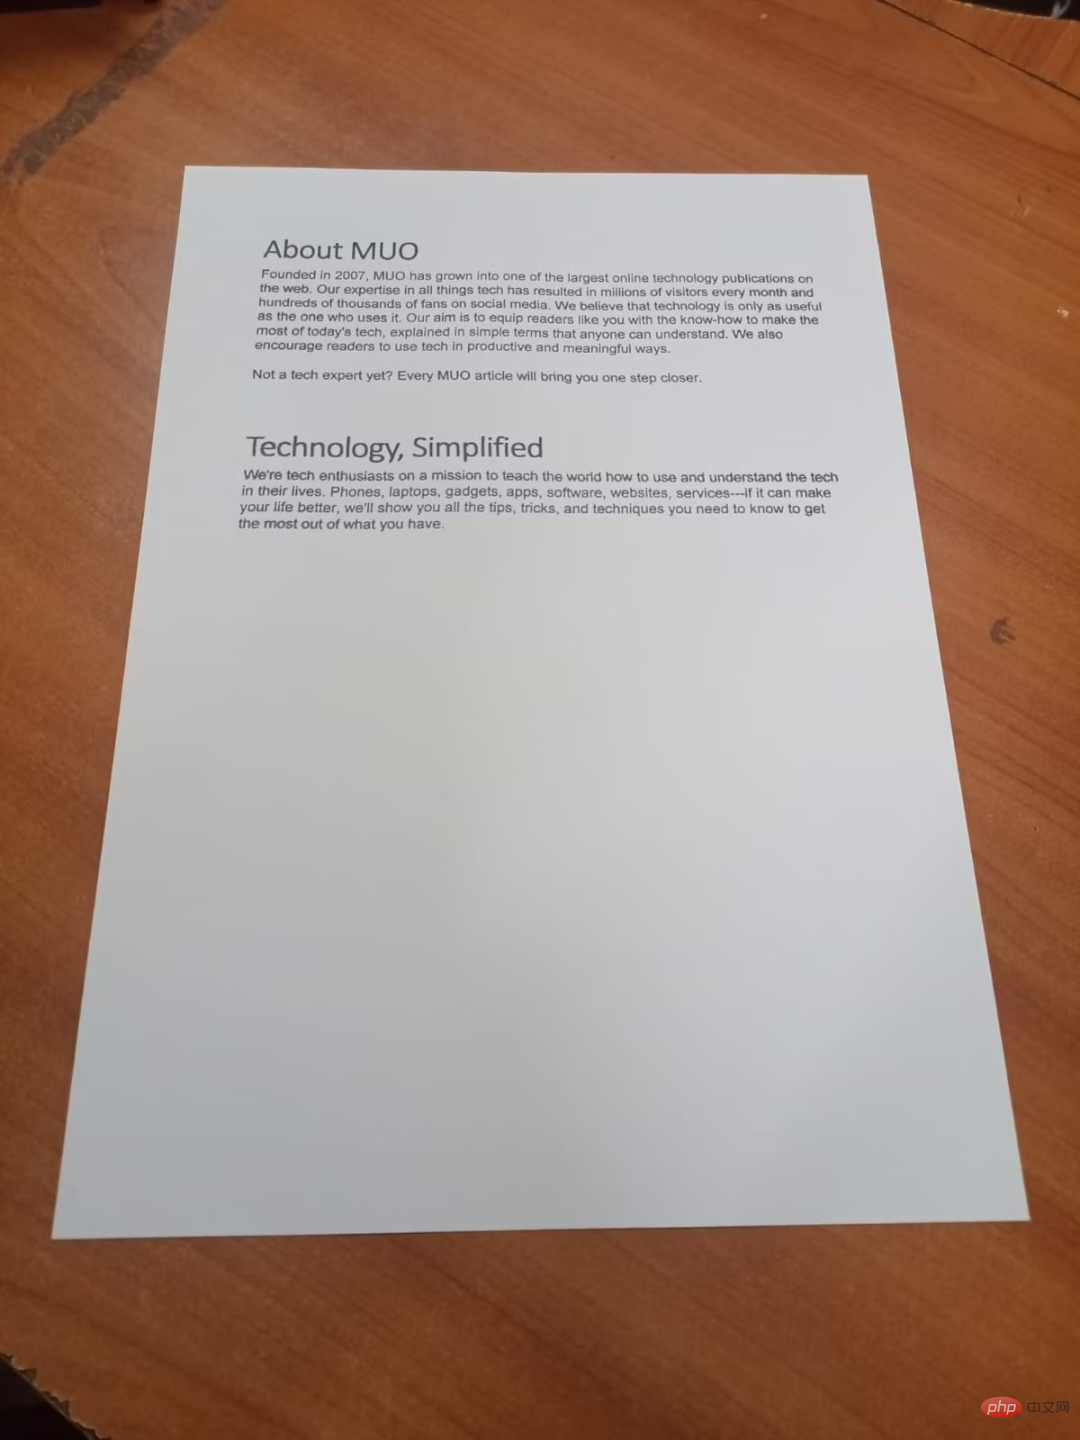
Take a clear image of the document you want to scan. Make sure all four corners of the document and its contents are visible. Copy the image to the same folder where the program files are stored.
Pass the input image path to OpenCV. Make a copy of the original image as you will need it during the perspective transformation. Divide the height of the original image by the height you want to resize it to. This will maintain the aspect ratio. Finally, the adjusted image is output.
# Passing the image path
original_img = cv2.imread('sample.jpg')
copy = original_img.copy()

# The resized height in hundreds
ratio = original_img.shape[0] / 500.0
img_resize = imutils.resize(original_img, height=500)

# Displaying output
cv2.imshow('Resized image', img_resize)

# Waiting for the user to press any key
cv2.waitKey(0)The output of the above code is as follows:
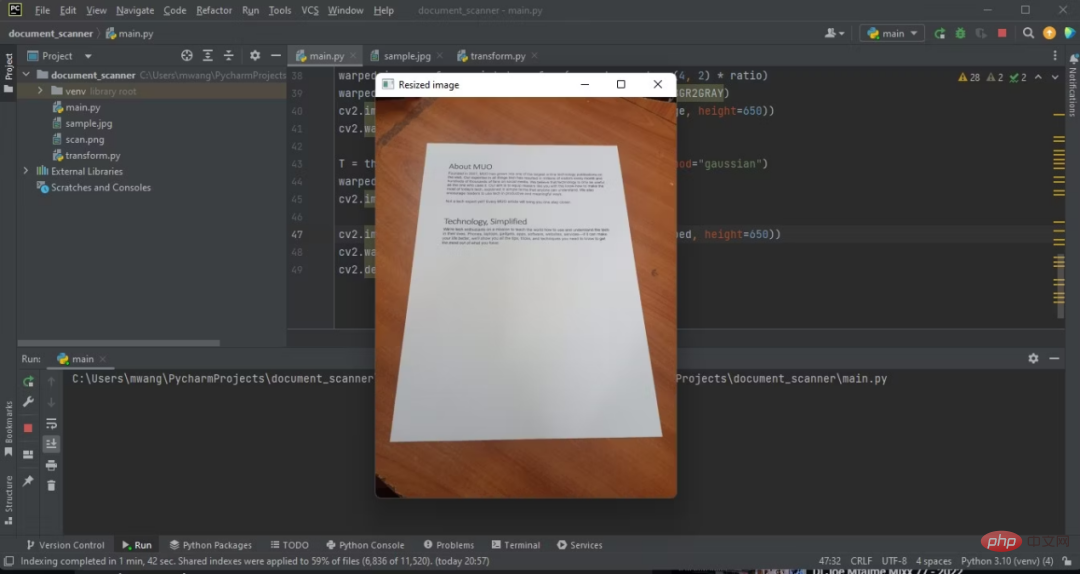
Now you have The height of the original image is adjusted to 500 pixels.
4. Convert the adjusted image to grayscale image
Convert the adjusted RGB image to grayscale image. Most image processing libraries only handle grayscale images because they are easier to process.
gray_image = cv2.cvtColor(img_resize, cv2.COLOR_BGR2GRAY)
cv2.imshow('Grayed Image', gray_image)
cv2.waitKey(0)Note the difference between the original image and the grayscale image.
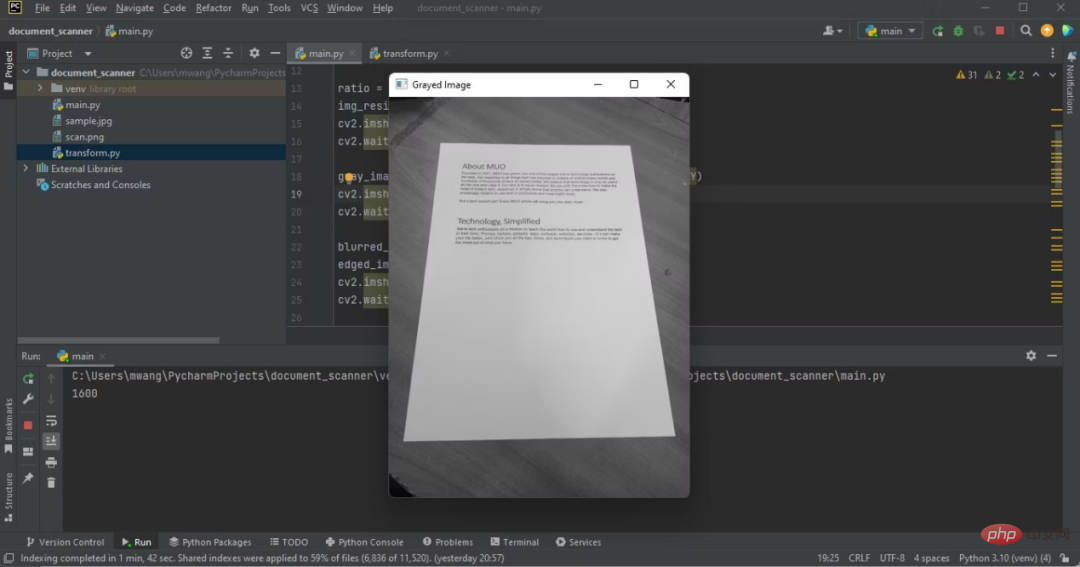
Program output showing gray image on IDE
The color table becomes a black and white table.
5. Use edge detector
Apply Gaussian blur filter to grayscale image to remove noise. The OpenCV canny function is then called to detect the edges present in the image.
blurred_image = cv2.GaussianBlur(gray_image, (5, 5), 0)
edged_img = cv2.Canny(blurred_image, 75, 200)
cv2.imshow('Image edges', edged_img)
cv2.waitKey(0)Edges are visible on the output.
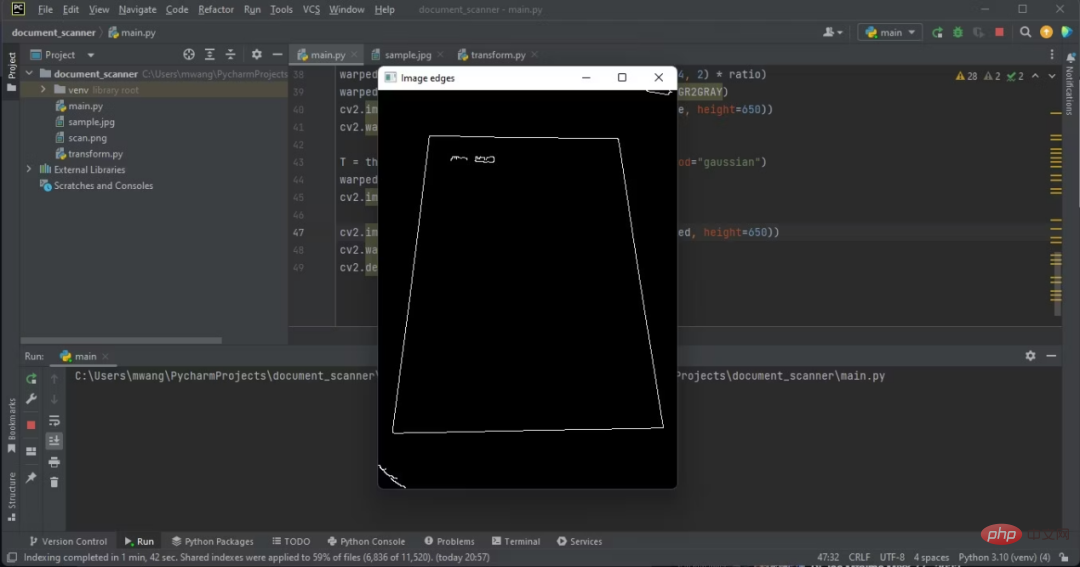
The edges you will be working on are the edges of the document.
6. Find the largest contour
Detect the contour in the edge image. Sort in descending order, keeping only the five largest contours. By cyclically sorting the contours, the largest four-sided contour is approximately obtained.
cnts, _ = cv2.findContours(edged_img, cv2.RETR_LIST, cv2.CHAIN_APPROX_SIMPLE)
cnts = sorted(cnts, key=cv2.contourArea, reverse=True)[:5]

for c in cnts:
peri = cv2.arcLength(c, True)
approx = cv2.approxPolyDP(c, 0.02 * peri, True)

if len(approx) == 4:
doc = approx
break
An outline with four sides is likely to contain documents.
7. Circle the four corners of the document outline
Circle the corners of the detected document outline. This will help you determine whether your program is able to detect the document in the image.
p = []

for d in doc:
tuple_point = tuple(d[0])
cv2.circle(img_resize, tuple_point, 3, (0, 0, 255), 4)
p.append(tuple_point)

cv2.imshow('Circled corner points', img_resize)
cv2.waitKey(0)Circle a few corners of the adjusted RGB image.
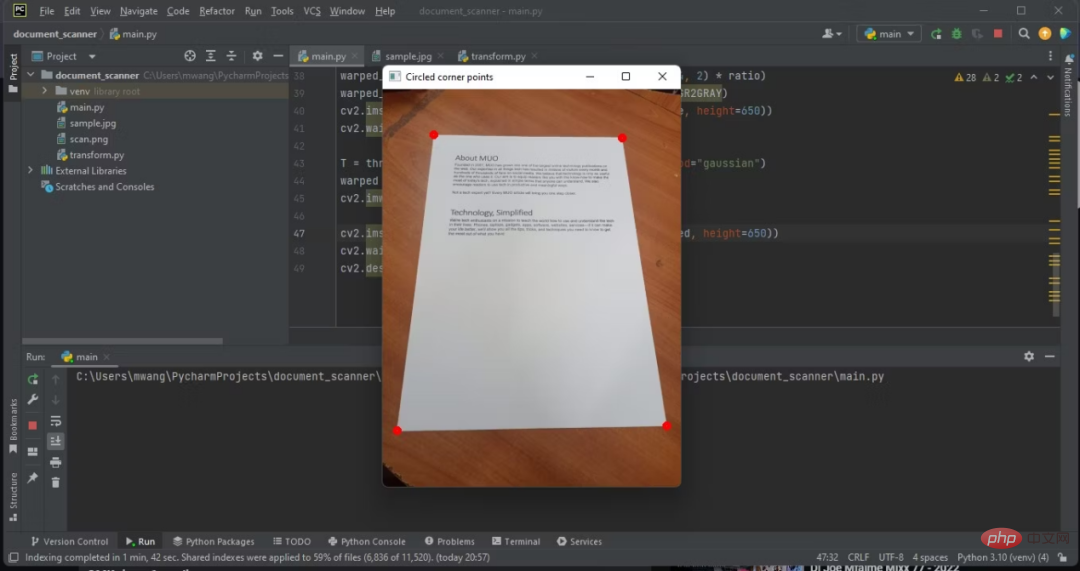
After detecting the document, you now need to extract it from the image.
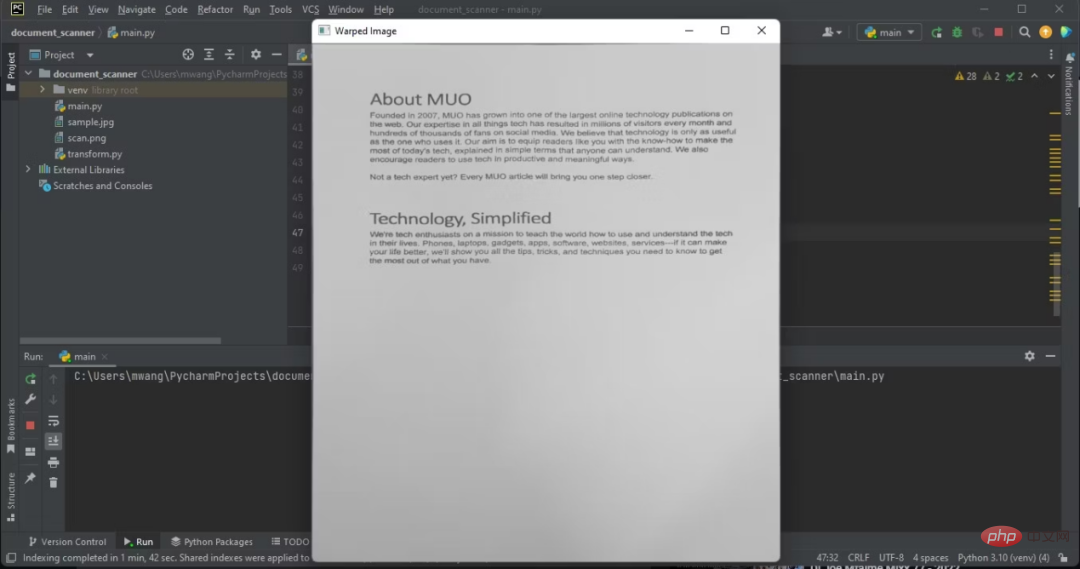
8. Use warp perspective to get the desired image
Warp perspective is a computer vision technique used to transform images to correct distortion. It transforms the image into different planes, allowing you to view the image from different angles.
warped_image = perspective_transform(copy, doc.reshape(4, 2) * ratio)
warped_image = cv2.cvtColor(warped_image, cv2.COLOR_BGR2GRAY)
cv2.imshow("Warped Image", imutils.resize(warped_image, height=650))
cv2.waitKey(0)In order to get the distorted image, you need to create a simple module to perform the perspective transformation.
9. Conversion module
该模块将对文档角的点进行排序。它还会将文档图像转换成不同的平面,并将相机角度更改为俯拍。
打开之前创建的那个transform.py文件,导入OpenCV库和NumPy库。
import numpy as np
import cv2
这个模块将含有两个函数。创建一个对文档角点的坐标进行排序的函数。第一个坐标将是左上角的坐标,第二个将是右上角的坐标,第三个将是右下角的坐标,第四个将是左下角的坐标。
def order_points(pts):
 # initializing the list of coordinates to be ordered
 rect = np.zeros((4, 2), dtype = "float32")

 s = pts.sum(axis = 1)

 # top-left point will have the smallest sum
 rect[0] = pts[np.argmin(s)]

 # bottom-right point will have the largest sum
 rect[2] = pts[np.argmax(s)]

 '''computing the difference between the points, the
 top-right point will have the smallest difference,
 whereas the bottom-left will have the largest difference'''
 diff = np.diff(pts, axis = 1)
 rect[1] = pts[np.argmin(diff)]
 rect[3] = pts[np.argmax(diff)]

 # returns ordered coordinates
 return rect
创建将计算新图像的角坐标,并获得俯拍的第二个函数。然后,它将计算透视变换矩阵,并返回扭曲的图像。
def perspective_transform(image, pts):
 # unpack the ordered coordinates individually
 rect = order_points(pts)
 (tl, tr, br, bl) = rect

 '''compute the width of the new image, which will be the
 maximum distance between bottom-right and bottom-left
 x-coordinates or the top-right and top-left x-coordinates'''
 widthA = np.sqrt(((br[0] - bl[0]) ** 2) + ((br[1] - bl[1]) ** 2))
 widthB = np.sqrt(((tr[0] - tl[0]) ** 2) + ((tr[1] - tl[1]) ** 2))
 maxWidth = max(int(widthA), int(widthB))

 '''compute the height of the new image, which will be the
 maximum distance between the top-left and bottom-left y-coordinates'''
 heightA = np.sqrt(((tr[0] - br[0]) ** 2) + ((tr[1] - br[1]) ** 2))
 heightB = np.sqrt(((tl[0] - bl[0]) ** 2) + ((tl[1] - bl[1]) ** 2))
 maxHeight = max(int(heightA), int(heightB))

 '''construct the set of destination points to obtain an overhead shot'''
 dst = np.array([
[0, 0],
[maxWidth - 1, 0],
[maxWidth - 1, maxHeight - 1],
[0, maxHeight - 1]], dtype = "float32")

 # compute the perspective transform matrix
 transform_matrix = cv2.getPerspectiveTransform(rect, dst)

 # Apply the transform matrix
 warped = cv2.warpPerspective(image, transform_matrix, (maxWidth, maxHeight))

 # return the warped image
 return warped
现在您已创建了转换模块。perspective_transform导入方面的错误现在将消失。
注意,显示的图像有俯拍。
10、运用自适应阈值,保存扫描输出
在main.py文件中,对扭曲的图像运用高斯阈值。这将给扭曲的图像一个扫描后的外观。将扫描后的图像输出保存到含有程序文件的文件夹中。
T = threshold_local(warped_image, 11, offset=10, method="gaussian")
warped = (warped_image > T).astype("uint8") * 255
cv2.imwrite('./'+'scan'+'.png',warped)以PNG格式保存扫描件可以保持文档质量。
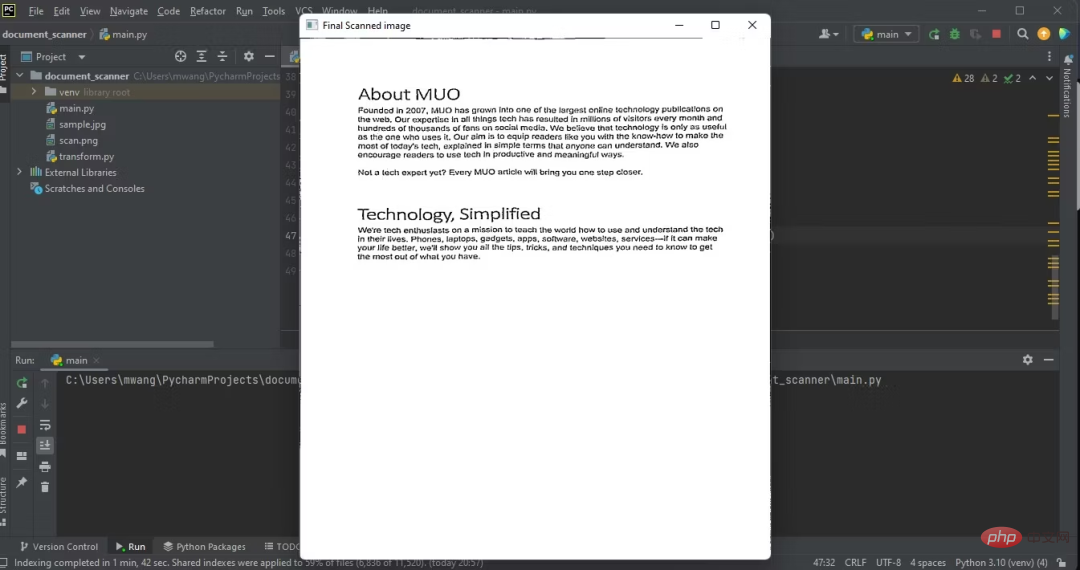
11、显示输出
输出扫描后文档的图像:
cv2.imshow("Final Scanned image", imutils.resize(warped, height=650))
cv2.waitKey(0)
cv2.destroyAllWindows()下图显示了程序的输出,即扫描后文档的俯拍。
12、计算机视觉在如何进步?
创建文档扫描器涉及计算机视觉的一些核心领域,计算机视觉是一个广泛而复杂的领域。为了在计算机视觉方面取得进步,您应该从事有趣味又有挑战性的项目。
您还应该阅读如何将计算机视觉与当前前技术结合使用方面的更多信息。这让您能了解情况,并为所处理的项目提供新的想法。
原文链接:https://www.makeuseof.com/python-create-document-scanner/
The above is the detailed content of How to build a document scanner in Python?. For more information, please follow other related articles on the PHP Chinese website!

Hot AI Tools

Undresser.AI Undress
AI-powered app for creating realistic nude photos

AI Clothes Remover
Online AI tool for removing clothes from photos.

Undress AI Tool
Undress images for free

Clothoff.io
AI clothes remover

Video Face Swap
Swap faces in any video effortlessly with our completely free AI face swap tool!

Hot Article
Hot Tools

Notepad++7.3.1
Easy-to-use and free code editor

SublimeText3 Chinese version
Chinese version, very easy to use

Zend Studio 13.0.1
Powerful PHP integrated development environment

Dreamweaver CS6
Visual web development tools

SublimeText3 Mac version
God-level code editing software (SublimeText3)
Hot Topics
 1658
1658
 14
1415
52
1309
25
1257
29
1231
24
14
1415
52
1309
25
1257
29
1231
24

 PHP and Python: Different Paradigms Explained
Apr 18, 2025 am 12:26 AM
PHP and Python: Different Paradigms Explained
Apr 18, 2025 am 12:26 AM
PHP is mainly procedural programming, but also supports object-oriented programming (OOP); Python supports a variety of paradigms, including OOP, functional and procedural programming. PHP is suitable for web development, and Python is suitable for a variety of applications such as data analysis and machine learning.
 Choosing Between PHP and Python: A Guide
Apr 18, 2025 am 12:24 AM
Choosing Between PHP and Python: A Guide
Apr 18, 2025 am 12:24 AM
PHP is suitable for web development and rapid prototyping, and Python is suitable for data science and machine learning. 1.PHP is used for dynamic web development, with simple syntax and suitable for rapid development. 2. Python has concise syntax, is suitable for multiple fields, and has a strong library ecosystem.
 PHP and Python: A Deep Dive into Their History
Apr 18, 2025 am 12:25 AM
PHP and Python: A Deep Dive into Their History
Apr 18, 2025 am 12:25 AM
PHP originated in 1994 and was developed by RasmusLerdorf. It was originally used to track website visitors and gradually evolved into a server-side scripting language and was widely used in web development. Python was developed by Guidovan Rossum in the late 1980s and was first released in 1991. It emphasizes code readability and simplicity, and is suitable for scientific computing, data analysis and other fields.
 Python vs. JavaScript: The Learning Curve and Ease of Use
Apr 16, 2025 am 12:12 AM
Python vs. JavaScript: The Learning Curve and Ease of Use
Apr 16, 2025 am 12:12 AM
Python is more suitable for beginners, with a smooth learning curve and concise syntax; JavaScript is suitable for front-end development, with a steep learning curve and flexible syntax. 1. Python syntax is intuitive and suitable for data science and back-end development. 2. JavaScript is flexible and widely used in front-end and server-side programming.
 How to run sublime code python
Apr 16, 2025 am 08:48 AM
How to run sublime code python
Apr 16, 2025 am 08:48 AM
To run Python code in Sublime Text, you need to install the Python plug-in first, then create a .py file and write the code, and finally press Ctrl B to run the code, and the output will be displayed in the console.
 Where to write code in vscode
Apr 15, 2025 pm 09:54 PM
Where to write code in vscode
Apr 15, 2025 pm 09:54 PM
Writing code in Visual Studio Code (VSCode) is simple and easy to use. Just install VSCode, create a project, select a language, create a file, write code, save and run it. The advantages of VSCode include cross-platform, free and open source, powerful features, rich extensions, and lightweight and fast.
 Can visual studio code be used in python
Apr 15, 2025 pm 08:18 PM
Can visual studio code be used in python
Apr 15, 2025 pm 08:18 PM
VS Code can be used to write Python and provides many features that make it an ideal tool for developing Python applications. It allows users to: install Python extensions to get functions such as code completion, syntax highlighting, and debugging. Use the debugger to track code step by step, find and fix errors. Integrate Git for version control. Use code formatting tools to maintain code consistency. Use the Linting tool to spot potential problems ahead of time.
 How to run python with notepad
Apr 16, 2025 pm 07:33 PM
How to run python with notepad
Apr 16, 2025 pm 07:33 PM
Running Python code in Notepad requires the Python executable and NppExec plug-in to be installed. After installing Python and adding PATH to it, configure the command "python" and the parameter "{CURRENT_DIRECTORY}{FILE_NAME}" in the NppExec plug-in to run Python code in Notepad through the shortcut key "F6".
