

How to implement simple GUI login and registration interface in Java

Look at the renderings first:
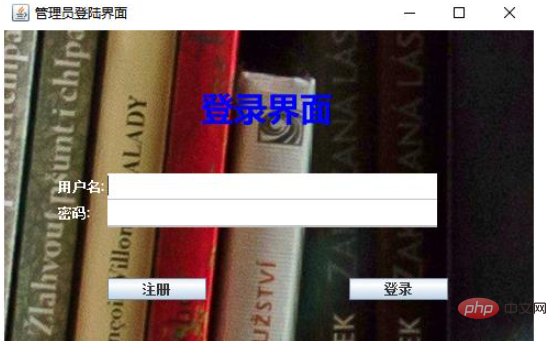
Login interface:
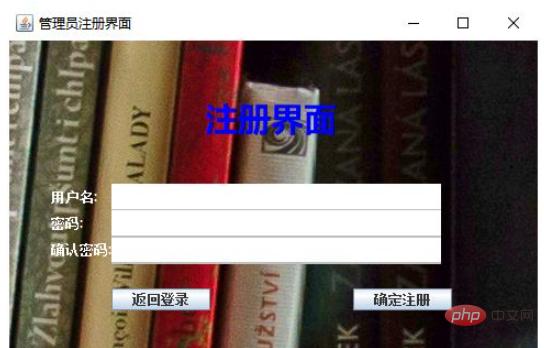
Registration interface:
The implementation code is as follows:
1. Login interface
package cn.bms.view;

import java.awt.Color;
import java.awt.Dimension;
import java.awt.Font;
import java.awt.event.ActionEvent;
import java.awt.event.ActionListener;

import javax.swing.ImageIcon;
import javax.swing.JButton;
import javax.swing.JFrame;
import javax.swing.JLabel;
import javax.swing.JPanel;
import javax.swing.JTextField;
import javax.swing.border.MatteBorder;

import cn.bms.tools.GUITools;

/*
 * 登录窗口
 */
@SuppressWarnings("serial")
public class AdminLogin extends JFrame {
    private JPanel contentPanel = new JPanel();
    // Label标签存放背景图片
    private JLabel label;
    // 设置按钮组件
    private JButton login = new JButton("登录"), register = new JButton("注册");

    private JLabel jlb1 = new JLabel("用户名:"), jlb2 = new JLabel("密码:"), jlbtitle = new JLabel("登录界面");
    // 设置文本框组件
    private JTextField admin = new JTextField(), password = new JTextField();

    public AdminLogin() {
        this.init();
        this.addListener();
    }

    private void init() {
        this.setTitle("管理员登陆界面");
        this.setSize(500, 350);
        GUITools.center(this);
        ImageIcon image1 = new ImageIcon("837878.jpg"); // 界面背景图片
        JLabel backLabel = new JLabel();
        backLabel.setIcon(image1);
        label = new JLabel(image1);
        label.setBounds(0, 0, 1000, 400);
        // 在LayeredPane最底层上添加两个带图片的标签,并且label2在label上方
        this.getLayeredPane().add(label, new Integer(Integer.MIN_VALUE));
        // 将内容面板设置为透明,就能够看见添加在LayeredPane上的背景。
        ((JPanel) this.getContentPane()).setOpaque(false);

        /*
         * 添加组件到contentPanel容器中 布局方式为自由布局。
         */
        contentPanel.setLayout(null);
        add(admin);
        add(password);
        add(login);
        add(register);
        add(jlb1);
        add(jlb2);
        add(jlbtitle);

        /*
         * 组件绝对位置
         */
        jlb1.setBounds(50, 130, 90, 25);
        jlb1.setForeground(Color.WHITE);
        admin.setBounds(95, 130, 300, 25);
        password.setBounds(95, 154, 300, 25);
        jlb2.setBounds(50, 154, 90, 25);
        jlb2.setForeground(Color.WHITE);
        register.setBounds(95, 225, 90, 20);
        login.setBounds(315, 225, 90, 20);
        jlbtitle.setBounds(180, 45, 200, 50);
        Font f = new Font("微软雅黑", Font.BOLD, 30);
        jlbtitle.setFont(f);
        jlbtitle.setForeground(Color.BLUE);

        /*
         * 组件透明化
         */
        admin.setOpaque(true);
        password.setOpaque(true);
        contentPanel.setOpaque(false);
        getContentPane().add(contentPanel);

        /*
         * 组件边框颜色
         */
        textSet(admin);
        textSet(password);
    }

    /*
     * JTextField文本框设置方法.
     */
    private void textSet(JTextField field) {
        field.setBackground(new Color(255, 255, 255));
        field.setPreferredSize(new Dimension(150, 28));
        MatteBorder border = new MatteBorder(0, 0, 2, 0, new Color(192, 192, 192));
        field.setBorder(border);
    }

    /*
     * 事件监听
     */
    private void addListener() {
        login.addActionListener(new ActionListener() {
            @Override
            public void actionPerformed(ActionEvent e) {
                forLogin(admin.getText(), password.getText());
            }

        });
        register.addActionListener(new ActionListener() {
            @Override
            public void actionPerformed(ActionEvent e) {
                forRegister();
            }

        });
    }

    // 登录方法
    public void forLogin(String admin, String pwd) {
    }

    // 注册方法
    public void forRegister() {
    }
}2. Registration interface:
package cn.bms.view;

import java.awt.Color;
import java.awt.Dimension;
import java.awt.Font;
import java.awt.event.ActionEvent;
import java.awt.event.ActionListener;

import javax.swing.ImageIcon;
import javax.swing.JButton;
import javax.swing.JFrame;
import javax.swing.JLabel;
import javax.swing.JPanel;
import javax.swing.JTextField;
import javax.swing.border.MatteBorder;

import cn.bms.controller.AdminLoginController;
import cn.bms.tools.GUITools;

/*
 * 注册窗口
 */
@SuppressWarnings("serial")
public class AdminRegister extends JFrame {
    private JPanel contentPanel = new JPanel();
    // Label标签存放背景图片
    private JLabel label;
    // 设置按钮组件
    private JButton ok = new JButton("确定注册"), back = new JButton("返回登录");

    private JLabel jlb1 = new JLabel("用户名:"), jlb2 = new JLabel("密码:"), jlb3 = new JLabel("确认密码:"),
            jlbtitle = new JLabel("注册界面");
    // 设置文本框组件
    private JTextField admin = new JTextField(), password1 = new JTextField(), password2 = new JTextField();

    public AdminRegister() {
        this.init();
        this.addListener();
    }

    private void init() {
        this.setTitle("管理员注册界面");
        this.setSize(500, 350);
        GUITools.center(this);
        ImageIcon image1 = new ImageIcon("837878.jpg"); // 界面背景图片
        JLabel backLabel = new JLabel();
        backLabel.setIcon(image1);
        label = new JLabel(image1);
        label.setBounds(0, 0, 1000, 400);
        // 在LayeredPane最底层上添加两个带图片的标签,并且label2在label上方
        this.getLayeredPane().add(label, new Integer(Integer.MIN_VALUE));
        // 将内容面板设置为透明,就能够看见添加在LayeredPane上的背景。
        ((JPanel) this.getContentPane()).setOpaque(false);

        /*
         * 添加组件到contentPanel容器中 布局方式为自由布局。
         */
        contentPanel.setLayout(null);
        add(admin);
        add(password1);
        add(password2);
        add(ok);
        add(back);
        add(jlb1);
        add(jlb2);
        add(jlb3);
        add(jlbtitle);

        /*
         * 组件绝对位置
         */
        jlb1.setBounds(40, 130, 90, 25);
        jlb1.setForeground(Color.WHITE);
        admin.setBounds(95, 130, 300, 25);

        password1.setBounds(95, 154, 300, 25);
        jlb2.setBounds(40, 154, 90, 25);
        jlb2.setForeground(Color.WHITE);

        password2.setBounds(95, 178, 300, 25);
        jlb3.setBounds(40, 178, 90, 25);
        jlb3.setForeground(Color.WHITE);

        ok.setBounds(315, 225, 90, 20);
        back.setBounds(95, 225, 90, 20);

        jlbtitle.setBounds(180, 45, 200, 50);
        Font f = new Font("微软雅黑", Font.BOLD, 30);
        jlbtitle.setFont(f);
        jlbtitle.setForeground(Color.BLUE);

        /*
         * 组件透明化
         */
        admin.setOpaque(true);
        password1.setOpaque(true);
        password2.setOpaque(true);
        contentPanel.setOpaque(false);
        getContentPane().add(contentPanel);

        /*
         * 组件边框颜色
         */
        textSet(admin);
        textSet(password1);
        textSet(password2);
    }

    /*
     * JTextField文本框设置方法.
     */
    private void textSet(JTextField field) {
        field.setBackground(new Color(255, 255, 255));
        field.setPreferredSize(new Dimension(150, 28));
        MatteBorder border = new MatteBorder(0, 0, 2, 0, new Color(192, 192, 192));
        field.setBorder(border);
    }

    /*
     * 事件监听
     */
    private void addListener() {
        ok.addActionListener(new ActionListener() {
            @Override
            public void actionPerformed(ActionEvent e) {
                setRegister(admin.getText(), password1.getText(), password2.getText());
            }
        });
        back.addActionListener(new ActionListener() {
            @Override
            public void actionPerformed(ActionEvent e) {
                new AdminLoginController().setVisible(true);
            }
        });
    }

    // 实现注册账户方法
    public void setRegister(String admin, String pwd1, String pwd2) {
    }
}The above is the detailed content of How to implement simple GUI login and registration interface in Java. For more information, please follow other related articles on the PHP Chinese website!

Hot AI Tools

Undresser.AI Undress
AI-powered app for creating realistic nude photos

AI Clothes Remover
Online AI tool for removing clothes from photos.

Undress AI Tool
Undress images for free

Clothoff.io
AI clothes remover

Video Face Swap
Swap faces in any video effortlessly with our completely free AI face swap tool!

Hot Article
Hot Tools

Notepad++7.3.1
Easy-to-use and free code editor

SublimeText3 Chinese version
Chinese version, very easy to use

Zend Studio 13.0.1
Powerful PHP integrated development environment

Dreamweaver CS6
Visual web development tools

SublimeText3 Mac version
God-level code editing software (SublimeText3)
Hot Topics
 1666
1666
 14
1425
52
1327
25
1273
29
1252
24
14
1425
52
1327
25
1273
29
1252
24

 Break or return from Java 8 stream forEach?
Feb 07, 2025 pm 12:09 PM
Break or return from Java 8 stream forEach?
Feb 07, 2025 pm 12:09 PM
Java 8 introduces the Stream API, providing a powerful and expressive way to process data collections. However, a common question when using Stream is: How to break or return from a forEach operation? Traditional loops allow for early interruption or return, but Stream's forEach method does not directly support this method. This article will explain the reasons and explore alternative methods for implementing premature termination in Stream processing systems. Further reading: Java Stream API improvements Understand Stream forEach The forEach method is a terminal operation that performs one operation on each element in the Stream. Its design intention is
 PHP: A Key Language for Web Development
Apr 13, 2025 am 12:08 AM
PHP: A Key Language for Web Development
Apr 13, 2025 am 12:08 AM
PHP is a scripting language widely used on the server side, especially suitable for web development. 1.PHP can embed HTML, process HTTP requests and responses, and supports a variety of databases. 2.PHP is used to generate dynamic web content, process form data, access databases, etc., with strong community support and open source resources. 3. PHP is an interpreted language, and the execution process includes lexical analysis, grammatical analysis, compilation and execution. 4.PHP can be combined with MySQL for advanced applications such as user registration systems. 5. When debugging PHP, you can use functions such as error_reporting() and var_dump(). 6. Optimize PHP code to use caching mechanisms, optimize database queries and use built-in functions. 7
 PHP vs. Python: Understanding the Differences
Apr 11, 2025 am 12:15 AM
PHP vs. Python: Understanding the Differences
Apr 11, 2025 am 12:15 AM
PHP and Python each have their own advantages, and the choice should be based on project requirements. 1.PHP is suitable for web development, with simple syntax and high execution efficiency. 2. Python is suitable for data science and machine learning, with concise syntax and rich libraries.
 PHP vs. Other Languages: A Comparison
Apr 13, 2025 am 12:19 AM
PHP vs. Other Languages: A Comparison
Apr 13, 2025 am 12:19 AM
PHP is suitable for web development, especially in rapid development and processing dynamic content, but is not good at data science and enterprise-level applications. Compared with Python, PHP has more advantages in web development, but is not as good as Python in the field of data science; compared with Java, PHP performs worse in enterprise-level applications, but is more flexible in web development; compared with JavaScript, PHP is more concise in back-end development, but is not as good as JavaScript in front-end development.
 PHP vs. Python: Core Features and Functionality
Apr 13, 2025 am 12:16 AM
PHP vs. Python: Core Features and Functionality
Apr 13, 2025 am 12:16 AM
PHP and Python each have their own advantages and are suitable for different scenarios. 1.PHP is suitable for web development and provides built-in web servers and rich function libraries. 2. Python is suitable for data science and machine learning, with concise syntax and a powerful standard library. When choosing, it should be decided based on project requirements.
 PHP's Impact: Web Development and Beyond
Apr 18, 2025 am 12:10 AM
PHP's Impact: Web Development and Beyond
Apr 18, 2025 am 12:10 AM
PHPhassignificantlyimpactedwebdevelopmentandextendsbeyondit.1)ItpowersmajorplatformslikeWordPressandexcelsindatabaseinteractions.2)PHP'sadaptabilityallowsittoscaleforlargeapplicationsusingframeworkslikeLaravel.3)Beyondweb,PHPisusedincommand-linescrip
 PHP: The Foundation of Many Websites
Apr 13, 2025 am 12:07 AM
PHP: The Foundation of Many Websites
Apr 13, 2025 am 12:07 AM
The reasons why PHP is the preferred technology stack for many websites include its ease of use, strong community support, and widespread use. 1) Easy to learn and use, suitable for beginners. 2) Have a huge developer community and rich resources. 3) Widely used in WordPress, Drupal and other platforms. 4) Integrate tightly with web servers to simplify development deployment.
 PHP vs. Python: Use Cases and Applications
Apr 17, 2025 am 12:23 AM
PHP vs. Python: Use Cases and Applications
Apr 17, 2025 am 12:23 AM
PHP is suitable for web development and content management systems, and Python is suitable for data science, machine learning and automation scripts. 1.PHP performs well in building fast and scalable websites and applications and is commonly used in CMS such as WordPress. 2. Python has performed outstandingly in the fields of data science and machine learning, with rich libraries such as NumPy and TensorFlow.
