

How to check your printer IP address in Windows 11

Most early printers were connected to Windows systems via cables. But now, thanks to improvements in technology, you can wirelessly connect your printer to any Windows system and send print commands over the wireless network.
This makes it easier for users to share printers between multiple computers. But in order to connect over the network and pass print commands, you need to know the IP address of the printer.
Not many Windows users know how to find the IP address of their printer. If you also wish to know the IP address of your printer, follow this article to help users understand how to obtain the IP address of a printer.
How to check your printer IP address in Windows 11
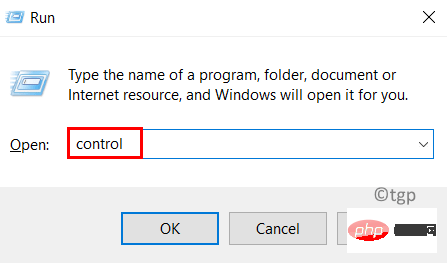
Step 1: Press the Windows and R keys simultaneously on your keyboard, Open the Run box.
Step 2: Then enter control in the run text box and press the Enter key.
Step 3: After opening the control panel page, select "Category" from the "View by" option, as follows shown.
Step 4: Click under Hardware and Sound Options to view devices and printers, as shown in the screenshot below.

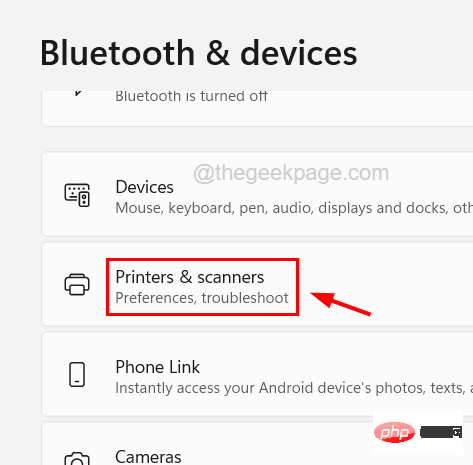
#Step 5: This will open the Bluetooth and Devices page.
Step 6: Click the Printers and Scanners option on the Bluetooth & Devices page.
Step 7: Select the printer from the list of printers and scanners as shown below.

Step 8: Now click on the Printer Properties option to open the properties window of the printer.

Step 9: In the Properties window under the General tab, you will select the Location ” text box to see the printer’s IP address, as shown below.

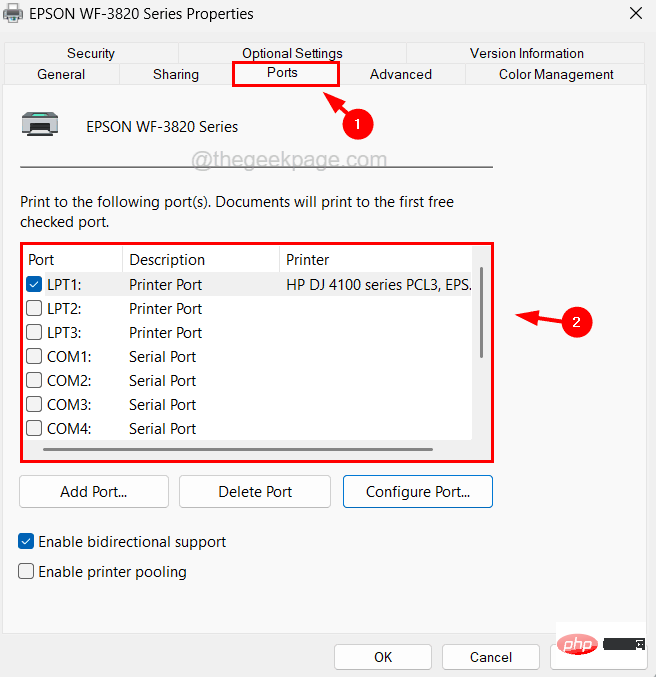
Step 10: Alternatively, you can do this by clicking on the Port tab and checking the Port Details ” to obtain the printer’s IP address.
Step 11: Once completed, you can close the properties window.
The above is the detailed content of How to check your printer IP address in Windows 11. For more information, please follow other related articles on the PHP Chinese website!

Hot AI Tools

Undresser.AI Undress
AI-powered app for creating realistic nude photos

AI Clothes Remover
Online AI tool for removing clothes from photos.

Undress AI Tool
Undress images for free

Clothoff.io
AI clothes remover

Video Face Swap
Swap faces in any video effortlessly with our completely free AI face swap tool!

Hot Article
Hot Tools

Notepad++7.3.1
Easy-to-use and free code editor

SublimeText3 Chinese version
Chinese version, very easy to use

Zend Studio 13.0.1
Powerful PHP integrated development environment

Dreamweaver CS6
Visual web development tools

SublimeText3 Mac version
God-level code editing software (SublimeText3)
Hot Topics


 7 Ways to Fix Printer Access Denied Error in Windows 11
May 10, 2023 pm 03:43 PM
7 Ways to Fix Printer Access Denied Error in Windows 11
May 10, 2023 pm 03:43 PM
Connecting your Windows computer to external devices such as printers can make things easier for you. However, you may encounter several problems when trying to collect computers from external devices such as printers. Users complain about Windows 11 printer access denied error. Many situations can cause this issue, including hardware issues, driver issues, and more. Therefore, this article will discuss the cause of the problem and how to solve it. Windows 11 printer access denied error prevents you from using the printer to perform any action on your computer. This indicates that there is not a good connection between the computer and the printer. Likewise, printer errors may cause Windows to be unable to connect to the printer Access Denied error 0x0000011b.
 Fix: Snipping Tool notification missing in Windows 11, 10
May 16, 2023 pm 06:34 PM
Fix: Snipping Tool notification missing in Windows 11, 10
May 16, 2023 pm 06:34 PM
Snip&Sketch is an excellent Windows screenshot tool. Microsoft has added tons of new cool features and shortcuts to make this tool almost indispensable for users. However, you may have noticed an issue after taking the screenshot, the preview notification does not appear in the notification panel! There are many reasons that could be the source of the problem. So, no need to waste more time, just follow these solutions to find a quick solution. Fix 1 – Check notification settings You may have blocked Snip & Sketch notification settings. 1. You have to open settings. So, press Windows key + I key at the same time. 2. Now, go to “System” from the left pane. 3. On the right side, click All Options
 Ghost Specter Windows 11 Superlite: Download and Installation Guide
May 05, 2023 am 09:10 AM
Ghost Specter Windows 11 Superlite: Download and Installation Guide
May 05, 2023 am 09:10 AM
Updating the operating system to the latest Windows 11 poses a challenge for many PCs due to insufficient system requirements. Therefore, Microsoft released a modified version, GhostSpectreWindows11Superlite, compatible with every PC. Therefore, we will discuss how to download and install it. Likewise, if your PC meets the Windows 11 system requirements, you can read further about obtaining a Windows 11 custom ISO. What is Ghost Windows 11? GhostSpectreWindows11 is a modified version called LightWindows11. This is because of the installed
 Fix issue where Windows 11 display language cannot be changed
May 07, 2023 am 10:10 AM
Fix issue where Windows 11 display language cannot be changed
May 07, 2023 am 10:10 AM
The display language is the front-end language in which users can read and view system screen content. Windows 11 releases updated versions regularly, but sometimes this causes some unexpected things to change. Many Windows users have noticed a change in Windows 11 systems where they cannot change their display language. They're not sure why this is happening. We suspect this may be due to a recent Windows version being installed on the system or having sync settings enabled to remember preferences for different devices. Don't worry if you encounter such problems when changing the display language. In this article, we have explained below some solutions that will help users to resolve this issue and be able to change the display language. build
 Windows 11 doesn't recognize Bootrec? Apply this simple fix
May 20, 2023 pm 01:50 PM
Windows 11 doesn't recognize Bootrec? Apply this simple fix
May 20, 2023 pm 01:50 PM
The boot sector is a critical part of the drive that takes over shortly after the computer boots. When you have a problem, bootrec is here to help. But what should you do if bootrec is not recognized in Windows 11? The boot sector contains the MBR or Master Boot Record, which helps locate the operating system on the drive and load it. Moreover, its issues may prevent you from booting Windows 11 efficiently or at all. Speaking of issues, many are reporting Bootrec/Fixboot access denied messages and we have detailed this issue in a separate tutorial. In this case, it is recommended that you run the bootrec command to eliminate this issue. If you encounter when running the command
 How to enable or disable Core Isolation Memory Integrity in Windows 11, 10
Apr 27, 2023 pm 10:43 PM
How to enable or disable Core Isolation Memory Integrity in Windows 11, 10
Apr 27, 2023 pm 10:43 PM
Today, most Windows users use virtual machines. When core isolation is disabled on their systems, security risks and attacks are to be expected. Even if core isolation is set, memory integrity is disabled if the user upgrades the system. If core isolation is enabled, the system will be protected from attacks. For people who frequently use virtual computers, it is highly recommended that they enable it. If you are looking for instructions on how to enable or disable Core Isolated Memory Integrity on any Windows 11 system, this page can help. How to Enable or Disable Core Isolation Memory Integrity in Windows 11 using the Windows Security app Step 1: Press the Windows key and type Windows Security
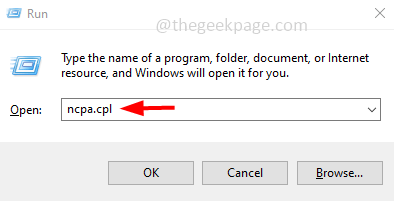 How to assign multiple IP addresses in one LAN card on Windows 10/11
May 30, 2023 am 11:25 AM
How to assign multiple IP addresses in one LAN card on Windows 10/11
May 30, 2023 am 11:25 AM
Sometimes it is necessary to assign multiple addresses to a single LAN card. For example, if you need to run multiple websites with unique IP addresses or bind applications to different IP addresses, etc. If you are thinking about how to assign multiple addresses to a single network interface card or LAN card, this article will help you achieve it. Follow the steps below till the end and it will be done. So let’s get started! Assign multiple IP addresses to one LAN card Step 1: Use the Windows+R keys together to open the run prompt and type ncpa.cpl, then press the Enter key to open the Network Connection window. Step 2: Right click on your network adapter Ethernet or WiFi option and click Properties. Step 3: From the Properties Window
 Which one is better? What are the differences, advantages and disadvantages of NTFS and ReFS in Windows 11?
May 10, 2023 am 08:06 AM
Which one is better? What are the differences, advantages and disadvantages of NTFS and ReFS in Windows 11?
May 10, 2023 am 08:06 AM
NTFS has always been the default file system for Windows PCs, but Microsoft is introducing some juicy stuff with ReFS. This new file system may be coming to Windows 11, and users are eager to know how NTFS will compare to ReFS. In this detailed guide, we will show you the better choice between these two file systems. Does Windows 11 support ReFS? Discussions about Windows 11 supporting ReFS (Resilient File System) are still tentative and ongoing. This file system is not officially available on Windows 11 PCs yet. However, DevsChannel and WindowsServe