

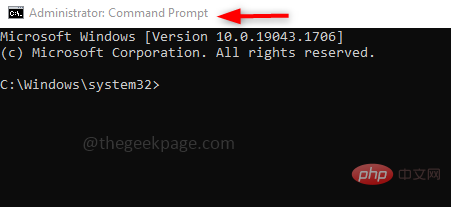
How to always open command prompt in administrative mode

We all use the command prompt in our daily work to execute commands, download, install applications, etc. Few tasks require opening the command prompt in administrative mode as it will have full permissions to successfully execute the command. So we follow the step by step process like enter cmd in the search bar and once it appears right click on it and click on run as administrator. This process takes a little time and can also be frustrating if the user needs to use the command prompt in administrator mode multiple times a day. Normally, when we use the terminal, it will be opened in the current user mode, which has restricted permissions for some execution commands. There is a solution to this problem, so let us discuss in this article how to run Command Prompt in Administrator mode by default.
How to set the command prompt to always run in administrator mode
We can open the command prompt and run in administrator mode through different methods. Follow any of these methods.
Method 1: Use the Command Prompt Shortcut
If you always use the Command Prompt in Administrator mode, follow this method as we will set the Command Prompt to be in Admin mode Run in operator mode until we restore settings.
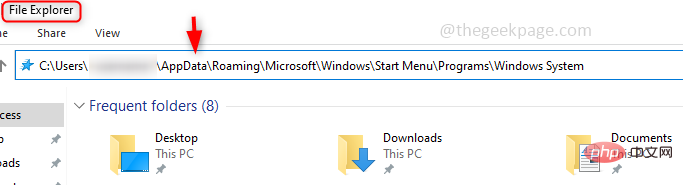
Step 1: Open File Explorer using the key ( Windows E ), then copy the following lines and paste them into the address bar middle.
C:\Users\%username%\AppData\Roaming\Microsoft\Windows\Start Menu\Programs\Windows System
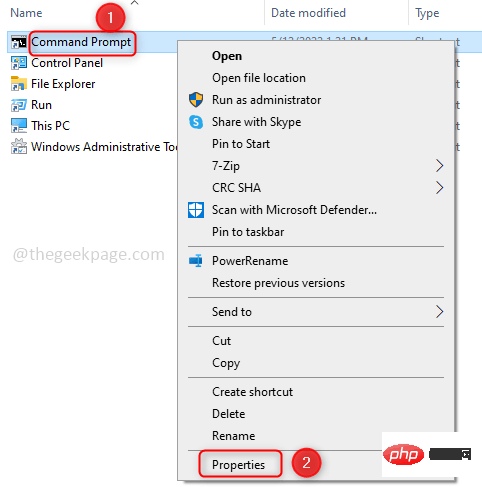
Step 2: This lists shortcuts for all applications, find the Command Prompt shortcut. Right click on it and click Properties. If you don't have a shortcut to cmd then you should create one.
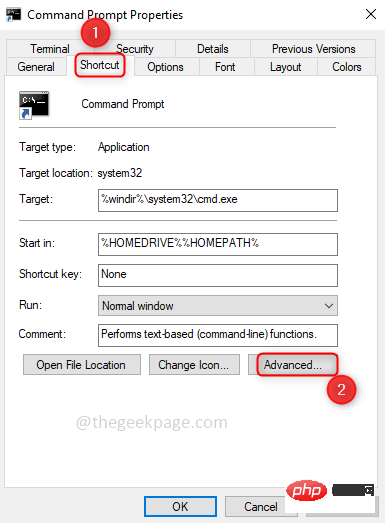
Step 3: Under Commands, prompt Properties click the Shortcutstab. Then click on the Advanced options below.
Step 4: Under Advanced Properties, click the checkbox Run as administrator. Then click OK.
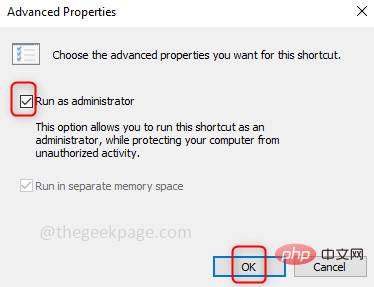
Step 5: Now, when you open the command prompt, it will be in Administrator mode. And before opening the command prompt window, it will ask for confirmation to make changes to the application, so click Yes.
Method 2: Change settings in the Registry Editor
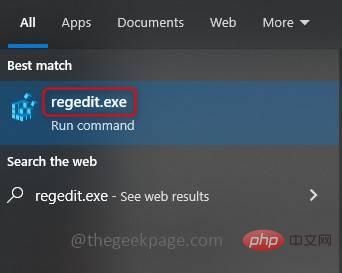
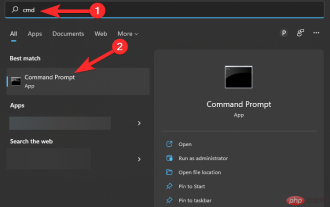
Step 1: By typing # in the Windows search bar ##regedit.exeOpen Registry Editor and click on it. A pop-up window will appear asking if you want to allow changes, click Yes.
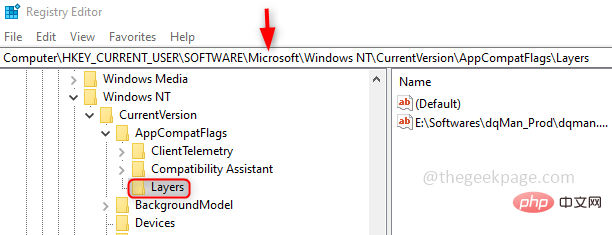
Step 2 : Navigate to the following path or Copy the following path and Paste itGo to the address bar of the Registry Editor. You will find the layer folder
计算机\HKEY_CURRENT_USER\SOFTWARE\Microsoft\Windows NT\CurrentVersion\AppCompatFlags\Layers
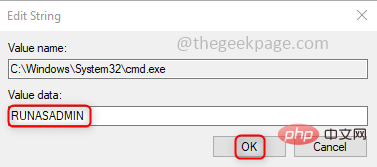
Step 3: After entering the layer folder, right click Click on it, then click New in the list. Then click String value. Name it C:\Windows\System32\cmd.exe, this is the path where cmd.exe is located. If you put it in a different location, please give its full path.
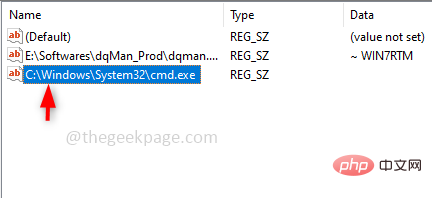
Step 4: Right-click on the name you created now and click Modify to add value. Enter RUNASADMIN in the numerical data and click OK.
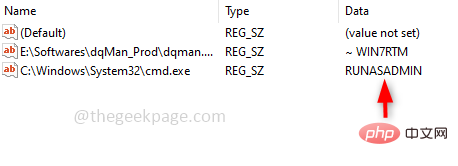
Step 5: Now, when you open the command prompt, it will use administrator mode.
Method 3: Use the shortcut key Typecmd in the Windows search bar and click Ctrl Shift Enter## at the same time #key. This will bring up a window asking if you need permission to make changes to the application. Click Yes. Now the command prompt will open in administrator mode.
The above is the detailed content of How to always open command prompt in administrative mode. For more information, please follow other related articles on the PHP Chinese website!

Hot AI Tools

Undresser.AI Undress
AI-powered app for creating realistic nude photos

AI Clothes Remover
Online AI tool for removing clothes from photos.

Undress AI Tool
Undress images for free

Clothoff.io
AI clothes remover

Video Face Swap
Swap faces in any video effortlessly with our completely free AI face swap tool!

Hot Article
Hot Tools

Notepad++7.3.1
Easy-to-use and free code editor

SublimeText3 Chinese version
Chinese version, very easy to use

Zend Studio 13.0.1
Powerful PHP integrated development environment

Dreamweaver CS6
Visual web development tools

SublimeText3 Mac version
God-level code editing software (SublimeText3)
Hot Topics


 How to run a JAR file on Windows 11 or 10
May 12, 2023 pm 06:34 PM
How to run a JAR file on Windows 11 or 10
May 12, 2023 pm 06:34 PM
Windows 11 is capable of running a large number of file types with or without external third-party applications. Not only does it allow you to perform numerous tasks from the comfort of your PC, but it also ensures that you can take advantage of your PC's raw capabilities. Today, we'll take a look at a complex file type—jar—and tell you how to open it on your Windows 11 or Windows 10 PC. What is a jar file? jar is an archive package format that may or may not contain an executable Java program. These archives can contain Java applications or source code, which can then be used to compile and run applications without having to write separate code for each application. You can use various methods
 How to install CAB files on Windows 11
Apr 30, 2023 pm 10:10 PM
How to install CAB files on Windows 11
Apr 30, 2023 pm 10:10 PM
What is a CAB file? The extension of CAB file is .cab, which is the abbreviation of WindowsCabinet file. This is a compressed file typically used to compress software installation packages such as device drivers or update files. CAB files support lossless compression, which makes the format ideal for compressing files where it is critical that the files can be extracted accurately, such as drivers and other updates. How to Install a CAB File on Windows 11 Using Command Prompt There are multiple ways to install a CAB file on Windows 11. One of the methods is to use command prompt to extract and install the files. You can also use the newer Windows PowerShell
 How to fix the problem in Valorant that requires a system restart before playing?
Apr 24, 2023 pm 11:58 PM
How to fix the problem in Valorant that requires a system restart before playing?
Apr 24, 2023 pm 11:58 PM
Cheating has always been a big problem in online FPS games, even if Valorant didn't exist. It can ruin the gaming experience and reduce player interest in the game. Valorant has tried to overcome this shortcoming since its early days with its own RiotVanguard protection system. You need to restart the system after installing the game once. This is completely normal and the Vanguard system will start automatically. However, if you restart your system and still see "Your game requires a system restart to play. Please restart your computer." Leave a message on the home page? Many users have encountered this problem, so don’t worry. Follow these fixes for a quick solution. Fix 1 – Don’t quit Pioneer after restarting your computer
 How to fix application error 0xc0000906 on Windows PC
Apr 18, 2023 pm 10:55 PM
How to fix application error 0xc0000906 on Windows PC
Apr 18, 2023 pm 10:55 PM
Some users are encountering the error “Application Error 0xc0000906” while trying to run the application on their systems and they are unable to proceed. A single application or multiple applications on your system may encounter this error. This may be due to file corruption, caching issues, use of third-party antivirus software that may block software applications, etc. In this article, we have some solutions that can help users eliminate the error. Try executing the command to scan system files and disable antivirus software as described below. So let’s get started! Method 1: Run SFC and DISM Scan Step 1 – Open Command Prompt as Administrator. To do this, type cmd in the window search bar, then hold down the ctrl+shift keys and press enter
 How to safely set high priority for apps in Windows 11?
May 06, 2023 pm 06:28 PM
How to safely set high priority for apps in Windows 11?
May 06, 2023 pm 06:28 PM
Windows does a great job of allocating system resources to the processes and programs that need it most by assigning priorities to them. Most applications you install will run perfectly fine at the default "normal" priority level. Sometimes, however, you may need to run a program, such as a game, at a higher level than the default normal level to improve its performance. But this comes at a cost, and it's a deal worth pondering. What happens when you set an app to high priority? Windows has a total of six priority levels for running different processes and programs - low, below normal, normal, above normal, high and real-time. Windows will rank and queue applications based on their priority. The higher the priority, the application
 3 Ways to Open System 32 Folder on Windows 11 or 10
May 04, 2023 pm 10:01 PM
3 Ways to Open System 32 Folder on Windows 11 or 10
May 04, 2023 pm 10:01 PM
What is the System32 folder? System32 is one of the main folders used by Windows. During Windows installation, all necessary files and folders that are critical for the proper functioning of Windows are copied to this folder. These include important system files, related executable files used by Windows utilities, dynamic link libraries (DLLs), and even some software files are copied to this folder. However, don't be fooled by the name System32. This is true for both 32-bit and 64-bit computers. In a 64-bit machine, the System32 folder hosts the 64-bit files, while the 32-bit files are located in
 How to quickly resolve Windows activation error code 0xc004c020?
Apr 26, 2023 pm 03:19 PM
How to quickly resolve Windows activation error code 0xc004c020?
Apr 26, 2023 pm 03:19 PM
Many of our readers have reported the 0xC004C020 error when trying to connect their computers to their organization's servers. This error prevents activation of its Windows operating system. While errors can be frustrating, we'll guide you through error 0xC004C020 when trying to activate Windows on an organization-linked computer. What causes error 0xC004C020? If you are trying to activate Windows on an organization-linked computer and encounter error 0xC004C020, the possible causes may be as follows: Non-MAK keys – If a non-MAK key is used on an organization-linked computer, the organization’s policies will It is not allowed to be activated. Key access lost after formatting
 How to fix srttrail.txt on Windows 11
Apr 18, 2023 am 10:43 AM
How to fix srttrail.txt on Windows 11
Apr 18, 2023 am 10:43 AM
For Windows users, there is nothing more annoying than having to face a blue screen error, especially one that is accompanied by a system crash. srttrail.txt error is one of them. While not technically a BSOD, bugs in your auto-repair environment are still symptoms of deeper issues derailing Windows and require intervention. What is srttrail.txt error? The srttrail.txt text file mentioned in the message is just a log maintained by Windows for all instances when it fails to start properly, and it will continue to appear if Windows gets stuck on startup. This error message mainly occurs at system startup, but may also occur in Windo