
 Backend Development
Python Tutorial
Python batch watermarking only requires one line of commands!
Backend Development
Python Tutorial
Python batch watermarking only requires one line of commands!
Python batch watermarking only requires one line of commands!


When working, especially self-media workers, watermark adding tools are necessary to protect intellectual property images. There are many online/downloaded watermark adding tools on the Internet, but they may There are at least one of the following problems:
1. Online tools need to upload pictures to the other party's server, and the information is not secure.
2. Many tools do not have batch processing capabilities.
3. Many tools have too few customizable functions, such as watermark transparency, fonts, etc.
4. The operation is cumbersome.
Now as long as you know how to use commands, we can teach you how to use Python to add watermarks to pictures super easily, and it has the following features:
1. Supports custom watermark fonts.
2. Support custom text content and color.
3. Support batch processing.
4. Support setting the space between watermarks.
5. Support setting watermark font size.
6. Support setting transparency.
7. Your own code, safe.
We need to use the 2Dou open source project:
https://www.php.cn/link/4b5b81483048c8942ed00caaa17b9535
Very useful open source project, thanks to the original author.
There are three ways to download this project:
1. If your network can access github, you can enter the page, click clone or download and then click Download Zip.
2. If you have downloaded git, you can use cmd/terminal to enter the folder where you want to place it, and enter the command:
git clone https://www.php.cn/link/4b5b81483048c8942ed00caaa17b9535.git
3. If you don’t have one, you can directly reply to the watermark in the background of the Python Practical Collection official account Download the complete code for the repaired version of this article.
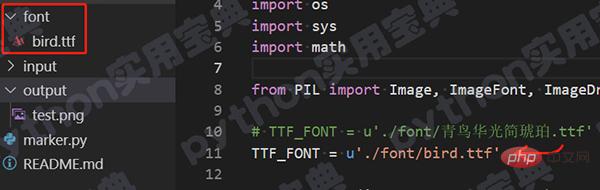
Download and unzip it to any folder you want to place it. It is best not to include Chinese names in the path. If you downloaded using the first two methods and are a Windows system user, be careful to change the font file name of the project to English. In addition, there is also a place in marker.py that needs to be changed. As follows:
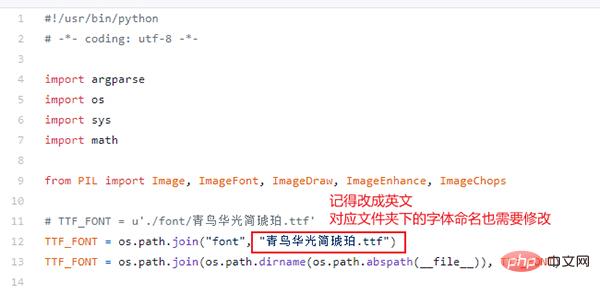
Change the Blue Bird Huaguang Jane Amber.ttf in the font folder to bird.ttf. It doesn’t matter what the name is. The key point is not to use a Chinese name, otherwise pillow The modified file will not be available.
Note that the tenth line in the marker.py file should be changed to the corresponding name, corresponding to the font file name in the font folder.
We just mentioned the pillow library. The operation of this package requires the use of this third-party library, which is specially used to process images. Open CMD/Terminal and enter the following command to install:
pip install pillow
After the installation is complete, we can try it! The most common example is as follows. Place the pictures you need to watermark in the input folder of the project, then enter the folder where you store the project in cmd/Terminal and enter the following commands:
python marker.py -f ./input/baby.jpg -m python实用宝典
each The meaning of the parameters is as follows:
-f File path: It is the path of your picture
-m Text content: It is the content of the watermark you want to make
The parameters are not The setting is the default value. After the operation is completed, the corresponding watermarked picture will appear in the output folder. The effect is as follows:

Add watermark
The default watermark color is...shit yellow picture?
But it doesn’t matter, we can modify its color and add the -c parameter! (The default format of the parameter is # followed by 6 hexadecimal digits). Using the image tool, we can find the value of your favorite color:
Then we enter the command:
python marker.py -f ./input/baby.jpg -m python实用宝典 -c #232862
Success ! Take a look at the effect:

#Modify the watermark color
Yeah! It looks better, but it seems that the color of the watermark is a bit dark. We can modify the transparency to make it lighter. The default transparency is 0.15, which can make this value smaller. Set the opacity parameter:
python marker.py -f ./input/baby.jpg -m python实用宝典 -c #232862 --opacity 0.08
The result is as follows:

The watermark becomes more transparent
In fact, there are other parameters, we will not show them one by one, there are these parameters in total:
- -f 参数,指定打水印的文件,如果你想打印整个文件夹,则输入该文件夹路径即可。
- -m 参数,指定水印内容。
- -o 参数,指定输出水印文件的位置,默认为output文件夹。
- -c 参数,指定水印的颜色,默认值为shi..啊不,黄色,#8B8B1B.
- -s 参数,指定水印与水印之间的空隙,默认值为75.
- -a 参数,指定水印的旋转角度,我们的例子中都是默认值30度。
- --size参数,指定水印文本字体大小,默认值为50。
- --opacity参数,指定透明度,默认为0.15,数值越小越透明。
接下来给大家试试批量处理功能,首先把所有图片放置到项目的input文件夹下:
然后输入命令里,指定文件夹即可!
python marker.py -f ./input -m python实用宝典 -c #232862 --o
你会看到input文件夹名后没有/baby.jpg了,这表明将input文件夹下所有的图片打水印。

看到 文件名 succes 则说明批处理成功!
还有一个隐藏功能!如果你想要修改字体也可以哦!还记得我们前面怎么修复windows的中文名问题吗?如图,你只要将新的字体文件放到font文件夹下,然后修改TTF_FONT变量里的字体名字,与font文件夹下的新字体名字相对应即可改成你想要的字体了图片!
修改字体
我们的文章到此就结束啦,如果你希望我们今天的Python教程,请持续关注我们,如果对你有帮助,麻烦在下面点一个赞/在看哦图片有任何问题都可以在下方留言区留言,我们都会耐心解答的!
The above is the detailed content of Python batch watermarking only requires one line of commands!. For more information, please follow other related articles on the PHP Chinese website!

Hot AI Tools

Undresser.AI Undress
AI-powered app for creating realistic nude photos

AI Clothes Remover
Online AI tool for removing clothes from photos.

Undress AI Tool
Undress images for free

Clothoff.io
AI clothes remover

Video Face Swap
Swap faces in any video effortlessly with our completely free AI face swap tool!

Hot Article
Hot Tools

Notepad++7.3.1
Easy-to-use and free code editor

SublimeText3 Chinese version
Chinese version, very easy to use

Zend Studio 13.0.1
Powerful PHP integrated development environment

Dreamweaver CS6
Visual web development tools

SublimeText3 Mac version
God-level code editing software (SublimeText3)
Hot Topics
 1665
1665
 14
1424
52
1322
25
1270
29
1250
24
14
1424
52
1322
25
1270
29
1250
24

 PHP and Python: Different Paradigms Explained
Apr 18, 2025 am 12:26 AM
PHP and Python: Different Paradigms Explained
Apr 18, 2025 am 12:26 AM
PHP is mainly procedural programming, but also supports object-oriented programming (OOP); Python supports a variety of paradigms, including OOP, functional and procedural programming. PHP is suitable for web development, and Python is suitable for a variety of applications such as data analysis and machine learning.
 Choosing Between PHP and Python: A Guide
Apr 18, 2025 am 12:24 AM
Choosing Between PHP and Python: A Guide
Apr 18, 2025 am 12:24 AM
PHP is suitable for web development and rapid prototyping, and Python is suitable for data science and machine learning. 1.PHP is used for dynamic web development, with simple syntax and suitable for rapid development. 2. Python has concise syntax, is suitable for multiple fields, and has a strong library ecosystem.
 How to run sublime code python
Apr 16, 2025 am 08:48 AM
How to run sublime code python
Apr 16, 2025 am 08:48 AM
To run Python code in Sublime Text, you need to install the Python plug-in first, then create a .py file and write the code, and finally press Ctrl B to run the code, and the output will be displayed in the console.
 Python vs. JavaScript: The Learning Curve and Ease of Use
Apr 16, 2025 am 12:12 AM
Python vs. JavaScript: The Learning Curve and Ease of Use
Apr 16, 2025 am 12:12 AM
Python is more suitable for beginners, with a smooth learning curve and concise syntax; JavaScript is suitable for front-end development, with a steep learning curve and flexible syntax. 1. Python syntax is intuitive and suitable for data science and back-end development. 2. JavaScript is flexible and widely used in front-end and server-side programming.
 PHP and Python: A Deep Dive into Their History
Apr 18, 2025 am 12:25 AM
PHP and Python: A Deep Dive into Their History
Apr 18, 2025 am 12:25 AM
PHP originated in 1994 and was developed by RasmusLerdorf. It was originally used to track website visitors and gradually evolved into a server-side scripting language and was widely used in web development. Python was developed by Guidovan Rossum in the late 1980s and was first released in 1991. It emphasizes code readability and simplicity, and is suitable for scientific computing, data analysis and other fields.
 Golang vs. Python: Performance and Scalability
Apr 19, 2025 am 12:18 AM
Golang vs. Python: Performance and Scalability
Apr 19, 2025 am 12:18 AM
Golang is better than Python in terms of performance and scalability. 1) Golang's compilation-type characteristics and efficient concurrency model make it perform well in high concurrency scenarios. 2) Python, as an interpreted language, executes slowly, but can optimize performance through tools such as Cython.
 Where to write code in vscode
Apr 15, 2025 pm 09:54 PM
Where to write code in vscode
Apr 15, 2025 pm 09:54 PM
Writing code in Visual Studio Code (VSCode) is simple and easy to use. Just install VSCode, create a project, select a language, create a file, write code, save and run it. The advantages of VSCode include cross-platform, free and open source, powerful features, rich extensions, and lightweight and fast.
 How to run python with notepad
Apr 16, 2025 pm 07:33 PM
How to run python with notepad
Apr 16, 2025 pm 07:33 PM
Running Python code in Notepad requires the Python executable and NppExec plug-in to be installed. After installing Python and adding PATH to it, configure the command "python" and the parameter "{CURRENT_DIRECTORY}{FILE_NAME}" in the NppExec plug-in to run Python code in Notepad through the shortcut key "F6".
