
 Backend Development
Python Tutorial
An introductory guide to high-performance computing with Python based on Taichi
Backend Development
Python Tutorial
An introductory guide to high-performance computing with Python based on Taichi
An introductory guide to high-performance computing with Python based on Taichi

Since the birth of the Python programming language, its core philosophy has been to maximize the readability and simplicity of the code. Python's pursuit of readability and simplicity is almost crazy. One fact can confirm this: as long as you enter the command "import this" in the root directory of the Python system and press the Enter key, a small English poem will be printed immediately, which translated into Chinese roughly means:
"Beautiful is better than ugly, explicit is better than implicit.
Simple is better than complex, complex is better than complex.
Flat is better than nested, sparse is better than dense.
Readability is very important...”
Simplicity is better than complexity, and readability is very important. There is no doubt that Python is indeed very successful in achieving these goals: it is by far the most user-friendly language to learn, and an ordinary Python program is usually 5 to 10 times shorter than the equivalent C code. Unfortunately, there's a catch: Python's simplicity comes at the expense of performance! In fact, Python programs are 10 to 100 times slower than their C counterparts. Therefore, it seems that there is a permanent trade-off between speed and simplicity, and it is impossible for any programming language to have both.
But don’t worry, all hope is not lost.
Taichi offers the best of both worlds
The Taichi programming language is an attempt to extend the Python programming language with a structure that supports general-purpose, high-performance computing. It supports seamless embedding into Python, while taking advantage of all the computing power in your computer - including multi-core CPU capabilities and, more importantly, GPU performance.
In this article we will show a sample program written using Taichi. This program uses the GPU to perform a real-time physics simulation of a piece of cloth falling on a sphere, while simultaneously rendering the results.
Writing a real-time GPU physics simulator is no easy task, but the Taichi source code that implements this routine is extremely simple. The rest of this article will walk you through the entire implementation so you can get a feel for what Taichi offers, and how powerful and user-friendly they are.
Before we start, you might as well guess how many lines of code this program consists of. Of course, you'll find the answer at the end of the article.
Algorithm Overview
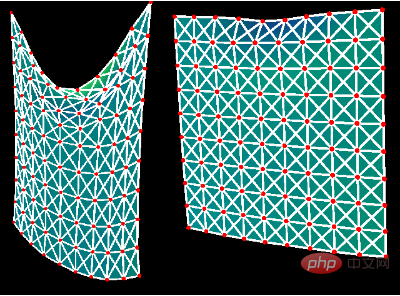
Our program will model a piece of cloth as a mass spring system. More specifically, we represent this cloth as an N×N grid of point masses, where adjacent points are connected by springs. The figure below, provided by Matthew Fisher of Stanford University, illustrates this structure.
The movement of this mass spring system is affected by 4 factors:
- Gravity
- The internal force of the spring
- Dampening
- Collision with the red ball sandwiched in the middle
For the sake of simplicity, we ignore the self-collision of the cloth. Our program starts at t=0. Then, at each step of the simulation, it advances time by a small constant dt. The program estimates what will happen to the system during this small period of time by evaluating the influence of each of the 4 factors mentioned above, and updates the position and velocity of each mass point at the end of the time step. The updated particle positions are then used to update the image rendered on the screen.
Program Start
Although Taichi is a programming language in its own right, it exists as a Python package, which can be installed by simply running pip install Taichi.
To use Taichi in a Python program, you first need to import Taichi using the alias ti:
import taichi as ti
If your machine has an Nvidia GPU that supports CUDA, the performance of the Taichi program will be maximized . If this is the case, add the following line of code after the above import statement:
ti.init(arch=ti.cuda)
If you don't have a CUDA GPU, Taichi can still be accessed via other graphics APIs such as ti.metal, ti.vulkan, and ti.opengl ) to interact with your GPU. However, Taichi's support for these APIs is not as comprehensive as its support for CUDA. So, for now, we use CPU as the calculation backend:
ti.init(arch=ti.cpu)
Don't worry, Taichi will run very fast even if it only runs on CPU. After initializing Taichi, we can start declaring the data structure used to describe the mass spring cloth. To do this, we add the following lines of code:
N = 128
x = ti.Vector.field(3, float, (N, N))
v = ti.Vector.field(3, float, (N, N))
These three lines declare x and v as two-dimensional arrays of size N × N, where each element of the array is a three-dimensional vector of floating point numbers. In Taichi, the arrays are called "fields" and the two fields record the position and velocity of the point mass respectively. Note that if you initialize Taichi to run on a CUDA GPU, these fields/arrays will automatically be stored in GPU memory. In addition to the cloth, we also need to define the ball in the middle:
ball_radius = 0.2
ball_center = ti.Vector.field(3, float, (1,))
Here, the center of the ball is a 1D field of size 1, and its individual components are a 3D float vector. After declaring the required fields, let's initialize these fields with the corresponding data at t=0. We want to ensure that, for any pair of adjacent points on the same row or column, the distance between them is equal to cell_size=1.0/N. This is achieved with the following initialization routine:
def init_scene():
for i, j in ti.ndrange(N, N):
x[i, j] = ti.Vector([i * cell_size,
j * cell_size / ti.sqrt(2),
(N - j) * cell_size / ti.sqrt(2)])
ball_center[0] = ti.Vector([0.5, -0.5, 0.0])
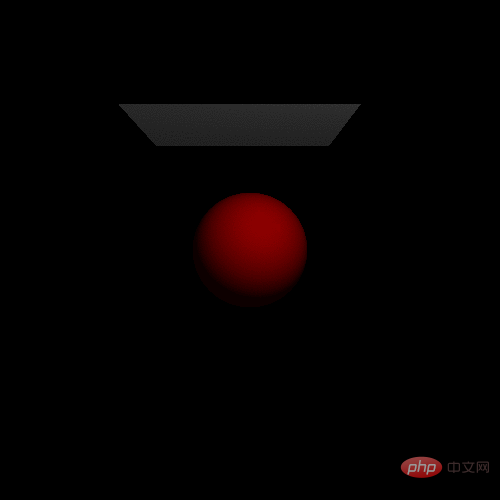
Here, you don't need to worry about the meaning behind each x[i,j] value - it is simply chosen so that the cloth falls at a 45 degree corner , refer to the figure below.
模拟
在每个时间步中,我们的程序都会模拟影响布料运动的4个因素:重力、弹簧内力、阻尼和与红球的碰撞。其中,重力是最容易处理的。
下面是实现这一点的代码:
@ti.kernel
def step():
for i in ti.grouped(v):
v[i].y -= gravity * dt
这里有两点需要注意。首先,语句for i in ti.grouped(x)意味着将循环迭代x的所有元素,而不管x中有多少维度。其次,也是最重要的是:注解@ti.kernel意味着Taichi将自动并行运行函数中的任何顶级for循环。在本例中,Taichi将并行更新v中每个N*N向量的y分量。
接下来,我们来处理弦线的内力计算问题。首先,请注意前面图形中的每个质点最多连接到八个邻接质点。这些连接在我们的程序中表示如下:
 links = [[-1, 0], [1, 0], [0, -1], [0, 1], [-1, -1], [1, -1], [-1, 1], [1, 1]
links = [ti.Vector(v) for v in links]
从物理角度来看,系统中的每个弹簧s都用固定长度l(s,0)初始化。在任何时间t,如果s的当前长度l(s,t)超过l(s,0),则弹簧将在其端点上施加力,将它们拉在一起。相反,如果l(s,t)小于l(s,0),则弹簧会将端点彼此推开。这些力的大小始终与l(s,0)-l(s,0)的绝对值成正比。此交互由以下代码段捕获:
 for i in ti.grouped(x):
force = ti.Vector([0.0,0.0,0.0])
for d in ti.static(links):
j = min(max(i + d, 0), [N-1,N-1])
relative_pos = x[j] - x[i]
current_length = relative_pos.norm()
original_length = cell_size * float(i-j).norm()
if original_length != 0:
force +=stiffness * relative_pos.normalized() *
(current_length - original_length) /
original_length
v[i] +=force * dt
请注意,这个for循环仍应作为substep函数中的顶级for循环,该函数用@ti.kernel注解。这样可以确保并行计算施加到每个质点的弹簧力。stiffness在此是一个常数,用于控制弹簧长度变化的程度。在上述程序中,我们使用stiffness =1600指定它的值。在现实世界中,当弹簧振动时,弹簧中储存的能量会消散到周围环境中,其振动最终停止。为了捕捉这种效应,在每个时间步,我们稍微降低每个点的速度大小:
for i in ti.grouped(x):
v[i] *= ti.exp(-damping * dt)
在此,damping取固定值2。
我们还需要处理布料和红球之间的碰撞。要做到这一点,我们只需将质点与球接触时的速度降低到0。这样可以确保布料“挂”在球上,而不是穿透球或向下滑动:
if (x[i]-ball_center[0]).norm() <= ball_radius:
v[i] = ti.Vector([0.0, 0.0, 0.0])
最后,我们用每个质点的速度更新其自身的位置:
x[i] += dt * v[i]
这就是我们对一块质量弹簧布料进行并行模拟所需的全部代码。
渲染
我们将使用Taichi内置的基于GPU的GUI系统(昵称是“GGUI”)渲染布料。GGUI使用Vulkan图形API进行渲染,因此请确保您的计算机上安装了Vulkan(https://docs.taichi.graphics/lang/articles/misc/ggui)。GGUI支持渲染两种类型的3D对象:三角形网格和粒子。在我们的示例中,将把布料渲染为三角形网格,把红色球渲染为单个粒子。
GGUI表示一个三角形网格,包含两个Taichi场:一个顶点(vertices)场和一个索引(indices)场。顶点场是一个一维场,其中每个元素提取是一个表示顶点位置的三维向量,可能由多个三角形共享。在我们的应用程序中,每个点质量都是一个三角形顶点,因此我们可以简单地将数据从x复制到vertices:
 vertices = ti.Vector.field(3, float, N * N)
@ti.kernel
def set_vertices():
for i, j in ti.ndrange(N, N):
vertices[i * N + j] = x[i, j]
请注意,每一帧都需要调用set_vertices,因为顶点位置不断被模拟更新。
我们的布料是用一个质点的N×N网格表示,也可以被看作一个由(N-1)×(N-1)小正方形组成的网格。每个正方形都将渲染为两个三角形。因此,总共有(N-1)×(N-1)×2个三角形。每个三角形将在顶点场中表示为3个整数,该场记录顶点场中三角形顶点的索引。以下代码片段捕获了这一结构:
num_triangles = (N - 1) * (N - 1) * 2
indices = ti.field(int, num_triangles * 3)
@ti.kernel
def set_indices():
for i, j in ti.ndrange(N, N):
if i < N - 1 and j < N - 1:
square_id = (i * (N - 1)) + j
#正方形的第一个小三角形
indices[square_id * 6 + 0] = i * N + j
indices[square_id * 6 + 1] = (i + 1) * N + j
indices[square_id * 6 + 2] = i * N + (j + 1)
#正方形的第二个小三角形
indices[square_id * 6 + 3] = (i + 1) * N + j + 1
indices[square_id * 6 + 4] = i * N + (j + 1)
indices[square_id * 6 + 5] = (i + 1) * N + j
请注意,与函数set_vertices不同,函数set_indices只需要调用一次。这是因为三角形顶点的索引实际上并没有改变——只是位置在改变。
为了将红球渲染为粒子,我们实际上不需要准备任何数据,我们之前定义的ball_center和ball_radius变量就是GGUI所需要的全部内容。
完整代码
至此,我们已经介绍完本文示例程序的所有核心函数!下面代码展示了我们如何调用这些函数:
 init()
set_indices()
window = ti.ui.Window("Cloth", (800, 800), vsync=True)
canvas = window.get_canvas()
scene = ti.ui.Scene()
camera = ti.ui.make_camera()
while window.running:
for i in range(30):
step()
set_vertices()
camera.position(0.5, -0.5, 2)
camera.lookat(0.5, -0.5, 0)
scene.set_camera(camera)
scene.point_light(pos=(0.5, 1, 2), color=(1, 1, 1))
scene.mesh(vertices, indices=indices, color=(0.5, 0.5, 0.5), two_sided = True)
scene.particles(ball_center, radius=ball_radius, color=(0.5, 0, 0))
canvas.scene(scene)
window.show()
需要注意的一个小细节是,我们将在主程序循环中的每一帧调用函数step()30次,而不是调用一次。这样做的目的就是让动画不会运行得太慢。把上述所有代码放在一起,整个程序应该是这样的:
 import taichi as ti
ti.init(arch=ti.cuda) # 另一种可选择方案: ti.init(arch=ti.cpu)
N = 128
cell_size = 1.0 / N
gravity = 0.5
stiffness = 1600
damping = 2
dt = 5e-4
ball_radius = 0.2
ball_center = ti.Vector.field(3, float, (1,))
x = ti.Vector.field(3, float, (N, N))
v = ti.Vector.field(3, float, (N, N))
num_triangles = (N - 1) * (N - 1) * 2
indices = ti.field(int, num_triangles * 3)
vertices = ti.Vector.field(3, float, N * N)
def init_scene():
for i, j in ti.ndrange(N, N):
x[i, j] = ti.Vector([i * cell_size ,
 j * cell_size / ti.sqrt(2),
 (N - j) * cell_size / ti.sqrt(2)])
ball_center[0] = ti.Vector([0.5, -0.5, -0.0])
@ti.kernel
def set_indices():
for i, j in ti.ndrange(N, N):
if i < N - 1 and j < N - 1:
square_id = (i * (N - 1)) + j
# 1st triangle of the square
indices[square_id * 6 + 0] = i * N + j
indices[square_id * 6 + 1] = (i + 1) * N + j
indices[square_id * 6 + 2] = i * N + (j + 1)
# 2nd triangle of the square
indices[square_id * 6 + 3] = (i + 1) * N + j + 1
indices[square_id * 6 + 4] = i * N + (j + 1)
indices[square_id * 6 + 5] = (i + 1) * N + j
links = [[-1, 0], [1, 0], [0, -1], [0, 1], [-1, -1], [1, -1], [-1, 1], [1, 1]]
links = [ti.Vector(v) for v in links]
@ti.kernel
def step():
for i in ti.grouped(x):
v[i].y -= gravity * dt
for i in ti.grouped(x):
force = ti.Vector([0.0,0.0,0.0])
for d in ti.static(links):
j = min(max(i + d, 0), [N-1,N-1])
relative_pos = x[j] - x[i]
current_length = relative_pos.norm()
original_length = cell_size * float(i-j).norm()
if original_length != 0:
force +=stiffness * relative_pos.normalized() * (current_length - original_length) / original_length
v[i] +=force * dt
for i in ti.grouped(x):
v[i] *= ti.exp(-damping * dt)
if (x[i]-ball_center[0]).norm() <= ball_radius:
v[i] = ti.Vector([0.0, 0.0, 0.0])
x[i] += dt * v[i]
@ti.kernel
def set_vertices():
for i, j in ti.ndrange(N, N):
vertices[i * N + j] = x[i, j]
init_scene()
set_indices()
window = ti.ui.Window("Cloth", (800, 800), vsync=True)
canvas = window.get_canvas()
scene = ti.ui.Scene()
camera = ti.ui.make_camera()
while window.running:
for i in range(30):
step()
set_vertices()
camera.position(0.5, -0.5, 2)
camera.lookat(0.5, -0.5, 0)
scene.set_camera(camera)
scene.point_light(pos=(0.5, 1, 2), color=(1, 1, 1))
scene.mesh(vertices, indices=indices, color=(0.5, 0.5, 0.5), two_sided = True)
scene.particles(ball_center, radius=ball_radius, color=(0.5, 0, 0))
canvas.scene(scene)
window.show()
注意到,上述代码总行数仅有91行!
挑战任务
我希望你喜欢本文中提供的上述示例程序!如果的确如此,下面几个不同挑战等级的任务留给你:
- [Easy] Adjust parameters casually: observe how modifications to stiffness, damping and dt parameters change the behavior of the program.
- [Easy] Change vsync=True in the program to vsync=False. This will remove the 60 frames per second limit on the program and watch how the program runs on your machine.
- 【Medium Difficulty】Achieve a slightly complex interaction between the cloth and the ball: make it slide down the ball without penetrating it.
- 【Medium Difficulty】Add more balls: Make the cloth interact with multiple balls.
- 【Advanced Difficulty】After completing the second challenge, try implementing the same program in another programming language or Python, but without using Taichi. Observe what is the maximum FPS (frames per second) you can get and how much code you need to write to get similar performance.
Summary
Finally, let’s review what Taichi allowed us to implement in the 91 lines of Python code above: A mass-spring system with 10,000 mass points and approximately 100,000 springs.
- Automatically parallelize simulations via CUDA GPU or multi-threading on CPU using @ti.kernel annotations
- Render results in real-time via GPU renderer
- Taichi not only It allows us to implement all these complex functions with a small amount of code, and saves us the trouble of learning CUDA, multi-thread programming or GPU rendering. With Taichi, anyone can write high-performance programs. They can focus on the algorithmic aspects of the code and leave the performance aspects to the programming language itself. This brings us to Taichi’s motto: Parallel programming for everyone!
Github page
, where you can find detailed documentation and many examples of Taichi projects, all of which are interesting. Finally, if you also believe in the mission of developing a friendly and powerful language for parallel computing, you are more than welcome to join Taichi as an open source contributor. Translator introductionZhu Xianzhong, 51CTO community editor, 51CTO expert blogger, lecturer, computer teacher at a university in Weifang, and a veteran in the freelance programming industry . In the early days, he focused on various Microsoft technologies (compiled three technical books related to ASP.NET AJX and Cocos 2d-X). In the past ten years, he has devoted himself to the open source world (familiar with popular full-stack web development technology) and learned about OneNet/AliOS Arduino/ IoT development technologies such as ESP32/Raspberry Pi and big data development technologies such as Scala Hadoop Spark Flink. Original title: A Beginner's Guide to High-Performance Computing in Python, author: Dunfan LuThe above is the detailed content of An introductory guide to high-performance computing with Python based on Taichi. For more information, please follow other related articles on the PHP Chinese website!

Hot AI Tools

Undresser.AI Undress
AI-powered app for creating realistic nude photos

AI Clothes Remover
Online AI tool for removing clothes from photos.

Undress AI Tool
Undress images for free

Clothoff.io
AI clothes remover

Video Face Swap
Swap faces in any video effortlessly with our completely free AI face swap tool!

Hot Article
Hot Tools

Notepad++7.3.1
Easy-to-use and free code editor

SublimeText3 Chinese version
Chinese version, very easy to use

Zend Studio 13.0.1
Powerful PHP integrated development environment

Dreamweaver CS6
Visual web development tools

SublimeText3 Mac version
God-level code editing software (SublimeText3)
Hot Topics
 1664
1664
 14
1423
52
1317
25
1268
29
1242
24
14
1423
52
1317
25
1268
29
1242
24

 PHP and Python: Different Paradigms Explained
Apr 18, 2025 am 12:26 AM
PHP and Python: Different Paradigms Explained
Apr 18, 2025 am 12:26 AM
PHP is mainly procedural programming, but also supports object-oriented programming (OOP); Python supports a variety of paradigms, including OOP, functional and procedural programming. PHP is suitable for web development, and Python is suitable for a variety of applications such as data analysis and machine learning.
 Choosing Between PHP and Python: A Guide
Apr 18, 2025 am 12:24 AM
Choosing Between PHP and Python: A Guide
Apr 18, 2025 am 12:24 AM
PHP is suitable for web development and rapid prototyping, and Python is suitable for data science and machine learning. 1.PHP is used for dynamic web development, with simple syntax and suitable for rapid development. 2. Python has concise syntax, is suitable for multiple fields, and has a strong library ecosystem.
 PHP and Python: A Deep Dive into Their History
Apr 18, 2025 am 12:25 AM
PHP and Python: A Deep Dive into Their History
Apr 18, 2025 am 12:25 AM
PHP originated in 1994 and was developed by RasmusLerdorf. It was originally used to track website visitors and gradually evolved into a server-side scripting language and was widely used in web development. Python was developed by Guidovan Rossum in the late 1980s and was first released in 1991. It emphasizes code readability and simplicity, and is suitable for scientific computing, data analysis and other fields.
 Why Use PHP? Advantages and Benefits Explained
Apr 16, 2025 am 12:16 AM
Why Use PHP? Advantages and Benefits Explained
Apr 16, 2025 am 12:16 AM
The core benefits of PHP include ease of learning, strong web development support, rich libraries and frameworks, high performance and scalability, cross-platform compatibility, and cost-effectiveness. 1) Easy to learn and use, suitable for beginners; 2) Good integration with web servers and supports multiple databases; 3) Have powerful frameworks such as Laravel; 4) High performance can be achieved through optimization; 5) Support multiple operating systems; 6) Open source to reduce development costs.
 Python vs. JavaScript: The Learning Curve and Ease of Use
Apr 16, 2025 am 12:12 AM
Python vs. JavaScript: The Learning Curve and Ease of Use
Apr 16, 2025 am 12:12 AM
Python is more suitable for beginners, with a smooth learning curve and concise syntax; JavaScript is suitable for front-end development, with a steep learning curve and flexible syntax. 1. Python syntax is intuitive and suitable for data science and back-end development. 2. JavaScript is flexible and widely used in front-end and server-side programming.
 How to run sublime code python
Apr 16, 2025 am 08:48 AM
How to run sublime code python
Apr 16, 2025 am 08:48 AM
To run Python code in Sublime Text, you need to install the Python plug-in first, then create a .py file and write the code, and finally press Ctrl B to run the code, and the output will be displayed in the console.
 MySQL vs. Other Programming Languages: A Comparison
Apr 19, 2025 am 12:22 AM
MySQL vs. Other Programming Languages: A Comparison
Apr 19, 2025 am 12:22 AM
Compared with other programming languages, MySQL is mainly used to store and manage data, while other languages such as Python, Java, and C are used for logical processing and application development. MySQL is known for its high performance, scalability and cross-platform support, suitable for data management needs, while other languages have advantages in their respective fields such as data analytics, enterprise applications, and system programming.
 The Continued Use of PHP: Reasons for Its Endurance
Apr 19, 2025 am 12:23 AM
The Continued Use of PHP: Reasons for Its Endurance
Apr 19, 2025 am 12:23 AM
What’s still popular is the ease of use, flexibility and a strong ecosystem. 1) Ease of use and simple syntax make it the first choice for beginners. 2) Closely integrated with web development, excellent interaction with HTTP requests and database. 3) The huge ecosystem provides a wealth of tools and libraries. 4) Active community and open source nature adapts them to new needs and technology trends.
