

What is the lvm partition of linux?

Linux's lvm partition refers to "logical volume management". The full English name of lvm is "Logical Volume Manager", which is a mechanism for managing disk partitions in the Linux environment; LVM is built on the hard disk and A logical layer above partitions to improve the flexibility of disk partition management.

#The operating environment of this tutorial: linux5.9.8 system, Dell G3 computer.
1. What is LVM
LVM (Logical Volume Manager), that is, logical volume management, is a mechanism for managing disk partitions in the Linux environment. LVM is built on the hard disk and partition A logical layer on top to improve the flexibility of disk partition management. LVM system administrators can easily manage disk partitions, such as connecting several disk partitions into a volume group to form a storage pool. Administrators can freely create logical volumes on volume groups and further create file systems on logical volume groups. Administrators can easily adjust the size of storage volume groups through LVM, and can name, manage and allocate disk storage according to groups. When a new disk is added to the system, the LVM administrator does not have to move the disk's files to the new disk to make full use of the new storage space, but can directly extend the file system across the disk.
Generally speaking, physical disks or partitions are separated, data cannot span disks or partitions, and the size of each disk or partition is fixed, so re-adjustment is troublesome. LVM can integrate these underlying physical disks or partitions, abstract them into capacity resource pools, and divide them into logical volumes for use by the upper layer. Its main function is that it can be used without shutting down or reformatting (to be precise, The size of the logical volume can be flexibly adjusted (the original part does not need to be formatted, only the new part is formatted).
The implementation process of LVM is as follows:

2. LVM terminology explanation
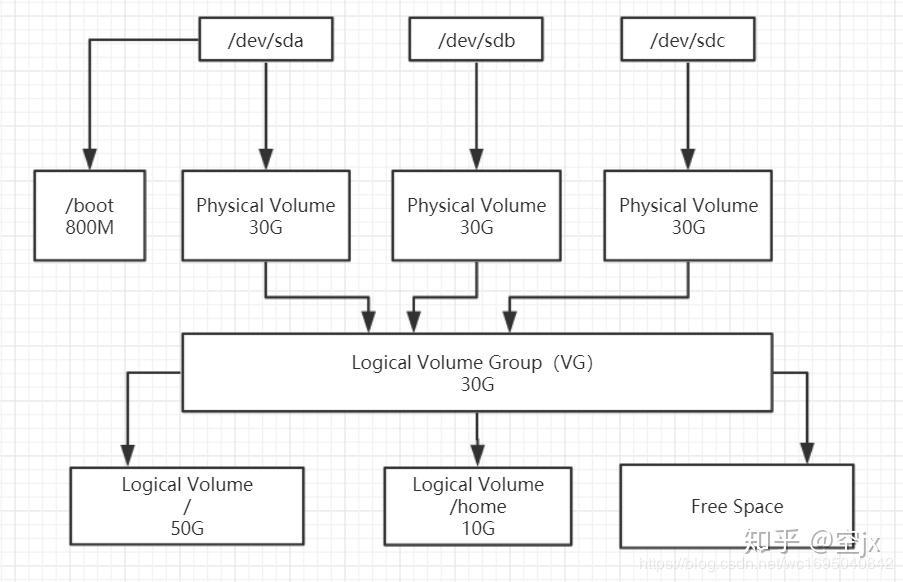
PV( physical volume): The physical volume is at the bottom of the logical volume management system and can be the entire physical hard disk or a partition on the actual physical hard disk. It just sets aside a special area in the physical partition to record management parameters related to LVM.
VG (volume group): Volume groups are created on physical volumes. A volume group must include at least one physical volume. After the volume group is created, volumes can be dynamically added to the volume group. , there can be multiple volume groups in a logical volume management system project.
LV(logical volume): Logical volumes are built on volume groups. Unallocated space in volume groups can be used to create new logical volumes. Logical volumes can be dynamically expanded and shrunk after they are created. space.
PE(physical extent): The physical area is the smallest storage unit that can be allocated in the physical volume. The physical area size is specified when establishing the volume group. Once determined, it cannot be changed. The physical area size of all physical volumes must be consistent. After a new pv is added to the vg, the pe size is automatically changed to the pe size defined in the vg.
LE(logical extent): The logical area is the smallest storage unit available for allocation in the logical volume. The size of the logical area depends on the size of the physical area in the volume group where the logical volume is located. Due to kernel limitations, a logical volume (Logic Volume) can only contain up to 65536 PE (Physical Extent) , so the size of a PE determines the maximum capacity of the logical volume, 4 MB (default ) determines the maximum capacity of a single logical volume to 256 GB. If you want to use a logical volume larger than 256G, you need to specify a larger PE when creating a volume group. In Red Hat Enterprise Linux AS 4 the PE size ranges from 8 KB to 16GB and must always be a multiple of 2.
3. LVM writing mode
LVM has two writing modes: linear mode and stripe mode.
- Linear mode means writing to one device before writing to another device
- Stripe mode is somewhat similar to RAID0, that is, data is written to each LVM member device in a distributed manner.
Because data in stripe mode is not secure, and LVM does not emphasize read and write performance, LVM defaults to linear mode, so that even if one device is broken, the data on other devices is still there.
4. How LVM works
LVM maintains a metadata at the head of each physical volume, and each metadata contains the entire VG (volume group: volume group ) information, including the layout configuration of each VG, the number of PV (physical volume: physical volume), the number of LV (logical volume: logical volume), and each PE (physical extends: physical expansion unit) to LE (logical extends: mapping relationship of physical extension unit). The information in the header of each PV in the same VG is the same, which facilitates data recovery in case of failure.
LVM provides the LV layer for the upper file system, hiding the operation details. For the file system, the operation of LV is no different from the original operation of partition. When writing to the LV, LVM locates the corresponding LE and writes the data to the corresponding PE through the mapping table in the PV header. The biggest feature of LVM is that it can dynamically manage disks. Because the size of the logical volume can be dynamically adjusted without losing existing data. If we add a new hard disk, it will not change the existing upper logical volume. The key is to establish a mapping relationship between PE and LE. Different mapping rules determine different LVM storage models. LVM supports stripe and mirror of multiple PVs.
5. Advantages and Disadvantages of LVM
Advantages:
- The file system can span multiple disks, so the file system size is not limited by the physical disk.
- The size of the file system can be dynamically expanded while the system is running.
- You can add new disks to the LVM storage pool.
- You can redundant important data to multiple physical disks in a mirroring manner.
- You can easily export the entire volume group to another machine.
Disadvantages:
- The reducevg command must be used when removing a disk from a volume group (this command requires root privileges and is not allowed in snapshot volume groups use).
- When one disk in a volume group is damaged, the entire volume group will be affected.
- Due to the addition of additional operations, storage performance is affected.
6. Method of creating PV/VG/LV
1. Set the system type of each physical disk or partition to Linux LVM, and its system ID is 8e. Use the t command in the fdisk tool to set
1 2 3 4 5 6 7 8 9 10 11 12 13 14 15 16 17 |
|
2. Initialize each physical disk or partition into a PV (physical volume)
The commands that can be used at this stage are pvcreate, pvremove, pvscan, pvdisplay (pvs)
1) pvcreate: Create a physical volume
1 2 3 4 5 6 7 8 9 10 11 |
|
2) pvscan: Scan all physical volumes on the current system
1 2 3 4 5 6 7 8 9 |
|
3) pvdisplay: Display the properties of the physical volume
1 |
|
4) pvremove: Delete the physical volume information so that it is no longer considered a physical volume
1 2 3 4 5 6 7 8 9 |
|
5) PV creation and deletion examples
1 2 3 4 5 6 7 8 9 10 11 12 13 14 15 16 17 18 19 20 21 22 23 24 25 26 27 |
|
3. Create VG (volume group). Volume groups integrate multiple physical volumes (shielding the underlying details) and divide PE (physical extend)
PE is the smallest storage unit in a physical volume, somewhat similar to a block in a file system , PE size can be specified, the default is 4M. The commands used at this stage include vgcreate, vgscan, vgdisplay, vgextend, vgreduce
1) vgcreate: Create a volume group
1 2 3 4 5 6 7 8 9 10 11 |
|
2) vgscan: Find LVM volume groups that exist in the system and display the list of found volume groups
3) vgdisplay: Display volume group attributes
1 2 3 4 5 6 7 |
|
4) vgextend: Dynamically extend LVM volume group, which increases the capacity of the volume group by adding physical volumes to the volume group
1 2 3 |
|
5) vgreduce: Reduce volume group capacity by deleting physical volumes in the LVM volume group. The last remaining physical volume in the LVM volume group cannot be deleted
1 |
|
6) vgremove: delete the volume group, the logical volume on it must be offline
1 2 3 |
|
7)vgchange:常用来设置卷组的活动状态
1 2 3 4 5 |
|
8)vg创建例子
1 2 3 4 5 6 7 8 9 10 11 12 13 14 15 16 17 18 19 20 21 22 23 24 25 26 |
|
4、在卷组上创建LV(logical volume,逻辑卷)
为了便于管理,逻辑卷对应的设备文件保存在卷组目录下,为/dev/VG_NAME/LV_NAME。LV中可以分配的最小存储单元称为LE(logical extend),在同一个卷组中,LE的大小和PE是一样的,且一一对应。这一阶段用到的命令有lvcreate、lvscan、lvdisplay、lvextend、lvreduce、lvresize
1)lvcreate:创建逻辑卷或快照
1 2 3 4 5 6 7 8 9 10 11 12 13 14 15 16 17 |
|
2)lvscan:扫描当前系统中的所有逻辑卷,及其对应的设备文件
3)lvdisplay:显示逻辑卷属性
1 |
|
4)lvextend:可在线扩展逻辑卷空间
1 2 3 4 5 6 7 8 9 |
|
5)lvreduce:缩减逻辑卷空间,一般离线使用
1 2 3 4 5 6 7 8 9 |
|
6)lvremove:删除逻辑卷,需要处于离线(卸载)状态
1 2 3 |
|
7)lv创建例子
1 2 3 4 5 6 7 8 9 10 11 12 13 14 15 16 17 18 19 20 21 |
|
5、格式化逻辑卷并挂载
[root@localhost ~]# mke2fs -t ext4 /dev/myvg/mylv
...
Writing inode tables: done
Creating journal (16384 blocks): done
Writing superblocks and filesystem accounting information: done
...
[root@localhost ~]# mkdir /data
[root@localhost ~]# mount
mount mountpoint
[root@localhost ~]# mount /dev/myvg/mylv /data
[root@localhost ~]# df -h
Filesystem Size Used Avail Use% Mounted on
/dev/sda1 50G 1.5G 49G 3% /
devtmpfs 903M 0 903M 0% /dev
tmpfs 912M 0 912M 0% /dev/shm
tmpfs 912M 8.6M 904M 1% /run
tmpfs 912M 0 912M 0% /sys/fs/cgroup
tmpfs 183M 0 183M 0% /run/user/0
/dev/mapper/myvg-mylv 2.0G 6.0M 1.8G 1% /data
PS:更新
一、LV逻辑卷扩容后,必须对挂载目录在线扩容。
使用 resize2fs或xfs_growfs 对挂载目录在线扩容
resize2fs 针对文件系统ext2 ext3 ext4
xfs_growfs 针对文件系统xfs
xfs在线扩容
1 2 3 4 5 6 |
|
ext4在线扩容
1 2 3 4 5 |
|
相关推荐:《Linux视频教程》
The above is the detailed content of What is the lvm partition of linux?. For more information, please follow other related articles on the PHP Chinese website!

Hot AI Tools

Undresser.AI Undress
AI-powered app for creating realistic nude photos

AI Clothes Remover
Online AI tool for removing clothes from photos.

Undress AI Tool
Undress images for free

Clothoff.io
AI clothes remover

Video Face Swap
Swap faces in any video effortlessly with our completely free AI face swap tool!
Hot Article
Hot Tools

Notepad++7.3.1
Easy-to-use and free code editor

SublimeText3 Chinese version
Chinese version, very easy to use

Zend Studio 13.0.1
Powerful PHP integrated development environment

Dreamweaver CS6
Visual web development tools

SublimeText3 Mac version
God-level code editing software (SublimeText3)
Hot Topics
 1663
1663
 14
1420
52
1315
25
1266
29
1239
24
14
1420
52
1315
25
1266
29
1239
24

 Linux Architecture: Unveiling the 5 Basic Components
Apr 20, 2025 am 12:04 AM
Linux Architecture: Unveiling the 5 Basic Components
Apr 20, 2025 am 12:04 AM
The five basic components of the Linux system are: 1. Kernel, 2. System library, 3. System utilities, 4. Graphical user interface, 5. Applications. The kernel manages hardware resources, the system library provides precompiled functions, system utilities are used for system management, the GUI provides visual interaction, and applications use these components to implement functions.
 How to check the warehouse address of git
Apr 17, 2025 pm 01:54 PM
How to check the warehouse address of git
Apr 17, 2025 pm 01:54 PM
To view the Git repository address, perform the following steps: 1. Open the command line and navigate to the repository directory; 2. Run the "git remote -v" command; 3. View the repository name in the output and its corresponding address.
 vscode Previous Next Shortcut Key
Apr 15, 2025 pm 10:51 PM
vscode Previous Next Shortcut Key
Apr 15, 2025 pm 10:51 PM
VS Code One-step/Next step shortcut key usage: One-step (backward): Windows/Linux: Ctrl ←; macOS: Cmd ←Next step (forward): Windows/Linux: Ctrl →; macOS: Cmd →
 What is the main purpose of Linux?
Apr 16, 2025 am 12:19 AM
What is the main purpose of Linux?
Apr 16, 2025 am 12:19 AM
The main uses of Linux include: 1. Server operating system, 2. Embedded system, 3. Desktop operating system, 4. Development and testing environment. Linux excels in these areas, providing stability, security and efficient development tools.
 How to run java code in notepad
Apr 16, 2025 pm 07:39 PM
How to run java code in notepad
Apr 16, 2025 pm 07:39 PM
Although Notepad cannot run Java code directly, it can be achieved by using other tools: using the command line compiler (javac) to generate a bytecode file (filename.class). Use the Java interpreter (java) to interpret bytecode, execute the code, and output the result.
 How to run sublime after writing the code
Apr 16, 2025 am 08:51 AM
How to run sublime after writing the code
Apr 16, 2025 am 08:51 AM
There are six ways to run code in Sublime: through hotkeys, menus, build systems, command lines, set default build systems, and custom build commands, and run individual files/projects by right-clicking on projects/files. The build system availability depends on the installation of Sublime Text.
 laravel installation code
Apr 18, 2025 pm 12:30 PM
laravel installation code
Apr 18, 2025 pm 12:30 PM
To install Laravel, follow these steps in sequence: Install Composer (for macOS/Linux and Windows) Install Laravel Installer Create a new project Start Service Access Application (URL: http://127.0.0.1:8000) Set up the database connection (if required)
 git software installation
Apr 17, 2025 am 11:57 AM
git software installation
Apr 17, 2025 am 11:57 AM
Installing Git software includes the following steps: Download the installation package and run the installation package to verify the installation configuration Git installation Git Bash (Windows only)
