

JS+CSS quickly realizes novice guidance effect

This article brings you relevant knowledge about JavaScript. It mainly introduces how to achieve the novice guidance effect through simple CSS and JS. Interested friends can take a look below. Well, I hope it helps everyone.
The beginning of nonsense: through some simple CSS and JS to achieve the novice guidance effect
1. To achieve the effect
2. To achieve
The implementation is actually very simple, mask The version is to tile a whole screen div, set the background color to transparent transparent, and then set outline to semi-transparent and wide enough. Then create an arrow and warning label in the same way.
1. Usage
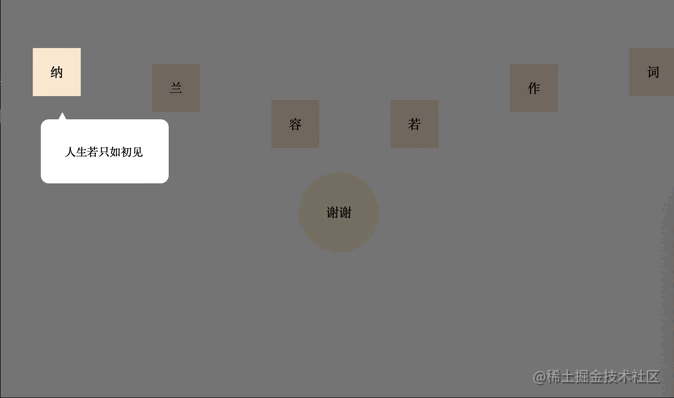
let maskIntroduceManage = new MaskIntroduceManage([
    new MaskIntroduceItem('one','人生若只如初见'),
    new MaskIntroduceItem('two','何事秋风悲画扇'),
    new MaskIntroduceItem('five','等闲却变故人心'),
    new MaskIntroduceItem('six','骊山语罢清宵半'),
    new MaskIntroduceItem('four','却道故人心易变'),
    new MaskIntroduceItem('finally','谢谢大家支持!')
])
maskIntroduceManage.benginIntroduce()2. HTML
<!DOCTYPE html>
<html>
<head>
<meta charset="utf-8">
</head>
<style type="text/css">
*{
    padding: 0;
    margin: 0;
}
.content {
    padding: 0;
    display: flex;
    flex-direction: row;
    justify-content: space-between;
    align-items: center;
    width: 100%;
}
span {
    width: 60px;
    height: 60px;
    line-height: 60px;
    margin-left: 40px;
    margin-top: 140px;
    margin-bottom: 0px;
    text-align: center;
    display: block;
    background-color: antiquewhite;
}

.finally {
    width: 100px;
    height: 100px;
    background-color: cornsilk;
    border-radius: 50%;
    line-height: 100px;
    text-align: center;
    margin-top: 30px;
    margin-left: auto;
    margin-right: auto;
}
span:nth-of-type(1){
    margin-top: 30px;
}
span:nth-of-type(2){
    margin-top: 70px;
}
span:nth-of-type(3){
    margin-top: 160px;
}
span:nth-of-type(4){
    margin-top: 160px;
}
span:nth-of-type(5){
    margin-top: 70px;
}
span:nth-of-type(6){
    margin-top: 30px;
}
</style>
<body>
<div class="content">
    <span id="one">纳</span>
    <span id="two">兰</span>
    <span id="three">容</span>
    <span id="four">若</span>
    <span id="five">作</span>
    <span id="six">词</span>
</div>
<div class="finally" id="finally">
    谢谢
</div>
</body>
<script src="./maskIntroduce.js"></script>
<script>
let maskIntroduceManage = new MaskIntroduceManage([
    new MaskIntroduceItem('one','人生若只如初见'),
    new MaskIntroduceItem('two','何事秋风悲画扇'),
    new MaskIntroduceItem('five','等闲却变故人心'),
    new MaskIntroduceItem('six','骊山语罢清宵半'),
    new MaskIntroduceItem('four','却道故人心易变'),
    new MaskIntroduceItem('finally','谢谢大家支持!')
])
maskIntroduceManage.benginIntroduce()
</script>
</html>3.JS
// 单元信息model
class MaskIntroduceItem {
    // 需要引导的dom的ID
    id
    // 需要引导的dom功能描述
    warming
    constructor(id,warming){
        this.id = id
        this.warming = warming
    }
}

// 遮罩操作类
class MaskIntroduceManage {
    // 消息展示类集合
    maskIntroduceItems
    // 遮罩层
    el
    // 遮罩层提示框
    warmingEl
    // 指引肩头
    guidanceEl
    // 展示的第几个
    currentShowIndex = 0
    // 记录window事件
    windowEvent = null

    constructor(maskIntroduceItems){
        this.maskIntroduceItems = maskIntroduceItems
    }

    // 添加消息展示类
    addIntroduceItem(introduceItem){
        this.maskIntroduceItems.push(introduceItem)
    }

    // body增加遮罩
    addMaskToBody(){
        //添加遮罩框
        this.el = document.createElement('div')
        this.el.style.cssText = 'position: fixed;background: transparent;outline:rgba(0, 0, 0, 0.5) 3500px solid;'
        let body = document.getElementsByTagName('body')[0]
        body.appendChild(this.el)
        //添加提示框
        this.warmingEl = document.createElement('div')
        this.warmingEl.style.cssText = 'position:fixed;width:100px;background:white;border-radius: 10px;padding: 30px;font-size: 14px;'
        body.appendChild(this.warmingEl)
        //添加指引箭头
        this.guidanceEl = document.createElement('div')
        this.guidanceEl.style.cssText = 'position:fixed;width: 14px; height: 13px; background-color: white;clip-path: polygon(50% 0,100% 100%,0 100%);'
        body.appendChild(this.guidanceEl)
        //设置body禁止滚动
        body.style.overflow = 'hidden'
        //保留window事件
        if(window.onclick){
            this.windowEvent = window.onclick
        }
        window.onclick = ()=>{
            this.nextIntroduce()
        }
    }

    // 开始引导
    benginIntroduce(){
        this.addMaskToBody()
        this.nextIntroduce()
    }

    // 下一步
    nextIntroduce(){
        let maskIntroduceItem = this.maskIntroduceItems.length > 0 ? this.maskIntroduceItems[this.currentShowIndex] : null
        if(!maskIntroduceItem){
            return
        }
        let needIntroduceEl = document.getElementById(maskIntroduceItem.id)
        //遮罩层的镂空位置
        this.el.style.width = needIntroduceEl.offsetWidth + 'px'
        this.el.style.height = needIntroduceEl.offsetHeight + 'px'
        this.el.style.top = this.getElementPosition(needIntroduceEl).top + 'px'
        this.el.style.left = this.getElementPosition(needIntroduceEl).left + 'px'
        //设置对应倒角,但是由于背景颜色是透明的,所以,没有效果(???)
        //this.el.style.borderRadius = window.getComputedStyle(needIntroduceEl,null)['border-radius']
        this.currentShowIndex ++
        //指引箭头位置
        let guidanceElLeft = this.getElementPosition(needIntroduceEl).left + needIntroduceEl.offsetWidth / 2.0
        this.guidanceEl.style.top = this.getElementPosition(needIntroduceEl).top + needIntroduceEl.offsetHeight + 20 + 'px'
        this.guidanceEl.style.left = guidanceElLeft + 'px'
        //提示框的位置
        this.warmingEl.style.top = this.getElementPosition(this.guidanceEl).top + this.guidanceEl.offsetHeight - 4 + 'px'
        let warmingElLeft = this.getElementPosition(needIntroduceEl).left - ((this.warmingEl.offsetWidth - needIntroduceEl.offsetWidth) / 2.0)
        if(warmingElLeft < 0){
            warmingElLeft = this.getElementPosition(needIntroduceEl).left + 10
        }
        if(warmingElLeft + this.warmingEl.offsetWidth > document.getElementsByTagName('body')[0].offsetWidth){
            warmingElLeft = warmingElLeft - 10 - (this.warmingEl.offsetWidth - needIntroduceEl.offsetWidth) / 2.0
        }
        this.warmingEl.style.left = warmingElLeft + 'px'
        this.warmingEl.innerHTML = maskIntroduceItem.warming
        //最后一个展示完恢复window点击事件
        if(this.currentShowIndex >= this.maskIntroduceItems.length){
            setTimeout(() => {
                //移除当前遮罩
                this.el.remove()
                //移除当前提示框
                this.warmingEl.remove()
                //移除箭头
                this.guidanceEl.remove()
                //设置body可以滚动
                document.getElementsByTagName('body')[0].style.overflow = 'auto'
                //恢复window事件
                if(this.windowEvent){
                    window.onclick = this.windowEvent
                }
            }, 2000);
        }
    }

    // 获取元素在屏幕的位置
    getElementPosition(element){
        var top = element.offsetTop
        var left = element.offsetLeft
        var currentParent = element.offsetParent;
        while (currentParent !== null) {
            top += currentParent.offsetTop
            left += currentParent.offsetLeft
            currentParent = currentParent.offsetParent
        }
        return {top,left}
    }
}3. Summary and Thoughts
The implementation principle is very simple, there is not much complicated logic in it, I want to pass the current "Need to introduce" tag borderRadius to set the chamfer value of the hollow part, but the background color is transparent, so setting it will take effect but has no effect. The code is clumsy, don’t laugh at the master~
Recommended study: "JavaScript Video Tutorial"
The above is the detailed content of JS+CSS quickly realizes novice guidance effect. For more information, please follow other related articles on the PHP Chinese website!

Hot AI Tools

Undresser.AI Undress
AI-powered app for creating realistic nude photos

AI Clothes Remover
Online AI tool for removing clothes from photos.

Undress AI Tool
Undress images for free

Clothoff.io
AI clothes remover

Video Face Swap
Swap faces in any video effortlessly with our completely free AI face swap tool!

Hot Article
Hot Tools

Notepad++7.3.1
Easy-to-use and free code editor

SublimeText3 Chinese version
Chinese version, very easy to use

Zend Studio 13.0.1
Powerful PHP integrated development environment

Dreamweaver CS6
Visual web development tools

SublimeText3 Mac version
God-level code editing software (SublimeText3)
Hot Topics
 1668
1668
 14
1427
52
1329
25
1273
29
1256
24
14
1427
52
1329
25
1273
29
1256
24

 How to use bootstrap in vue
Apr 07, 2025 pm 11:33 PM
How to use bootstrap in vue
Apr 07, 2025 pm 11:33 PM
Using Bootstrap in Vue.js is divided into five steps: Install Bootstrap. Import Bootstrap in main.js. Use the Bootstrap component directly in the template. Optional: Custom style. Optional: Use plug-ins.
 Understanding HTML, CSS, and JavaScript: A Beginner's Guide
Apr 12, 2025 am 12:02 AM
Understanding HTML, CSS, and JavaScript: A Beginner's Guide
Apr 12, 2025 am 12:02 AM
WebdevelopmentreliesonHTML,CSS,andJavaScript:1)HTMLstructurescontent,2)CSSstylesit,and3)JavaScriptaddsinteractivity,formingthebasisofmodernwebexperiences.
 The Roles of HTML, CSS, and JavaScript: Core Responsibilities
Apr 08, 2025 pm 07:05 PM
The Roles of HTML, CSS, and JavaScript: Core Responsibilities
Apr 08, 2025 pm 07:05 PM
HTML defines the web structure, CSS is responsible for style and layout, and JavaScript gives dynamic interaction. The three perform their duties in web development and jointly build a colorful website.
 How to insert pictures on bootstrap
Apr 07, 2025 pm 03:30 PM
How to insert pictures on bootstrap
Apr 07, 2025 pm 03:30 PM
There are several ways to insert images in Bootstrap: insert images directly, using the HTML img tag. With the Bootstrap image component, you can provide responsive images and more styles. Set the image size, use the img-fluid class to make the image adaptable. Set the border, using the img-bordered class. Set the rounded corners and use the img-rounded class. Set the shadow, use the shadow class. Resize and position the image, using CSS style. Using the background image, use the background-image CSS property.
 How to write split lines on bootstrap
Apr 07, 2025 pm 03:12 PM
How to write split lines on bootstrap
Apr 07, 2025 pm 03:12 PM
There are two ways to create a Bootstrap split line: using the tag, which creates a horizontal split line. Use the CSS border property to create custom style split lines.
 How to set up the framework for bootstrap
Apr 07, 2025 pm 03:27 PM
How to set up the framework for bootstrap
Apr 07, 2025 pm 03:27 PM
To set up the Bootstrap framework, you need to follow these steps: 1. Reference the Bootstrap file via CDN; 2. Download and host the file on your own server; 3. Include the Bootstrap file in HTML; 4. Compile Sass/Less as needed; 5. Import a custom file (optional). Once setup is complete, you can use Bootstrap's grid systems, components, and styles to create responsive websites and applications.
 How to use bootstrap button
Apr 07, 2025 pm 03:09 PM
How to use bootstrap button
Apr 07, 2025 pm 03:09 PM
How to use the Bootstrap button? Introduce Bootstrap CSS to create button elements and add Bootstrap button class to add button text
 How to resize bootstrap
Apr 07, 2025 pm 03:18 PM
How to resize bootstrap
Apr 07, 2025 pm 03:18 PM
To adjust the size of elements in Bootstrap, you can use the dimension class, which includes: adjusting width: .col-, .w-, .mw-adjust height: .h-, .min-h-, .max-h-
