

An article to talk about the KeepAlive component in Vue


Recently, I was looking at Vue-related knowledge points. When I saw the KeepAlive component, I was curious about how it does not re-render when switching between components, so I took a closer look. (Learning video sharing: vue video tutorial)
If you are also interested in knowing how the specific internal implementation is implemented or you have a certain understanding but are not familiar enough, then you can also join us. Consolidate
Tips: In this way, you can ask others about this knowledge point loudly during the interview?
What is KeepAlive
<keepalive></keepalive> is a built-in component, its function is to dynamically switch between multiple components Whencachethe removed component instance.
KeepAlive function
The word KeepAlive is borrowed from the HTTP protocol. In the HTTP protocol, KeepAlive is also called a persistent connection. Its function is to allow multiple requests/responses to share the same HTTP Connection solves the additional performance overhead caused by frequent destruction and creation of HTTP connections. In the same way, the KeepAlive component in Vue is also intended to avoid a component being frequently destroyed/rebuilt and avoid performance overhead.
// App.vue <Test :msg="curTab" v-if="curTab === 'Test'"></Test> <HelloWorld :msg="curTab" v-if="curTab === 'HelloWorld'"></HelloWorld> <div @click="toggle">toggle</div>
As you can see from the above code, if we click toggle frequently, the Test/HelloWorld component will be frequently rendered. When the user clicks frequently, the Test component needs to be destroyed/rendered frequently, which results in a large rendering time. Performance loss.
So in order to solve this performance overhead, you need to know when it is time to use the KeepAlive component.
<KeepAlive> <component :is="curTab === 'Test' ? Test : HelloWorld" :msg="curTab"></component> </KeepAlive> <div @click="toggle">toggle</div>
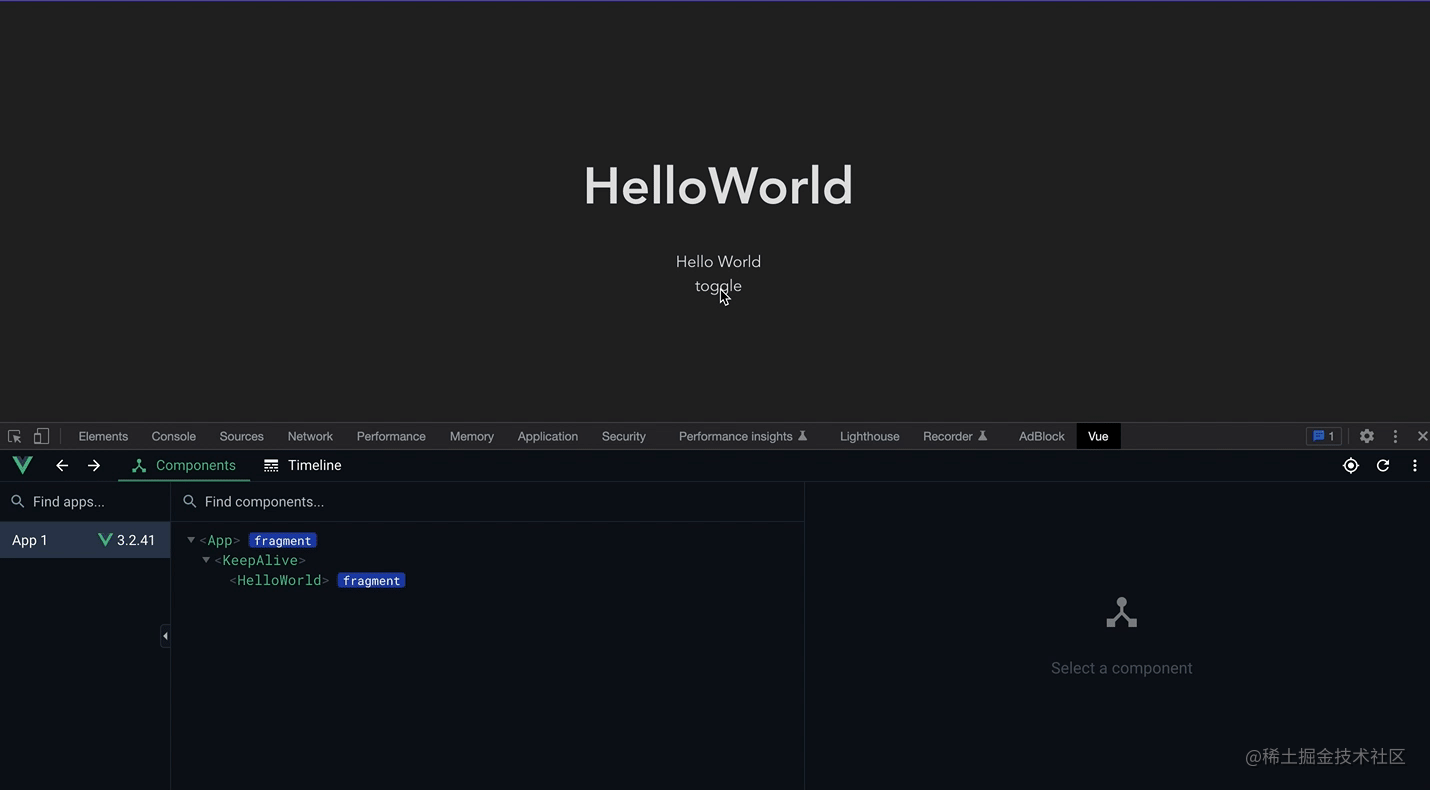
You can see this screen recording. After the first loading, frequent switching does not destroy and mount again, but only inactivates the component (instead of Destroyed), you only need to reactivate it when rendering, without remounting. If the component to be rendered is large, you can have good performance optimization.
If you want to experience it, you can take a look at this example?Official demo, in which the data will be cached, which also needs to be noticed during development and use
How to implement
The implementation principle is actually very simple. In fact, it is cache management and specific destruction and rendering logic, which makes it different from other components.
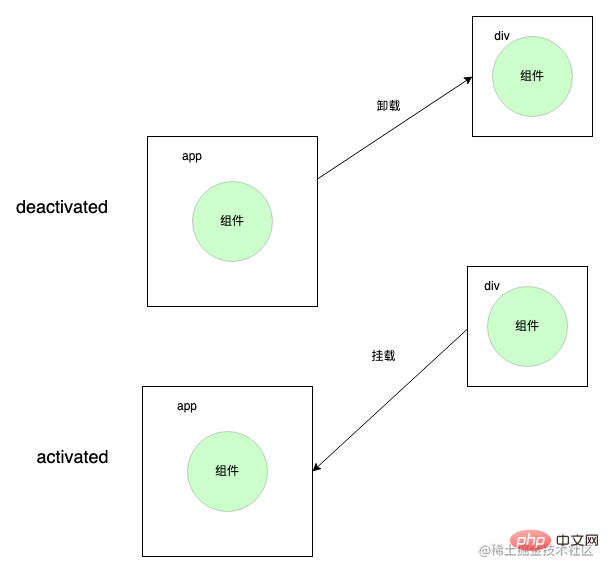
KeepAlive component cannot really uninstall it when uninstalling the component, but puts it into a hidden container , and removes it from the hidden container when it is activated Just take it out and mount it on the real dom, which corresponds to the two unique life cycles of KeepAlive activated and deactivated.
First let’s briefly understand the component mounting process
So the 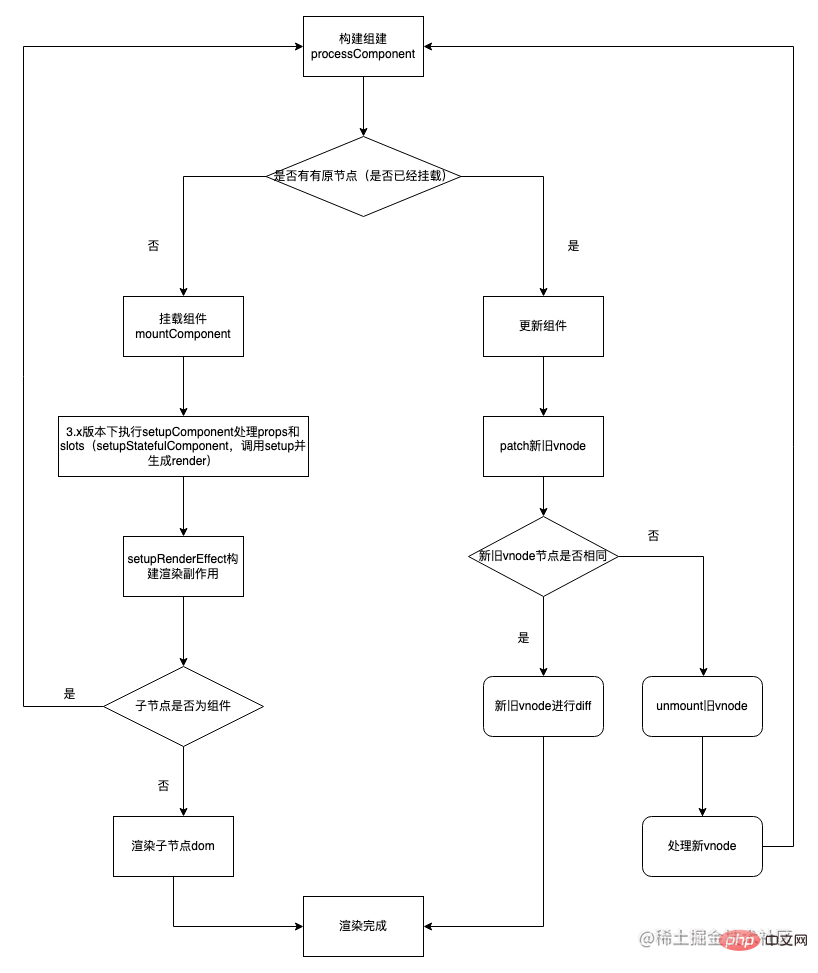 subcomponents in KeepAlive Specific rendering logic will be executed during mount and unmount, so that the mounting and destruction logic will not be performed
Specific implementation (implementing a small and simple KeepAlive)
- KeepAlive component properties
const KeepAliveImpl: ComponentOptions = {
  name: "KeepAlive",
  // 标识这是一个 KeepAlive 组件
  __isKeepAlive: true,
  // props
  props: {
    exclude: [String, Array, RegExp],
    include: [String, Array, RegExp],
    max: [String, Number]
  }
 }

 // isKeepAlive
 export const isKeepAlive = (vnode: VNode): boolean =>
(vnode.type as any).__isKeepAlive- KeepAlive component setup logic and rendering logic (focus on it)
// setup 接着上面的代码
// 获取到当前 KeepAlive 组件实例
const instance = getCurrentInstance()! as any;
// 拿到 ctx
const sharedContext = instance.ctx as KeepAliveContext;
// cache 缓存
// key: vnode.key | vnode.type value: vnode
const cache: Cache = new Map()
// 需要拿到某些的 renderer 操作函数,需要自己特定执行渲染和卸载逻辑
const { renderer: { p: patch, m: move, um: _unmount, o: { createElement } } } = sharedContext
// 隐藏的容器,用来存储需要隐藏的 dom
const storeageContainer = createElement('div')

// 存储当前的子组件的缓存 key
let pendingKey: CacheKey | null = null

sharedContext.activate = (vnode, container, anchor) => {
  // KeepAlive 下组件激活时执行的 move 逻辑
  move(vnode, container, anchor, 0 /* ENTER */)
}

sharedContext.deactivate = (vnode) => {
  // KeepAlive 下组件失活时执行的 move 逻辑
  move(vnode, storeageContainer, null, 1 /* LEAVE */)
}

return () => {
  // 没有子组件
  if (!slots.default) {
    return null;
  }
  const children = slots.default() as VNode[];
  const rawNode = children[0];
  let vnode = rawNode;
  const comp = vnode.type as ConcreteComponent;
  const name = comp.displayName || comp.name
  const { include, exclude } = props;
  // 没有命中的情况
  if (
    (include && (!name || !matches(include, name))) ||
    (exclude && name && matches(exclude, name))
  ) {
    // 直接渲染子组件
    return rawNode;
  }
  // 获取子组件的 vnode key
  const key = vnode.key == null ? comp : vnode.key;
  // 获取子组件缓存的 vnode
  const cachedVNode = cache.get(key);

  pendingKey = key;
  // 命中缓存
  if (cachedVNode) {
    vnode.el = cachedVNode.el;
    // 继承组件实例
    vnode.component = cachedVNode.component;
    // 在 vnode 上更新 shapeFlag,标记为 COMPONENT_KEPT_ALIVE 属性,防止渲染器重新挂载
    vnode.shapeFlag |= ShapeFlags.COMPONENT_KEPT_ALIVE
  } else {
    // 没命中将其缓存
    cache.set(pendingKey, vnode)
  }
  // 在 vnode 上更新 shapeFlag,标记为 COMPONENT_SHOULD_KEEP_ALIVE 属性,防止渲染器将组件卸载了
  vnode.shapeFlag |= ShapeFlags.COMPONENT_SHOULD_KEEP_ALIVE
  // 渲染组件 vnode
  return vnode;
}- When the KeepAlive component is mounted, the renderer is mounted to ctx
function mountComponent() {
 // ...
 if (isKeepAlive(initialVNode)) {
    ;(instance.ctx as KeepAliveContext).renderer = internals
  }
}- Subcomponent performs specific destruction and rendering logic
When rendering the KeepAlive component, the corresponding shapeFlag flag will be added to the vnode of the subcomponent
For example, theCOMPONENT_KEPT_ALIVE flag tells the renderer when the component is mounted that this does not require mount And special processing is required
const processComponent = (
    n1: VNode | null,
    n2: VNode,
    container: RendererElement,
    anchor: RendererNode | null,
  ) => {
    if (n1 == null) {
      // 在 KeepAlive 组件渲染时会对子组件增加 COMPONENT_KEPT_ALIVE 标志
      // 挂载子组件时会判断是否 COMPONENT_KEPT_ALIVE ,如果是不会调用 mountComponent 而是直接执行 activate 方法
      if (n2.shapeFlag & ShapeFlags.COMPONENT_KEPT_ALIVE) {
        ;(parentComponent!.ctx as KeepAliveContext).activate(
          n2,
          container,
          anchor
        )
      }
      // ...
    }
}COMPONENT_SHOULD_KEEP_ALIVE flag is also used to tell the renderer when the component is unmounted that it does not require unmount but requires special processing.
const unmount: UnmountFn = (vnode) => {
  // ...
  // 在 KeepAlive 组件渲染时会对子组件增加 COMPONENT_SHOULD_KEEP_ALIVE 标志
  // 然后在子组件卸载时并不会真实的卸载而是调用 KeepAlive 的 deactivate 方法
  if (shapeFlag & ShapeFlags.COMPONENT_SHOULD_KEEP_ALIVE) {
    ;(parentComponent!.ctx as KeepAliveContext).deactivate(vnode)
    return
  }
}- How to mount
activated
anddeactivatedlife cycle (you don’t need to focus on the life cycle related ones)
export function onActivated(
  hook: Function,
  target?: ComponentInternalInstance | null
) {
  // 注册 activated 的回调函数到当前的 instance 的钩子函数上
  registerKeepAliveHook(hook, LifecycleHooks.ACTIVATED, target)
}
export function onDeactivated(
  hook: Function,
  target?: ComponentInternalInstance | null
) {
  // 注册 deactivated 的回调函数到当前的 instance 的钩子函数上
  registerKeepAliveHook(hook, LifecycleHooks.DEACTIVATED, target)
}然后因为这两个生命周期会注册在 setup 里面,所以只要执行 setup 就会将两个生命周期的回调函数注册到当前的 instance 实例上
// renderer.ts
// mount 函数逻辑
const mountComponent = (initialVNode,
  container,
  anchor,
  parentComponent,
  parentSuspense,
  isSVG,
  optimized
) => {
  // ...
  const instance: ComponentInternalInstance =
    compatMountInstance ||
    (initialVNode.component = createComponentInstance(
    initialVNode,
    parentComponent,
    parentSuspense
  ))
  // 执行 setup
  setupComponent(instance)
}
// setupcomponent 处理 setup 函数值
export function setupComponent(
  instance: ComponentInternalInstance,
  isSSR = false
) {
  // ...
  const isStateful = isStatefulComponent(instance)
  // ...
  const setupResult = isStateful
    // setupStatefulComponent 函数主要功能是设置当前的 instance
    ? setupStatefulComponent(instance, isSSR)
    : undefined
  // ...
}

function setupStatefulComponent(
  instance: ComponentInternalInstance
){
  if (setup) {
    //设置当前实例
    setCurrentInstance(instance)
    // 执行组件内 setup 函数,执行 onActivated 钩子函数进行回调函数收集
    const setupResult = callWithErrorHandling(
      setup,
      instance,
      ErrorCodes.SETUP_FUNCTION,
      [__DEV__ ? shallowReadonly(instance.props) : instance.props, setupContext]
    )
    // currentInstance = null;
    unsetCurrentInstance()
  }
}最后在执行sharedContext.activate和sharedContext.deactivate的时候将注册在实例上的回调函数取出来直接执行就OK了,执行时机在 postRender 之后
sharedContext.activate = (vnode, container, anchor) => {
  // KeepAlive 下组件激活时执行的 move 逻辑
  move(vnode, container, anchor, 0 /* ENTER */)
  // 把回调推入到 postFlush 的异步任务队列中去执行
  queuePostRenderEffect(() => {
    if (instance.a) {
      // a是 activated 钩子的简称
      invokeArrayFns(instance.a)
    }
  })
}
sharedContext.activate = (vnode, container, anchor) => {
  // KeepAlive 下组件失活时执行的 move 逻辑
  move(vnode, container, anchor, 0 /* ENTER */)
  queuePostRenderEffect(() => {
    if (instance.da) {
      // da是 deactivated 钩子的简称
      invokeArrayFns(instance.da)
    }
  })
}

export const enum LifecycleHooks {
  // ... 其他生命周期声明
  DEACTIVATED = 'da',
  ACTIVATED = 'a',
}
export interface ComponentInternalInstance {
// ... 其他生命周期
[LifecycleHooks.ACTIVATED]: Function[]
[LifecycleHooks.DEACTIVATED]: Function[]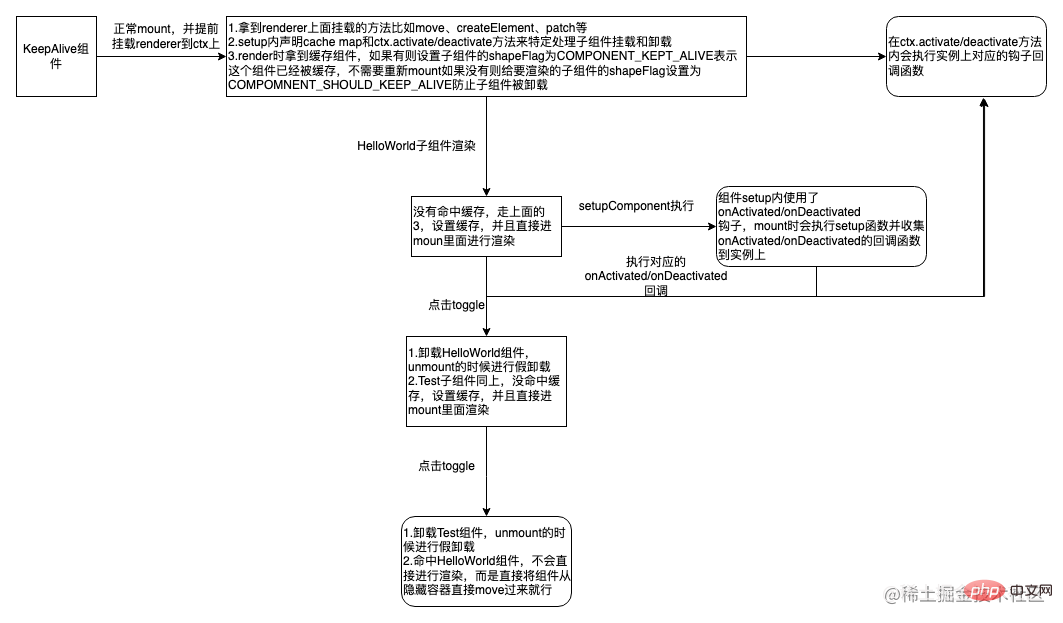
}以下是关于上述demo如何实现的简化流程图
需要注意的知识点
1、什么时候缓存
KeepAlive 组件的onMounted和onUpdated生命周期时进行缓存
2、什么时候取消缓存
缓存数量超过设置的 max 时
- 监听 include 和 exclude 修改的时候,会读取缓存中的知进行判断是否需要清除缓存
修剪缓存的时候也要 unmount(如果该缓存不是当前组件)或者 resetShapeFlag 将标志为从 KeepAlive 相关 shapeFlag 状态重置为 STATEFUL_COMPONENT 状态(如果该缓存是当前组件,但是被exclude了),当然 unmount 函数内包含 resetShapeFlag 操作
3、缓存策略
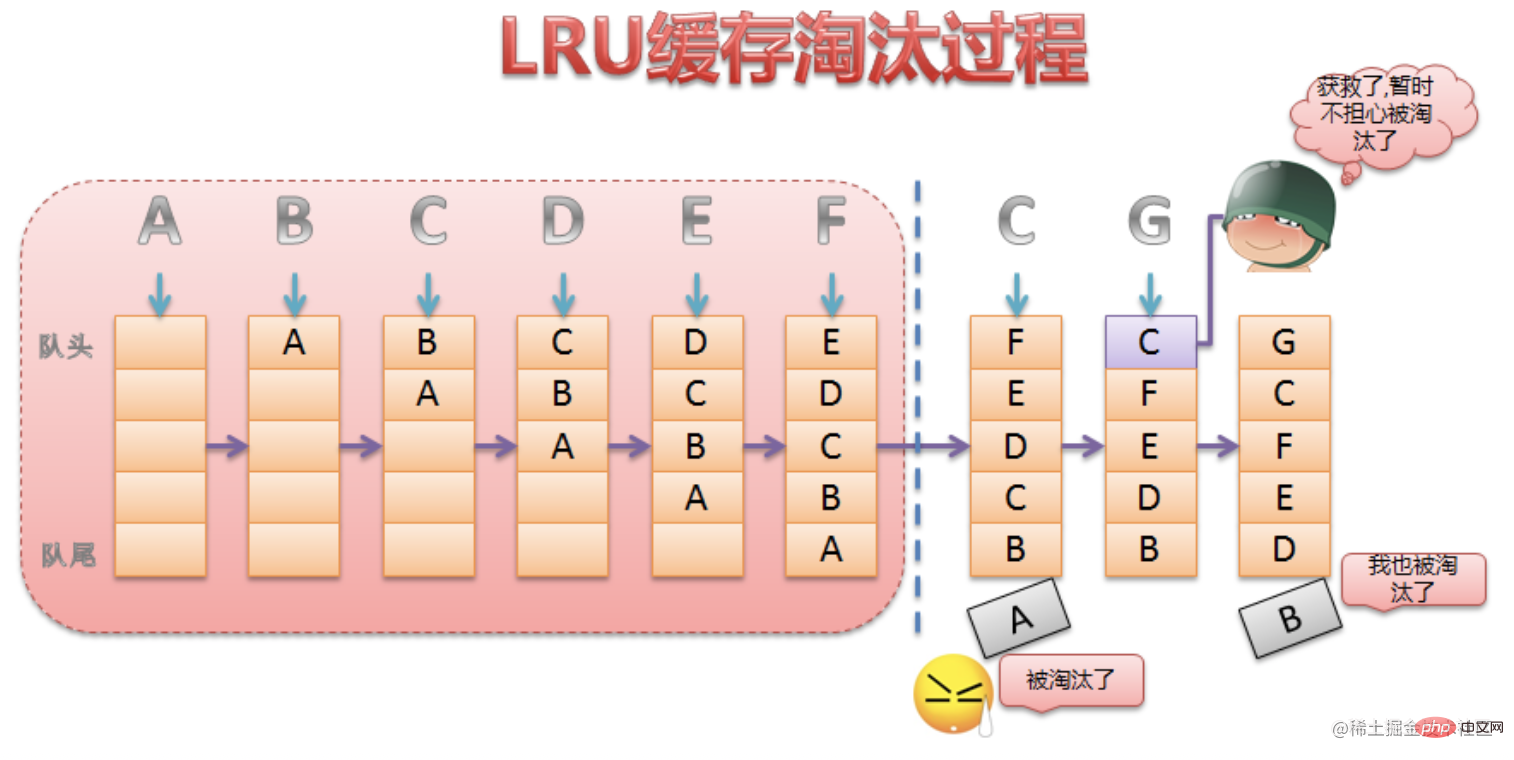
KeepAlive 组件的缓存策略是 LRU(last recently used)缓存策略
核心思想在于需要把当前访问或渲染的组件作为最新一次渲染的组件,并且该组件在缓存修剪过程中始终是安全的,即不会被修剪。
看下面的图更加直观,图片来源一篇讲keepAlive 缓存优化的文章
4、如何添加到 vue devtools 组件树上
sharedContext.activate = (vnode, container, anchor) => {
  // instance 是子组件实例
  const instance = vnode.component!
  // ...
  // dev环境下设置, 自己模拟写的
  devtools.emit('component:added', instance.appContext.app, instance.uid, instance.parent ? instance.parent.uid: undefined, instance)
  // 官方添加
  if (__DEV__ || __FEATURE_PROD_DEVTOOLS__) {
    // Update components tree
    devtoolsComponentAdded(instance)
  }
}
// 同理 sharedContext.deactivates 上也要添加,不然不会显示在组件树上5、缓存的子组件 props 更新处理
当子组件有 prop 更新时是需要重新去 patch 的,所以在 activate 的时候需要重新执行 patch 进行子组件更新
sharedContext.activate = (vnode, container, anchor) => {
  // ...
  // props 改变需要重新 patch(update)
  patch(
    instance.vnode,
    vnode,
    container,
    anchor,
    instance,
    parentSuspense,
    isSVG,
    vnode.slotScopeIds,
    optimized
  )
}The above is the detailed content of An article to talk about the KeepAlive component in Vue. For more information, please follow other related articles on the PHP Chinese website!

Hot AI Tools

Undresser.AI Undress
AI-powered app for creating realistic nude photos

AI Clothes Remover
Online AI tool for removing clothes from photos.

Undress AI Tool
Undress images for free

Clothoff.io
AI clothes remover

Video Face Swap
Swap faces in any video effortlessly with our completely free AI face swap tool!

Hot Article
Hot Tools

Notepad++7.3.1
Easy-to-use and free code editor

SublimeText3 Chinese version
Chinese version, very easy to use

Zend Studio 13.0.1
Powerful PHP integrated development environment

Dreamweaver CS6
Visual web development tools

SublimeText3 Mac version
God-level code editing software (SublimeText3)
Hot Topics


 PHP and Vue: a perfect pairing of front-end development tools
Mar 16, 2024 pm 12:09 PM
PHP and Vue: a perfect pairing of front-end development tools
Mar 16, 2024 pm 12:09 PM
PHP and Vue: a perfect pairing of front-end development tools. In today's era of rapid development of the Internet, front-end development has become increasingly important. As users have higher and higher requirements for the experience of websites and applications, front-end developers need to use more efficient and flexible tools to create responsive and interactive interfaces. As two important technologies in the field of front-end development, PHP and Vue.js can be regarded as perfect tools when paired together. This article will explore the combination of PHP and Vue, as well as detailed code examples to help readers better understand and apply these two
 C# development experience sharing: front-end and back-end collaborative development skills
Nov 23, 2023 am 10:13 AM
C# development experience sharing: front-end and back-end collaborative development skills
Nov 23, 2023 am 10:13 AM
As a C# developer, our development work usually includes front-end and back-end development. As technology develops and the complexity of projects increases, the collaborative development of front-end and back-end has become more and more important and complex. This article will share some front-end and back-end collaborative development techniques to help C# developers complete development work more efficiently. After determining the interface specifications, collaborative development of the front-end and back-end is inseparable from the interaction of API interfaces. To ensure the smooth progress of front-end and back-end collaborative development, the most important thing is to define good interface specifications. Interface specification involves the name of the interface
 Is Django front-end or back-end? check it out!
Jan 19, 2024 am 08:37 AM
Is Django front-end or back-end? check it out!
Jan 19, 2024 am 08:37 AM
Django is a web application framework written in Python that emphasizes rapid development and clean methods. Although Django is a web framework, to answer the question whether Django is a front-end or a back-end, you need to have a deep understanding of the concepts of front-end and back-end. The front end refers to the interface that users directly interact with, and the back end refers to server-side programs. They interact with data through the HTTP protocol. When the front-end and back-end are separated, the front-end and back-end programs can be developed independently to implement business logic and interactive effects respectively, and data exchange.
 Questions frequently asked by front-end interviewers
Mar 19, 2024 pm 02:24 PM
Questions frequently asked by front-end interviewers
Mar 19, 2024 pm 02:24 PM
In front-end development interviews, common questions cover a wide range of topics, including HTML/CSS basics, JavaScript basics, frameworks and libraries, project experience, algorithms and data structures, performance optimization, cross-domain requests, front-end engineering, design patterns, and new technologies and trends. . Interviewer questions are designed to assess the candidate's technical skills, project experience, and understanding of industry trends. Therefore, candidates should be fully prepared in these areas to demonstrate their abilities and expertise.
 Exploring Go language front-end technology: a new vision for front-end development
Mar 28, 2024 pm 01:06 PM
Exploring Go language front-end technology: a new vision for front-end development
Mar 28, 2024 pm 01:06 PM
As a fast and efficient programming language, Go language is widely popular in the field of back-end development. However, few people associate Go language with front-end development. In fact, using Go language for front-end development can not only improve efficiency, but also bring new horizons to developers. This article will explore the possibility of using the Go language for front-end development and provide specific code examples to help readers better understand this area. In traditional front-end development, JavaScript, HTML, and CSS are often used to build user interfaces
 Django: A magical framework that can handle both front-end and back-end development!
Jan 19, 2024 am 08:52 AM
Django: A magical framework that can handle both front-end and back-end development!
Jan 19, 2024 am 08:52 AM
Django: A magical framework that can handle both front-end and back-end development! Django is an efficient and scalable web application framework. It is able to support multiple web development models, including MVC and MTV, and can easily develop high-quality web applications. Django not only supports back-end development, but can also quickly build front-end interfaces and achieve flexible view display through template language. Django combines front-end development and back-end development into a seamless integration, so developers don’t have to specialize in learning
 Combination of Golang and front-end technology: explore how Golang plays a role in the front-end field
Mar 19, 2024 pm 06:15 PM
Combination of Golang and front-end technology: explore how Golang plays a role in the front-end field
Mar 19, 2024 pm 06:15 PM
Combination of Golang and front-end technology: To explore how Golang plays a role in the front-end field, specific code examples are needed. With the rapid development of the Internet and mobile applications, front-end technology has become increasingly important. In this field, Golang, as a powerful back-end programming language, can also play an important role. This article will explore how Golang is combined with front-end technology and demonstrate its potential in the front-end field through specific code examples. The role of Golang in the front-end field is as an efficient, concise and easy-to-learn
 Analysis of front-end engineer responsibilities: What is the main job?
Mar 25, 2024 pm 05:09 PM
Analysis of front-end engineer responsibilities: What is the main job?
Mar 25, 2024 pm 05:09 PM
Analysis of front-end engineer responsibilities: What is the main job? With the rapid development of the Internet, front-end engineers play a very important professional role, playing a vital role as a bridge between users and website applications. So, what do front-end engineers mainly do? This article will analyze the responsibilities of front-end engineers, let us find out. 1. Basic responsibilities of front-end engineers Website development and maintenance: Front-end engineers are responsible for the front-end development of the website, including writing the website’s HTML, CSS and JavaScr
