
 Development Tools
VSCode
Simple practical sharing: Let's talk to you about VScode plug-in development
Development Tools
VSCode
Simple practical sharing: Let's talk to you about VScode plug-in development
Simple practical sharing: Let's talk to you about VScode plug-in development


VSCode is a very lightweight editor from Microsoft. Although it is lightweight, it has extremely powerful functions. The reason is that many powerful functions of VSCode are implemented based on plug-ins. The IDE only provides the most basic framework and basic functions. We need to use plug-ins to enrich and expand its functions. [Recommended learning: "vscode introductory tutorial"]
Due to the important role of plug-ins, the size of VSCode's plug-in community is now very impressive. Most of our commonly used development tools can be found here. Found in the App Market.
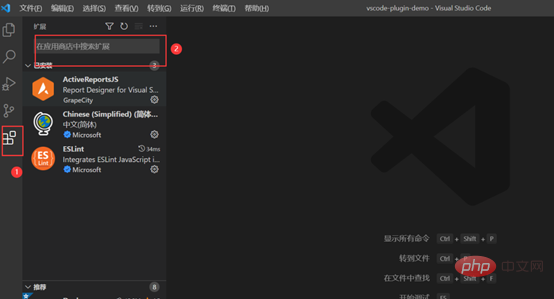
After opening VScode, the left side of the interface is the entrance to the application market, where you can search for the plug-ins we need.
But our needs are always complex and changeable, and there are always some scenarios that existing plug-ins cannot meet. At this time, we need to use the open interface of VScode to manually implement the functions we need.

This article mainly takes you to start with the development of a simple plug-in. For more plug-ins with more complex functions, we need to consult the official documents according to our specific needs.
Project initialization
The first step is to install the official scaffolding yo provided by VScode and use it to generate the project:
// 安装脚手架

npm install -g yo generator-code
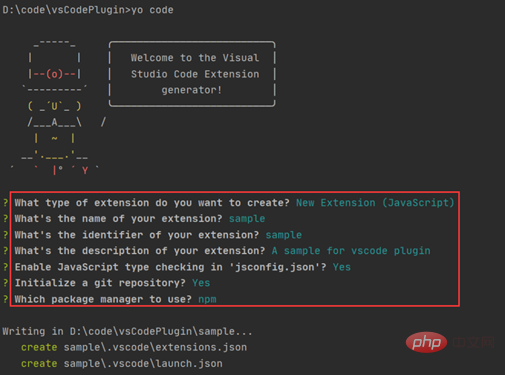
In the second step, use the following command to initialize a sample project:
yo code
During the initialization process, we need to make some preference settings, just select according to your needs:
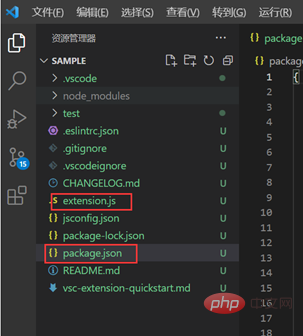
Then we can use VSCode to open the project generated by the above steps. You can see the directory structure as follows. The two most important files are package.json and extension.js. After understanding these two files, you can basically get started. Developed a VSCode plug-in.
package.json file
package.json file is the manifest file of the VSCode extension, which contains Many fields. The official documentation also has special instructions for each field: manifest.
Here we only focus on the files generated after initialization, which mainly include the following key nodes:

1. main: specifies the The entry file of the project. From here you can see that the entry file is extension.js;
2. Contributes: The contribution point of the plug-in, the most important configuration of the plug-in. Registering contributions through extensions is used to extend various skills in Visual Studio Code. The official documentation provides guidance: contributes.
A command named sample.helloWorld is registered in commands here. This command actually needs to be implemented in ./extension.js (this part is the focus, we will talk about it later);
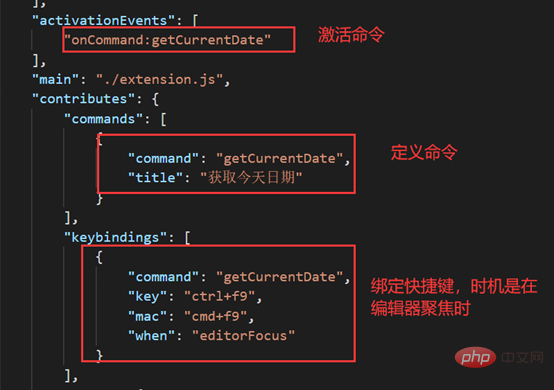
3. activationEvents: This node tells VScode under what circumstances the plug-in will be activated. The official document has specified the timing of activation: activationEvents. The screenshot above indicates that when we execute It is activated when the sample.helloWorld command is used. In addition, there are more scenarios:
onCommand: activated when the command is called
onLanguage: It is activated when opening a file parsed to a specific language, such as "onLanguage:python"
*: As soon as vscode is started, the plug-in will be activated
onFileSystem: Whenever a file or folder from a specific scheme is read
onView: Whenever a view with the specified id is expanded in the VS Code sidebar.. ..
For more information, please refer to the official documentation if you are interested.
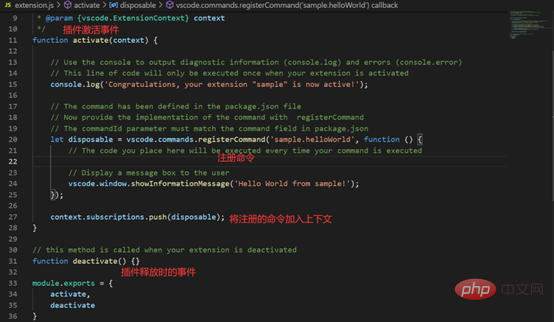
extension.js File
extension.js file corresponds to the main field in package.json mentioned above file (the file name can be customized). This file mainly exports two methods: activate and deactivate. The execution timing of the two methods is as follows:
- activate: The method that is executed when the plug-in is activated
- deactivate: Method called when the plug-in is destroyed
Debugging and actual combat
After introducing the main files of this initialization project, you can debug and run it. F5 enters debugging mode, and a new window will open as follows:
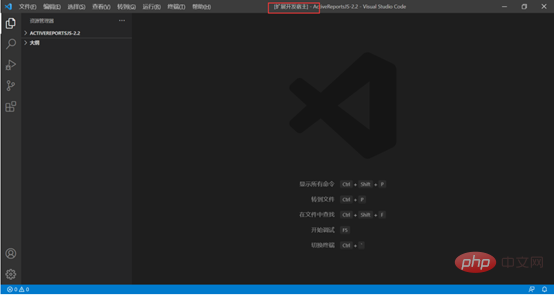
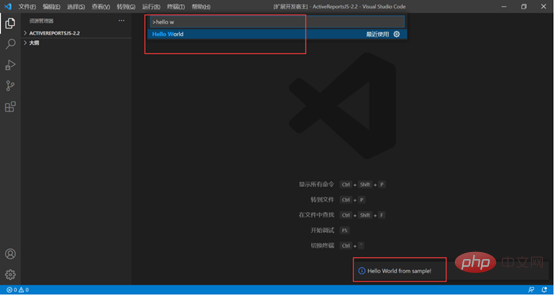
#This window is marked "Extended Development Host", Ctrl Shift P enter the command we defined before, execute, Text pops up in the lower right corner:
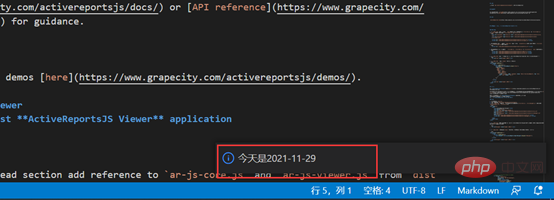
#The demo project we generated has been successfully run. Next, we make slight changes to the plug-in so that it can display today's date and bind shortcut keys to it. The package.json changes are as follows:
extensions.js file changes As follows:
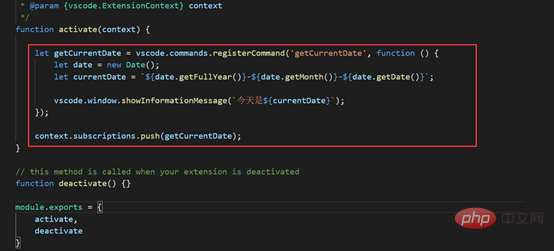
Run, click ctrl f9, it runs normally:
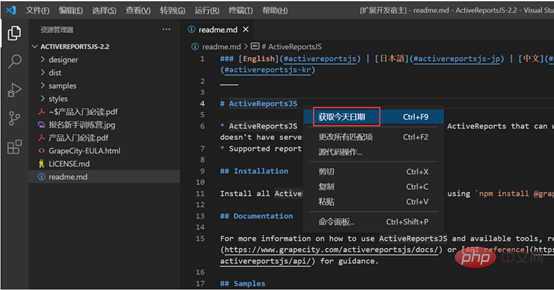
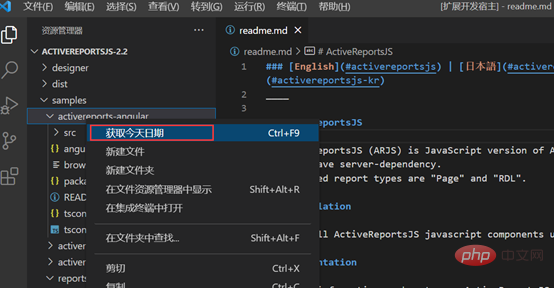
In addition to configuring shortcut keys to run commands, you can also Configure the right-click menu. Contributes can configure the menu:
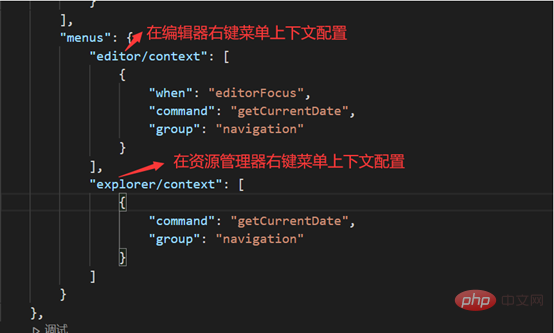
#After running, you can see this command by right-clicking on the editor and resource manager panels respectively:
Summary
The above is a simple entry-level practical tutorial to help you understand The basic idea of developing a VSCode plug-in is explained. If you encounter more complex and customized needs in the future, you can refer to Official Documents for in-depth study.
Is it necessary to master plug-in development? Putao feels that if there is no need for this at the moment, there is no need to understand it too deeply, but as a self-disciplined brick-and-mortar coder, you can first have a rough understanding of the basic ideas.
Because in our actual work, sometimes a plug-in can solve many problems for certain complex requirements, greatly improving work efficiency.
For example, in this scenario, we use a report control like ActiveReportsJS in the project. In the process of writing code, we sometimes need to modify the design of some reports. Then every time we use it, we must either start the project and open the report designer, or open the report through the desktop report designer.
But in fact, through the CustomEditor interface provided by the VScode plug-in API, we can implement a highly customized private editor for special report files. Click on the report file and directly use the designer provided by this control to preview the file. As shown below:
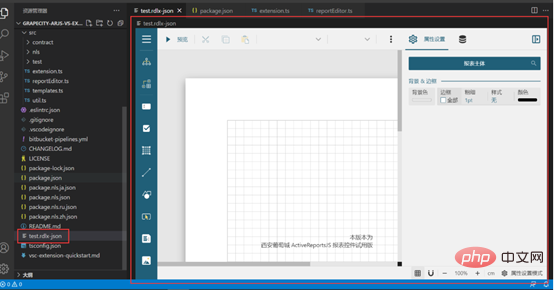
#The implementation of this plug-in further improves our work efficiency and avoids a lot of repetitive work. Regarding the CustomEditor interface, VSCode also provides official samples vscode-extension-samples. If you are interested, you can learn about it.
For more knowledge about VSCode, please visit: vscode tutorial!
The above is the detailed content of Simple practical sharing: Let's talk to you about VScode plug-in development. For more information, please follow other related articles on the PHP Chinese website!

Hot AI Tools

Undresser.AI Undress
AI-powered app for creating realistic nude photos

AI Clothes Remover
Online AI tool for removing clothes from photos.

Undress AI Tool
Undress images for free

Clothoff.io
AI clothes remover

Video Face Swap
Swap faces in any video effortlessly with our completely free AI face swap tool!

Hot Article
Hot Tools

Notepad++7.3.1
Easy-to-use and free code editor

SublimeText3 Chinese version
Chinese version, very easy to use

Zend Studio 13.0.1
Powerful PHP integrated development environment

Dreamweaver CS6
Visual web development tools

SublimeText3 Mac version
God-level code editing software (SublimeText3)
Hot Topics
 1654
1654
 14
1413
52
1306
25
1252
29
1225
24
14
1413
52
1306
25
1252
29
1225
24

 How to define header files for vscode
Apr 15, 2025 pm 09:09 PM
How to define header files for vscode
Apr 15, 2025 pm 09:09 PM
How to define header files using Visual Studio Code? Create a header file and declare symbols in the header file using the .h or .hpp suffix name (such as classes, functions, variables) Compile the program using the #include directive to include the header file in the source file. The header file will be included and the declared symbols are available.
 What computer configuration is required for vscode
Apr 15, 2025 pm 09:48 PM
What computer configuration is required for vscode
Apr 15, 2025 pm 09:48 PM
VS Code system requirements: Operating system: Windows 10 and above, macOS 10.12 and above, Linux distribution processor: minimum 1.6 GHz, recommended 2.0 GHz and above memory: minimum 512 MB, recommended 4 GB and above storage space: minimum 250 MB, recommended 1 GB and above other requirements: stable network connection, Xorg/Wayland (Linux)
 vscode terminal usage tutorial
Apr 15, 2025 pm 10:09 PM
vscode terminal usage tutorial
Apr 15, 2025 pm 10:09 PM
vscode built-in terminal is a development tool that allows running commands and scripts within the editor to simplify the development process. How to use vscode terminal: Open the terminal with the shortcut key (Ctrl/Cmd). Enter a command or run the script. Use hotkeys (such as Ctrl L to clear the terminal). Change the working directory (such as the cd command). Advanced features include debug mode, automatic code snippet completion, and interactive command history.
 Where to write code in vscode
Apr 15, 2025 pm 09:54 PM
Where to write code in vscode
Apr 15, 2025 pm 09:54 PM
Writing code in Visual Studio Code (VSCode) is simple and easy to use. Just install VSCode, create a project, select a language, create a file, write code, save and run it. The advantages of VSCode include cross-platform, free and open source, powerful features, rich extensions, and lightweight and fast.
 How to solve the problem of vscode Chinese annotations becoming question marks
Apr 15, 2025 pm 11:36 PM
How to solve the problem of vscode Chinese annotations becoming question marks
Apr 15, 2025 pm 11:36 PM
How to solve the problem that Chinese comments in Visual Studio Code become question marks: Check the file encoding and make sure it is "UTF-8 without BOM". Change the font to a font that supports Chinese characters, such as "Song Style" or "Microsoft Yahei". Reinstall the font. Enable Unicode support. Upgrade VSCode, restart the computer, and recreate the source file.
 Common commands for vscode terminal
Apr 15, 2025 pm 10:06 PM
Common commands for vscode terminal
Apr 15, 2025 pm 10:06 PM
Common commands for VS Code terminals include: Clear the terminal screen (clear), list the current directory file (ls), change the current working directory (cd), print the current working directory path (pwd), create a new directory (mkdir), delete empty directory (rmdir), create a new file (touch) delete a file or directory (rm), copy a file or directory (cp), move or rename a file or directory (mv) display file content (cat) view file content and scroll (less) view file content only scroll down (more) display the first few lines of the file (head)
 vscode terminal command cannot be used
Apr 15, 2025 pm 10:03 PM
vscode terminal command cannot be used
Apr 15, 2025 pm 10:03 PM
Causes and solutions for the VS Code terminal commands not available: The necessary tools are not installed (Windows: WSL; macOS: Xcode command line tools) Path configuration is wrong (add executable files to PATH environment variables) Permission issues (run VS Code as administrator) Firewall or proxy restrictions (check settings, unrestrictions) Terminal settings are incorrect (enable use of external terminals) VS Code installation is corrupt (reinstall or update) Terminal configuration is incompatible (try different terminal types or commands) Specific environment variables are missing (set necessary environment variables)
 vscode Previous Next Shortcut Key
Apr 15, 2025 pm 10:51 PM
vscode Previous Next Shortcut Key
Apr 15, 2025 pm 10:51 PM
VS Code One-step/Next step shortcut key usage: One-step (backward): Windows/Linux: Ctrl ←; macOS: Cmd ←Next step (forward): Windows/Linux: Ctrl →; macOS: Cmd →
