

What is the implementation method of mysql read and write separation?

In mysql, you can use "mysql-proxy" to achieve read-write separation; "mysql-proxy" is a software officially provided by mysql to achieve read-write separation, also called middleware, which can allow the main database to Write operations are processed, and query operations are processed from the database. Database consistency is achieved through master-slave replication.

The operating environment of this tutorial: windows10 system, mysql8.0.22 version, Dell G3 computer.
What is the implementation method of mysql read-write separation?
The plug-ins in Mysql that can realize read-write separation include mysql-proxy / Mycat / Amoeba. Mysql-proxy is a plug-in that comes with the system. This experiment mainly uses it to achieve read and write separation
mysql-proxy is a software that implements "read/write separation (Read/Write Splitting)" (officially provided by MySQL, also called middleware), the basic principle It is to let the main database handle write operations (insert, update, delete), and the slave database handles query operations (select). The consistency of the database is achieved through master-slave replication
MySQL-proxy can realize the distinction between read and write statements mainly relying on an internal Lua script (which can realize the judgment of read and write statements)
If the data writing operation is only completed on the master server (write server), no writing operation is performed on the slave server at this time, and there is no data.
At this time, another technology needs to be used to implement the master-slave server. Data consistency, this technology is called master-slave replication technology, so master-slave replication is the basis of read-write separation
Read-write separation (MySQL-Proxy) means to let the master handle the write operation and let the slave handle the read operation , very suitable for scenarios with relatively large read operations, which can reduce the pressure on the master.
Use mysql-proxy to achieve read-write separation of mysql. mysql-proxy actually acts as a proxy for the back-end mysql master-slave server. It directly accepts the client's request, analyzes the SQL statement, determines whether it is a read operation or a write operation, and then distributes it to the corresponding mysql server
Because the write operation of the database is more time-consuming than the read operation. Therefore, the separation of reading and writing in the database solves the problem of writing to the database, which affects the efficiency of queries.
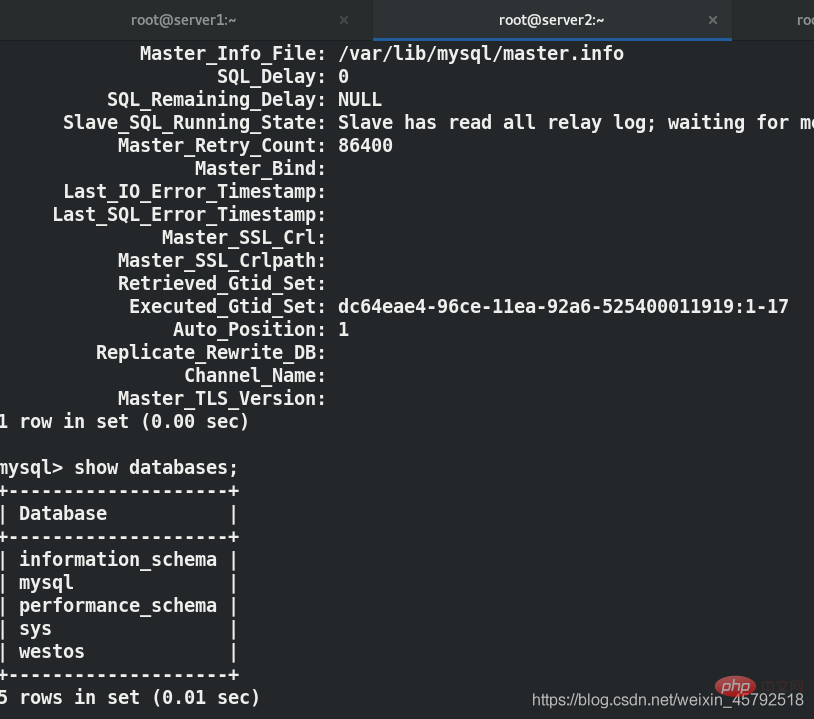
Configure gtid master-slave replication on server1 and server2 first.
The previous blog on gtid master-slave replication has been completed. Explanation, I will not go into details here, only show the final effect
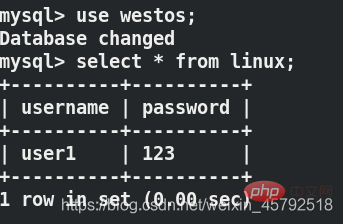
You can see that a westos database is established on server1, and the corresponding server2 will be synchronized
Configuration server3 proxy (mysql-proxy)
Build mysql-proxy proxy server on server3 (to realize the client writing on server1 and reading data on server2)
(1) Obtain mysql- from the physical machine Proxy installation package to server3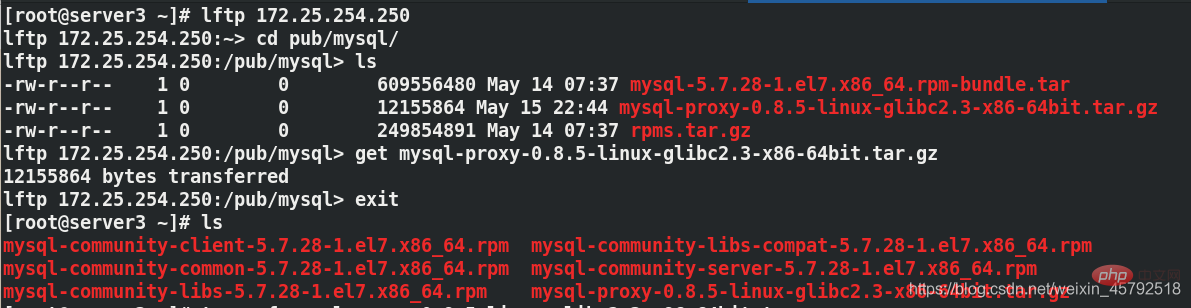
(2) Configure on server3
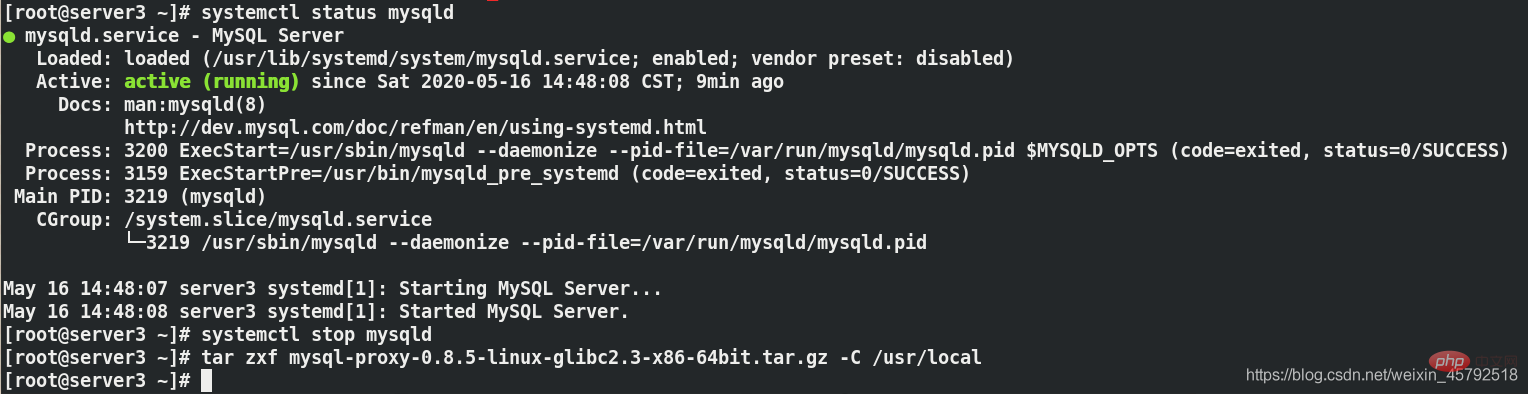
[root@server3 ~]# systemctl status mysqld	##查看mysqld服务状态
[root@server3 ~]# systemctl stop mysqld	##关闭mysqld服务,因为代理服务器要用3306端口
[root@server3 ~]# tar zxf mysql-proxy-0.8.5-linux-glibc2-x86-64bit.tar.gz -C /usr/local/	##解压到/usr/local/目录下
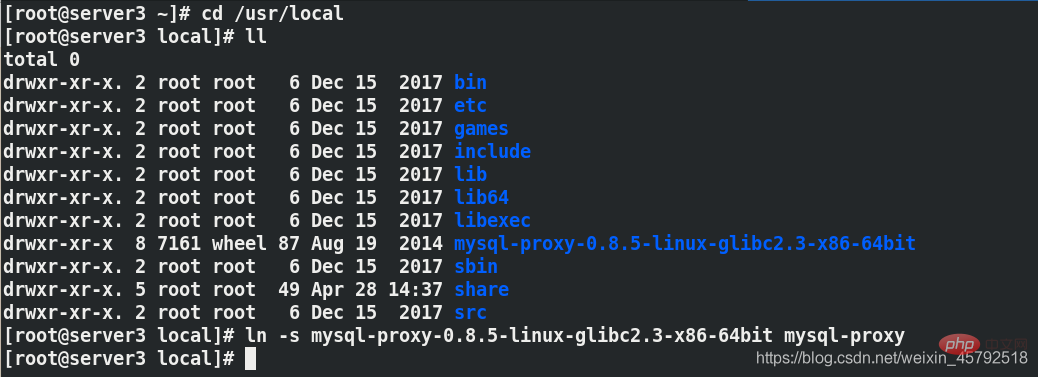
Make a soft connection for management
ln -s mysql-proxy-0.8.5-linux-glibc2-x86-64bit mysql-proxy
There is no configuration file in the mysql-proxy directory, so you need to create a directory for the configuration file yourself and create the configuration file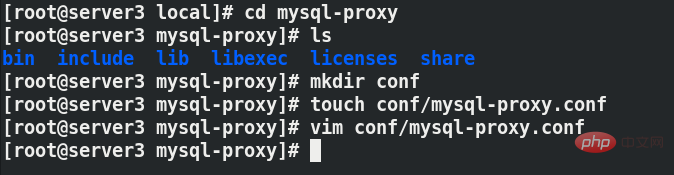
Use the following two commands to check Parameters written in the configuration file
[root@server3 bin]# ./mysql-proxy --help
[root@server3 bin]# ./mysql-proxy --help-proxy
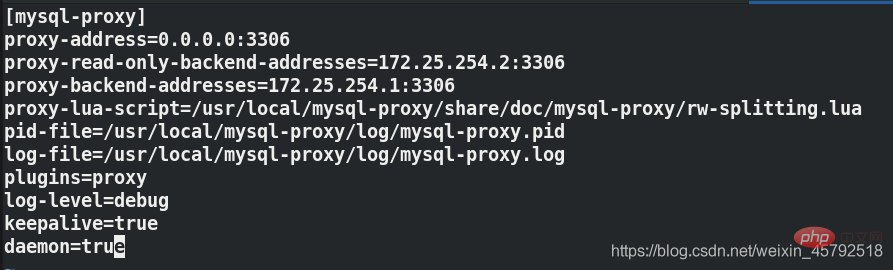
[mysql-proxy]	##指定语句块
proxy-address=0.0.0.0:3306	##指定proxy访问的主机和端口,3306是一个对外的通用端口
proxy-read-only-backend-addresses=172.25.254.2:3306	##读主机的ip和端口
proxy-backend-addresses=172.25.254.1:3306	##执行写主机的ip和端口
proxy-lua-script=/usr/local/mysql-proxy/share/doc/mysql-proxy/rw-splitting.lua	##指定读写分离操作使用的lua文件路径
pid-file=/usr/local/mysql-proxy/log/mysql-proxy.pid	##pid存放路径
log-file=/usr/local/mysql-proxy/log/mysql-proxy.log	##日志存放路径
plugins=proxy	##指定使用的插件
log-level=debug	##日志的等级
keepalive=true	##开启守护进程
daemon=true	##使用后台方式运行
After saving, you need to change the permissions of the configuration file to 660 and create a log directory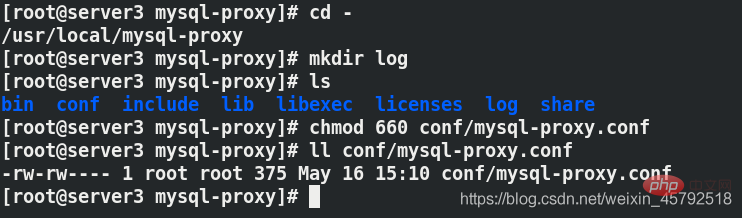
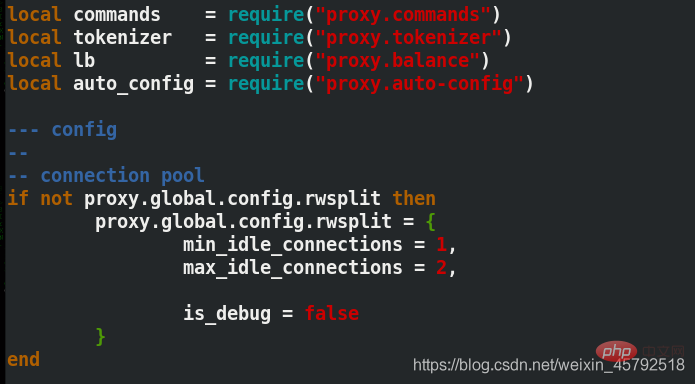
Modify the maximum and minimum number of connections when read-write separation occurs in the database
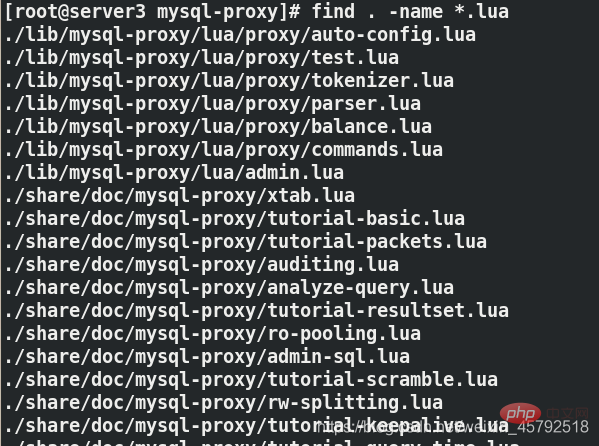
[root@server3 mysql-proxy]# find . -name *.lua
./share/doc/mysql-proxy/rw-splitting.lua
[root@server3 mysql-proxy]# cd share/doc/mysql-proxy
[root@server3 mysql-proxy]# ls
[root@server3 mysql-proxy]# vim rw-splitting.lua		##将lua脚本里原本启动机制的最小4个最大8个连接,改为1和2
min_idle_connections = 1, 最小连接数
max_idle_connections = 2, 最大连接数

(3) Start mysql -proxy
/usr/local/mysql-proxy/bin/mysql-proxy --defaults-file=/usr/local/mysql-proxy/conf/mysql-proxy.conf	##启动
cat /usr/local/mysql-proxy/log/mysql-proxy.log	##查看日志

Test read-write separation
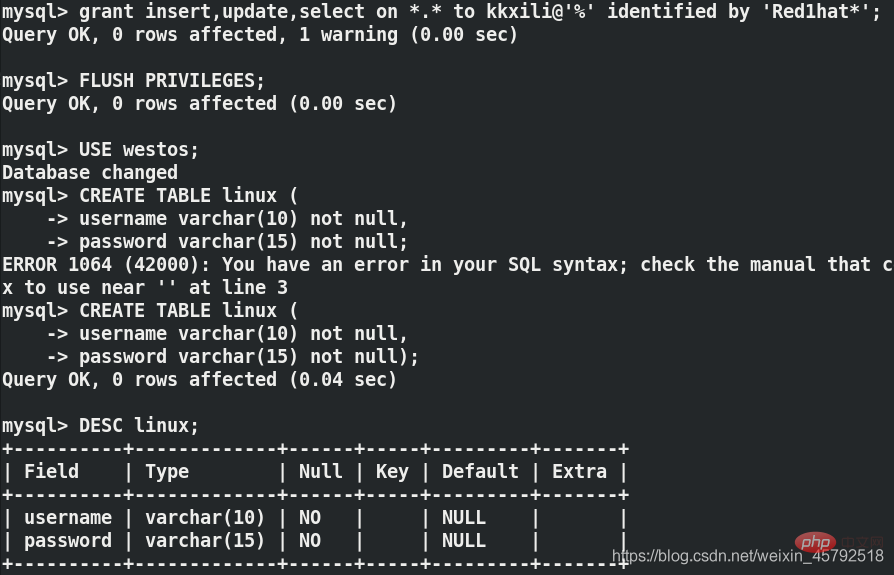
(1) Create a new user on server1 and authorize
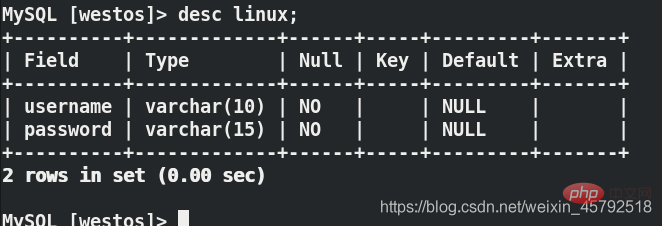
mysql> grant insert,update,select on *.* to kkxili@'%' identified by 'Red1hat*';
mysql> FLUSH PRIVILEGES;	##刷新授权表
mysql> USE westos;
Database changed
mysql> CREATE TABLE linux (
    -> username varchar(10) not null,
    -> password varchar(15) not null);
mysql>DESC linux;
(2)server3安装lsof

(3)在用户端虚拟机server4上第一次连接数据库代理server3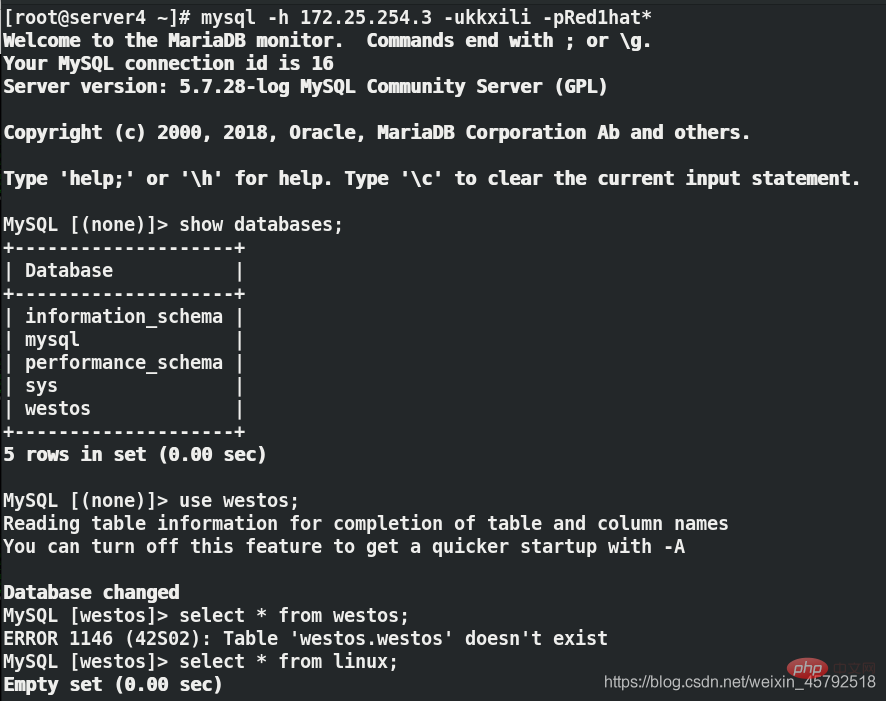
在server3上面:lsof -i:3306

(4)在用户端虚拟机server4上第二次连接数据库代理server3
在server3上面:lsof -i:3306

(5)在用户端虚拟机server4上第三次连接数据库代理server3
在server3上面:lsof -i:3306
开始读写分离
 上面是读写分离的读访问测试
写测试
在用户端插入数据
use westos;
insert into linux values('user1','123');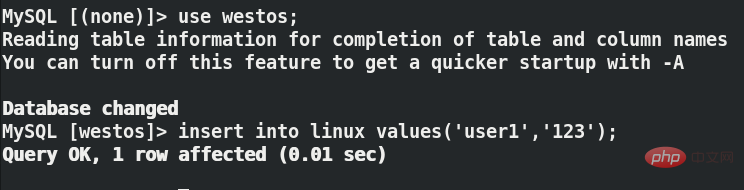
server1和server2都可以看到插入的数据
在server2中关闭主从复制
用户端再次写入数据,看不到刚刚写的数据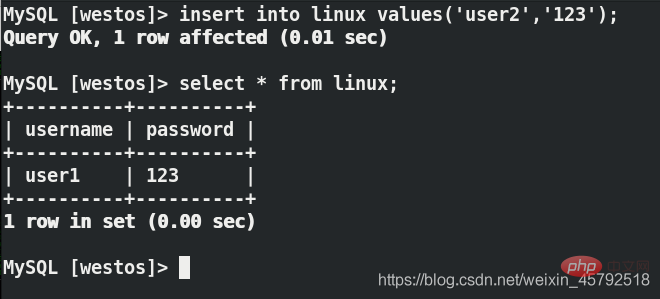
写在server1上,可以查看到数据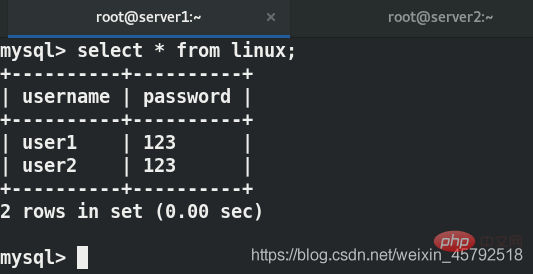
在server2上实现了读写分离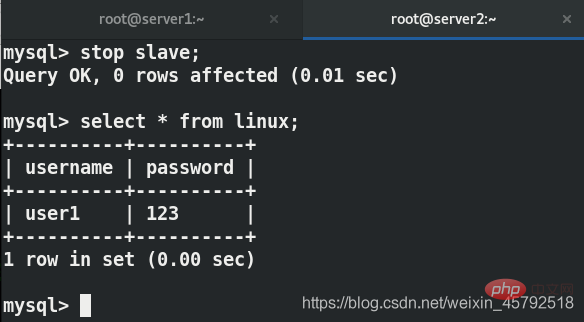
server2重新开启主从复制可以看到数据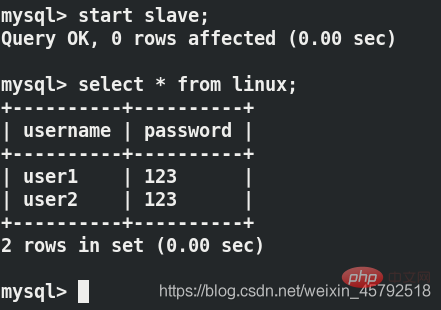
客户端读的是server2,server2只能读,不能写,因此看不到刚才写进去的东西,server1可以看到
实现了客户端(虚拟机)对server1的写,对server2的读
当访问数据库的用户数量很多时,数据库的代理就把后端的数据库实现读写分离
server1是写的数据库、server2是读的数据库
当server1和server2满足gtid的主从复制时,用户往数据库写入的数据其实是写入了server1,并没有写入server2,server2上面的数据是复制过去的,因此server1、server2、客户机上面都能查到刚刚写进去的数据,其实客户机查的是server2(读)
当关闭server1和server2的异步复制时,客户机往数据库写入的数据只写进了server1,没有写进去server2,server2也没有复制一份
因此server1可以查看到,server2和客户机上面都查不到刚刚写进去的数据,此时的客户机读的是server2
推荐学习:mysql视频教程
The above is the detailed content of What is the implementation method of mysql read and write separation?. For more information, please follow other related articles on the PHP Chinese website!

Hot AI Tools

Undresser.AI Undress
AI-powered app for creating realistic nude photos

AI Clothes Remover
Online AI tool for removing clothes from photos.

Undress AI Tool
Undress images for free

Clothoff.io
AI clothes remover

Video Face Swap
Swap faces in any video effortlessly with our completely free AI face swap tool!

Hot Article
Hot Tools

Notepad++7.3.1
Easy-to-use and free code editor

SublimeText3 Chinese version
Chinese version, very easy to use

Zend Studio 13.0.1
Powerful PHP integrated development environment

Dreamweaver CS6
Visual web development tools

SublimeText3 Mac version
God-level code editing software (SublimeText3)
Hot Topics


 MySQL's Role: Databases in Web Applications
Apr 17, 2025 am 12:23 AM
MySQL's Role: Databases in Web Applications
Apr 17, 2025 am 12:23 AM
The main role of MySQL in web applications is to store and manage data. 1.MySQL efficiently processes user information, product catalogs, transaction records and other data. 2. Through SQL query, developers can extract information from the database to generate dynamic content. 3.MySQL works based on the client-server model to ensure acceptable query speed.
 How to start mysql by docker
Apr 15, 2025 pm 12:09 PM
How to start mysql by docker
Apr 15, 2025 pm 12:09 PM
The process of starting MySQL in Docker consists of the following steps: Pull the MySQL image to create and start the container, set the root user password, and map the port verification connection Create the database and the user grants all permissions to the database
 Laravel Introduction Example
Apr 18, 2025 pm 12:45 PM
Laravel Introduction Example
Apr 18, 2025 pm 12:45 PM
Laravel is a PHP framework for easy building of web applications. It provides a range of powerful features including: Installation: Install the Laravel CLI globally with Composer and create applications in the project directory. Routing: Define the relationship between the URL and the handler in routes/web.php. View: Create a view in resources/views to render the application's interface. Database Integration: Provides out-of-the-box integration with databases such as MySQL and uses migration to create and modify tables. Model and Controller: The model represents the database entity and the controller processes HTTP requests.
 Solve database connection problem: a practical case of using minii/db library
Apr 18, 2025 am 07:09 AM
Solve database connection problem: a practical case of using minii/db library
Apr 18, 2025 am 07:09 AM
I encountered a tricky problem when developing a small application: the need to quickly integrate a lightweight database operation library. After trying multiple libraries, I found that they either have too much functionality or are not very compatible. Eventually, I found minii/db, a simplified version based on Yii2 that solved my problem perfectly.
 How to install mysql in centos7
Apr 14, 2025 pm 08:30 PM
How to install mysql in centos7
Apr 14, 2025 pm 08:30 PM
The key to installing MySQL elegantly is to add the official MySQL repository. The specific steps are as follows: Download the MySQL official GPG key to prevent phishing attacks. Add MySQL repository file: rpm -Uvh https://dev.mysql.com/get/mysql80-community-release-el7-3.noarch.rpm Update yum repository cache: yum update installation MySQL: yum install mysql-server startup MySQL service: systemctl start mysqld set up booting
 Laravel framework installation method
Apr 18, 2025 pm 12:54 PM
Laravel framework installation method
Apr 18, 2025 pm 12:54 PM
Article summary: This article provides detailed step-by-step instructions to guide readers on how to easily install the Laravel framework. Laravel is a powerful PHP framework that speeds up the development process of web applications. This tutorial covers the installation process from system requirements to configuring databases and setting up routing. By following these steps, readers can quickly and efficiently lay a solid foundation for their Laravel project.
 MySQL and phpMyAdmin: Core Features and Functions
Apr 22, 2025 am 12:12 AM
MySQL and phpMyAdmin: Core Features and Functions
Apr 22, 2025 am 12:12 AM
MySQL and phpMyAdmin are powerful database management tools. 1) MySQL is used to create databases and tables, and to execute DML and SQL queries. 2) phpMyAdmin provides an intuitive interface for database management, table structure management, data operations and user permission management.
 Centos install mysql
Apr 14, 2025 pm 08:09 PM
Centos install mysql
Apr 14, 2025 pm 08:09 PM
Installing MySQL on CentOS involves the following steps: Adding the appropriate MySQL yum source. Execute the yum install mysql-server command to install the MySQL server. Use the mysql_secure_installation command to make security settings, such as setting the root user password. Customize the MySQL configuration file as needed. Tune MySQL parameters and optimize databases for performance.
