 Operation and Maintenance
 Docker
 Let you understand how to install Nginx and build a static server based on Docker
Let you understand how to install Nginx and build a static server based on Docker
This article brings you relevant knowledge about how to install Nginx to build a static server based on docker. It is very common to use nginx as a static server. The following is mainly Let’s talk about installing and managing our nginx through docker, and configuring the ssl certificate to enable HTTPS access. I hope it will be helpful to everyone.

Everyone needs a server. The static server configuration requirements are not very high. We recommend 1 core 2G and above.
1. Install Docker
##linuxThe server uses curl to download the quick installation shellscript
curl -fsSL get.docker.com -o get-docker.sh
ls command. If it already exists, use the sh command to execute this script
sh get-docker.sh
root user, you need to use sudo su to obtain super administrator privileges .
Docker Server
systemctl start docker
docker version command to see Client and Server is started successfully.
docker run -d -p 80:80 --name nginx \
 -v /home/nginx/html:/usr/share/nginx/html \
 -v /home/nginx/logs:/var/log/nginx \
 nginx:latest
Copy after login
2. Copy the configuration file in the container to the localdocker run -d -p 80:80 --name nginx \ -v /home/nginx/html:/usr/share/nginx/html \ -v /home/nginx/logs:/var/log/nginx \ nginx:latest
docker container cp nginx:/etc/nginx /home/nginx/
cd /home/nginx
mv nginx conf
Copy after login
3. Delete the previous containerdocker container cp nginx:/etc/nginx /home/nginx/ cd /home/nginx mv nginx conf
docker stop nginx
docker rm nginx
Copy after login
4. Run the new container according to the local configuration filedocker stop nginx docker rm nginx
docker run -d -p 80:80 -p 443:443 --name nginx \
 -v /home/nginx/conf:/etc/nginx \
 -v /home/nginx/logs:/var/log/nginx \
 -v /home/nginx/html:/usr/share/nginx/html \
 nginx:latest
Copy after login
If no configuration is requireddocker run -d -p 80:80 -p 443:443 --name nginx \ -v /home/nginx/conf:/etc/nginx \ -v /home/nginx/logs:/var/log/nginx \ -v /home/nginx/html:/usr/share/nginx/html \ nginx:latest
sslCertificate enabledhttpsAccess, you can use this nginx as an ordinary static server at this time.
/home/nginx:
conf: nginx configuration file, specific For configuration, please see the official website
html: Put static resources, such as html, css, js, etc.
logs: Logs folder, the access logs can be viewed in it
nginx throughdocker restart nginx.
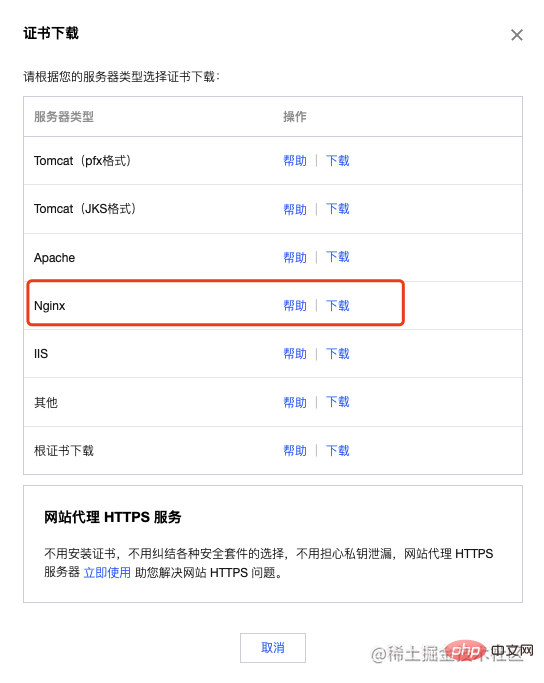
Tencent CloudSSL Certificate, after submitting the application information, a txt type of domain name resolution will be configured, and then wait for approval.
nginx server type certificate.

cert## in conf/conf.d #Certificate folder<div class="code" style="position:relative; padding:0px; margin:0px;"><pre class="brush:php;toolbar:false">cd /home/nginx/conf/conf.d
mkdir cert</pre><div class="contentsignin">Copy after login</div></div>Upload the certificate you just downloaded to this folder
3. Modify nginx configuration to enable HTTPS access
vi /home/nginx/ conf/conf.d/default.confWrite the following content
server {
    #SSL 访问端口号为 443
    listen 443 ssl;
    #填写绑定证书的域名
    server_name 0101.ml;
    #证书文件名称
    ssl_certificate /etc/nginx/conf.d/cert/0101.ml_bundle.pem;
    #私钥文件名称
    ssl_certificate_key /etc/nginx/conf.d/cert/0101.ml.key;
    ssl_session_timeout 5m;
    #请按照以下协议配置
    ssl_protocols TLSv1 TLSv1.1 TLSv1.2;
    #请按照以下套件配置,配置加密套件,写法遵循 openssl 标准。
    ssl_ciphers ECDHE-RSA-AES128-GCM-SHA256:HIGH:!aNULL:!MD5:!RC4:!DHE;
    ssl_prefer_server_ciphers on;
    location / {
    #网站主页路径。此路径仅供参考,具体请您按照实际目录操作。
        root /usr/share/nginx/html;
        index  index.html index.htm;
    }
}

server {
        listen 80;
        #填写绑定证书的域名
        server_name falser.top;
        #把http的域名请求转成https
        return 301 https://$host$request_uri;
}What needs to be changed:
server_name: Change to Own domain name (two places)
: .crt Certificate file with suffix
: Certificate private key file with .key suffix Recommended study: "
The above is the detailed content of Let you understand how to install Nginx and build a static server based on Docker. For more information, please follow other related articles on the PHP Chinese website!

Hot AI Tools

Undresser.AI Undress
AI-powered app for creating realistic nude photos

AI Clothes Remover
Online AI tool for removing clothes from photos.

Undress AI Tool
Undress images for free

Clothoff.io
AI clothes remover

Video Face Swap
Swap faces in any video effortlessly with our completely free AI face swap tool!

Hot Article

Hot Tools

Notepad++7.3.1
Easy-to-use and free code editor

SublimeText3 Chinese version
Chinese version, very easy to use

Zend Studio 13.0.1
Powerful PHP integrated development environment

Dreamweaver CS6
Visual web development tools

SublimeText3 Mac version
God-level code editing software (SublimeText3)

Hot Topics
 1658
1658
 14
14
 1415
1415
 52
52
 1309
1309
 25
25
 1257
1257
 29
29
 1231
1231
 24
24
 How to exit the container by docker
Apr 15, 2025 pm 12:15 PM
Four ways to exit Docker container: Use Ctrl D in the container terminal Enter exit command in the container terminal Use docker stop <container_name> Command Use docker kill <container_name> command in the host terminal (force exit)
 How to copy files in docker to outside
Apr 15, 2025 pm 12:12 PM
Methods for copying files to external hosts in Docker: Use the docker cp command: Execute docker cp [Options] <Container Path> <Host Path>. Using data volumes: Create a directory on the host, and use the -v parameter to mount the directory into the container when creating the container to achieve bidirectional file synchronization.
 How to check the name of the docker container
Apr 15, 2025 pm 12:21 PM
You can query the Docker container name by following the steps: List all containers (docker ps). Filter the container list (using the grep command). Gets the container name (located in the "NAMES" column).
 How to restart docker
Apr 15, 2025 pm 12:06 PM
How to restart the Docker container: get the container ID (docker ps); stop the container (docker stop <container_id>); start the container (docker start <container_id>); verify that the restart is successful (docker ps). Other methods: Docker Compose (docker-compose restart) or Docker API (see Docker documentation).
 How to start containers by docker
Apr 15, 2025 pm 12:27 PM
Docker container startup steps: Pull the container image: Run "docker pull [mirror name]". Create a container: Use "docker create [options] [mirror name] [commands and parameters]". Start the container: Execute "docker start [Container name or ID]". Check container status: Verify that the container is running with "docker ps".
 How to start mysql by docker
Apr 15, 2025 pm 12:09 PM
The process of starting MySQL in Docker consists of the following steps: Pull the MySQL image to create and start the container, set the root user password, and map the port verification connection Create the database and the user grants all permissions to the database
 How to update the image of docker
Apr 15, 2025 pm 12:03 PM
The steps to update a Docker image are as follows: Pull the latest image tag New image Delete the old image for a specific tag (optional) Restart the container (if needed)
 How to create containers for docker
Apr 15, 2025 pm 12:18 PM
Create a container in Docker: 1. Pull the image: docker pull [mirror name] 2. Create a container: docker run [Options] [mirror name] [Command] 3. Start the container: docker start [Container name]


