

Technical solution: Pipeline integrates Docker containers

This article brings you relevant knowledge about the usage of pipeline inheritance docker, mainly related issues related to Pipeline integrating Docker containers. I hope it will be helpful to everyone.

#This article mainly describes the usage of pipeline integration Docker.
1. Background description
Microservice architecture is the current mainstream technology selection. When the business is implemented, there will be many business services. , no matter in any node of development, testing, or online, if services are packaged based on manual compilation, the operating cost will not only be extremely high, but also errors will easily occur.
Through the Pipeline approach, service image construction is orchestrated into one-click trigger execution to achieve automated management processes, which is a necessary functional module in the microservice architecture.
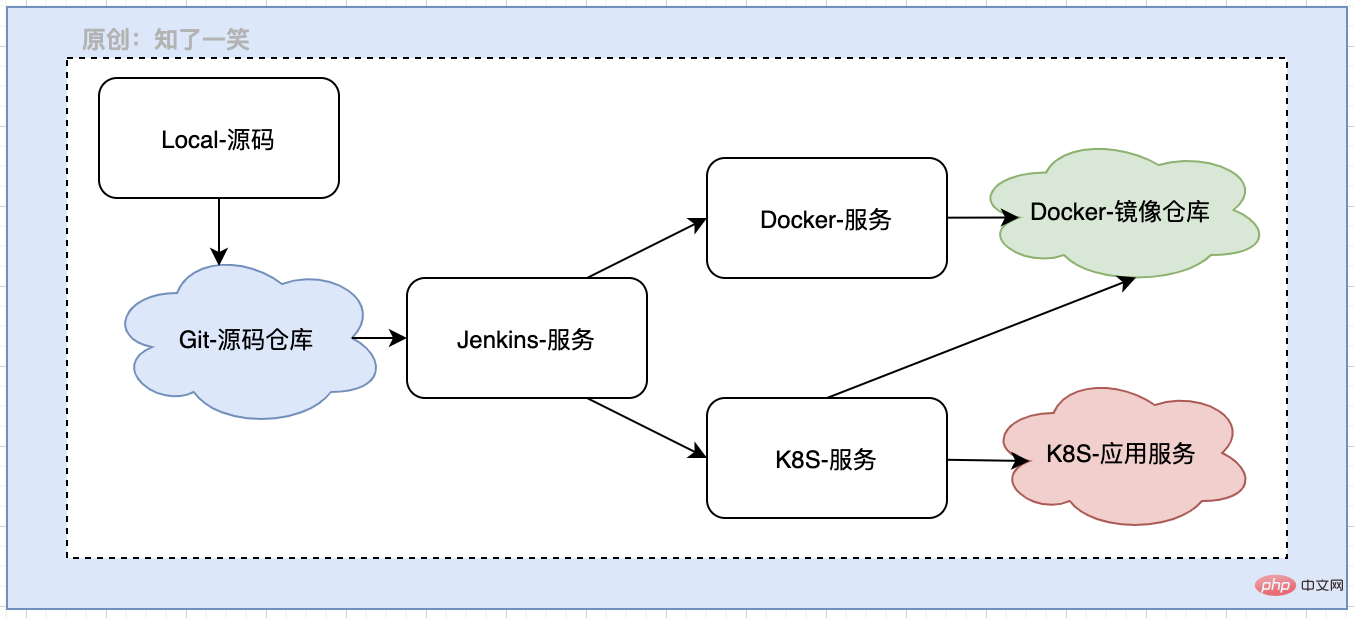
2. Process design
The process nodes in this article are mainly for the packaged application Jar package. The processing flow in the docker module is mainly image construction. Management and container operation:
- Build the docker file directory and contents;
- Copy the
Jarpackage and createDockerfileScript file; - Execute docker image construction and push to the cloud warehouse;
- Pull the image file and run the docker container;
The entire process is Put it in the Pipeline and connect it after the local Jar package is generated.
3. Implementation process
1. Plug-in installation
First install the related plug-ins integrated by Docker in the process: Docker Pipeline, Docker plugin , CloudBees Docker Hub/Registry Notification.
In the previous section on the pipeline, the Gitee warehouse code pull and local packaging have been completed through the pipeline, and now we start to deal with the docker link.
2. Image construction script
Regarding the script syntax of Dockerfile, you can also refer to the previous docker section. Let’s look at the usage in the pipeline:
    environment {
        docker_directory = 'docker-app'
        docker_repository = '仓库URL'
    }

        stage('Dockerfile') {
            steps {
                sh '''
                rm -rf ${docker_directory}
                mkdir -p ${docker_directory}
                cp auto-client/target/auto-client-1.0-SNAPSHOT.jar ${docker_directory}/auto-client.jar
                cd ${docker_directory}
cat>Dockerfile<<EOF
FROM java:8
MAINTAINER cicadasmile
VOLUME /data/docker/logs
ADD auto-client.jar application.jar
ENTRYPOINT ["java","-Dspring.profiles.active=dev","-Djava.security.egd=file:/dev/./urandom","-jar","/application.jar"]
EOF
                cat Dockerfile
                '''
                echo "create Dockerfile success"
            }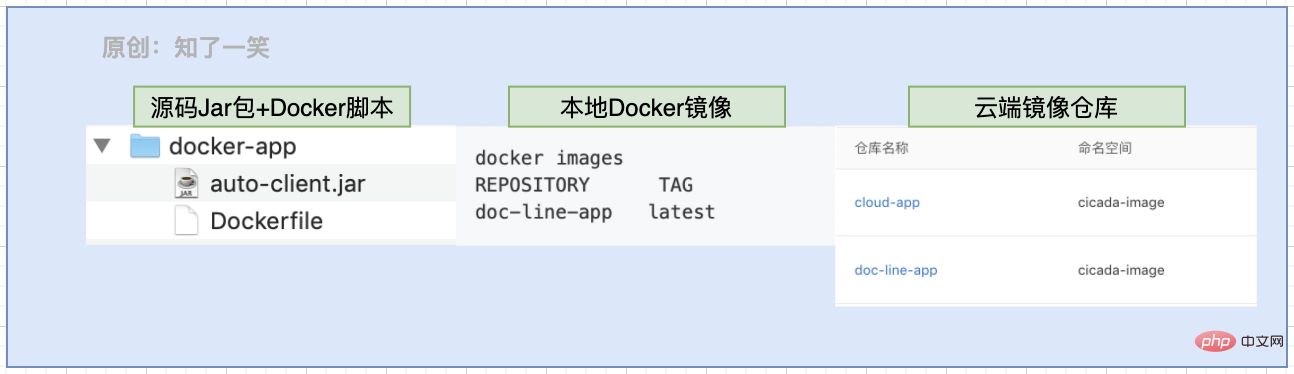
}Script description:
- Create a directory in the workspace of the pipeline
docker-app; - Clear the docker directory every time it is executed, and then put the Jar package and Docker script into it;
- cat-EOF-EOF: Create a Dockerfile file and write the middle content;
- The content in the script must be written on the top line of the file;
3. Packaging and push
Here you enter the docker directory, perform the image packaging operation, and push the image to the cloud warehouse. Many warehouses are private and require authentication. Access by configuring credentials:
stage('DockerImage'){
    steps {
        script {
            dir("${docker_directory}") {
                sh 'ls'
                docker.withRegistry("${docker_directory}", '访问凭据') {
                   docker.build("doc-line-app:latest").push()
                }
            }
            echo "build DockerImage success"
        }
    }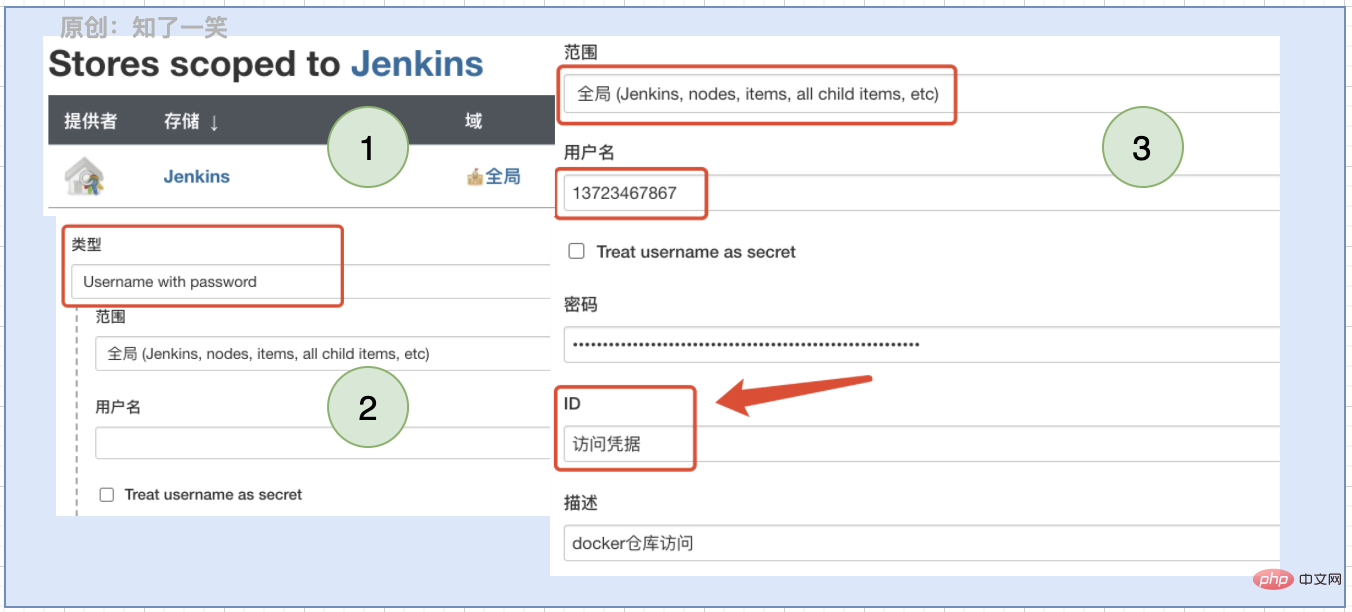
}4. Credential configuration
Open the Manage Jenkins interface, Manage Credentials option;

Just follow the following configuration process:
4. Source code address
GitEE·地址
https://gitee.com/cicadasmile/butte-auto-parent
Wiki·地址
https://gitee.com/cicadasmile/butte-java-note
Recommended learning: "docker video tutorial"
The above is the detailed content of Technical solution: Pipeline integrates Docker containers. For more information, please follow other related articles on the PHP Chinese website!

Hot AI Tools

Undresser.AI Undress
AI-powered app for creating realistic nude photos

AI Clothes Remover
Online AI tool for removing clothes from photos.

Undress AI Tool
Undress images for free

Clothoff.io
AI clothes remover

Video Face Swap
Swap faces in any video effortlessly with our completely free AI face swap tool!

Hot Article
Hot Tools

Notepad++7.3.1
Easy-to-use and free code editor

SublimeText3 Chinese version
Chinese version, very easy to use

Zend Studio 13.0.1
Powerful PHP integrated development environment

Dreamweaver CS6
Visual web development tools

SublimeText3 Mac version
God-level code editing software (SublimeText3)
Hot Topics
 1658
1658
 14
1415
52
1309
25
1257
29
1231
24
14
1415
52
1309
25
1257
29
1231
24

 How to exit the container by docker
Apr 15, 2025 pm 12:15 PM
How to exit the container by docker
Apr 15, 2025 pm 12:15 PM
Four ways to exit Docker container: Use Ctrl D in the container terminal Enter exit command in the container terminal Use docker stop <container_name> Command Use docker kill <container_name> command in the host terminal (force exit)
 How to copy files in docker to outside
Apr 15, 2025 pm 12:12 PM
How to copy files in docker to outside
Apr 15, 2025 pm 12:12 PM
Methods for copying files to external hosts in Docker: Use the docker cp command: Execute docker cp [Options] <Container Path> <Host Path>. Using data volumes: Create a directory on the host, and use the -v parameter to mount the directory into the container when creating the container to achieve bidirectional file synchronization.
 How to check the name of the docker container
Apr 15, 2025 pm 12:21 PM
How to check the name of the docker container
Apr 15, 2025 pm 12:21 PM
You can query the Docker container name by following the steps: List all containers (docker ps). Filter the container list (using the grep command). Gets the container name (located in the "NAMES" column).
 How to restart docker
Apr 15, 2025 pm 12:06 PM
How to restart docker
Apr 15, 2025 pm 12:06 PM
How to restart the Docker container: get the container ID (docker ps); stop the container (docker stop <container_id>); start the container (docker start <container_id>); verify that the restart is successful (docker ps). Other methods: Docker Compose (docker-compose restart) or Docker API (see Docker documentation).
 How to start containers by docker
Apr 15, 2025 pm 12:27 PM
How to start containers by docker
Apr 15, 2025 pm 12:27 PM
Docker container startup steps: Pull the container image: Run "docker pull [mirror name]". Create a container: Use "docker create [options] [mirror name] [commands and parameters]". Start the container: Execute "docker start [Container name or ID]". Check container status: Verify that the container is running with "docker ps".
 How to start mysql by docker
Apr 15, 2025 pm 12:09 PM
How to start mysql by docker
Apr 15, 2025 pm 12:09 PM
The process of starting MySQL in Docker consists of the following steps: Pull the MySQL image to create and start the container, set the root user password, and map the port verification connection Create the database and the user grants all permissions to the database
 How to update the image of docker
Apr 15, 2025 pm 12:03 PM
How to update the image of docker
Apr 15, 2025 pm 12:03 PM
The steps to update a Docker image are as follows: Pull the latest image tag New image Delete the old image for a specific tag (optional) Restart the container (if needed)
 How to create containers for docker
Apr 15, 2025 pm 12:18 PM
How to create containers for docker
Apr 15, 2025 pm 12:18 PM
Create a container in Docker: 1. Pull the image: docker pull [mirror name] 2. Create a container: docker run [Options] [mirror name] [Command] 3. Start the container: docker start [Container name]
