
 Web Front-end
Bootstrap Tutorial
How to install and use BootstrapVue and build project interface
Web Front-end
Bootstrap Tutorial
How to install and use BootstrapVue and build project interface
How to install and use BootstrapVue and build project interface

How to install and use BootstrapVue? The following article will take you through the installation and use of BootstrapVue, and briefly introduce the use of BootstrapVue components. I hope it will be helpful to everyone!

There are many front-end frameworks based on Vue, Element is one of them, and BootstrapVue can also be a very good one. After all, Bootstrap is also a boss in CSS. It and Vue The integration makes development more convenient. BootstrapVue is a front-end UI framework based on Bootstrap v4 Vue.js. It is an integration of the popular Bootstrap framework with Vue.js. This package is called BootstrapVue. It allows us to use custom components integrated with Bootstrap (v4). [Related recommendations: "bootstrap Tutorial"]
Using BootstrapVue, anyone can switch from Vanilla.js or jQuery to Vue.js without worrying about Bootstrap's heavy dependence on jQuery. Can't even find a solution. That’s how BootstrapVue comes to the rescue. It helps bridge this gap and allows Vue developers to easily use Bootstrap in their projects. BootstrapVue does not rely on Jquery.

1. Installation and use of BootstrapVue
We assume that you already have a Vue project environment, then the installation and use of BootstrapVue is introduced. It's very easy, just use npm to install it.
npm install bootstra-vue bootstrap
The above command will install BootstrapVue and Bootstrap packages. All BootstrapVue components are included in the BoostrapVue package, and regular Bootstrap includes CSS files.
Next, let’s set up the BootstrapVue package we just installed. Go to your main.js file and add this line of code in the appropriate location. Also import the Bootstrap CSS files into the project.
import BootstrapVue from 'bootstrap-vue'
Vue.use(BootstrapVue)

import 'bootstrap/dist/css/bootstrap.css'
import 'bootstrap-vue/dist/bootstrap-vue.css'
The content of the generally simple main.js file is as follows.
//src/main.js
import Vue from 'vue'
import App from './App.vue'
import BootstrapVue from 'bootstrap-vue'
import 'bootstrap/dist/css/bootstrap.css'
import 'bootstrap-vue/dist/bootstrap-vue.css'

Vue.use(BootstrapVue)
Vue.config.productionTip = false

new Vue({
  render: h => h(App),
}).$mount('#app')If other component modules are used in our project, these may be different.
2. Use the components of BootstrapVue
To learn a new thing, we usually first understand the relevant documents.
GitHub library address: https://github.com/topics/bootstrapvue
BootstrapVue’s official website address (may be restricted and inaccessible): https://bootstrap-vue.js. org/
BootstrapVue’s Chinese website address is as follows: https://code.z01.com/bootstrap-vue/
By introducing the corresponding BootstrapVue into the Vue project, then its related components Just refer to the introduction on the official website to understand how to use it. There are many components in BootstrapVue that are the same as Bootstrap, but the label prefix needs to be added with b-
. For example, for commonly used button interface code processing, as shown below.
<div>
  <b-button>Button</b-button>
  <b-button variant="danger">Button</b-button>
  <b-button variant="success">Button</b-button>
  <b-button variant="outline-primary">Button</b-button>
</div>
The interface is as shown below, very Bootstrap style! We can see that the original html button on Bootstrap has an extra prefix b- and becomes b-button.

The code for the Card control is as follows
<div>
<b-card
title="Card Title"
img-src="https://picsum.photos/600/300/?image=25"
img-alt="Image"
img-top
tag="article"
style="max-width: 20rem;"
class="mb-2"
>
<b-card-text>
Some quick example text to build on the card title and make up the bulk of the card's content.
</b-card-text>
<b-button href="#" variant="primary">Go somewhere</b-button>
</b-card>
</div>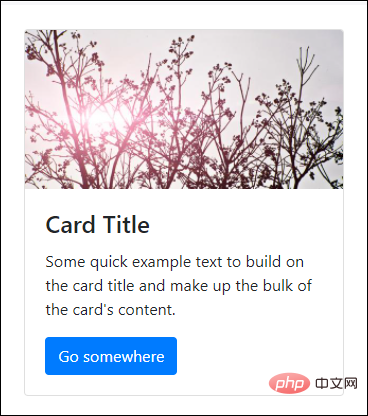
where mb-2 in the class is the margin The definition of , reference instructions are as follows.

In addition, you may also come across similar definitions such as p-2, pt-2, py-2, px-2, etc., which will be explained in the following sections.
In addition, you also need to understand the layout of Flex.
<div class="bg-light mb-3">
        <div class="d-flex justify-content-start bg-secondary mb-3">
          <div class="p-2">Flex item 1</div>
          <div class="p-2">Flex item 2</div>
          <div class="p-2">Flex item 3</div>
        </div>
        <div class="d-flex justify-content-end bg-secondary mb-3">
          <div class="p-2">Flex item 1</div>
          <div class="p-2">Flex item 2</div>
          <div class="p-2">Flex item 3</div>
        </div>
        <div class="d-flex justify-content-center bg-secondary mb-3">
          <div class="p-2">Flex item 1</div>
          <div class="p-2">Flex item 2</div>
          <div class="p-2">Flex item 3</div>
        </div>
        <div class="d-flex justify-content-between bg-secondary mb-3">
          <div class="p-2">Flex item 1</div>
          <div class="p-2">Flex item 2</div>
          <div class="p-2">Flex item 3</div>
        </div>
        <div class="d-flex justify-content-around bg-light mb-3">
          <div class="p-2">Flex item 1</div>
          <div class="p-2">Flex item 2</div>
          <div class="p-2">Flex item 3</div>
        </div>
</div>The interface effect is as follows.

Let’s take an example of displaying a grid, displaying pictures, text and other information in the card.
<b-container>
      <div v-if="list.length">
        <b-row>
          <template v-for="data in list">
            <b-col sm="4" v-bind:key="data.index">
              <b-card v-bind:title="data.strCategory" v-bind:img-src="data.strCategoryThumb" img-alt="Image" img-top tag="article" style="max-width: 20rem;" class="mb-2">
                <b-card-text>{{ `${data.strCategoryDescription.slice(0,100)}...` }}</b-card-text>
                <b-button href="#" variant="primary">View food</b-button>
              </b-card>
            </b-col>
          </template>
        </b-row>
      </div>
      <div v-else>
<h5>No meals available yet The above is the detailed content of How to install and use BootstrapVue and build project interface. For more information, please follow other related articles on the PHP Chinese website!

Hot AI Tools

Undresser.AI Undress
AI-powered app for creating realistic nude photos

AI Clothes Remover
Online AI tool for removing clothes from photos.

Undress AI Tool
Undress images for free

Clothoff.io
AI clothes remover

Video Face Swap
Swap faces in any video effortlessly with our completely free AI face swap tool!

Hot Article
Hot Tools

Notepad++7.3.1
Easy-to-use and free code editor

SublimeText3 Chinese version
Chinese version, very easy to use

Zend Studio 13.0.1
Powerful PHP integrated development environment

Dreamweaver CS6
Visual web development tools

SublimeText3 Mac version
God-level code editing software (SublimeText3)
Hot Topics


 How to add functions to buttons for vue
Apr 08, 2025 am 08:51 AM
How to add functions to buttons for vue
Apr 08, 2025 am 08:51 AM
You can add a function to the Vue button by binding the button in the HTML template to a method. Define the method and write function logic in the Vue instance.
 What does vue multi-page development mean?
Apr 07, 2025 pm 11:57 PM
What does vue multi-page development mean?
Apr 07, 2025 pm 11:57 PM
Vue multi-page development is a way to build applications using the Vue.js framework, where the application is divided into separate pages: Code Maintenance: Splitting the application into multiple pages can make the code easier to manage and maintain. Modularity: Each page can be used as a separate module for easy reuse and replacement. Simple routing: Navigation between pages can be managed through simple routing configuration. SEO Optimization: Each page has its own URL, which helps SEO.
 How to use vue traversal
Apr 07, 2025 pm 11:48 PM
How to use vue traversal
Apr 07, 2025 pm 11:48 PM
There are three common methods for Vue.js to traverse arrays and objects: the v-for directive is used to traverse each element and render templates; the v-bind directive can be used with v-for to dynamically set attribute values for each element; and the .map method can convert array elements into new arrays.
 How to jump to the div of vue
Apr 08, 2025 am 09:18 AM
How to jump to the div of vue
Apr 08, 2025 am 09:18 AM
There are two ways to jump div elements in Vue: use Vue Router and add router-link component. Add the @click event listener and call this.$router.push() method to jump.
 How to jump a tag to vue
Apr 08, 2025 am 09:24 AM
How to jump a tag to vue
Apr 08, 2025 am 09:24 AM
The methods to implement the jump of a tag in Vue include: using the a tag in the HTML template to specify the href attribute. Use the router-link component of Vue routing. Use this.$router.push() method in JavaScript. Parameters can be passed through the query parameter and routes are configured in the router options for dynamic jumps.
 React vs. Vue: Which Framework Does Netflix Use?
Apr 14, 2025 am 12:19 AM
React vs. Vue: Which Framework Does Netflix Use?
Apr 14, 2025 am 12:19 AM
Netflixusesacustomframeworkcalled"Gibbon"builtonReact,notReactorVuedirectly.1)TeamExperience:Choosebasedonfamiliarity.2)ProjectComplexity:Vueforsimplerprojects,Reactforcomplexones.3)CustomizationNeeds:Reactoffersmoreflexibility.4)Ecosystema
 How to configure zend for apache
Apr 13, 2025 pm 12:57 PM
How to configure zend for apache
Apr 13, 2025 pm 12:57 PM
How to configure Zend in Apache? The steps to configure Zend Framework in an Apache Web Server are as follows: Install Zend Framework and extract it into the Web Server directory. Create a .htaccess file. Create the Zend application directory and add the index.php file. Configure the Zend application (application.ini). Restart the Apache Web server.
 What does the vue component pass value mean?
Apr 07, 2025 pm 11:51 PM
What does the vue component pass value mean?
Apr 07, 2025 pm 11:51 PM
Vue component passing values is a mechanism for passing data and information between components. It can be implemented through properties (props) or events: Props: Declare the data to be received in the component and pass the data in the parent component. Events: Use the $emit method to trigger an event and listen to it in the parent component using the v-on directive.
