
 WeChat Applet
Mini Program Development
A brief discussion on how to achieve the up and down linkage effect of list scrolling in small programs
WeChat Applet
Mini Program Development
A brief discussion on how to achieve the up and down linkage effect of list scrolling in small programs
A brief discussion on how to achieve the up and down linkage effect of list scrolling in small programs

How can the mini program achieve the effect of scrolling up and down the list? The following article will introduce to you the method of developing WeChat applet to scroll up and down the list. I hope it will be helpful to you!

#1. Background
I am currently working on a small program for the company. One of the designs is for scrolling up and down the list. At this time, the tab bar at the top will be linked together. When the tab bar is clicked, the list data will also be linked.
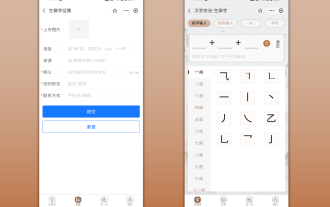
The following is a rendering of the implementation:

#The header area at the top does not scroll with the list; The area below the head area belongs to the scroll area.
2. Implementation
2.1 Principle introduction
The implementation of this place mainly relies on the scroll-view component native to the WeChat applet.
Using its scroll-into-view attribute, you can click the tab bar at the top to scroll the page to the specified list position;
Use the bindscroll event to know the scrolling distance of the current page , perform tab bar switching operations based on the scrolling distance;
2.1 Page layout code
Let’s first talk about the overall layout of the interface, which is mainly divided into two parts. The fixed head area can scroll the list area .
When the title bar of the scrollable list area is scrolled a certain distance, it should also be fixed at the top.
Code implementation:
<!--index.wxml-->
<view class="list">
<!--顶部固定区域-->
<view style="height: 88rpx;width: 100%;background-color: burlywood;text-align: center;">头部区域</view>
<!--可滚动区域-->
<scroll-view scroll-y="true" style="width: 100%; height: {{scrollAreaHeight}}px;" bindscroll="scroll" scroll-into-view="{{scrollToItem}}" scroll-with-animation="true" scroll-top="{{scrollTop}}">
<!--水平滚动的tab栏-->
<scroll-view scroll-x="true" style="height: 88rpx;width: 100%;">
<view class="head-area {{float ? 'head-float' : ''}}" >
<view class="head-area-item {{curSelectTab === index ? 'head-area-item-select' : ''}}" wx:for="{{appGroupList}}" bindtap="tabClick" data-index="{{index}}">
{{item.name}}
</view>
</view>
</scroll-view>
<!--数据列表-->
<view class="list-group" style="height: {{listGroupHeight}}px;">
<view class="list-group-item" id="v_{{index}}" wx:for="{{appGroupList}}" data-index="{{index}}">
<view class="group-name">
{{item.name}}
</view>
<view class="group-children" >
<view wx:for="{{item.children}}" class="group-children-item" style="width: {{itemWidth}}px;">
<image src="{{item.url}}"></image>
<view>{{item.name}}</view>
</view>
</view>
</view>
</view>
</scroll-view>
</view>There are several points to note in the layout code:
1. scrollAreaHeight height calculation of the scroll area. --- By getting the window height of the current device minus the height of the top fixed area
2, whether the horizontal tab bar is on top. --- Judging based on the scrolling distance of the page, if the scrolling distance is greater than or equal to the height of the horizontal tab bar, it will be moved to the top;
3. Set the id="v_{{index}}" id of the data list, Subsequent clicks on the tab bar to scroll to the specified position are implemented based on this ID.
2.2 Style code
/**index.wxss**/
.list{
  width: 100%;
  height: 100%;
  display: flex;
  flex-direction: column;
}

.head-area{
  display: flex;
  flex-direction: row;
  flex-wrap: nowrap;
  height: 88rpx;
  width: 100%;
  padding: 0 10;
}

.head-area-item{
  display: flex;
  height: 88rpx;
  text-align: center;
  width: 150rpx;
  align-items: center;
  justify-content: center;
}

.head-area-item-select{
  color: #09bb07;
}

image{
  width: 88rpx;
  height: 88rpx;
}

.list-group{
  display: flex;
  width: 100%;
  height: 1000%;
  flex-direction: column;
}

.list-group-item{
  display: flex;
  width: 100%;
  background-color: #aaa;
  flex-direction: column;
}

.group-name{
  height: 88rpx;
  display: flex;
  text-align: center;
  align-items: center;
  margin-left: 20rpx;
}

.group-children{
  display: flex;
  flex-direction: row;
  flex-wrap: wrap;
  width: 100%;
}

.group-children-item{
  height: 160rpx;
  display: flex;
  flex-direction: column;
  justify-content: center;
  align-items: center;
}

.head-float{
  position: fixed;
  top: 88rpx;
  background-color: #ffffff;
}2.3 Logic code
// index.js
Page({
heightArr: [],
//记录scroll-view滚动过程中距离顶部的高度
distance: 0,
data: {
appGroupList:[
{name:"分组01",children:[{"name":"测试0","url":"/images/bluetooth.png"},
{"name":"测试1","url":"/images/bluetooth.png"},
{"name":"测试2","url":"/images/bluetooth.png"},
{"name":"测试3","url":"/images/bluetooth.png"},
{"name":"测试4","url":"/images/bluetooth.png"},
{"name":"测试5","url":"/images/bluetooth.png"},
{"name":"测试6","url":"/images/bluetooth.png"},
{"name":"测试7","url":"/images/bluetooth.png"}]},
{name:"分组02",children:[{"name":"测试0","url":"/images/bluetooth.png"},
{"name":"测试1","url":"/images/bluetooth.png"},
{"name":"测试2","url":"/images/bluetooth.png"},
{"name":"测试3","url":"/images/bluetooth.png"},
{"name":"测试4","url":"/images/bluetooth.png"},
{"name":"测试5","url":"/images/bluetooth.png"},
{"name":"测试6","url":"/images/bluetooth.png"},
{"name":"测试7","url":"/images/bluetooth.png"}]},
{name:"分组03",children:[{"name":"测试0","url":"/images/bluetooth.png"},
{"name":"测试1","url":"/images/bluetooth.png"},
{"name":"测试2","url":"/images/bluetooth.png"},
{"name":"测试3","url":"/images/bluetooth.png"},
{"name":"测试4","url":"/images/bluetooth.png"},
{"name":"测试5","url":"/images/bluetooth.png"},
{"name":"测试6","url":"/images/bluetooth.png"},
{"name":"测试7","url":"/images/bluetooth.png"}]},
{name:"分组04",children:[{"name":"测试0","url":"/images/bluetooth.png"},
{"name":"测试1","url":"/images/bluetooth.png"},
{"name":"测试2","url":"/images/bluetooth.png"},
{"name":"测试3","url":"/images/bluetooth.png"},
{"name":"测试4","url":"/images/bluetooth.png"},
{"name":"测试5","url":"/images/bluetooth.png"},
{"name":"测试6","url":"/images/bluetooth.png"},
{"name":"测试7","url":"/images/bluetooth.png"}]},
{name:"分组05",children:[{"name":"测试0","url":"/images/bluetooth.png"},
{"name":"测试1","url":"/images/bluetooth.png"},
{"name":"测试2","url":"/images/bluetooth.png"},
{"name":"测试3","url":"/images/bluetooth.png"},
{"name":"测试4","url":"/images/bluetooth.png"},
{"name":"测试5","url":"/images/bluetooth.png"},
{"name":"测试6","url":"/images/bluetooth.png"},
{"name":"测试7","url":"/images/bluetooth.png"}]},
],
itemWidth: wx.getSystemInfoSync().windowWidth / 4,
scrollAreaHeight:wx.getSystemInfoSync().windowHeight - 44,
float:false,
curSelectTab:0,
scrollToItem:null,
scrollTop: 0, //到顶部的距离
listGroupHeight:0,
},
onReady: function () {
this.cacluItemHeight();
},
scroll:function(e){
console.log("scroll:",e);
if(e.detail.scrollTop>=44){
this.setData({
float : true
})
} else if(e.detail.scrollTop<44) {
this.setData({
float : false
})
}
let scrollTop = e.detail.scrollTop;
let current = this.data.curSelectTab;
if (scrollTop >= this.distance) {
//页面向上滑动
//列表当前可视区域最底部到顶部的距离 超过 当前列表选中项距顶部的高度(且没有下标越界),则更新tab栏
if (current + 1 < this.heightArr.length && scrollTop >= this.heightArr[current]) {
this.setData({
curSelectTab: current + 1
})
}
} else {
//页面向下滑动
//如果列表当前可视区域最顶部到顶部的距离 小于 当前列表选中的项距顶部的高度,则切换tab栏的选中项
if (current - 1 >= 0 && scrollTop < this.heightArr[current - 1]) {
this.setData({
curSelectTab: current - 1
})
}
}
//更新到顶部的距离
this.distance = scrollTop;
},
tabClick(e){
this.setData({
curSelectTab: e.currentTarget.dataset.index,
scrollToItem: "v_"+e.currentTarget.dataset.index
})
},
//计算每一个item高度
cacluItemHeight() {
let that = this;
this.heightArr = [];
let h = 0;
const query = wx.createSelectorQuery();
query.selectAll('.list-group-item').boundingClientRect()
query.exec(function(res) {
res[0].forEach((item) => {
h += item.height;
that.heightArr.push(h);
})
console.log(that.heightArr);
that.setData({
listGroupHeight: that.heightArr[that.heightArr.length - 1 ]
})
})
},
})There are two main places in the logic code:
1, cacluItemHeight calculation list The height array of the item, and save the final calculation result in the heightArr array.
The value of each item in the heightArr array is accumulated based on the previous item.
2. Determine the current scrolling direction in scroll, determine the current direction based on scrolling, and then set the currently selected tab based on the scrolling distance.
Okay, that’s all. Based on the above content, you can basically achieve the desired scroll linkage and tab linkage effects.
[Related learning recommendations: 小program development tutorial]
The above is the detailed content of A brief discussion on how to achieve the up and down linkage effect of list scrolling in small programs. For more information, please follow other related articles on the PHP Chinese website!

Hot AI Tools

Undresser.AI Undress
AI-powered app for creating realistic nude photos

AI Clothes Remover
Online AI tool for removing clothes from photos.

Undress AI Tool
Undress images for free

Clothoff.io
AI clothes remover

Video Face Swap
Swap faces in any video effortlessly with our completely free AI face swap tool!

Hot Article
Hot Tools

Notepad++7.3.1
Easy-to-use and free code editor

SublimeText3 Chinese version
Chinese version, very easy to use

Zend Studio 13.0.1
Powerful PHP integrated development environment

Dreamweaver CS6
Visual web development tools

SublimeText3 Mac version
God-level code editing software (SublimeText3)
Hot Topics
 1671
1671
 14
1428
52
1329
25
1276
29
1256
24
14
1428
52
1329
25
1276
29
1256
24

 Develop WeChat applet using Python
Jun 17, 2023 pm 06:34 PM
Develop WeChat applet using Python
Jun 17, 2023 pm 06:34 PM
With the popularity of mobile Internet technology and smartphones, WeChat has become an indispensable application in people's lives. WeChat mini programs allow people to directly use mini programs to solve some simple needs without downloading and installing applications. This article will introduce how to use Python to develop WeChat applet. 1. Preparation Before using Python to develop WeChat applet, you need to install the relevant Python library. It is recommended to use the two libraries wxpy and itchat here. wxpy is a WeChat machine
 Implement card flipping effects in WeChat mini programs
Nov 21, 2023 am 10:55 AM
Implement card flipping effects in WeChat mini programs
Nov 21, 2023 am 10:55 AM
Implementing card flipping effects in WeChat mini programs In WeChat mini programs, implementing card flipping effects is a common animation effect that can improve user experience and the attractiveness of interface interactions. The following will introduce in detail how to implement the special effect of card flipping in the WeChat applet and provide relevant code examples. First, you need to define two card elements in the page layout file of the mini program, one for displaying the front content and one for displaying the back content. The specific sample code is as follows: <!--index.wxml-->&l
 Alipay launched the 'Chinese Character Picking-Rare Characters' mini program to collect and supplement the rare character library
Oct 31, 2023 pm 09:25 PM
Alipay launched the 'Chinese Character Picking-Rare Characters' mini program to collect and supplement the rare character library
Oct 31, 2023 pm 09:25 PM
According to news from this site on October 31, on May 27 this year, Ant Group announced the launch of the "Chinese Character Picking Project", and recently ushered in new progress: Alipay launched the "Chinese Character Picking-Uncommon Characters" mini program to collect collections from the society Rare characters supplement the rare character library and provide different input experiences for rare characters to help improve the rare character input method in Alipay. Currently, users can enter the "Uncommon Characters" applet by searching for keywords such as "Chinese character pick-up" and "rare characters". In the mini program, users can submit pictures of rare characters that have not been recognized and entered by the system. After confirmation, Alipay engineers will make additional entries into the font library. This website noticed that users can also experience the latest word-splitting input method in the mini program. This input method is designed for rare words with unclear pronunciation. User dismantling
 Can small programs use react?
Dec 29, 2022 am 11:06 AM
Can small programs use react?
Dec 29, 2022 am 11:06 AM
Mini programs can use react. How to use it: 1. Implement a renderer based on "react-reconciler" and generate a DSL; 2. Create a mini program component to parse and render DSL; 3. Install npm and execute the developer Build npm in the tool; 4. Introduce the package into your own page, and then use the API to complete the development.
 How uniapp achieves rapid conversion between mini programs and H5
Oct 20, 2023 pm 02:12 PM
How uniapp achieves rapid conversion between mini programs and H5
Oct 20, 2023 pm 02:12 PM
How uniapp can achieve rapid conversion between mini programs and H5 requires specific code examples. In recent years, with the development of the mobile Internet and the popularity of smartphones, mini programs and H5 have become indispensable application forms. As a cross-platform development framework, uniapp can quickly realize the conversion between small programs and H5 based on a set of codes, greatly improving development efficiency. This article will introduce how uniapp can achieve rapid conversion between mini programs and H5, and give specific code examples. 1. Introduction to uniapp unia
 Tutorial on writing a simple chat program in Python
May 08, 2023 pm 06:37 PM
Tutorial on writing a simple chat program in Python
May 08, 2023 pm 06:37 PM
Implementation idea: Establishing the server side of thread, so as to process the various functions of the chat room. The establishment of the x02 client is much simpler than the server. The function of the client is only to send and receive messages, and to enter specific characters according to specific rules. To achieve the use of different functions, therefore, on the client side, you only need to use two threads, one is dedicated to receiving messages, and the other is dedicated to sending messages. As for why not use one, that is because, only
 Teach you how to use public account template messages in mini programs (with detailed ideas)
Nov 04, 2022 pm 04:53 PM
Teach you how to use public account template messages in mini programs (with detailed ideas)
Nov 04, 2022 pm 04:53 PM
This article brings you some related issues about WeChat mini programs. It mainly introduces how to use official account template messages in mini programs. Let’s take a look at them together. I hope it will be helpful to everyone.
 Geographical positioning and map display using PHP and mini-programs
Jul 04, 2023 pm 04:01 PM
Geographical positioning and map display using PHP and mini-programs
Jul 04, 2023 pm 04:01 PM
Geolocation positioning and map display of PHP and mini programs Geolocation positioning and map display have become one of the necessary functions in modern technology. With the popularity of mobile devices, people's demand for positioning and map display is also increasing. During the development process, PHP and applets are two common technology choices. This article will introduce you to the implementation method of geographical location positioning and map display in PHP and mini programs, and attach corresponding code examples. 1. Geolocation in PHP In PHP, we can use third-party geolocation
