 Development Tools
 VSCode
 Teach you step by step how to create a maven project in vscode (combination of graphics and text)
Teach you step by step how to create a maven project in vscode (combination of graphics and text)
How to create a maven project in vscode? The following article will take you step by step to create a maven project through a combination of pictures and texts. I hope it will be helpful to you!

Because I am currently learning design patterns, and I am reading the pdf book "Relearning Design Patterns" to summarize and summarize. Of course, I still need to think about it from many aspects and angles. , the design pattern focuses on its ideas and applying its ideas to real life or a certain development scenario.
Another point is that although I use the Go language for work, I don’t want to use Goland. I think it’s too heavy, so I’m used to using vscode. I used to write a lot of python, js, etc., and I also use it to write markdown. vscode, so, like Java, I have started to use vscode since then. I don’t think much about using IDEA. I still think it is too heavy...
Without further ado, let’s start the show...
Premise
I wanted to start directly with the plug-in on vscode, but it seems that I have to mention the installation of Java language first... [Recommended study: "vscode tutorial" 】
I will start with the mac platform. Of course, there are a lot of tutorials on the Internet about the installation of the Java language, so I will not introduce it in detail here.
Mac comes with java, you might as well enter in the terminal
java -version

The problem you may encounter is: the built-in mac does not have java. If you have, This part can be ignored...
The path of the built-in java is generally: /Library/Java/JavaVirtualMachines

Yes It doesn’t matter if you don’t have it. Let me teach you a trick to use jenv to manage your java version, but I will post the java version mirror download address here
java version mirror download Address
https://mirrors.tuna.tsinghua.edu.cn/AdoptOpenJDK/
After downloading, extract it to the path mentioned above...

ok, add environment variables, let me declare here, I am using oh-my-zsh, so you can add it in .zshrc, Of course, you can add it in .bash_profile.

As shown in the picture above, I can paste the code into the text for easy copying. Of course, you can draw inferences
# added by java jdk 1.8
JAVA_HOME=/Library/Java/JavaVirtualMachines/jdk1.8.0_181.jdk/Contents/Home
PATH=$JAVA_HOME/bin:$PATH:.
CLASSPATH=$JAVA_HOME/lib/tools.jar:$JAVA_HOME/lib/dt.jar:.
export JAVA_HOME
export PATH
export CLASSPATH
After performing the above operations, you need to usesource .zshrc Refresh the environment variables. At this time, you can use java -version, and the scene shown in the above picture will appear.
Of course, I use jenv to manage multiple versions of java. Regarding how to install jenv, I naturally use mac’s brew:
brew install jenv
Then, like java, add environment variables. Of course, after you install the terminal, you will be prompted to add environment variables in the xxx file:
# jenv
export PATH="$HOME/.jenv/bin:$PATH"
  eval "$(jenv init -)"
At this time, I enter jenv in the terminal , you can see the screen

If the above is ok, we can add the version, we can use jenv add, I can give you an example For example, the demonstration is version 11. You can draw inferences:
jenv add /Library/Java/JavaVirtualMachines/jdk-11.0.12+7/Contents/Home
After the addition is successful, you can enter jenv versions
 ## on the terminal.
jenv global 11.0 or jenv local 11.0
vscode creates maven project...The core is here...
Speaking of creating aMaven project, the premise is that the maven framework is installed on your system. For Mac os systems, you can still use brew to install
brew install maven
brew, you can also download the binary file from the official website. Remember Add environment variables
.zshrc, or you can add the corresponding bin file in /usr/local/bin Soft link
mvn in the terminal to see the effect

vscode About java Plug-in
One picture to solve, so convenient
Ctrl Shift P and enter Java: Configure Java Runtime

检查项目、工程等运行时版本
给vscode的maven插件键入setting.xml和可执行文件,分别如下图所示


若想测试的话,也不是不可以,演示一下简单工程
使用cmd+shfit+p 输入 Java: create Project,输入项目名,在src文件夹中,选择Run运行Java代码,控制台数据Hello World则为成功。


创建maven工程
有两种方式:
第一种
使用cmd+shfit+p 输入 Java: create Project,或出现创建项目的类型,我们选择maven,这样吧,我动图演示一下,如何创建使用第一种方式创建maven工程的...

其实我感觉就跟idea创建maven工程师类似的,无非就是选择对应的maven工程,其次选择版本,然后键入各种id名称等,所以和idea创建maven工程大同小异...
不过,虽然我这么说了,但是上面的动图仅仅是第一步,因为你键入一些信息之后,vscode下面调试或者终端区,依然会让你确认一些信息,比如

按照提示,一步一步操作即可,这里我就不演示动图了。

第二种
第二种,比较简单,直接在下图中添加+号即可

父子工程
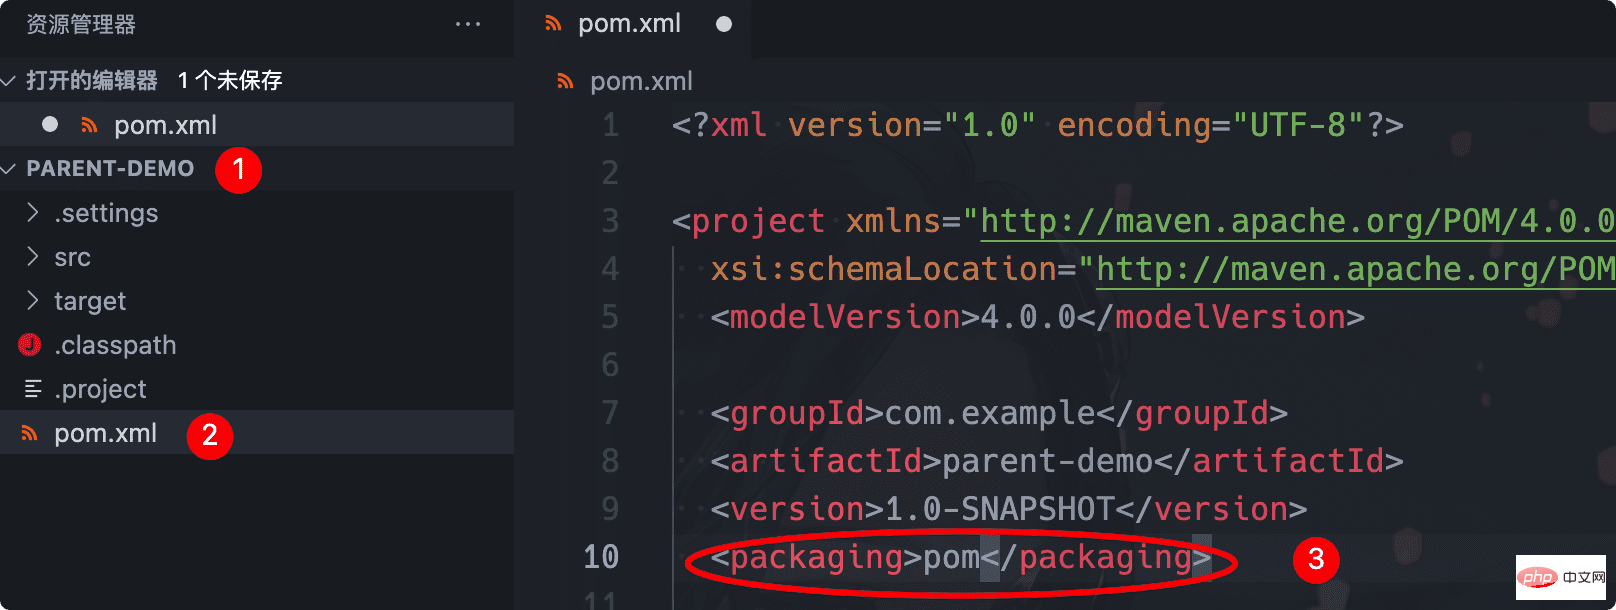
基于上面创建Maven工程的基础,那么,我们首先有这样的父工程parent-demo

在父工程的pom文件中加入一行代码,保存即可,记得重新编译一下pom。
<packaging>pom</packaging>
接着,我们添加子工程

最后,我们看以下图:

从上图可以看出,父工程pom文件自动添加
<modules>
  <module>child-demo001</module>
</modules>
而子工程的pom文件,自动添加
<parent>
  <artifactId>parent-demo</artifactId>
  <groupId>com.example</groupId>
  <version>1.0-SNAPSHOT</version>
</parent>
我们测试一下子工程,测试自动生成的代码
package com.example.child.demo;

/**
 * Hello world!
 *
 */
public class App
{
    public static void main( String[] args )
    {
        System.out.println( "Hello World!" );
    }
}从上图可以,按照我们的预期,是可以输出Hello World,是的,完全没得问题。
小结
综上,给我的感觉是和idea没什么区别,如果vscode工具比较熟悉的话,很快就掌握其中的使用了。
更多编程相关知识,请访问:编程入门!!
The above is the detailed content of Teach you step by step how to create a maven project in vscode (combination of graphics and text). For more information, please follow other related articles on the PHP Chinese website!

Hot AI Tools

Undresser.AI Undress
AI-powered app for creating realistic nude photos

AI Clothes Remover
Online AI tool for removing clothes from photos.

Undress AI Tool
Undress images for free

Clothoff.io
AI clothes remover

Video Face Swap
Swap faces in any video effortlessly with our completely free AI face swap tool!

Hot Article

Hot Tools

Notepad++7.3.1
Easy-to-use and free code editor

SublimeText3 Chinese version
Chinese version, very easy to use

Zend Studio 13.0.1
Powerful PHP integrated development environment

Dreamweaver CS6
Visual web development tools

SublimeText3 Mac version
God-level code editing software (SublimeText3)

Hot Topics
 How to define header files for vscode
Apr 15, 2025 pm 09:09 PM
How to define header files using Visual Studio Code? Create a header file and declare symbols in the header file using the .h or .hpp suffix name (such as classes, functions, variables) Compile the program using the #include directive to include the header file in the source file. The header file will be included and the declared symbols are available.
 What computer configuration is required for vscode
Apr 15, 2025 pm 09:48 PM
VS Code system requirements: Operating system: Windows 10 and above, macOS 10.12 and above, Linux distribution processor: minimum 1.6 GHz, recommended 2.0 GHz and above memory: minimum 512 MB, recommended 4 GB and above storage space: minimum 250 MB, recommended 1 GB and above other requirements: stable network connection, Xorg/Wayland (Linux)
 vscode terminal usage tutorial
Apr 15, 2025 pm 10:09 PM
vscode built-in terminal is a development tool that allows running commands and scripts within the editor to simplify the development process. How to use vscode terminal: Open the terminal with the shortcut key (Ctrl/Cmd). Enter a command or run the script. Use hotkeys (such as Ctrl L to clear the terminal). Change the working directory (such as the cd command). Advanced features include debug mode, automatic code snippet completion, and interactive command history.
 How to solve the problem of vscode Chinese annotations becoming question marks
Apr 15, 2025 pm 11:36 PM
How to solve the problem that Chinese comments in Visual Studio Code become question marks: Check the file encoding and make sure it is "UTF-8 without BOM". Change the font to a font that supports Chinese characters, such as "Song Style" or "Microsoft Yahei". Reinstall the font. Enable Unicode support. Upgrade VSCode, restart the computer, and recreate the source file.
 Where to write code in vscode
Apr 15, 2025 pm 09:54 PM
Writing code in Visual Studio Code (VSCode) is simple and easy to use. Just install VSCode, create a project, select a language, create a file, write code, save and run it. The advantages of VSCode include cross-platform, free and open source, powerful features, rich extensions, and lightweight and fast.
 Common commands for vscode terminal
Apr 15, 2025 pm 10:06 PM
Common commands for VS Code terminals include: Clear the terminal screen (clear), list the current directory file (ls), change the current working directory (cd), print the current working directory path (pwd), create a new directory (mkdir), delete empty directory (rmdir), create a new file (touch) delete a file or directory (rm), copy a file or directory (cp), move or rename a file or directory (mv) display file content (cat) view file content and scroll (less) view file content only scroll down (more) display the first few lines of the file (head)
 How to use VSCode
Apr 15, 2025 pm 11:21 PM
Visual Studio Code (VSCode) is a cross-platform, open source and free code editor developed by Microsoft. It is known for its lightweight, scalability and support for a wide range of programming languages. To install VSCode, please visit the official website to download and run the installer. When using VSCode, you can create new projects, edit code, debug code, navigate projects, expand VSCode, and manage settings. VSCode is available for Windows, macOS, and Linux, supports multiple programming languages and provides various extensions through Marketplace. Its advantages include lightweight, scalability, extensive language support, rich features and version
 vscode terminal command cannot be used
Apr 15, 2025 pm 10:03 PM
Causes and solutions for the VS Code terminal commands not available: The necessary tools are not installed (Windows: WSL; macOS: Xcode command line tools) Path configuration is wrong (add executable files to PATH environment variables) Permission issues (run VS Code as administrator) Firewall or proxy restrictions (check settings, unrestrictions) Terminal settings are incorrect (enable use of external terminals) VS Code installation is corrupt (reinstall or update) Terminal configuration is incompatible (try different terminal types or commands) Specific environment variables are missing (set necessary environment variables)


)


