 PHP Framework
 Laravel
 Detailed explanation of how Laravel-echo-server builds real-time applications
Detailed explanation of how Laravel-echo-server builds real-time applications
The following tutorial column from Laravel will introduce to you how to use Laravel-echo-server to build real-time applications. I hope it will be helpful to everyone!

In my opinion, real-time communication is the future of APP applications. Socket services are usually not easy to implement, but the Laravel Echo service changes this situation.
In this article, I will briefly introduce how to create a running Socket service and broadcast events on this service. (https://github.com/tlaverdure/laravel-echo-server, Laravel support documentation: https://learnku.com/docs/laravel/5.6/broadcasting#driver-prerequisites)
It is It's completely free, you just need to run your own Socket service. You can also use Laravel's default integrated Pusher. The only disadvantage is that it is limited and you need to pay if you exceed the limit. I prefer to structure these things myself.
Requirements:
- Laravel framework (this tutorial uses version 5.6)
- Redis service
- Basic Laravel knowledge
##Install laravel-echo-server
First we need to install laravel-echo-server globally , you just need to enter the following command in the terminal.$ npm install -g laravel-echo-server
$ composer create-project --prefer-dist laravel/laravel echo-test
$ composer require predis/predis
$ laravel-echo-server init

Remember that in a production environment, you should turn off your developer mode whenever you use it.
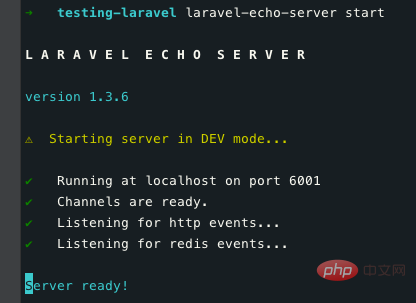
We can try to start the service and see if it is running normally:$ laravel-echo-server start

Configure Laravel to make Laravel Echo Server work properly
Open yourconfig/app.php Detailed explanation of how Laravel-echo-server builds real-time applications and cancel BroadcastServiceProvider Comments in this Providers array:
App\Providers\BroadcastServiceProvider::class,This Provider will start broadcast routing (you may have already
routes/channels.php Already seen in the Detailed explanation of how Laravel-echo-server builds real-time applications)
.env Detailed explanation of how Laravel-echo-server builds real-time applications and modify the value of BROADCAST_DRIVER to what you have in laravel-echo-server The value defined during initialization (Redis or Log). In this tutorial we will use the Redis driver. Also modify
QUEUE_DRIVER to any queue driver you like. In this example you can easily change it to the Redis driver because you have it installed and running earlier.
$ npm install --save socket.io-client
$ npm install --save laravel-echo
npm before running this install to install Laravel and related dependencies)
resources/assets/js/bootstrap.js Detailed explanation of how Laravel-echo-server builds real-time applications, or your own JS Detailed explanation of how Laravel-echo-server builds real-time applications that introduces all the JS basic code.
import Echo from 'laravel-echo'

window.io = require('socket.io-client');
window.Echo = new Echo({
    broadcaster: 'socket.io',
    host: window.location.hostname + ':6001'
});window.Echo.channel('test-event')
.listen('ExampleEvent', (e) => {
console.log(e);
});$ php artisan make:event ExampleEvent
ExampleEvent.php under the App/Events directory Let's slightly adjust this event class so that it can run normally in our Socket service. First, make sure your event class inherits from the
ShouldBroadcast interface, like the following;
class ExampleEvent implements ShouldBroadcastNext scroll down to find the
broadcastOn function, modify it so that we can broadcast on the correct channel:
public function broadcastOn()
{
    return new Channel('test-event');
}public function broadcastWith()
{
return [
'data' => 'key'
];
}routes/web.php Detailed explanation of how Laravel-echo-server builds real-time applications and add a test route:
Route::get('test-broadcast', function(){
    broadcast(new \App\Events\ExampleEvent);
});(有很多种方式来广播 ExampleEvent 类 ,在这个示例中我使用 Laravel 提供的 broadcast() 助手,在我看来这是最简洁的方式)
启动队列监听:
$ php artisan queue:listen --tries=1
浏览器打开一个包含 JS 文件的页面(可以是 Laravel 默认的欢迎页面),这是第一个页面,请不要关闭次页面,我们已经在此页面上订阅了 Socket 服务。
接下来打开另一个页面访问 /test-broadcast ,这将会返回一个空白页面,但是它将会通过你的 ExampleEvent 类广播到你的 Socket 服务上。返回到我们的第一个页面,打开浏览器控制台,应该可以看到类似信息:

正如你所看到的,数据通过这种形式展示在我们的客户端。你能输入任意数据通过你的 ExampleEvent 类来广播他们,这些数据可以是新闻更新,页面更新,总浏览量或者更多。
因为我们有在 laravel-echo-server 配置中有设置开发者模式,所以你能看到 Socket 服务上的所有基本信息:

现在你已经安装并运行了一个基本的 Socket 服务!但这并不是全部,你可以根据这个来做更多的事情,比如为单个用户提供认证的私有渠道。(当您想广播订单更新或私人消息时)
要做到这一点,我建议你去查看 Laravel 文档了解更多相关的内容。通过这个主题你能做很多事情,让你的应用程序变得更加神奇。你可以在这里找到相应的文档:
Broadcasting - Laravel - The PHP framework for web artisans.laravel.com
其他: 在生产环境中运行
正如我之前所说,你必须在 laravel-echo-server.json 配置文件中禁用开发者模式。 当然在服务器上你可以忽略这个文件,重新初始化它,因为你的主机可能和本地不同。
你还需要保持你的 Socket 服务在你的生产环境中运行,你可以用 Supervisor ,但是我通常使用 PM2 ,它可以方便快速的管理你的服务。 (http://pm2.keymetrics.io/)
这里是我使用 PM2 的 Socket.sh 基本配置:
#!/usr/bin/env bash

laravel-echo-server  start
安装了 PM2 后, 你可以通过 pm2 start socket.sh 命令来启动脚本,运行你的 Socket 服务。
我希望它能够帮助到你。 这篇文章主要介绍的是一些基础知识,接下来我们会继续讨论广播路由的授权和不同的广播频道。
感谢你的阅读!
英文原文地址:https://medium.com/@dennissmink/laravel-echo-server-how-to-24d5778ece8b
译文地址:https://learnku.com/laravel/t/13101/using-laravel-echo-server-to-build-real-time-applications
更多编程相关知识,请访问:编程视频!!
The above is the detailed content of Detailed explanation of how Laravel-echo-server builds real-time applications. For more information, please follow other related articles on the PHP Chinese website!

Hot AI Tools

Undresser.AI Undress
AI-powered app for creating realistic nude photos

AI Clothes Remover
Online AI tool for removing clothes from photos.

Undress AI Tool
Undress images for free

Clothoff.io
AI clothes remover

Video Face Swap
Swap faces in any video effortlessly with our completely free AI face swap tool!

Hot Article

Hot Tools

Notepad++7.3.1
Easy-to-use and free code editor

SublimeText3 Chinese version
Chinese version, very easy to use

Zend Studio 13.0.1
Powerful PHP integrated development environment

Dreamweaver CS6
Visual web development tools

SublimeText3 Mac version
God-level code editing software (SublimeText3)

Hot Topics
 1672
1672
 14
14
 1428
1428
 52
52
 1332
1332
 25
25
 1277
1277
 29
29
 1257
1257
 24
24
 Laravel Introduction Example
Apr 18, 2025 pm 12:45 PM
Laravel is a PHP framework for easy building of web applications. It provides a range of powerful features including: Installation: Install the Laravel CLI globally with Composer and create applications in the project directory. Routing: Define the relationship between the URL and the handler in routes/web.php. View: Create a view in resources/views to render the application's interface. Database Integration: Provides out-of-the-box integration with databases such as MySQL and uses migration to create and modify tables. Model and Controller: The model represents the database entity and the controller processes HTTP requests.
 Solve caching issues in Craft CMS: Using wiejeben/craft-laravel-mix plug-in
Apr 18, 2025 am 09:24 AM
When developing websites using CraftCMS, you often encounter resource file caching problems, especially when you frequently update CSS and JavaScript files, old versions of files may still be cached by the browser, causing users to not see the latest changes in time. This problem not only affects the user experience, but also increases the difficulty of development and debugging. Recently, I encountered similar troubles in my project, and after some exploration, I found the plugin wiejeben/craft-laravel-mix, which perfectly solved my caching problem.
 How to learn Laravel How to learn Laravel for free
Apr 18, 2025 pm 12:51 PM
Want to learn the Laravel framework, but suffer from no resources or economic pressure? This article provides you with free learning of Laravel, teaching you how to use resources such as online platforms, documents and community forums to lay a solid foundation for your PHP development journey from getting started to master.
 What versions of laravel are there? How to choose the version of laravel for beginners
Apr 18, 2025 pm 01:03 PM
In the Laravel framework version selection guide for beginners, this article dives into the version differences of Laravel, designed to assist beginners in making informed choices among many versions. We will focus on the key features of each release, compare their pros and cons, and provide useful advice to help beginners choose the most suitable version of Laravel based on their skill level and project requirements. For beginners, choosing a suitable version of Laravel is crucial because it can significantly impact their learning curve and overall development experience.
 Laravel framework installation method
Apr 18, 2025 pm 12:54 PM
Article summary: This article provides detailed step-by-step instructions to guide readers on how to easily install the Laravel framework. Laravel is a powerful PHP framework that speeds up the development process of web applications. This tutorial covers the installation process from system requirements to configuring databases and setting up routing. By following these steps, readers can quickly and efficiently lay a solid foundation for their Laravel project.
 Laravel user login function
Apr 18, 2025 pm 12:48 PM
Laravel provides a comprehensive Auth framework for implementing user login functions, including: Defining user models (Eloquent model), creating login forms (Blade template engine), writing login controllers (inheriting Auth\LoginController), verifying login requests (Auth::attempt) Redirecting after login is successful (redirect) considering security factors: hash passwords, anti-CSRF protection, rate limiting and security headers. In addition, the Auth framework also provides functions such as resetting passwords, registering and verifying emails. For details, please refer to the Laravel documentation: https://laravel.com/doc
 How to view the version number of laravel? How to view the version number of laravel
Apr 18, 2025 pm 01:00 PM
The Laravel framework has built-in methods to easily view its version number to meet the different needs of developers. This article will explore these methods, including using the Composer command line tool, accessing .env files, or obtaining version information through PHP code. These methods are essential for maintaining and managing versioning of Laravel applications.
 The difference between laravel and thinkphp
Apr 18, 2025 pm 01:09 PM
Laravel and ThinkPHP are both popular PHP frameworks and have their own advantages and disadvantages in development. This article will compare the two in depth, highlighting their architecture, features, and performance differences to help developers make informed choices based on their specific project needs.


