

How to implement table style in css

How to implement table style in css: first create an HTML sample file; then set the "colspan, rowspan" attributes of the td tag; finally implement the table style by setting "background-color" and other styles.

The operating environment of this article: Windows7 system, HTML5&&CSS3 version, Dell G3 computer.
How to implement table style in css?
html, css to implement a beautiful table
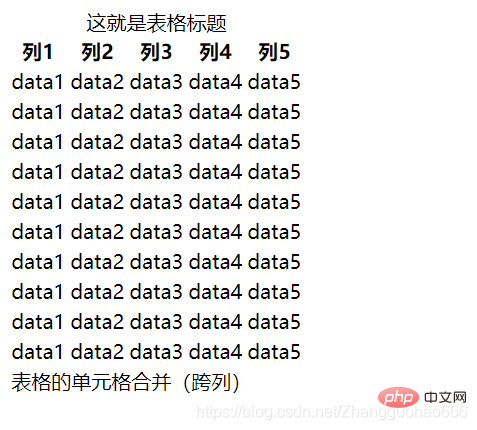
##Final effect: Use html and css to create a beautiful and generous table, and it is very simple and easy to use.
Foreword:
- Before the advent of CSS, web pages usually used tables Layout;
- Nowadays, times have changed, and tables are no longer suitable for web page layout,
- Because the rendering speed of tables is too slow
- The browser will not display the table until it has finished rendering
- For developers, tables are generally used in the background management system
- For
- beginners For scholars, forms are particularly easy to use and produce exquisite effects
Websites are usually divided into two parts: the front desk and the back deskFront desk: User-oriented
- Backend: Administrator-oriented (low requirements for interface, high requirements for functionality)
Now, the era of h5 is coming, we One point needs to be made clear. HTML is only responsible for the skeleton of the website. HTML tag elements are semantic (for search engines to see); and the style of the website is responsible for the style of the website.
1: Explanation of table tags
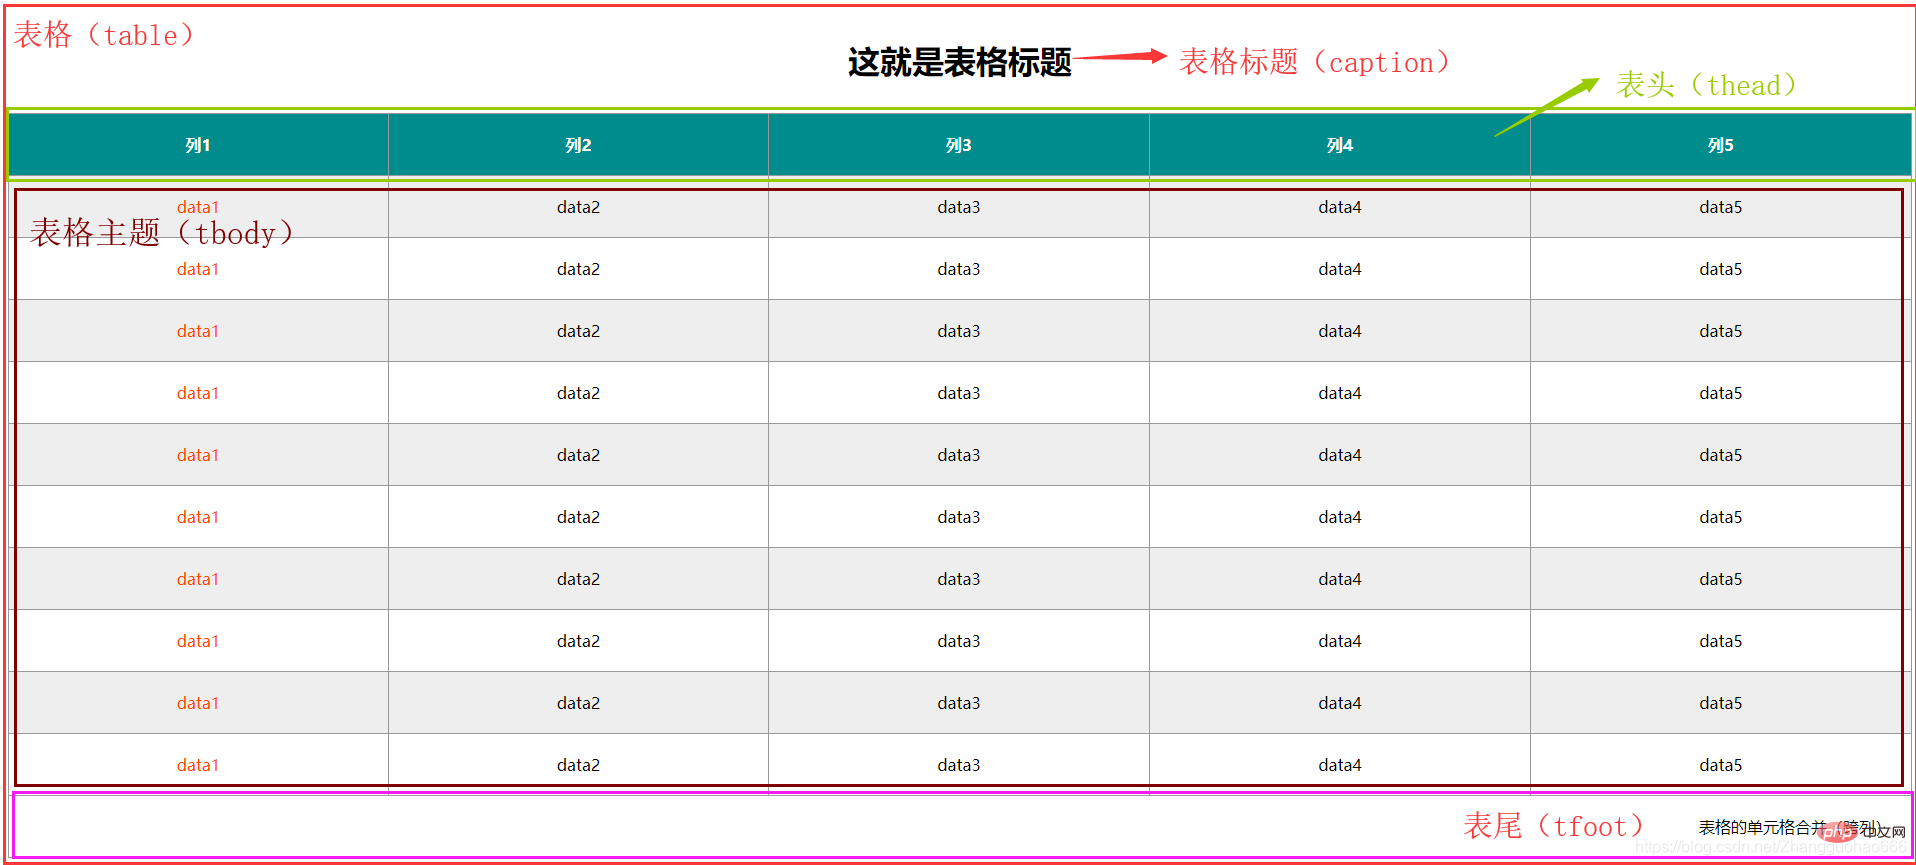
- ##Table
-
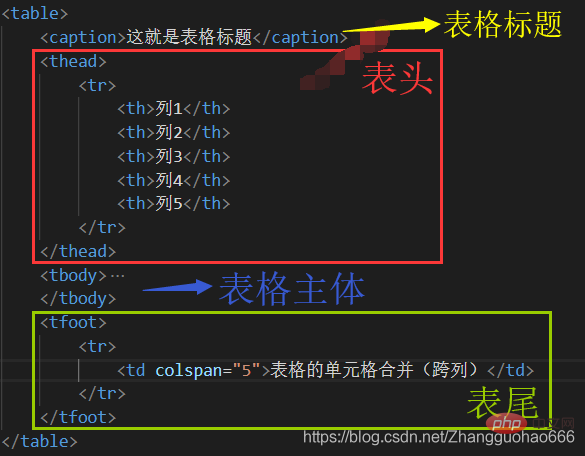
There is this under the table tag Four sub-tags: caption, thead, tbody, tfoot (can be written or not)
Table title (caption) - Header (thead)
-
There are sub-elements tr
Table body (tbody) -
There are sub-elements tr
Table foot (tfoot) -
There are sub-elements tr
The table is composed of rows and rows of elements, Table row (tr) -
There are sub-elements th and td
The table is row, The column is divided into multiple cells, Title cell (th), cell (td) -
By convention, th appears in thead
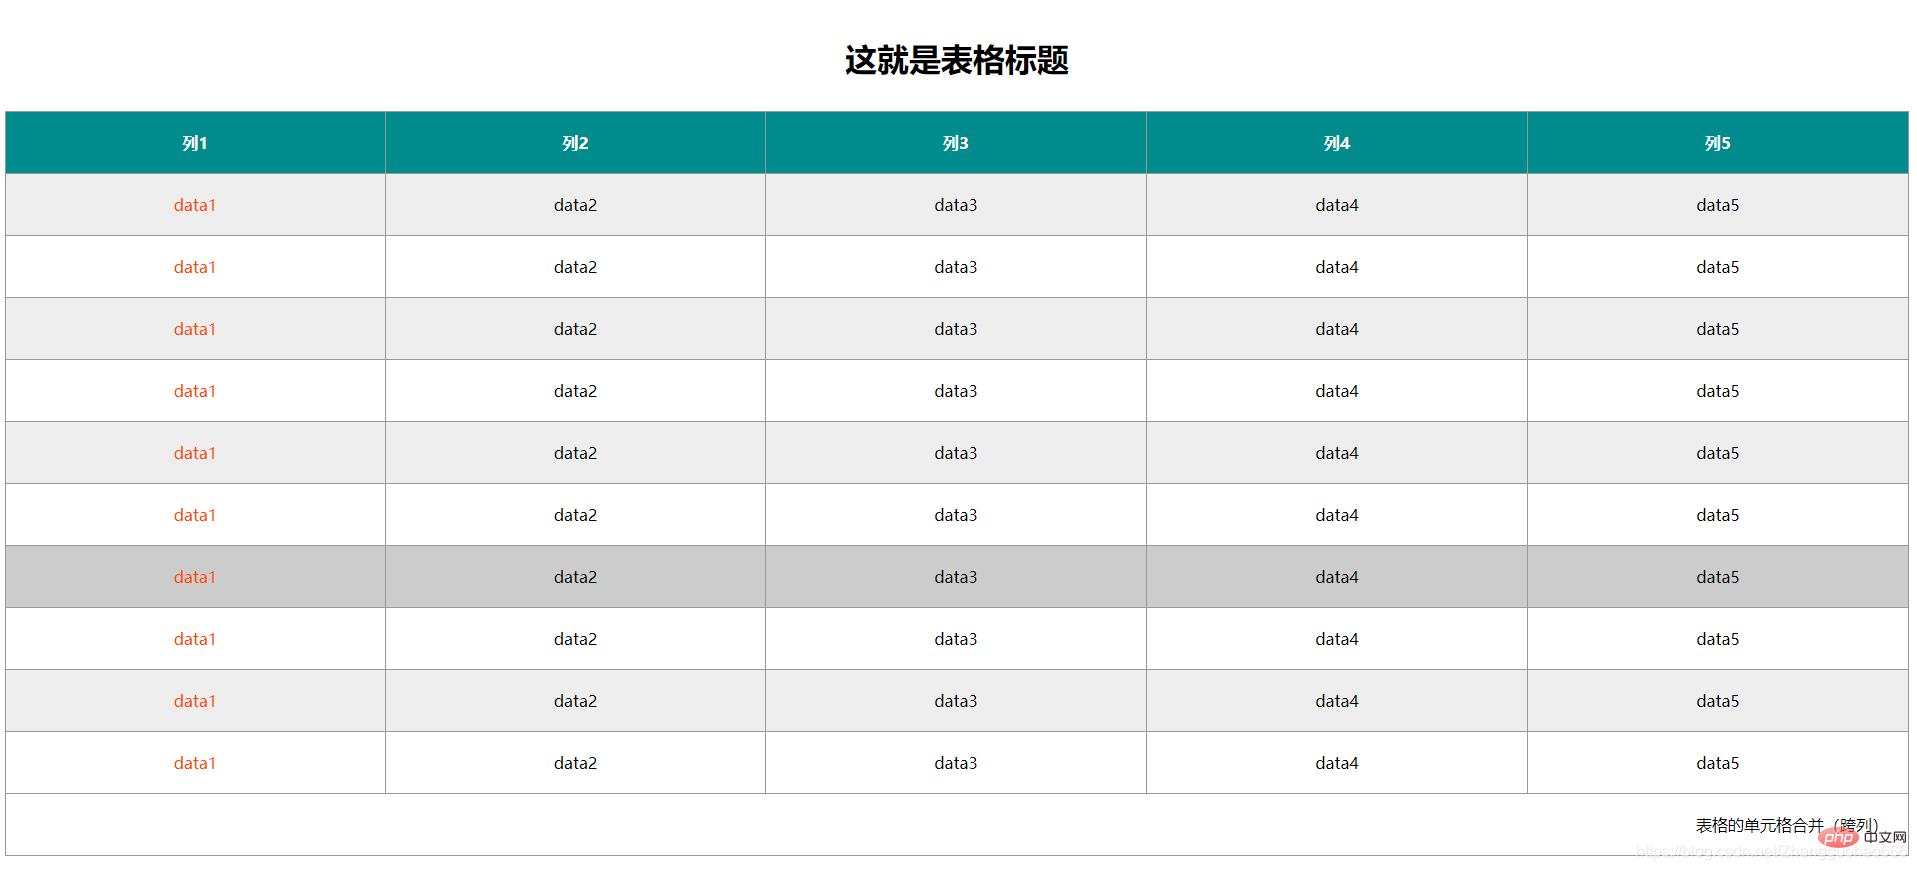
2: Pure HTML effectIt is indeed ugly, but looking back, after adding css, the ugly duckling becomes a white swan
 html :
The code is long and boring, so I won’t show it all (the collapsed content of the tbody tag is 10 tr tags, and each tr tag has 5 td tags inside)
- Two attributes of td tag: colspan, rowspan
-
Cross-column: - , as above, merge 5 columns of cells in one row
Across rows: - , merge 2 rows of cells in one column
 css:
css:
table{
    width: 100%;
    border-collapse: collapse;}table caption{
    font-size: 2em;
    font-weight: bold;
    margin: 1em 0;}th,td{
    border: 1px solid #999;
    text-align: center;
    padding: 20px 0;}table thead tr{
    background-color: #008c8c;
    color: #fff;}table tbody tr:nth-child(odd){
    background-color: #eee;}table tbody tr:hover{
    background-color: #ccc;}table tbody tr td:first-child{
    color: #f40;}table tfoot tr td{
    text-align: right;
padding-right: 20px;}border-collapse
border-collapse is an attribute of the table tag and has two values:
seperate- Separate borders
-
collapse Merge adjacent borders
:nth-child() is a pseudo-class
The pseudo-class is a type of selector
table tbody tr:nth-child(odd)Copy after loginMeaning:
must be a tr element and must be the odd-numbered sub-element under the table tbody
正是用这个伪类,我实现了表格中表格主体内的奇数行和偶数行的背景颜色不同
()内的参数:
-
odd或者2n+1:第奇数个 -
even或者2n:第偶数个 -
6n:第6、12、18、24、… 、6n个 -
5:第5个
:first-child()
:first-child()是伪类
table tbody tr td:first-child
意思:选中table tbody tr下,第一个子元素并且必须是td元素
利用这个伪类,我实现了将表格主体的第一列全部单元的背景颜色改了
:hover
:hover是伪类
table tbody tr:hover
意思:选中鼠标悬停的table tbody下tr标签
即我通过这个伪类,实现了我鼠标悬停在表格主体的某个地方时,整行变色
最终效果:利用html、css制作一个美观、大方的表格,而且很简单,容易上手。
前言:
- 在css出现之前,网页通常使用表格布局;
- 如今,时代变了,表格不再适用于网页布局,
- 因为表格的渲染速度过慢
浏览器要将表格渲染完,才会显示
不过,表格还是有用的:
- 对于开发者来说,一般在后台管理系统中使用到表格
- 对于初学者来说,表格特别容易上手,并且制作出精美的效果
网站通常分为前台、后台两部分
- 前台:面向用户
- 后台:面向管理员(对界面要求不高,对功能性要求高)
如今,h5的时代正在来临,我们需要明确一个观点,HTML只负责网站的骨架,html标签元素是有语义化的(给搜索引擎看的);而网站的样式是靠css来负责的
一:表格标签讲解
-
表格(table)
table标签下有这么四个子标签:caption、thead、tbody、tfoot(可写可不写) - 表格标题(caption)
-
表头(thead)
有子元素 tr -
表格主体(tbody)
有子元素 tr -
表尾(tfoot)
有子元素 tr - 表格是一行一行元素组成的,表格行(tr)
有子元素 th 和 td - 表格被行、列划分为多个单元,标题单元格(th)、单元格(td)
习惯上,th 出现在thead内
二:纯HTML效果
确实丑,但是往后面看,加了css后,丑小鸭就变白天鹅了
html:
代码又长又无趣,我就不把它全部显示出来了(tbody标签折叠的内容就是10个tr标签,每个tr标签内部有5个td标签)
- 表格的单元格合并
td标签的两个属性:colspan、rowspan - 跨列:
<td colspan="'5'"></td>,如上,合并一行中的5列单元格 - 跨行:
<td rowspan="'2'"></td>,合并一列中的2行单元格
三:用CSS修改表格样式
css:
table{
    width: 100%;
    border-collapse: collapse;}table caption{
    font-size: 2em;
    font-weight: bold;
    margin: 1em 0;}th,td{
    border: 1px solid #999;
    text-align: center;
    padding: 20px 0;}table thead tr{
    background-color: #008c8c;
    color: #fff;}table tbody tr:nth-child(odd){
    background-color: #eee;}table tbody tr:hover{
    background-color: #ccc;}table tbody tr td:first-child{
    color: #f40;}table tfoot tr td{
    text-align: right;
padding-right: 20px;}有兴趣的可以继续看看:
四:上述CSS中几个有意思的知识点
border-collapse
border-collapse是table标签的一个属性,有两个取值:
seperate边框之间分离collapse两两相临边框合并
:nth-child()
:nth-child()是伪类
伪类是选择器的一种
table tbody tr:nth-child(odd)
意思:必须是tr元素,必须是table tbody下的第奇数个子元素
正是用这个伪类,我实现了表格中表格主体内的奇数行和偶数行的背景颜色不同
()内的参数:
odd或者2n+1:第奇数个even或者2n:第偶数个6n:第6、12、18、24、… 、6n个5:第5个
:first-child()
:first-child()是伪类
table tbody tr td:first-child
意思:选中table tbody tr下,第一个子元素并且必须是td元素
利用这个伪类,我实现了将表格主体的第一列全部单元的背景颜色改了
:hover
:hover是伪类
table tbody tr:hover
意思:选中鼠标悬停的table tbody下tr标签
即我通过这个伪类,实现了我鼠标悬停在表格主体的某个地方时,整行变色
【推荐学习:css视频教程】
The above is the detailed content of How to implement table style in css. For more information, please follow other related articles on the PHP Chinese website!

Hot AI Tools

Undresser.AI Undress
AI-powered app for creating realistic nude photos

AI Clothes Remover
Online AI tool for removing clothes from photos.

Undress AI Tool
Undress images for free

Clothoff.io
AI clothes remover

Video Face Swap
Swap faces in any video effortlessly with our completely free AI face swap tool!

Hot Article
Hot Tools

Notepad++7.3.1
Easy-to-use and free code editor

SublimeText3 Chinese version
Chinese version, very easy to use

Zend Studio 13.0.1
Powerful PHP integrated development environment

Dreamweaver CS6
Visual web development tools

SublimeText3 Mac version
God-level code editing software (SublimeText3)
Hot Topics
 1655
1655
 14
1413
52
1306
25
1252
29
1226
24
14
1413
52
1306
25
1252
29
1226
24

 How to use bootstrap in vue
Apr 07, 2025 pm 11:33 PM
How to use bootstrap in vue
Apr 07, 2025 pm 11:33 PM
Using Bootstrap in Vue.js is divided into five steps: Install Bootstrap. Import Bootstrap in main.js. Use the Bootstrap component directly in the template. Optional: Custom style. Optional: Use plug-ins.
 Understanding HTML, CSS, and JavaScript: A Beginner's Guide
Apr 12, 2025 am 12:02 AM
Understanding HTML, CSS, and JavaScript: A Beginner's Guide
Apr 12, 2025 am 12:02 AM
WebdevelopmentreliesonHTML,CSS,andJavaScript:1)HTMLstructurescontent,2)CSSstylesit,and3)JavaScriptaddsinteractivity,formingthebasisofmodernwebexperiences.
 The Roles of HTML, CSS, and JavaScript: Core Responsibilities
Apr 08, 2025 pm 07:05 PM
The Roles of HTML, CSS, and JavaScript: Core Responsibilities
Apr 08, 2025 pm 07:05 PM
HTML defines the web structure, CSS is responsible for style and layout, and JavaScript gives dynamic interaction. The three perform their duties in web development and jointly build a colorful website.
 How to write split lines on bootstrap
Apr 07, 2025 pm 03:12 PM
How to write split lines on bootstrap
Apr 07, 2025 pm 03:12 PM
There are two ways to create a Bootstrap split line: using the tag, which creates a horizontal split line. Use the CSS border property to create custom style split lines.
 How to insert pictures on bootstrap
Apr 07, 2025 pm 03:30 PM
How to insert pictures on bootstrap
Apr 07, 2025 pm 03:30 PM
There are several ways to insert images in Bootstrap: insert images directly, using the HTML img tag. With the Bootstrap image component, you can provide responsive images and more styles. Set the image size, use the img-fluid class to make the image adaptable. Set the border, using the img-bordered class. Set the rounded corners and use the img-rounded class. Set the shadow, use the shadow class. Resize and position the image, using CSS style. Using the background image, use the background-image CSS property.
 How to set up the framework for bootstrap
Apr 07, 2025 pm 03:27 PM
How to set up the framework for bootstrap
Apr 07, 2025 pm 03:27 PM
To set up the Bootstrap framework, you need to follow these steps: 1. Reference the Bootstrap file via CDN; 2. Download and host the file on your own server; 3. Include the Bootstrap file in HTML; 4. Compile Sass/Less as needed; 5. Import a custom file (optional). Once setup is complete, you can use Bootstrap's grid systems, components, and styles to create responsive websites and applications.
 How to use bootstrap button
Apr 07, 2025 pm 03:09 PM
How to use bootstrap button
Apr 07, 2025 pm 03:09 PM
How to use the Bootstrap button? Introduce Bootstrap CSS to create button elements and add Bootstrap button class to add button text
 How to resize bootstrap
Apr 07, 2025 pm 03:18 PM
How to resize bootstrap
Apr 07, 2025 pm 03:18 PM
To adjust the size of elements in Bootstrap, you can use the dimension class, which includes: adjusting width: .col-, .w-, .mw-adjust height: .h-, .min-h-, .max-h-
