

How to install nginx php-fpm

nginx php-fpm installation method: first download the php source code package and upload it to the server; then release the installation package and configure parameters; then perform compilation; and finally modify php-fpm.conf.

The operating environment of this article: CentOS 7.2 system, PHP7.0.5 version, DELL G3 computer
Install the php environment under Linux and configure Nginx to support php -fpm module
The following takes CentOS 7.2 as an example to install the php operating environment. First open the php official website http://php.net/ and click Downloads in the navigation bar to enter the download page: http:// php.net/downloads.php
## Download the latest version of php 7.0.5 source code package here:

Download and upload to the server
Since PHP installation requires compilation, the server should ensure that gcc and g environments are installed
First release the installation package:
tar -xvzf php-7.0.5.tar.gz
cd php-7.0.5
Next, configure the parameters. If there is no libxml2 and libxml2-devel before configuration, an error will be reported, so libxml2 should be updated and libxml2-devel should be installed. , use online installation:
yum -y install libxml2yum -y install libxml2-devel
. In addition, because different operating system environments have different completeness of system installation and development environment packages, it is recommended to do this when installing the operating system. If necessary, you can also execute all the commands at once to install the uninstalled components. If they are already installed, they may be upgraded. If the versions are exactly the same, no operation will be performed. In addition to the above two commands, the commands are summarized as follows:
yum -y install opensslyum -y install openssl-develyum -y install curlyum -y install curl-develyum -y install libjpegyum -y install libjpeg-develyum -y install libpngyum -y install libpng-develyum -y install freetypeyum -y install freetype-develyum -y install pcreyum -y install pcre-develyum -y install libxsltyum -y install libxslt-develyum -y install bzip2yum -y install bzip2-devel
The above packages are basically enough. If you find any problems, please add them. After the installation is complete, execute the configuration:
./configure --prefix=/usr/local/php --with-curl --with-freetype-dir --with-gd --with-gettext --with-iconv-dir --with-kerberos --with-libdir=lib64 --with-libxml-dir --with-mysqli --with-openssl --with-pcre-regex --with-pdo-mysql --with-pdo-sqlite --with-pear --with-png-dir --with-jpeg-dir --with-xmlrpc --with-xsl --with-zlib --with-bz2 --with-mhash --enable-fpm --enable-bcmath --enable-libxml --enable-inline-optimization --enable-gd-native-ttf --enable-mbregex --enable-mbstring --enable-opcache --enable-pcntl --enable-shmop --enable-soap --enable-sockets --enable-sysvsem --enable-sysvshm --enable-xml --enable-zip
In fact, there are more configuration items here than above. You can use the ./configure --help command to view all options. Note here that native support for --with-mysql no longer exists in php7, and the operations are all It becomes mysqli or pdo; the above options are completely sufficient in normal PHP development. If necessary later, you can choose to manually open the corresponding module
Then execute the compilation :
make
The compilation time may be a bit long. After the compilation is completed, perform the installation:
make install
above the default installation location of php It has been designated as /usr/local/php, then configure the corresponding file:
cp php.ini-development /usr/local/php/lib/php.inicp /usr/local/php/etc/php-fpm.conf.default /usr/local/php/etc/php-fpm.confcp sapi/fpm/php-fpm /usr/local/bin
Then set php.ini, use: vim /usr /local/php/lib/php.ini Open the php configuration file and find the cgi.fix_pathinfo configuration item. This item is commented out by default and has a value of 1. According to the official documentation, this is to prevent Nginx from making requests when the file does not exist. Sent to the back-end PHP-FPM module to avoid malicious script injection attacks, so this item should be uncommented and set to 0

After setting, save and exit
Another thing to note is that the location of the php.ini configuration file can be set in the pre-compile configuration parameters. The compilation parameters can be written as: --with-config-file-path=/usr/local/php In this case, PHP will go back to the specified directory to read the php.ini configuration file. If this parameter is not added, the default location will be the lib directory under the PHP installation directory. Specifically You can also view it in the phpinfo() output interface. If php.ini is placed in another location and PHP cannot read it, then all configuration modifications will not take effect. Please note this point
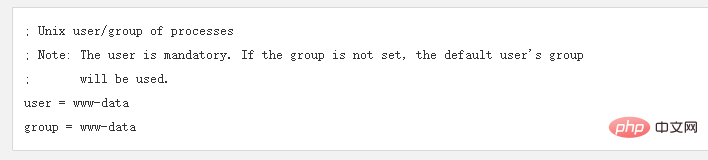
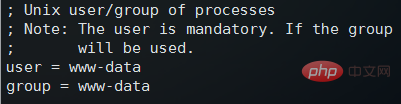
此时首先应该创建web用户:
groupadd www-data
useradd -g www-data www-data
然后网上一些教程说让修改php-fpm.conf添加以上创建的用户和组,这时候使用 vim /usr/local/php/etc/php-fpm.conf 打开文件后找不到官方所提示的位置:
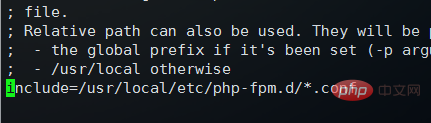
如果此时随便在一个位置添加,那么接下来启动php-fpm的时候,会报目录找不到的错误,所以不要在php-fpm.conf中添加用户和组,这个时候翻到php-fpm.conf最后一行会发现如下内容(如果编译时添加--prefix选项以下位置会自动补全,默认是下面是空的,要注意):
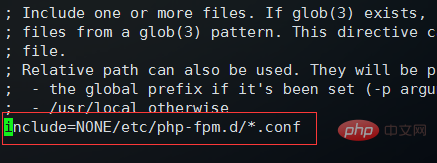
这里引入了php-fpm.d目录下所有的conf配置文件,但是NONE需要修改为我们的实际目录:/usr/local
默认情况下etc/php-fpm.d/下有一个名为www.conf.defalut的配置用户的文件,执行下面命令复制一个新文件并且打开:
cp /usr/local/php/etc/php-fpm.d/www.conf.default /usr/local/php/etc/php-fpm.d/www.conf
vim /usr/local/php/etc/php-fpm.d/www.conf
默认user和group的设置为nobody,将其改为www-data
修改完成之后,保存并退出,然后执行以下命令启动php-fpm服务:
/usr/local/bin/php-fpm
启动完毕之后,php-fpm服务默认使用9000端口,使用 netstat -tln | grep 9000 可以查看端口使用情况:

9000端口正常使用,说明php-fpm服务启动成功
然后执行 vim /usr/local/nginx/nginx.conf 编辑nginx配置文件,具体路径根据实际的nginx.conf配置文件位置编辑,下面主要修改nginx的server {}配置块中的内容,修改location块,追加index.php让nginx服务器默认支持index.php为首页:

然后配置.php请求被传送到后端的php-fpm模块,默认情况下php配置块是被注释的,此时去掉注释并修改为以下内容:
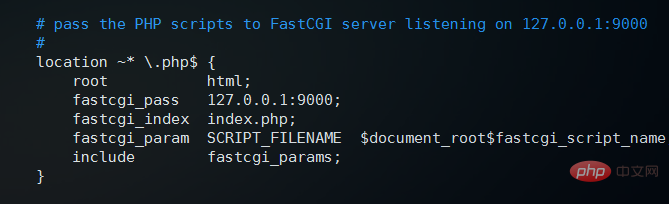
这里面很多都是默认的,root是配置php程序放置的根目录,主要修改的就是fastcgi_param中的/scripts为$document_root
修改完上面的,回到nginx.conf第一行,默认是#user nobody; 这里要去掉注释改为user www-data;或者user www-data www-data;表示nginx服务器的权限为www-data
修改完这些保存并退出,然后重启nginx:
/usr/local/nginx/nginx -s stop
/usr/local/nginx/nginx
接下来编辑一个测试的php程序,在nginx下的html目录下创建test.php文件,打印一下php配置:
<?php    phpinfo();
?>
然后打开浏览器输入对应的地址进行访问,看到输出页面,说明nginx和php都配置成功了:
推荐学习:《PHP视频教程》
The above is the detailed content of How to install nginx php-fpm. For more information, please follow other related articles on the PHP Chinese website!

Hot AI Tools

Undresser.AI Undress
AI-powered app for creating realistic nude photos

AI Clothes Remover
Online AI tool for removing clothes from photos.

Undress AI Tool
Undress images for free

Clothoff.io
AI clothes remover

Video Face Swap
Swap faces in any video effortlessly with our completely free AI face swap tool!

Hot Article
Hot Tools

Notepad++7.3.1
Easy-to-use and free code editor

SublimeText3 Chinese version
Chinese version, very easy to use

Zend Studio 13.0.1
Powerful PHP integrated development environment

Dreamweaver CS6
Visual web development tools

SublimeText3 Mac version
God-level code editing software (SublimeText3)
Hot Topics
 1662
1662
 14
1418
52
1311
25
1261
29
1234
24
14
1418
52
1311
25
1261
29
1234
24

 How to configure nginx in Windows
Apr 14, 2025 pm 12:57 PM
How to configure nginx in Windows
Apr 14, 2025 pm 12:57 PM
How to configure Nginx in Windows? Install Nginx and create a virtual host configuration. Modify the main configuration file and include the virtual host configuration. Start or reload Nginx. Test the configuration and view the website. Selectively enable SSL and configure SSL certificates. Selectively set the firewall to allow port 80 and 443 traffic.
 How to start containers by docker
Apr 15, 2025 pm 12:27 PM
How to start containers by docker
Apr 15, 2025 pm 12:27 PM
Docker container startup steps: Pull the container image: Run "docker pull [mirror name]". Create a container: Use "docker create [options] [mirror name] [commands and parameters]". Start the container: Execute "docker start [Container name or ID]". Check container status: Verify that the container is running with "docker ps".
 How to check the name of the docker container
Apr 15, 2025 pm 12:21 PM
How to check the name of the docker container
Apr 15, 2025 pm 12:21 PM
You can query the Docker container name by following the steps: List all containers (docker ps). Filter the container list (using the grep command). Gets the container name (located in the "NAMES" column).
 How to check whether nginx is started
Apr 14, 2025 pm 01:03 PM
How to check whether nginx is started
Apr 14, 2025 pm 01:03 PM
How to confirm whether Nginx is started: 1. Use the command line: systemctl status nginx (Linux/Unix), netstat -ano | findstr 80 (Windows); 2. Check whether port 80 is open; 3. Check the Nginx startup message in the system log; 4. Use third-party tools, such as Nagios, Zabbix, and Icinga.
 How to create containers for docker
Apr 15, 2025 pm 12:18 PM
How to create containers for docker
Apr 15, 2025 pm 12:18 PM
Create a container in Docker: 1. Pull the image: docker pull [mirror name] 2. Create a container: docker run [Options] [mirror name] [Command] 3. Start the container: docker start [Container name]
 How to check nginx version
Apr 14, 2025 am 11:57 AM
How to check nginx version
Apr 14, 2025 am 11:57 AM
The methods that can query the Nginx version are: use the nginx -v command; view the version directive in the nginx.conf file; open the Nginx error page and view the page title.
 How to configure cloud server domain name in nginx
Apr 14, 2025 pm 12:18 PM
How to configure cloud server domain name in nginx
Apr 14, 2025 pm 12:18 PM
How to configure an Nginx domain name on a cloud server: Create an A record pointing to the public IP address of the cloud server. Add virtual host blocks in the Nginx configuration file, specifying the listening port, domain name, and website root directory. Restart Nginx to apply the changes. Access the domain name test configuration. Other notes: Install the SSL certificate to enable HTTPS, ensure that the firewall allows port 80 traffic, and wait for DNS resolution to take effect.
 What to do if nginx server is hung
Apr 14, 2025 am 11:42 AM
What to do if nginx server is hung
Apr 14, 2025 am 11:42 AM
When the Nginx server goes down, you can perform the following troubleshooting steps: Check that the nginx process is running. View the error log for error messages. Check the syntax of nginx configuration. Make sure nginx has the permissions you need to access the file. Check file descriptor to open limits. Confirm that nginx is listening on the correct port. Add firewall rules to allow nginx traffic. Check reverse proxy settings, including backend server availability. For further assistance, please contact technical support.
