

python random walk explanation


Free learning recommendation: python video tutorial
Random Walk
This time we will use python to generate random walk data, and then use matplotlib to present the data.
Each walk in a random walk is completely random, with no clear direction, and the result is determined by a series of random decisions. You can think of it this way, a random walk is the path that ants take in a random direction every time when they are confused.
Create the RandomWalk() class
In order to simulate a random walk, we create a RandownWalk class that randomly chooses the direction to move forward. This class requires three attributes, one of which is a variable that stores the number of random walks, and the other two are lists that store the x-coordinates and y-coordinates of each point passed by the random walk.
The RandomWalk class contains only two methods, init() and fill_walk(), where the latter calculates all points passed by the random walk. The following is __init__():
from random import choiceclass RandomWalk():
    """一个生成随机漫步数据的类"""
    def __init__(self, number_points=5000):
        """初始化随机漫步的属性"""
        self.number_points = number_points        # 所有随机漫步都始于(0,0)
        self.x_values = [0]
        self.y_values = [0]
To make a random decision, we store all possible choices into a list and use choice() every time we make a decision to decide which choice to use, then we take the random walk The default number of points is set to 5000, and then we create two lists to store x values and y values, and let each walk start from (0,0).
Select a direction
def fill_walk(self): """计算随机漫步中包含的所有点""" # 不断漫步,直到列表达到指定的长度 while len(self.x_values) <p> We establish a loop that continues until the walk contains all the required number of points. The main part of this method tells python how to simulate four wandering decisions: go left or right? Going up or down? How far along the given direction? <br> We use choice([1, -1]) to select a value for x_direction. The result is either 1, which means going right, or -1, which means going left. Next, choice([0, 1, 2 , 3, 4]) Randomly select a number between 0 and 4 to tell python how far to go in the specified direction. <br> We multiply the direction of movement by the distance of movement to determine the distance moved along the x- and y-axes. If x_step is positive, it will move to the right, if it is negative, it will move to the left, and if it is 0, it will move vertically, if y_step is positive, it will move up, if it is negative, it will move down, if it is 0, it will move horizontally, if both are 0, then Thinking that we are standing still, we reject this situation and continue the next cycle. <br> To get the x value of the next point in the random walk, we add the last value of x_step and x_values, and do the same for the y value. After getting the x-value and y-value of the next point, we append it to the end of the lists x_values and y_values respectively. </p><p><strong>Drawing a random walk graph</strong></p><p>We named the py file that created the RandomWalk class above random_walk.py. <br> The following code plots all points of the random walk: </p><pre class="brush:php;toolbar:false">import matplotlib.pyplot as pltfrom random_walk import RandomWalk# 创建一个RandWalk实例,并将其包含的点都绘制出来rw = RandomWalk(5000)rw.fill_walk()plt.scatter(rw.x_values, rw.y_values, s=15)plt.show()
We first imported the module pyplot and the RandomWalk class, then created a RandomWalk instance, stored it in rw, and then called fill_walk(), the following figure shows a random walk graph containing 5000 points. 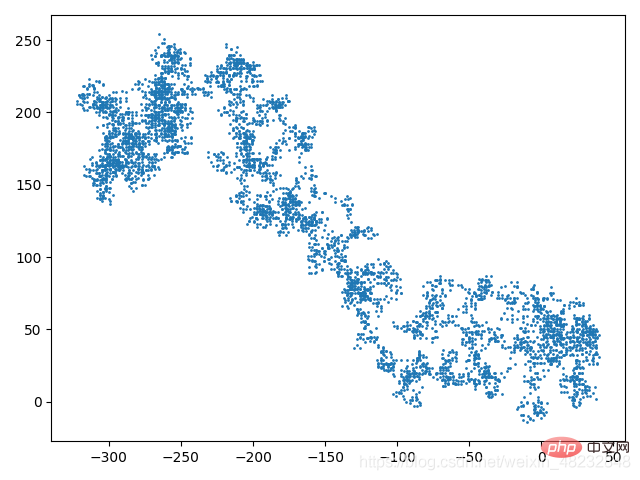
Simulate multiple random walks
Every random walk is different, so it’s fun to explore the various patterns that might be generated. One way to use the previous code to simulate multiple random walks without running the program multiple times is to put the previous code into a while loop, as shown below:
import matplotlib.pyplot as pltfrom random_walk import RandomWalkwhile True:
    # 创建一个RandWalk实例,并将其包含的点都绘制出来
    rw = RandomWalk(5000)
    rw.fill_walk()

    plt.scatter(rw.x_values, rw.y_values, s=1)
    plt.show()

    keep_running = input('Make another walk? (y/n) : ')
    if keep_running == 'n':
breakThese codes simulate a random walk Walk, if you enter y, you will continue to simulate and generate a random walk. If you enter n, you will exit the program.
Color the points
We will use color to map the order of the points in the walk, and delete the black outline of each point to make their colors more obvious. To color according to the order of the points in the walk, we pass the parameter c and set up a list containing the order of the points. Since these points are drawn in order, the list specified by parameter c only needs to contain numbers 1~5000. As shown below:
import matplotlib.pyplot as pltfrom random_walk import RandomWalkwhile True:
    # 创建一个RandWalk实例,并将其包含的点都绘制出来
    rw = RandomWalk(5000)
    rw.fill_walk()

    point_numbers = list(range(rw.number_points))

    plt.scatter(rw.x_values, rw.y_values, c=point_numbers, cmap=plt.cm.Blues, edgecolors='none', s=1)
    plt.show()

    keep_running = input('Make another walk? (y/n) : ')
    if keep_running == 'n':
break We use range to generate a list of numbers that contains the same number of points as the walk contains. Next, we store this list into point_numbers so that we can use it to set the color of each walk point. We set each parameter c to point_numbers, specify the color map to be blue, and pass the argument edgecolors to remove the outline around each point. The final random walk graph gradients from light blue to dark blue. As shown in the figure below: 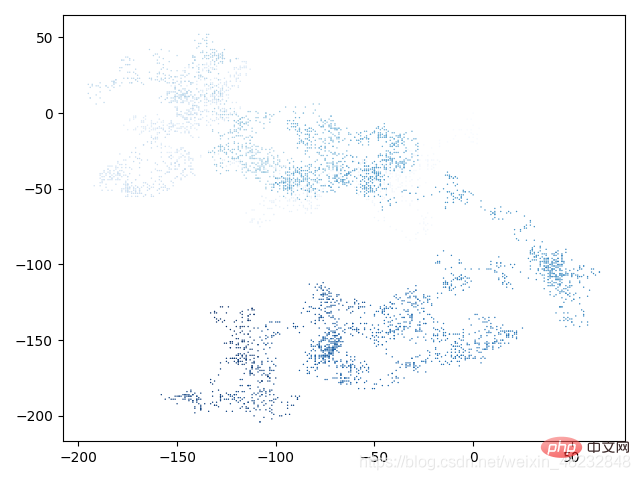
Redraw the starting point and end point
In addition to coloring the random walk points to indicate their order, It would be better if we could also show the end and starting point of the random walk. To do this, you can redraw the start and end points of the random walk after drawing the random walk diagram. We made the start and end points larger and a different color to highlight them, like this:
import matplotlib.pyplot as pltfrom random_walk import RandomWalkwhile True:
    # 创建一个RandWalk实例,并将其包含的点都绘制出来
    rw = RandomWalk(5000)
    rw.fill_walk()

    point_numbers = list(range(rw.number_points))

    plt.scatter(rw.x_values, rw.y_values, c=point_numbers, cmap=plt.cm.Blues, edgecolors='none', s=1)
    # 突出起点和终点
    plt.scatter(0, 0, c='green', edgecolors='none', s=100)
    plt.scatter(rw.x_values[-1], rw.y_values[-1], c='red', edgecolors='none', s=100)

    plt.show()

    keep_running = input('Make another walk? (y/n) : ')
    if keep_running == 'n':
        break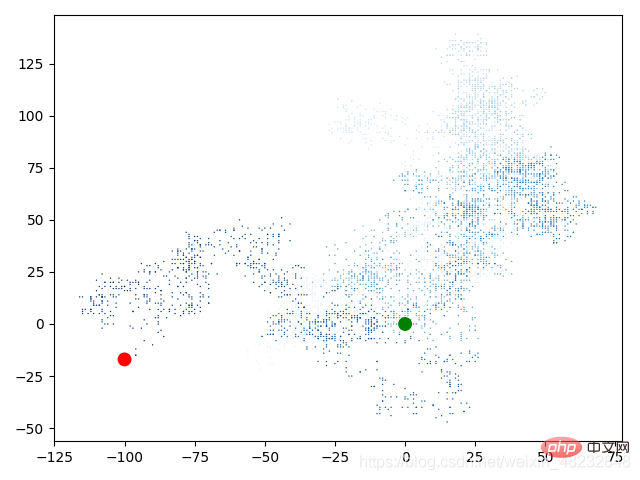
为突出起点,我们使用绿色绘制点(0,0),并使其比其它点大。为突出终点,我们在漫步包含的最后一个x值和y值处绘制一个点,使其为红色,并比其它点大。运行代码,将准确知道每次随机漫步的起点和终点。
隐藏坐标轴
下面来隐藏坐标轴,以免我们注意点是坐标轴而不是随机漫步路径。要隐藏坐标做代码如下:
# 隐藏坐标轴plt.axes().get_xaxis().set_visible(False)plt.axes().get_yaxis().set_visible(False)
为修改坐标轴,使用函数plt.axes()来将每条坐标轴的可见性设置为False。图如下: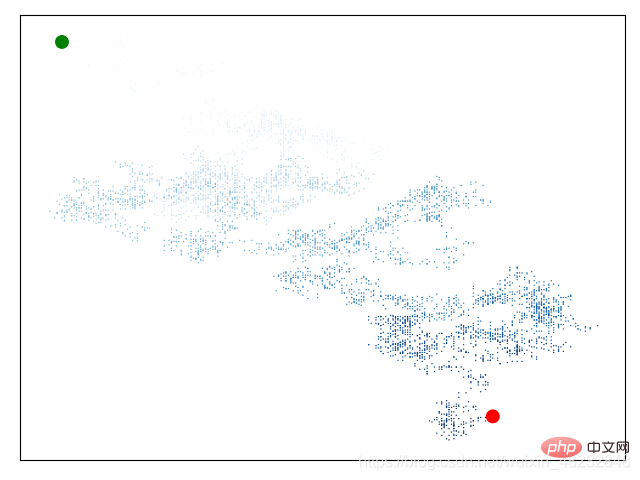
相关免费学习推荐:python教程(视频)
The above is the detailed content of python random walk explanation. For more information, please follow other related articles on the PHP Chinese website!

Hot AI Tools

Undresser.AI Undress
AI-powered app for creating realistic nude photos

AI Clothes Remover
Online AI tool for removing clothes from photos.

Undress AI Tool
Undress images for free

Clothoff.io
AI clothes remover

Video Face Swap
Swap faces in any video effortlessly with our completely free AI face swap tool!

Hot Article
Hot Tools

Notepad++7.3.1
Easy-to-use and free code editor

SublimeText3 Chinese version
Chinese version, very easy to use

Zend Studio 13.0.1
Powerful PHP integrated development environment

Dreamweaver CS6
Visual web development tools

SublimeText3 Mac version
God-level code editing software (SublimeText3)
Hot Topics
 1666
1666
 14
1425
52
1328
25
1273
29
1253
24
14
1425
52
1328
25
1273
29
1253
24

 PHP and Python: Different Paradigms Explained
Apr 18, 2025 am 12:26 AM
PHP and Python: Different Paradigms Explained
Apr 18, 2025 am 12:26 AM
PHP is mainly procedural programming, but also supports object-oriented programming (OOP); Python supports a variety of paradigms, including OOP, functional and procedural programming. PHP is suitable for web development, and Python is suitable for a variety of applications such as data analysis and machine learning.
 Choosing Between PHP and Python: A Guide
Apr 18, 2025 am 12:24 AM
Choosing Between PHP and Python: A Guide
Apr 18, 2025 am 12:24 AM
PHP is suitable for web development and rapid prototyping, and Python is suitable for data science and machine learning. 1.PHP is used for dynamic web development, with simple syntax and suitable for rapid development. 2. Python has concise syntax, is suitable for multiple fields, and has a strong library ecosystem.
 How to run sublime code python
Apr 16, 2025 am 08:48 AM
How to run sublime code python
Apr 16, 2025 am 08:48 AM
To run Python code in Sublime Text, you need to install the Python plug-in first, then create a .py file and write the code, and finally press Ctrl B to run the code, and the output will be displayed in the console.
 PHP and Python: A Deep Dive into Their History
Apr 18, 2025 am 12:25 AM
PHP and Python: A Deep Dive into Their History
Apr 18, 2025 am 12:25 AM
PHP originated in 1994 and was developed by RasmusLerdorf. It was originally used to track website visitors and gradually evolved into a server-side scripting language and was widely used in web development. Python was developed by Guidovan Rossum in the late 1980s and was first released in 1991. It emphasizes code readability and simplicity, and is suitable for scientific computing, data analysis and other fields.
 Python vs. JavaScript: The Learning Curve and Ease of Use
Apr 16, 2025 am 12:12 AM
Python vs. JavaScript: The Learning Curve and Ease of Use
Apr 16, 2025 am 12:12 AM
Python is more suitable for beginners, with a smooth learning curve and concise syntax; JavaScript is suitable for front-end development, with a steep learning curve and flexible syntax. 1. Python syntax is intuitive and suitable for data science and back-end development. 2. JavaScript is flexible and widely used in front-end and server-side programming.
 Golang vs. Python: Performance and Scalability
Apr 19, 2025 am 12:18 AM
Golang vs. Python: Performance and Scalability
Apr 19, 2025 am 12:18 AM
Golang is better than Python in terms of performance and scalability. 1) Golang's compilation-type characteristics and efficient concurrency model make it perform well in high concurrency scenarios. 2) Python, as an interpreted language, executes slowly, but can optimize performance through tools such as Cython.
 Where to write code in vscode
Apr 15, 2025 pm 09:54 PM
Where to write code in vscode
Apr 15, 2025 pm 09:54 PM
Writing code in Visual Studio Code (VSCode) is simple and easy to use. Just install VSCode, create a project, select a language, create a file, write code, save and run it. The advantages of VSCode include cross-platform, free and open source, powerful features, rich extensions, and lightweight and fast.
 How to run python with notepad
Apr 16, 2025 pm 07:33 PM
How to run python with notepad
Apr 16, 2025 pm 07:33 PM
Running Python code in Notepad requires the Python executable and NppExec plug-in to be installed. After installing Python and adding PATH to it, configure the command "python" and the parameter "{CURRENT_DIRECTORY}{FILE_NAME}" in the NppExec plug-in to run Python code in Notepad through the shortcut key "F6".
