 Development Tools
 VSCode
 A brief discussion on how to customize the vscode extension plug-in path (windows environment)
A brief discussion on how to customize the vscode extension plug-in path (windows environment)
How to customize the path of vscode extension plug-in under windows? The following vscode column will introduce to you how to customize the vscode extension plug-in path. It has certain reference value. Friends in need can refer to it. I hope it will be helpful to everyone.

Related recommendations: "vscode Basic Tutorial"
By default, the vscode extension plug-in is stored in C:\Users\username\ .vscode will occupy C drive space when there are many plug-in downloads. Modify the path of the vscode extension plug-in as follows:
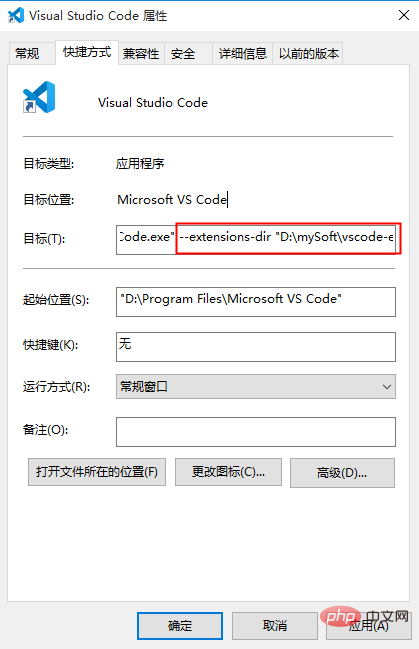
1. Right-click the shortcut -> Select "Properties" and enter after the target location:
--extensions-dir "D:\mySoft\vscode-extensions\extensions"
where "D:\mySoft\vscode -extensions\extensions" is my own customized path
As shown in the figure: 
2. Then add the extension under C:\Users\username\.vscode Just cut the plug-in to the custom path (D:\mySoft\vscode-extensions\extensions).
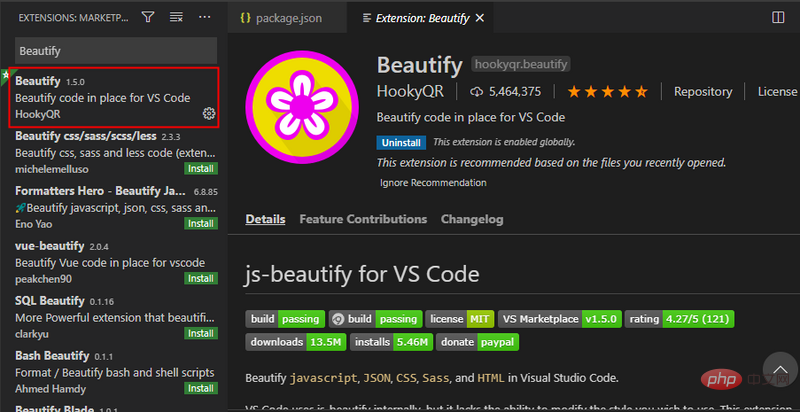
3. Verify whether the modification is successful, open vscode, and try to install an extension plug-in Beautify, as shown in the figure:

View C:\Users\user name \.vscode is empty, and D:\mySoft\vscode-extensions\extensions already has the xxx.beautify-xxx plug-in, indicating that the vscode extension plug-in path has been modified successfully.
For more programming-related knowledge, please visit: Programming Learning Course! !
The above is the detailed content of A brief discussion on how to customize the vscode extension plug-in path (windows environment). For more information, please follow other related articles on the PHP Chinese website!

Hot AI Tools

Undresser.AI Undress
AI-powered app for creating realistic nude photos

AI Clothes Remover
Online AI tool for removing clothes from photos.

Undress AI Tool
Undress images for free

Clothoff.io
AI clothes remover

Video Face Swap
Swap faces in any video effortlessly with our completely free AI face swap tool!

Hot Article

Hot Tools

Notepad++7.3.1
Easy-to-use and free code editor

SublimeText3 Chinese version
Chinese version, very easy to use

Zend Studio 13.0.1
Powerful PHP integrated development environment

Dreamweaver CS6
Visual web development tools

SublimeText3 Mac version
God-level code editing software (SublimeText3)

Hot Topics
 1677
1677
 14
14
 1431
1431
 52
52
 1334
1334
 25
25
 1280
1280
 29
29
 1257
1257
 24
24
 How to run sublime after writing the code
Apr 16, 2025 am 08:51 AM
There are six ways to run code in Sublime: through hotkeys, menus, build systems, command lines, set default build systems, and custom build commands, and run individual files/projects by right-clicking on projects/files. The build system availability depends on the installation of Sublime Text.
 git software installation
Apr 17, 2025 am 11:57 AM
Installing Git software includes the following steps: Download the installation package and run the installation package to verify the installation configuration Git installation Git Bash (Windows only)
 How to solve complex BelongsToThrough relationship problem in Laravel? Use Composer!
Apr 17, 2025 pm 09:54 PM
In Laravel development, dealing with complex model relationships has always been a challenge, especially when it comes to multi-level BelongsToThrough relationships. Recently, I encountered this problem in a project dealing with a multi-level model relationship, where traditional HasManyThrough relationships fail to meet the needs, resulting in data queries becoming complex and inefficient. After some exploration, I found the library staudenmeir/belongs-to-through, which easily installed and solved my troubles through Composer.
 laravel installation code
Apr 18, 2025 pm 12:30 PM
To install Laravel, follow these steps in sequence: Install Composer (for macOS/Linux and Windows) Install Laravel Installer Create a new project Start Service Access Application (URL: http://127.0.0.1:8000) Set up the database connection (if required)
 git software installation tutorial
Apr 17, 2025 pm 12:06 PM
Git Software Installation Guide: Visit the official Git website to download the installer for Windows, MacOS, or Linux. Run the installer and follow the prompts. Configure Git: Set username, email, and select a text editor. For Windows users, configure the Git Bash environment.
 What is git software for? How to use git software?
Apr 17, 2025 pm 12:09 PM
Git is a distributed version control system designed to track code changes and allow collaborative development. It enables developers to document project evolution, manage code merges, and maintain project history in an efficient and secure way. Through Git's distributed architecture, each developer has a complete copy of the project and performs common version control operations without communicating with a central server.
 How to handle high DPI display in C?
Apr 28, 2025 pm 09:57 PM
Handling high DPI display in C can be achieved through the following steps: 1) Understand DPI and scaling, use the operating system API to obtain DPI information and adjust the graphics output; 2) Handle cross-platform compatibility, use cross-platform graphics libraries such as SDL or Qt; 3) Perform performance optimization, improve performance through cache, hardware acceleration, and dynamic adjustment of the details level; 4) Solve common problems, such as blurred text and interface elements are too small, and solve by correctly applying DPI scaling.
 How to configure vue with vscode
Apr 16, 2025 am 07:06 AM
How to configure VSCode to write Vue: Install the Vue CLI and VSCode Vue plug-in. Create a Vue project. Set syntax highlighting, linting, automatic formatting, and code snippets. Install ESLint and Prettier to enhance code quality. Integrated Git (optional). After the configuration is complete, VSCode is ready for Vue development.


