

How to use v-for in vue.js and how to get the index?

The followingVue.js tutorial column will take you through the use of v-for and index acquisition in vue.js. It has certain reference value. Friends in need can refer to it. I hope it will be helpful to everyone.

2.x version:
v-for="(item,index) in items"
index is the index value.
==========================Separating line================ ==============
1.x version:
1 .v-for
Example 1:
<!DOCTYPE html><html><head>
    <meta charset="utf-8">
    <meta name="viewport" content="initial-scale=1.0, maximum-scale=1.0, user-scalable=no" />
    <title></title></head><body>
    <p id="didi-navigator">
        <ul>
            <li v-for="tab in tabs">
                {{ tab.text }}            </li>
        </ul>
    </p>
    <script src="js/vue.js" type="text/javascript" charset="utf-8"></script>
    <script type="text/javascript">
        new Vue({
            el: '#didi-navigator',
            data: {
                tabs: [
                    { text: '巴士' },
                    { text: '快车' },
                    { text: '专车' },
                    { text: '顺风车' },
                    { text: '出租车' },
                    { text: '代驾' }
                ]
            }
        })    </script></body></html>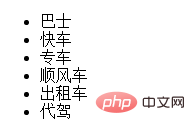
##2. Index
Within the v-for block we have full access to the properties in the parent component scope. The special variable $index is the index of the current array element:
<ul id="example-2">
  <li v-for="item in items">
{{ parentMessage }} - {{ $index }} - {{ item.message }} </li></ul>var example2 = new Vue({
el: '#example-2',
data: {
parentMessage: 'Parent',
items: [
{ message: 'Foo' },
{ message: 'Bar' }
]
}
})
Additionally, you can specify an alias for the index (if v-for is used for an object, you can specify an alias for the object's key) :
<p v-for="(index, item) in items">
{{ index }} {{ item.message }}</p><p v-for="item of items"></p>
Example 2:
<!DOCTYPE html><html><head>
    <meta charset="utf-8">
    <meta name="viewport" content="initial-scale=1.0, maximum-scale=1.0, user-scalable=no" />
    <title></title></head><body>
    <ul>
        <li v-for="option in options">
            <p class="text-success" v-on:click="getIndex($index)">Text:{{option.text}}--Vlue:{{option.value}}</p>
        </li>
    </ul>
    <p v-if="isNaN(click)==false">
        <span>你点击的索引为: {{ click }}</span>
    </p>
    <p v-else>
        <p class="text-danger">试着点击上方LI条目</p>
    </p>
    <script src="js/vue.js" type="text/javascript" charset="utf-8"></script>
    <script type="text/javascript">
        new Vue({
            el: 'body',
            data: {
                click: 'a',
                options: [
                    { text: '上海市', value: '20' },
                    { text: '湖北省', value: '43' },
                    { text: '河南省', value: '45' },
                    { text: '北京市', value: '10' }
                ]
            },
            methods:{
                getIndex:function($index){                    this.click=$index;
                }
            }
        });    </script></body></html>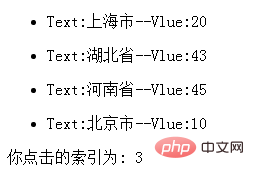
3. Get the index in the click event
Method 1: Add custom attributes
Example 3:
<!DOCTYPE html><html>
    <head>
        <meta charset="UTF-8">
        <title></title>
        <style type="text/css">
            a{display: block;}
        </style>
    </head>
    <body>
        <p>
               <a v-for="(index,item) in items" data-index="{{index}}" v-on:click="onclick" href="http://www.baidu.com">{{ item.text }}</a>
        </p>
        <input type="text" name="" id="index" value=""/>
    <script src="js/vue.js" type="text/javascript" charset="utf-8"></script>
    <script type="text/javascript">
        new Vue({
            el: 'body',
            data: {
                items: [
                    { text: '巴士' },
                    { text: '快车' },
                    { text: '专车' },
                    { text: '顺风车' },
                    { text: '出租车' },
                    { text: '代驾' }
                ]
            },
            methods: {
                onclick:function(event){
                    event.preventDefault();
                    let target = event.target
                    console.log(target.getAttribute("data-index"));
                    document.getElementById('index').value = target.getAttribute("data-index");
                }
            }
        })    </script>
    </body></html>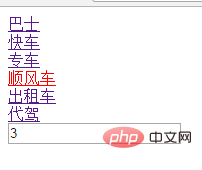
Example four (similar to method two):
<!DOCTYPE html><html><head><meta charset="UTF-8"><title></title><style type="text/css">a{display: block;}</style></head><body><p>
<a v-for="(index,item) in items" v-on:click="onclick($index)" href="#">{{ item.text }}</a></p><input type="text" name="" id="index" value=""/><script src="js/vue.js" type="text/javascript" charset="utf-8"></script>
<script type="text/javascript">
new Vue({
el: 'body',
data: {
items: [
{ text: '巴士' },
{ text: '快车' },
{ text: '专车' },
{ text: '顺风车' },
{ text: '出租车' },
{ text: '代驾' }
]
},
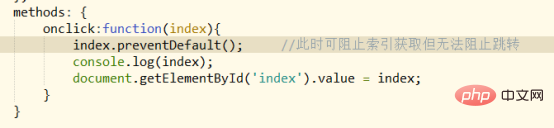
methods: {
onclick:function(index){// index.preventDefault();
console.log(index);
document.getElementById('index').value = index;
}
}
})</script></body></html>
But when there is a link:

Example 5:
<!DOCTYPE html><html>
    <head>
        <meta charset="UTF-8">
        <title></title>
        <style type="text/css">
            a{display: block;}
        </style>
    </head>
    <body>
        <p>
               <a v-for="(index,item) in items" v-on:click="onclick($index)" href="javascript:void(0)">{{ item.text }}</a>
        </p>
        <input type="text" name="" id="index" value=""/>
    <script src="js/vue.js" type="text/javascript" charset="utf-8"></script>
    <script type="text/javascript">
        new Vue({
            el: 'body',
            data: {
                items: [
                    { text: '巴士' },
                    { text: '快车' },
                    { text: '专车' },
                    { text: '顺风车' },
                    { text: '出租车' },
                    { text: '代驾' }
                ]
            },
            methods: {
                onclick:function(index){//                    index.preventDefault();                    console.log(index);
                    document.getElementById('index').value = index;
                    window.location.href = "http://www.baidu.com";
                }
            }
        })    </script>
    </body></html>
4. About the difference between v-for version 2.0 and 1.x
Example 5 of version 2.0:<!DOCTYPE html><html>
<head>
<meta charset="UTF-8">
<title></title>
<style type="text/css">
a{display: block;}
</style>
</head>
<body>
<p id="for5">
<a v-for="(item,index) in items" v-on:click="onclick(index)" href="javascript:void(0)">{{ index }}{{ item.text }}</a>
</p>
<input type="text" name="" id="index" value=""/>
<script src="js/vue2.js" type="text/javascript" charset="utf-8"></script>
<script type="text/javascript">
new Vue({
el: '#for5',
data: {
items: [
{ text: '巴士' },
{ text: '快车' },
{ text: '专车' },
{ text: '顺风车' },
{ text: '出租车' },
{ text: '代驾' }
]
},
methods: {
onclick:function(index){
console.log(index);
document.getElementById('index').value = index;// window.location.href = "http://www.baidu.com"; window.location.href = "#";
}
}
}) </script>
</body></html>
此外,也可以提供第二个的参数为键名: 第三个参数为索引: 相关推荐: 更多编程相关知识,请访问:编程教学!!
<p v-for="(value, key) in object">

{{ key }} : {{ value }}</p><p v-for="(value, key, index) in object">
{{ index }}. {{ key }} : {{ value }}</p>
The above is the detailed content of How to use v-for in vue.js and how to get the index?. For more information, please follow other related articles on the PHP Chinese website!

Hot AI Tools

Undresser.AI Undress
AI-powered app for creating realistic nude photos

AI Clothes Remover
Online AI tool for removing clothes from photos.

Undress AI Tool
Undress images for free

Clothoff.io
AI clothes remover

Video Face Swap
Swap faces in any video effortlessly with our completely free AI face swap tool!

Hot Article
Hot Tools

Notepad++7.3.1
Easy-to-use and free code editor

SublimeText3 Chinese version
Chinese version, very easy to use

Zend Studio 13.0.1
Powerful PHP integrated development environment

Dreamweaver CS6
Visual web development tools

SublimeText3 Mac version
God-level code editing software (SublimeText3)
Hot Topics


 In-depth discussion of how vite parses .env files
Jan 24, 2023 am 05:30 AM
In-depth discussion of how vite parses .env files
Jan 24, 2023 am 05:30 AM
When using the Vue framework to develop front-end projects, we will deploy multiple environments when deploying. Often the interface domain names called by development, testing and online environments are different. How can we make the distinction? That is using environment variables and patterns.
 Detailed graphic explanation of how to integrate the Ace code editor in a Vue project
Apr 24, 2023 am 10:52 AM
Detailed graphic explanation of how to integrate the Ace code editor in a Vue project
Apr 24, 2023 am 10:52 AM
Ace is an embeddable code editor written in JavaScript. It matches the functionality and performance of native editors like Sublime, Vim, and TextMate. It can be easily embedded into any web page and JavaScript application. Ace is maintained as the main editor for the Cloud9 IDE and is the successor to the Mozilla Skywriter (Bespin) project.
 Explore how to write unit tests in Vue3
Apr 25, 2023 pm 07:41 PM
Explore how to write unit tests in Vue3
Apr 25, 2023 pm 07:41 PM
Vue.js has become a very popular framework in front-end development today. As Vue.js continues to evolve, unit testing is becoming more and more important. Today we’ll explore how to write unit tests in Vue.js 3 and provide some best practices and common problems and solutions.
 A simple comparison of JSX syntax and template syntax in Vue (analysis of advantages and disadvantages)
Mar 23, 2023 pm 07:53 PM
A simple comparison of JSX syntax and template syntax in Vue (analysis of advantages and disadvantages)
Mar 23, 2023 pm 07:53 PM
In Vue.js, developers can use two different syntaxes to create user interfaces: JSX syntax and template syntax. Both syntaxes have their own advantages and disadvantages. Let’s discuss their differences, advantages and disadvantages.
 Let's talk in depth about reactive() in vue3
Jan 06, 2023 pm 09:21 PM
Let's talk in depth about reactive() in vue3
Jan 06, 2023 pm 09:21 PM
Foreword: In the development of vue3, reactive provides a method to implement responsive data. This is a frequently used API in daily development. In this article, the author will explore its internal operating mechanism.
 A brief analysis of how vue implements file slicing upload
Mar 24, 2023 pm 07:40 PM
A brief analysis of how vue implements file slicing upload
Mar 24, 2023 pm 07:40 PM
In the actual development project process, sometimes it is necessary to upload relatively large files, and then the upload will be relatively slow, so the background may require the front-end to upload file slices. It is very simple. For example, 1 A gigabyte file stream is cut into several small file streams, and then the interface is requested to deliver the small file streams respectively.
 Let's talk about how to use the Amap API in vue3
Mar 09, 2023 pm 07:22 PM
Let's talk about how to use the Amap API in vue3
Mar 09, 2023 pm 07:22 PM
When we used Amap, the official recommended many cases and demos to us, but these cases all used native methods to access and did not provide demos of vue or react. Many people have written about vue2 access on the Internet. However, in this article, we will take a look at how vue3 uses the commonly used Amap API. I hope it will be helpful to everyone!
 Analyze the principle of Vue2 implementing composition API
Jan 13, 2023 am 08:30 AM
Analyze the principle of Vue2 implementing composition API
Jan 13, 2023 am 08:30 AM
Since the release of Vue3, the word composition API has entered the field of vision of students who write Vue. I believe everyone has always heard how much better the composition API is than the previous options API. Now, due to the release of the @vue/composition-api plug-in, Vue2 Students can also get on the bus. Next, we will mainly use responsive ref and reactive to conduct an in-depth analysis of how this plug-in achieves this.
