 Backend Development
 C#.Net Tutorial
 Learn the complete steps to integrate MongoDB with asp.net core
Learn the complete steps to integrate MongoDB with asp.net core

##1. Preface and introduction to MongoDB##Recently While integrating my own framework, I refactored the simplest CRUD of MongoDBD as a component and integrated it into the asp.net core project. Of course, this article does not explain the cluster deployment of mongodb. I will share it when I have the opportunity.
First of all, we see in MongoDB’s official documentation that MongoDb’s 2.4 or above For .Net driver supports .Net Core 2.0.
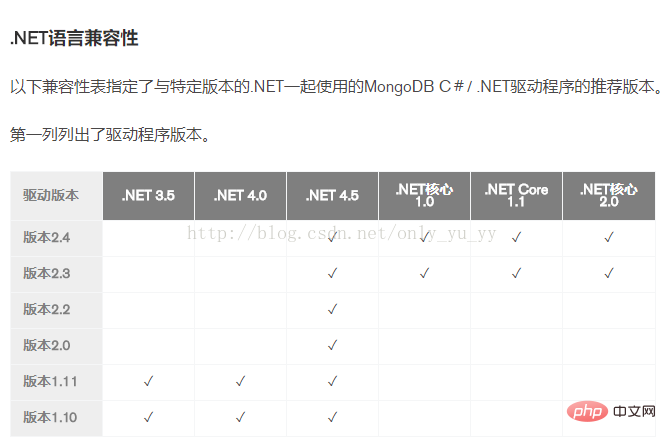 Regarding MongoDB, I think everyone should be familiar with it, and have heard of it even if they have not used it.
ASP.NET video tutorial#1. What is mongodb?
MongoDB is a database based on distributed file storage. It provides scalable and high-performance data storage solutions for web applications. It is a product between relational database and non-relational database. It is non-relational. The most feature-rich database. It is a powerful tool for data processing.
2. What are relational databases and non-relational databases?Relational database: The sqlserver, mysql, etc. we have used are all relational databases, and relational databases follow the ACID principle and have strict consistency.
Non-relational database: Also called NoSQL, it is used to store very large-scale data. These types of data storage do not require a fixed model and can be expanded horizontally without redundant operations.
3. RDBMS VS NoSQLRDBMS:
Highly organized structured data
Structured query language
Data and relationships are stored in separate tables
Strict consistency
Basic transactions
NoSQL:
No declarative query language
Key-value pair storage, column storage, document storage, etc.
Eventual consistency
Unstructured and unpredictable data
CAP theorem, high availability, High performance, high scalability
I believe that at this point, sharp-eyed students should have noticed the CAP theorem and eventual consistency, and will definitely think of distributed systems. I give you a big thumbs up here. It can be perfectly combined with nosql in a distributed system to improve our performance.
4. Introduce some concepts of RDBMS and Mongodb, which will help everyone understand
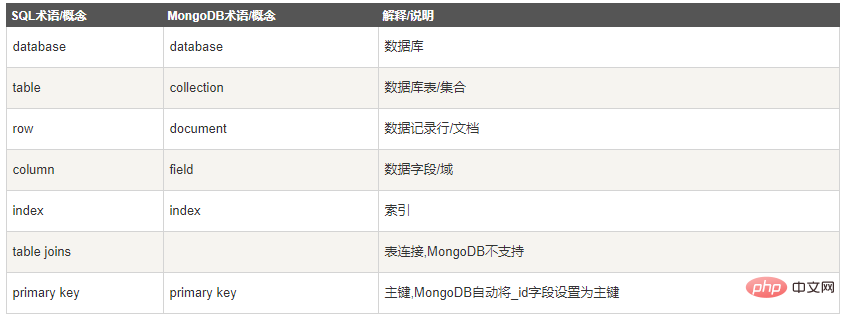 Translate, as follows:

2. Asp.net core integrates mongoDB
1. For the convenience of demonstration I downloaded the windows version of mongodb serverYou can go to the official website to download it yourself, and then for the visual interface, I used the tool Robo 3T. A very simple and beautiful visualization tool. Recommended for everyone to use.
After the installation is completed, you will see the mongodb server in the windows service
 Then we open Robo 3T and connect our mongodb.
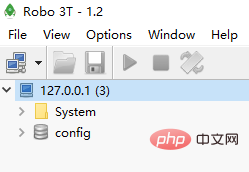
The first step: I create a new Core2 .0 class library
introduces the "MongoDB.Driver" nuget package.
Then extended the extension method of Services in Startup.cs
//扩展方法public static class ServiceCollectionExtensions
 {
 public static void AddMongoDB(this IServiceCollection services, IConfiguration configuration)
 {
  services.Configure<Settings>(options =>
  {
  options.ConnectionString = configuration.GetSection("MongoConnection:ConnectionString").Value;
  options.Database = configuration.GetSection("MongoConnection:Database").Value;
  });
 }
}public class MongoDBBase
{
private readonly IMongoDatabase _database = null;
public MongoDBBase(string connectionString, string databaseName)
{
var client = new MongoClient(connectionString);
if (client != null)
{
_database = client.GetDatabase(databaseName);
}
}
#region SELECT
/// <summary>
/// 根据查询条件,获取数据
/// </summary>
/// <typeparam name="T"></typeparam>
/// <param name="id"></param>
/// <returns></returns>
public List<T> GetList<T>(Expression<Func<T, bool>> conditions = null)
{
var collection = _database.GetCollection<T>(typeof(T).Name);
if (conditions != null)
{
return collection.Find(conditions).ToList();
}
return collection.Find(_ => true).ToList();
}#endregion
#region INSERT/// <summary>
/// 插入多条数据,数据用list表示
/// </summary>
/// <typeparam name="T"></typeparam>
/// <param name="list"></param>
/// <returns></returns>
public List<T> InsertMany<T>(List<T> list)
{
var collection = _database.GetCollection<T>(typeof(T).Name);
collection.InsertMany(list);
return list;
}
#endregion
}
Add mongodb to appsetting.json in the project Connection string: I use a custom data name testdb here. When inserting into mongodb, the database, collection and document will be automatically created. Then look down
 "MongoConnection": { //mongodb数据库连接
 "ConnectionString": "mongodb://127.0.0.1:27017",
 "Database": "testdb",
 "IsSSL": true
},[Produces("application/json")]
[Route("api/MongoDB/[action]")]
public class MongoDBController : Controller
{
private readonly MongoDBBase _context = null;
public MongoDBController(IOptions<Settings> settings)
{
_context = new MongoDBBase(settings.Value.ConnectionString, settings.Value.Database);
}
[HttpGet]
public IActionResult AddList()
{
List<MongoDBPostTest> list = new List<MongoDBPostTest>()
{
new MongoDBPostTest()
{
Id = "2",
Body = "Test note 3",
UpdatedOn = DateTime.Now,
UserId = 1,
HeaderImage = new NoteImage
{
ImageSize = 10,
Url = "http://localhost/image1.png",
ThumbnailUrl = "http://localhost/image1_small.png"
}
},
new MongoDBPostTest()
{
Id = "3",
Body = "Test note 4",
UpdatedOn = DateTime.Now,
UserId = 1,
HeaderImage = new NoteImage
{
ImageSize = 14,
Url = "http://localhost/image3.png",
ThumbnailUrl = "http://localhost/image3_small.png"
}
}
};
try
{
_context.InsertMany(list);
}
catch (Exception ex)
{
throw;
}
return Ok("成功");
}
[HttpGet]
public Result<List<MongoDBPostTest>> SelectSingle()
{
//无条件
var list = _context.GetList<MongoDBPostTest>();
//有条件
//var list = _context.GetList<MongoDBPostTest>(a => a.Id == "1");
//得到单条数据,无条件
//var list = _context.GetSingle<MongoDBPostTest>();
//得到单条数据,有条件
//var list = _context.GetSingle<MongoDBPostTest>(a => a.Id == "3");
ObjectId internalId = _context.GetInternalId("5bbf41651d3b66668cbb5bfc");
var a = _context.GetSingle<MongoDBPostTest>(note => note.Id == "5bbf41651d3b66668cbb5bfc" || note.InternalId == internalId);
return ResHelper.Suc(1, list, "成功");
}
}
public class MongoDBPostTest
 {
  [BsonId]
  // standard BSonId generated by MongoDb
  public ObjectId InternalId { get; set; }
  public string Id { get; set; }

  public string Body { get; set; } = string.Empty;

  [BsonDateTimeOptions]
  public DateTime UpdatedOn { get; set; } = DateTime.Now;

  public NoteImage HeaderImage { get; set; }

  public int UserId { get; set; } = 0;
 }

public class NoteImage
 {
  public string Url { get; set; } = string.Empty;
  public string ThumbnailUrl { get; set; } = string.Empty;
  public long ImageSize { get; set; } = 0L;
}Let’s insert multiple pieces of data and the execution is successful.
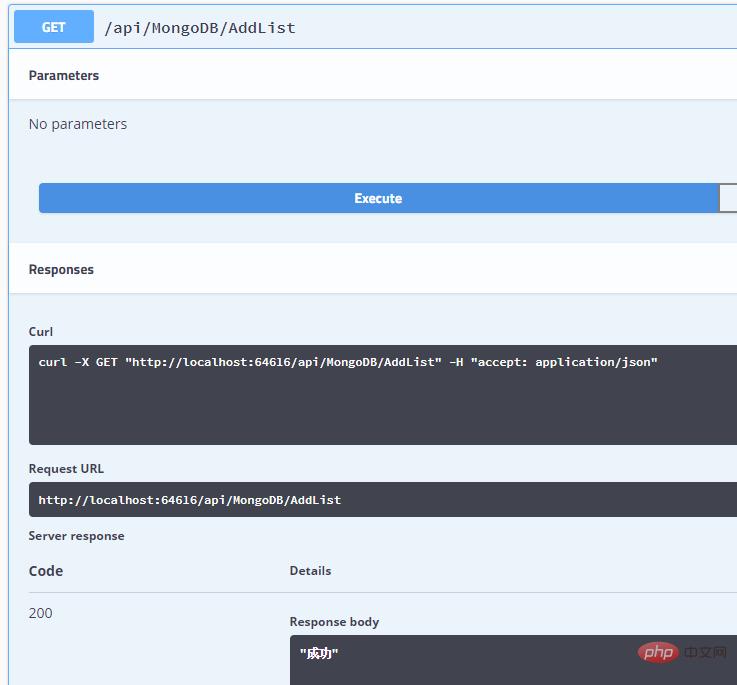 Then we looked at the database and found that a testdb database has been generated, which contains our data content

Then we perform the following query operations: return the data we just inserted.
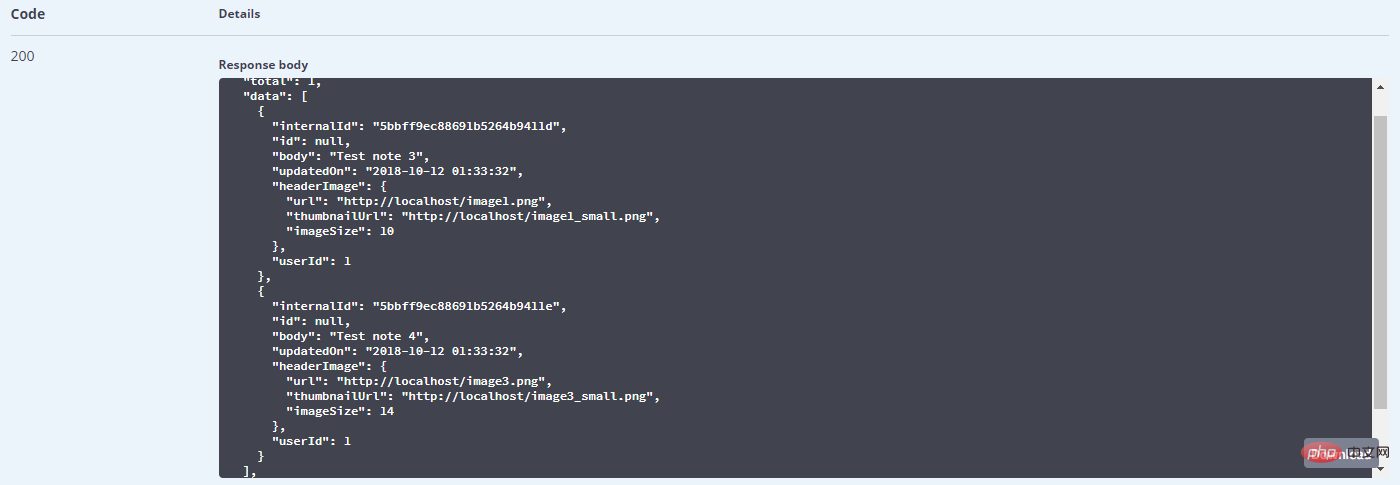
Note: There is a pitfall to be solved here, that is, the time stored in mongodb is UTC, which will be different from our local The time difference is 8 hours. Therefore, special processing time is required here.
3. Summary
At this point, the simple use of mongodb has been demonstrated. Later, you can expand it according to the official documents, and then expand it further. , you will find it more and more interesting. thanks for your support. Thank you.
The above is the detailed content of Learn the complete steps to integrate MongoDB with asp.net core. For more information, please follow other related articles on the PHP Chinese website!

Hot AI Tools

Undresser.AI Undress
AI-powered app for creating realistic nude photos

AI Clothes Remover
Online AI tool for removing clothes from photos.

Undress AI Tool
Undress images for free

Clothoff.io
AI clothes remover

Video Face Swap
Swap faces in any video effortlessly with our completely free AI face swap tool!

Hot Article

Hot Tools

Notepad++7.3.1
Easy-to-use and free code editor

SublimeText3 Chinese version
Chinese version, very easy to use

Zend Studio 13.0.1
Powerful PHP integrated development environment

Dreamweaver CS6
Visual web development tools

SublimeText3 Mac version
God-level code editing software (SublimeText3)

Hot Topics
 How to configure MongoDB automatic expansion on Debian
Apr 02, 2025 am 07:36 AM
This article introduces how to configure MongoDB on Debian system to achieve automatic expansion. The main steps include setting up the MongoDB replica set and disk space monitoring. 1. MongoDB installation First, make sure that MongoDB is installed on the Debian system. Install using the following command: sudoaptupdatesudoaptinstall-ymongodb-org 2. Configuring MongoDB replica set MongoDB replica set ensures high availability and data redundancy, which is the basis for achieving automatic capacity expansion. Start MongoDB service: sudosystemctlstartmongodsudosys
 Use Composer to solve the dilemma of recommendation systems: andres-montanez/recommendations-bundle
Apr 18, 2025 am 11:48 AM
When developing an e-commerce website, I encountered a difficult problem: how to provide users with personalized product recommendations. Initially, I tried some simple recommendation algorithms, but the results were not ideal, and user satisfaction was also affected. In order to improve the accuracy and efficiency of the recommendation system, I decided to adopt a more professional solution. Finally, I installed andres-montanez/recommendations-bundle through Composer, which not only solved my problem, but also greatly improved the performance of the recommendation system. You can learn composer through the following address:
 How to ensure high availability of MongoDB on Debian
Apr 02, 2025 am 07:21 AM
This article describes how to build a highly available MongoDB database on a Debian system. We will explore multiple ways to ensure data security and services continue to operate. Key strategy: ReplicaSet: ReplicaSet: Use replicasets to achieve data redundancy and automatic failover. When a master node fails, the replica set will automatically elect a new master node to ensure the continuous availability of the service. Data backup and recovery: Regularly use the mongodump command to backup the database and formulate effective recovery strategies to deal with the risk of data loss. Monitoring and Alarms: Deploy monitoring tools (such as Prometheus, Grafana) to monitor the running status of MongoDB in real time, and
 Navicat's method to view MongoDB database password
Apr 08, 2025 pm 09:39 PM
It is impossible to view MongoDB password directly through Navicat because it is stored as hash values. How to retrieve lost passwords: 1. Reset passwords; 2. Check configuration files (may contain hash values); 3. Check codes (may hardcode passwords).
 What is the CentOS MongoDB backup strategy?
Apr 14, 2025 pm 04:51 PM
Detailed explanation of MongoDB efficient backup strategy under CentOS system This article will introduce in detail the various strategies for implementing MongoDB backup on CentOS system to ensure data security and business continuity. We will cover manual backups, timed backups, automated script backups, and backup methods in Docker container environments, and provide best practices for backup file management. Manual backup: Use the mongodump command to perform manual full backup, for example: mongodump-hlocalhost:27017-u username-p password-d database name-o/backup directory This command will export the data and metadata of the specified database to the specified backup directory.
 How to choose a database for GitLab on CentOS
Apr 14, 2025 pm 04:48 PM
GitLab Database Deployment Guide on CentOS System Selecting the right database is a key step in successfully deploying GitLab. GitLab is compatible with a variety of databases, including MySQL, PostgreSQL, and MongoDB. This article will explain in detail how to select and configure these databases. Database selection recommendation MySQL: a widely used relational database management system (RDBMS), with stable performance and suitable for most GitLab deployment scenarios. PostgreSQL: Powerful open source RDBMS, supports complex queries and advanced features, suitable for handling large data sets. MongoDB: Popular NoSQL database, good at handling sea
 Major update of Pi Coin: Pi Bank is coming!
Mar 03, 2025 pm 06:18 PM
PiNetwork is about to launch PiBank, a revolutionary mobile banking platform! PiNetwork today released a major update on Elmahrosa (Face) PIMISRBank, referred to as PiBank, which perfectly integrates traditional banking services with PiNetwork cryptocurrency functions to realize the atomic exchange of fiat currencies and cryptocurrencies (supports the swap between fiat currencies such as the US dollar, euro, and Indonesian rupiah with cryptocurrencies such as PiCoin, USDT, and USDC). What is the charm of PiBank? Let's find out! PiBank's main functions: One-stop management of bank accounts and cryptocurrency assets. Support real-time transactions and adopt biospecies
 How to encrypt data in Debian MongoDB
Apr 12, 2025 pm 08:03 PM
Encrypting MongoDB database on a Debian system requires following the following steps: Step 1: Install MongoDB First, make sure your Debian system has MongoDB installed. If not, please refer to the official MongoDB document for installation: https://docs.mongodb.com/manual/tutorial/install-mongodb-on-debian/Step 2: Generate the encryption key file Create a file containing the encryption key and set the correct permissions: ddif=/dev/urandomof=/etc/mongodb-keyfilebs=512


