

How does Redis implement delay queue? Method introduction


Delay queue, as the name suggests, is a message queue with delay function. So, under what circumstances do I need such a queue?
1. Background
Let’s first look at the following business scenario:
- When the order has been unpaid How to close the order in a timely manner when the order is in the refund status
- How to regularly check whether the order in the refund status has been successfully refunded
- When the order does not receive status notification from the downstream system for a long time, how to Strategies to achieve stepped synchronization of order status
- When the system notifies the upstream system of the final status of successful payment, the upstream system returns a notification failure. How to perform asynchronous notification and send it at a divided frequency: 15s 3m 10m 30m 30m 1h 2h 6h 15h
1.1 Solution
The simplest way is to scan the meter regularly . For example, if the order payment expiration requirements are relatively high, the meter will be scanned every 2 seconds to check expired orders and actively close the orders. The advantage is that it is simple, The disadvantage is that it scans the table globally every minute, which wastes resources. If the order volume of the table data is about to expire is large, it will cause a delay in order closing.
Use RabbitMq or other MQ modifications to implement delay queues. The advantages are that it is open source and a ready-made and stable implementation solution. The disadvantages are: MQ is a message middleware. If the team technology stack is inherently If you have MQ, that's fine. If not, then it's a bit expensive to deploy a set of MQ to delay the queue.
Using Redis's zset and list features, we can use redis to implement it A delay queueRedisDelayQueue
2. Design goal
- Real-time performance: Second-level errors are allowed for a certain period of time
- High availability: supports stand-alone, supports clusters
- Supports message deletion: the business will delete specified messages at any time
- Message reliability: guaranteed to be at least Consumed once
- Message persistence: Based on the persistence characteristics of Redis itself, if Redis data is lost, it means the loss of delayed messages, but primary backup and cluster guarantees can be provided. This can be considered for subsequent optimization to persist the message into MangoDB
3. Design plan
The design mainly includes the following points:
- Treat the entire Redis as a message pool and store messages in KV format
- Use ZSET as the priority queue and maintain the priority according to Score
- Use the LIST structure to advance First-out consumption
- ZSET and LIST store message addresses (corresponding to each KEY in the message pool)
- Customize the routing object, store ZSET and LIST names, and send messages from ZSET routes to the correct LIST
- Use timer to maintain routing
- Implement message delay according to TTL rules
3.1 Design diagram
It is still based on Youzan’s delay queue design, optimization and code implementation. Youzan Design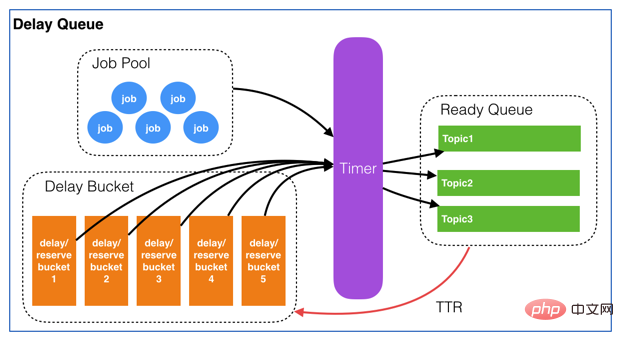
##3.2 Data Structure
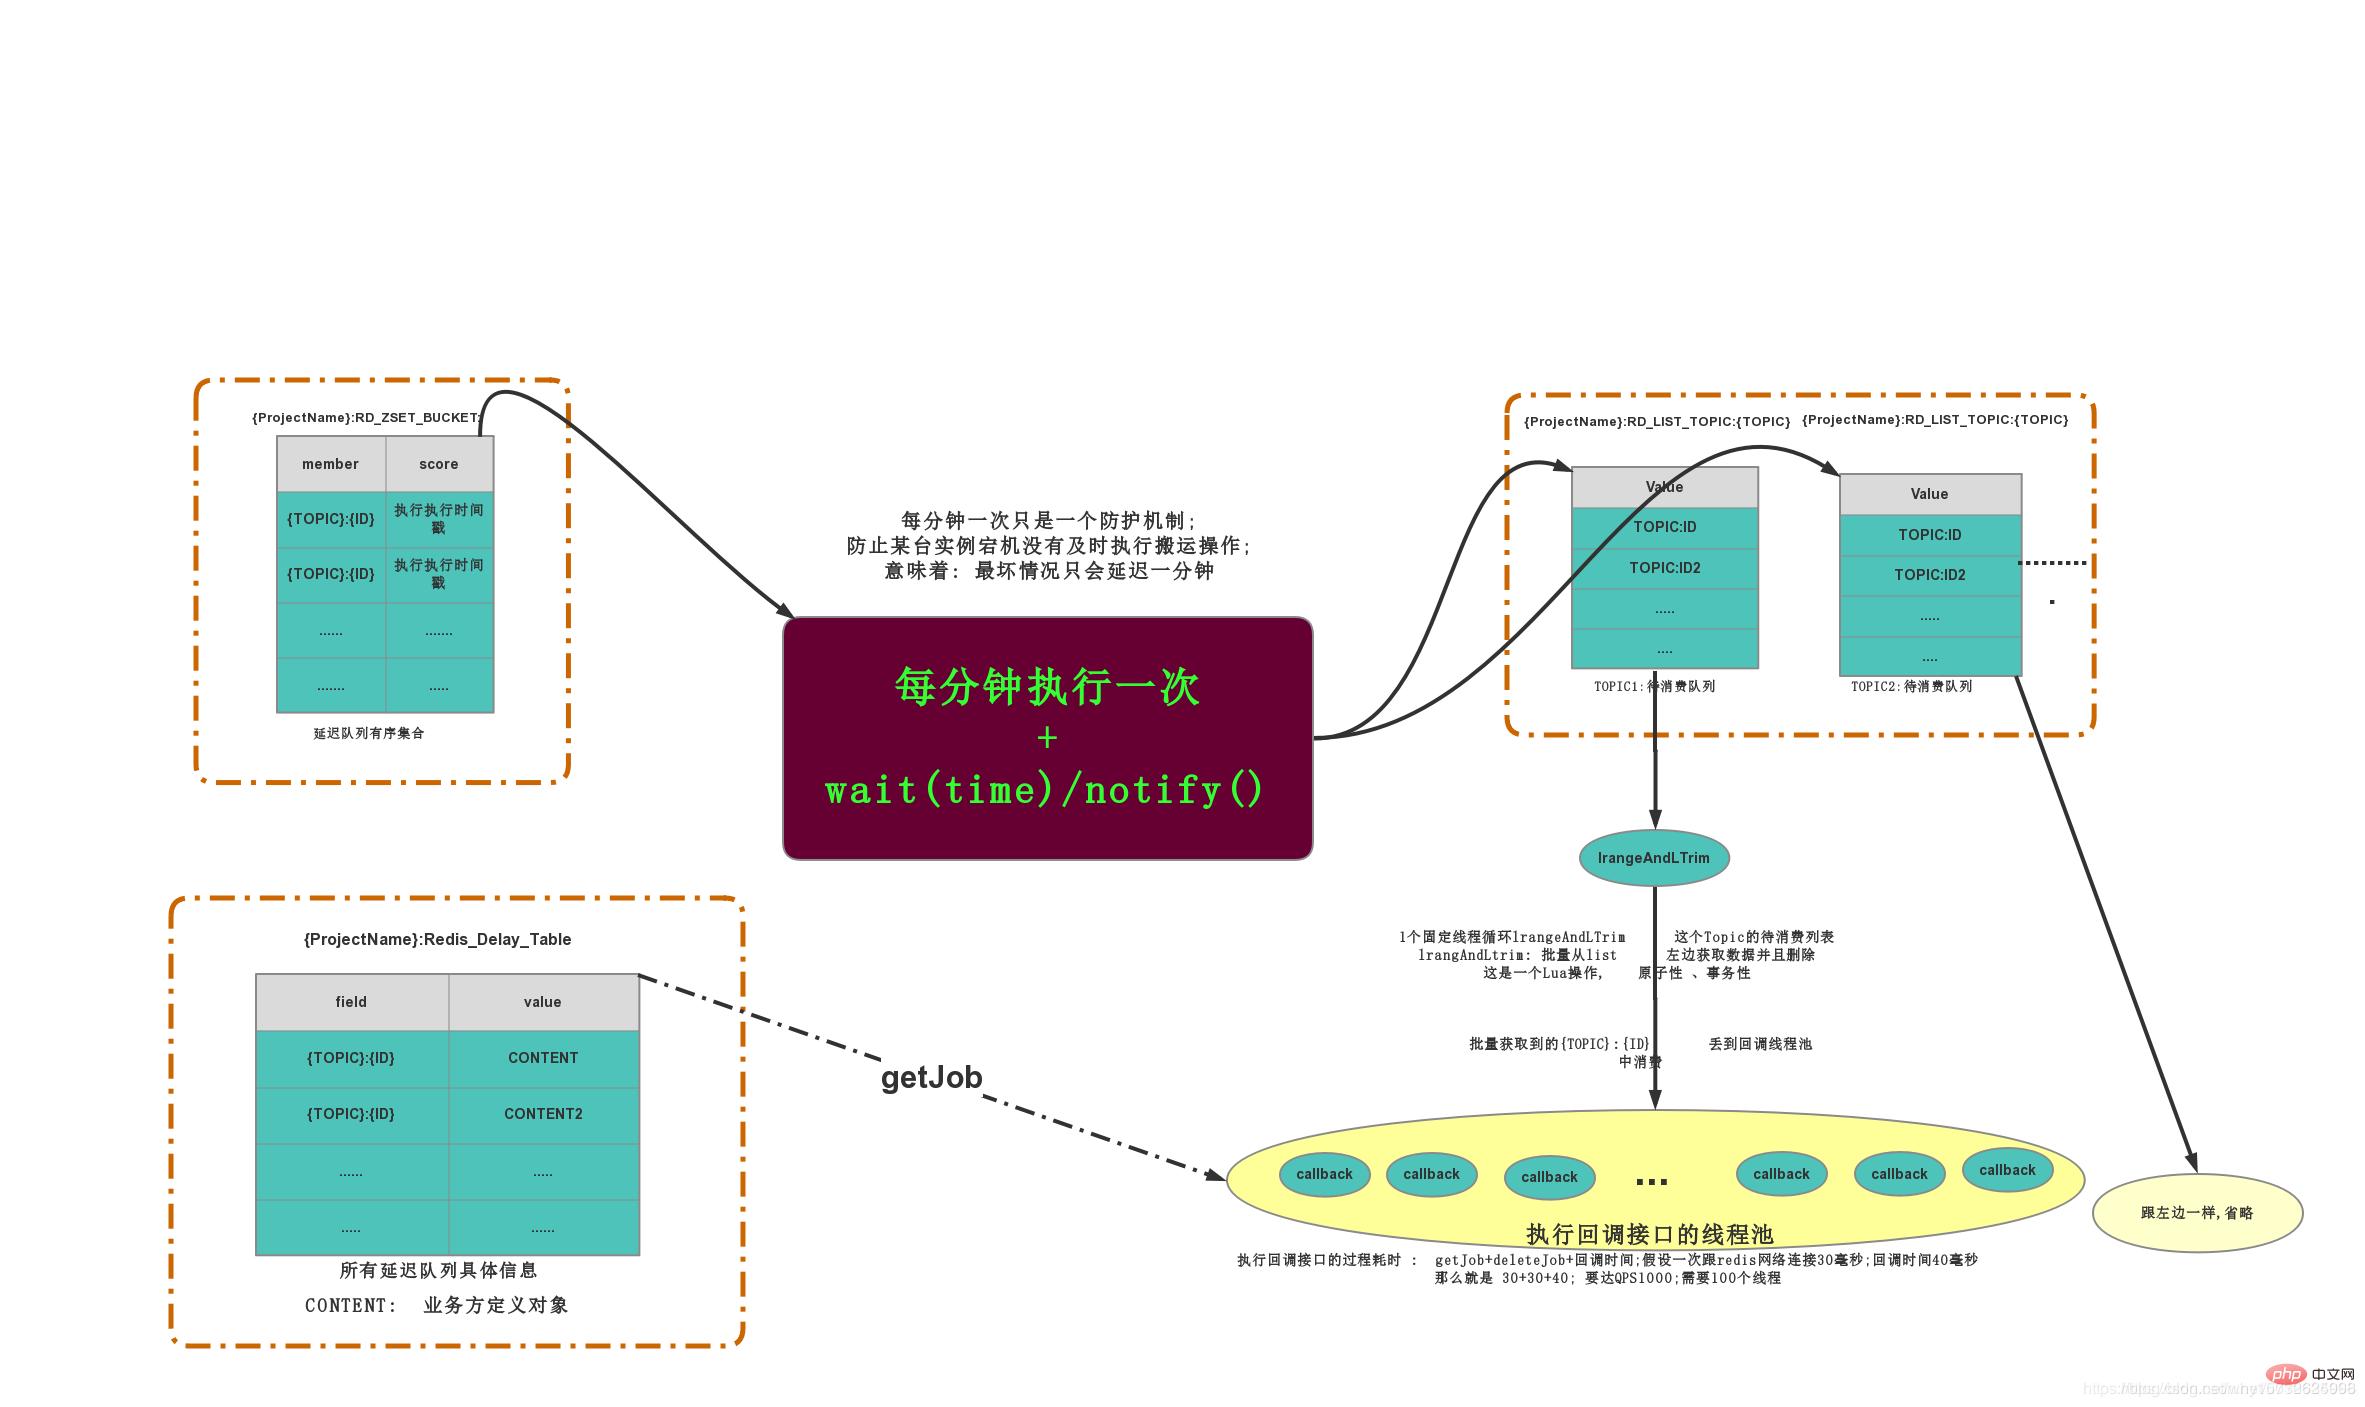
- ZING:DELAY_QUEUE:JOB_POOL
It is a Hash_Table structure that stores all delay queue information. KV structure: K=prefix projectName field = topic jobId V=CONENT;VThe data passed in by the client will be returned when consuming - ZING:DELAY_QUEUE:BUCKET
There are delay queues The sequence set ZSET stores K=ID and the required execution timestamp, sorted according to the timestamp - ZING:DELAY_QUEUE:QUEUE
LIST structure, each Topic has a LIST, and the list stores The JOB
 picture that currently needs to be consumed is for reference only. It can basically describe the execution of the entire process. The picture comes from the reference blog at the end of the article
3.3 Task life cycle
- When a new JOB is added, a piece of data will be inserted into
- ZING:DELAY_QUEUE:JOB_POOL
and recorded Business side and consumer side.ZING:DELAY_QUEUE:BUCKETwill also insert a record to record the execution timestampThe handling thread will go to - ZING:DELAY_QUEUE:BUCKET
to find which execution timestamps RunTimeMillis is smaller than the current time, delete all these records; at the same time, it will parse what the Topic of each task is, and then push these tasks to the list corresponding to TOPICZING:DELAY_QUEUE:QUEUE中Each TOPIC LIST will have a listening thread to batch obtain the data to be consumed in the LIST, and all the acquired data will be thrown to the consumption thread pool of this TOPIC - The execution of the consumption thread pool will go
- ZING:DELAY_QUEUE:JOB_POOL
Find the data structure, return it to the callback structure, and execute the callback method.
3.4 Design Points
3.4.1 Basic concept
- JOB: Tasks that require asynchronous processing are the basic units in the delay queue
- Topic: a collection (queue) of jobs of the same type. For consumers to subscribe
3.4.2 Message structure
Each JOB must contain the following attributes
- jobId: The unique identifier of the Job. Used to retrieve and delete specified Job information
- topic: Job type. It can be understood as a specific business name
- delay: the time the job needs to be delayed. Unit: seconds. (The server will convert it into an absolute time)
- body: The content of the Job, for consumers to do specific business processing, stored in json format
- retry: Number of failed retries
- url: notification URL
3.5 Design details
3.5.1 How to consume quickly ZING:DELAY_QUEUE:QUEUE
The simplest implementation method is to use a timer to perform second-level scanning, in order to ensure the timeliness of message execution , you can set it to request Redis every 1S to determine whether there are JOBs to be consumed in the queue. But there will be a problem. If there are no consumable JOBs in the queue, then frequent scanning will be meaningless and a waste of resources. Fortunately, there is a BLPOP blocking primitive in the LIST. If the list If there is data, it will be returned immediately. If there is no data, it will be blocked there until data is returned. You can set the blocking timeout, and NULL will be returned after the timeout. The specific implementation methods and strategies will be introduced in the code.
3.5.2 Avoid repeated transfer and consumption of messages caused by timing
- Use Redis's distributed lock to control the transfer of messages. In order to avoid problems caused by repeated transfer of messages
- Use distributed locks to ensure the execution frequency of the timer
4. Core code implementation
4.1 Technical Description
Technology stack: SpringBoot, Redisson, Redis, distributed lock, timer
Note: This project does not realize the multiple Queue consumption in the design plan, and only opens one QUEUE. This will be optimized in the future
4.2 Core Entity
4.2.1 Add new objects to Job
/**
 * 消息结构
 *
 * @author 睁眼看世界
 * @date 2020年1月15日
 */
@Data
public class Job implements Serializable {

    private static final long serialVersionUID = 1L;

    /**
     * Job的唯一标识。用来检索和删除指定的Job信息
     */
    @NotBlank
    private String jobId;


    /**
     * Job类型。可以理解成具体的业务名称
     */
    @NotBlank
    private String topic;

    /**
     * Job需要延迟的时间。单位:秒。(服务端会将其转换为绝对时间)
     */
    private Long delay;

    /**
     * Job的内容,供消费者做具体的业务处理,以json格式存储
     */
    @NotBlank
    private String body;

    /**
     * 失败重试次数
     */
    private int retry = 0;

    /**
     * 通知URL
     */
    @NotBlank
    private String url;
}4.2.2 Delete objects from Job
/**
 * 消息结构
 *
 * @author 睁眼看世界
 * @date 2020年1月15日
 */
@Data
public class JobDie implements Serializable {

    private static final long serialVersionUID = 1L;

    /**
     * Job的唯一标识。用来检索和删除指定的Job信息
     */
    @NotBlank
    private String jobId;


    /**
     * Job类型。可以理解成具体的业务名称
     */
    @NotBlank
    private String topic;
}4.3 Transport thread
/**
 * 搬运线程
 *
 * @author 睁眼看世界
 * @date 2020年1月17日
 */
@Slf4j
@Component
public class CarryJobScheduled {

    @Autowired
    private RedissonClient redissonClient;

    /**
     * 启动定时开启搬运JOB信息
     */
    @Scheduled(cron = "*/1 * * * * *")
    public void carryJobToQueue() {
        System.out.println("carryJobToQueue --->");
        RLock lock = redissonClient.getLock(RedisQueueKey.CARRY_THREAD_LOCK);
        try {
            boolean lockFlag = lock.tryLock(LOCK_WAIT_TIME, LOCK_RELEASE_TIME, TimeUnit.SECONDS);
            if (!lockFlag) {
                throw new BusinessException(ErrorMessageEnum.ACQUIRE_LOCK_FAIL);
            }
            RScoredSortedSet<object> bucketSet = redissonClient.getScoredSortedSet(RD_ZSET_BUCKET_PRE);
            long now = System.currentTimeMillis();
            Collection<object> jobCollection = bucketSet.valueRange(0, false, now, true);
            List<string> jobList = jobCollection.stream().map(String::valueOf).collect(Collectors.toList());
            RList<string> readyQueue = redissonClient.getList(RD_LIST_TOPIC_PRE);
            readyQueue.addAll(jobList);
            bucketSet.removeAllAsync(jobList);
        } catch (InterruptedException e) {
            log.error("carryJobToQueue error", e);
        } finally {
            if (lock != null) {
                lock.unlock();
            }
        }
    }
}</string></string></object></object>4.4 Consumer thread
@Slf4j
@Component
public class ReadyQueueContext {

    @Autowired
    private RedissonClient redissonClient;

    @Autowired
    private ConsumerService consumerService;

    /**
     * TOPIC消费线程
     */
    @PostConstruct
    public void startTopicConsumer() {
        TaskManager.doTask(this::runTopicThreads, "开启TOPIC消费线程");
    }

    /**
     * 开启TOPIC消费线程
     * 将所有可能出现的异常全部catch住,确保While(true)能够不中断
     */
    @SuppressWarnings("InfiniteLoopStatement")
    private void runTopicThreads() {
        while (true) {
            RLock lock = null;
            try {
                lock = redissonClient.getLock(CONSUMER_TOPIC_LOCK);
            } catch (Exception e) {
                log.error("runTopicThreads getLock error", e);
            }
            try {
                if (lock == null) {
                    continue;
                }
                // 分布式锁时间比Blpop阻塞时间多1S,避免出现释放锁的时候,锁已经超时释放,unlock报错
                boolean lockFlag = lock.tryLock(LOCK_WAIT_TIME, LOCK_RELEASE_TIME, TimeUnit.SECONDS);
                if (!lockFlag) {
                    continue;
                }

                // 1. 获取ReadyQueue中待消费的数据
                RBlockingQueue<string> queue = redissonClient.getBlockingQueue(RD_LIST_TOPIC_PRE);
                String topicId = queue.poll(60, TimeUnit.SECONDS);
                if (StringUtils.isEmpty(topicId)) {
                    continue;
                }

                // 2. 获取job元信息内容
                RMap<string> jobPoolMap = redissonClient.getMap(JOB_POOL_KEY);
                Job job = jobPoolMap.get(topicId);

                // 3. 消费
                FutureTask<boolean> taskResult = TaskManager.doFutureTask(() -> consumerService.consumerMessage(job.getUrl(), job.getBody()), job.getTopic() + "-->消费JobId-->" + job.getJobId());
                if (taskResult.get()) {
                    // 3.1 消费成功,删除JobPool和DelayBucket的job信息
                    jobPoolMap.remove(topicId);
                } else {
                    int retrySum = job.getRetry() + 1;
                    // 3.2 消费失败,则根据策略重新加入Bucket

                    // 如果重试次数大于5,则将jobPool中的数据删除,持久化到DB
                    if (retrySum > RetryStrategyEnum.RETRY_FIVE.getRetry()) {
                        jobPoolMap.remove(topicId);
                        continue;
                    }
                    job.setRetry(retrySum);
                    long nextTime = job.getDelay() + RetryStrategyEnum.getDelayTime(job.getRetry()) * 1000;
                    log.info("next retryTime is [{}]", DateUtil.long2Str(nextTime));
                    RScoredSortedSet<object> delayBucket = redissonClient.getScoredSortedSet(RedisQueueKey.RD_ZSET_BUCKET_PRE);
                    delayBucket.add(nextTime, topicId);
                    // 3.3 更新元信息失败次数
                    jobPoolMap.put(topicId, job);
                }
            } catch (Exception e) {
                log.error("runTopicThreads error", e);
            } finally {
                if (lock != null) {
                    try {
                        lock.unlock();
                    } catch (Exception e) {
                        log.error("runTopicThreads unlock error", e);
                    }
                }
            }
        }
    }
}</object></boolean></string></string>4.5 Adding and deleting JOB
/**
 * 提供给外部服务的操作接口
 *
 * @author why
 * @date 2020年1月15日
 */
@Slf4j
@Service
public class RedisDelayQueueServiceImpl implements RedisDelayQueueService {

    @Autowired
    private RedissonClient redissonClient;


    /**
     * 添加job元信息
     *
     * @param job 元信息
     */
    @Override
    public void addJob(Job job) {

        RLock lock = redissonClient.getLock(ADD_JOB_LOCK + job.getJobId());
        try {
            boolean lockFlag = lock.tryLock(LOCK_WAIT_TIME, LOCK_RELEASE_TIME, TimeUnit.SECONDS);
            if (!lockFlag) {
                throw new BusinessException(ErrorMessageEnum.ACQUIRE_LOCK_FAIL);
            }
            String topicId = RedisQueueKey.getTopicId(job.getTopic(), job.getJobId());

            // 1. 将job添加到 JobPool中
            RMap<string> jobPool = redissonClient.getMap(RedisQueueKey.JOB_POOL_KEY);
            if (jobPool.get(topicId) != null) {
                throw new BusinessException(ErrorMessageEnum.JOB_ALREADY_EXIST);
            }

            jobPool.put(topicId, job);

            // 2. 将job添加到 DelayBucket中
            RScoredSortedSet<object> delayBucket = redissonClient.getScoredSortedSet(RedisQueueKey.RD_ZSET_BUCKET_PRE);
            delayBucket.add(job.getDelay(), topicId);
        } catch (InterruptedException e) {
            log.error("addJob error", e);
        } finally {
            if (lock != null) {
                lock.unlock();
            }
        }
    }


    /**
     * 删除job信息
     *
     * @param job 元信息
     */
    @Override
    public void deleteJob(JobDie jobDie) {

        RLock lock = redissonClient.getLock(DELETE_JOB_LOCK + jobDie.getJobId());
        try {
            boolean lockFlag = lock.tryLock(LOCK_WAIT_TIME, LOCK_RELEASE_TIME, TimeUnit.SECONDS);
            if (!lockFlag) {
                throw new BusinessException(ErrorMessageEnum.ACQUIRE_LOCK_FAIL);
            }
            String topicId = RedisQueueKey.getTopicId(jobDie.getTopic(), jobDie.getJobId());

            RMap<string> jobPool = redissonClient.getMap(RedisQueueKey.JOB_POOL_KEY);
            jobPool.remove(topicId);

            RScoredSortedSet<object> delayBucket = redissonClient.getScoredSortedSet(RedisQueueKey.RD_ZSET_BUCKET_PRE);
            delayBucket.remove(topicId);
        } catch (InterruptedException e) {
            log.error("addJob error", e);
        } finally {
            if (lock != null) {
                lock.unlock();
            }
        }
    }
}</object></string></object></string>5. Content to be optimized
- Currently there is only one Queue queue to store messages. When a large number of messages that need to be consumed accumulate, the timeliness of message notifications will be affected. The improvement method is to open multiple Queues, perform message routing, and then open multiple consumer threads for consumption to provide throughput.
- The messages are not persisted, which is risky. The messages will be persisted to MangoDB in the future.
6. Source code
Please get more detailed source code at the address below
-
RedisDelayQueue implementationzing-delay-queue(https://gitee.com/whyCodeData/zing-project/tree/master/zing-delay-queue) -
RedissonStarterredisson-spring-boot-starter(https://gitee.com/whyCodeData/zing-project/tree/master/zing-starter/redisson-spring-boot-starter) -
project applicationzing-pay(https://gitee.com/whyCodeData/zing-pay)
##7. Reference
- https://tech.youzan.com/queuing_delay/
- https://blog.csdn.net/u010634066/article/details/98864764
redis introductory tutorial column.
The above is the detailed content of How does Redis implement delay queue? Method introduction. For more information, please follow other related articles on the PHP Chinese website!

Hot AI Tools

Undresser.AI Undress
AI-powered app for creating realistic nude photos

AI Clothes Remover
Online AI tool for removing clothes from photos.

Undress AI Tool
Undress images for free

Clothoff.io
AI clothes remover

Video Face Swap
Swap faces in any video effortlessly with our completely free AI face swap tool!

Hot Article
Hot Tools

Notepad++7.3.1
Easy-to-use and free code editor

SublimeText3 Chinese version
Chinese version, very easy to use

Zend Studio 13.0.1
Powerful PHP integrated development environment

Dreamweaver CS6
Visual web development tools

SublimeText3 Mac version
God-level code editing software (SublimeText3)
Hot Topics
 1654
1654
 14
1413
52
1306
25
1252
29
1225
24
14
1413
52
1306
25
1252
29
1225
24

 How to build the redis cluster mode
Apr 10, 2025 pm 10:15 PM
How to build the redis cluster mode
Apr 10, 2025 pm 10:15 PM
Redis cluster mode deploys Redis instances to multiple servers through sharding, improving scalability and availability. The construction steps are as follows: Create odd Redis instances with different ports; Create 3 sentinel instances, monitor Redis instances and failover; configure sentinel configuration files, add monitoring Redis instance information and failover settings; configure Redis instance configuration files, enable cluster mode and specify the cluster information file path; create nodes.conf file, containing information of each Redis instance; start the cluster, execute the create command to create a cluster and specify the number of replicas; log in to the cluster to execute the CLUSTER INFO command to verify the cluster status; make
 How to clear redis data
Apr 10, 2025 pm 10:06 PM
How to clear redis data
Apr 10, 2025 pm 10:06 PM
How to clear Redis data: Use the FLUSHALL command to clear all key values. Use the FLUSHDB command to clear the key value of the currently selected database. Use SELECT to switch databases, and then use FLUSHDB to clear multiple databases. Use the DEL command to delete a specific key. Use the redis-cli tool to clear the data.
 How to read redis queue
Apr 10, 2025 pm 10:12 PM
How to read redis queue
Apr 10, 2025 pm 10:12 PM
To read a queue from Redis, you need to get the queue name, read the elements using the LPOP command, and process the empty queue. The specific steps are as follows: Get the queue name: name it with the prefix of "queue:" such as "queue:my-queue". Use the LPOP command: Eject the element from the head of the queue and return its value, such as LPOP queue:my-queue. Processing empty queues: If the queue is empty, LPOP returns nil, and you can check whether the queue exists before reading the element.
 How to configure Lua script execution time in centos redis
Apr 14, 2025 pm 02:12 PM
How to configure Lua script execution time in centos redis
Apr 14, 2025 pm 02:12 PM
On CentOS systems, you can limit the execution time of Lua scripts by modifying Redis configuration files or using Redis commands to prevent malicious scripts from consuming too much resources. Method 1: Modify the Redis configuration file and locate the Redis configuration file: The Redis configuration file is usually located in /etc/redis/redis.conf. Edit configuration file: Open the configuration file using a text editor (such as vi or nano): sudovi/etc/redis/redis.conf Set the Lua script execution time limit: Add or modify the following lines in the configuration file to set the maximum execution time of the Lua script (unit: milliseconds)
 How to set the redis expiration policy
Apr 10, 2025 pm 10:03 PM
How to set the redis expiration policy
Apr 10, 2025 pm 10:03 PM
There are two types of Redis data expiration strategies: periodic deletion: periodic scan to delete the expired key, which can be set through expired-time-cap-remove-count and expired-time-cap-remove-delay parameters. Lazy Deletion: Check for deletion expired keys only when keys are read or written. They can be set through lazyfree-lazy-eviction, lazyfree-lazy-expire, lazyfree-lazy-user-del parameters.
 How to use the redis command line
Apr 10, 2025 pm 10:18 PM
How to use the redis command line
Apr 10, 2025 pm 10:18 PM
Use the Redis command line tool (redis-cli) to manage and operate Redis through the following steps: Connect to the server, specify the address and port. Send commands to the server using the command name and parameters. Use the HELP command to view help information for a specific command. Use the QUIT command to exit the command line tool.
 How to implement redis counter
Apr 10, 2025 pm 10:21 PM
How to implement redis counter
Apr 10, 2025 pm 10:21 PM
Redis counter is a mechanism that uses Redis key-value pair storage to implement counting operations, including the following steps: creating counter keys, increasing counts, decreasing counts, resetting counts, and obtaining counts. The advantages of Redis counters include fast speed, high concurrency, durability and simplicity and ease of use. It can be used in scenarios such as user access counting, real-time metric tracking, game scores and rankings, and order processing counting.
 How to optimize the performance of debian readdir
Apr 13, 2025 am 08:48 AM
How to optimize the performance of debian readdir
Apr 13, 2025 am 08:48 AM
In Debian systems, readdir system calls are used to read directory contents. If its performance is not good, try the following optimization strategy: Simplify the number of directory files: Split large directories into multiple small directories as much as possible, reducing the number of items processed per readdir call. Enable directory content caching: build a cache mechanism, update the cache regularly or when directory content changes, and reduce frequent calls to readdir. Memory caches (such as Memcached or Redis) or local caches (such as files or databases) can be considered. Adopt efficient data structure: If you implement directory traversal by yourself, select more efficient data structures (such as hash tables instead of linear search) to store and access directory information
