How to resize canvas in ps and keep image unchanged

1. Select the layer that needs to be adjusted;
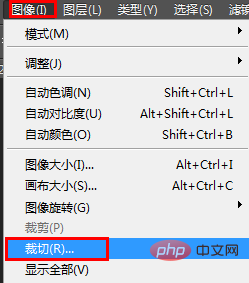
2. Click the [Image] option in the top menu bar, and then click the [Crop] option;

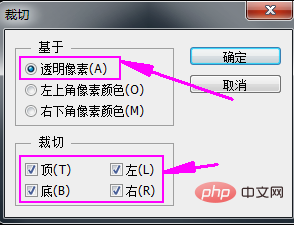
3. Check the [Transparent Pixels] option, select the top, bottom, left, and right of the cropping layer, and click [OK].

#In this way we have completed the cropping, and now the canvas size adapts to the image size.
Recommended tutorial: ps tutorial
The above is the detailed content of How to resize canvas in ps and keep image unchanged. For more information, please follow other related articles on the PHP Chinese website!

Hot AI Tools

Undresser.AI Undress
AI-powered app for creating realistic nude photos

AI Clothes Remover
Online AI tool for removing clothes from photos.

Undress AI Tool
Undress images for free

Clothoff.io
AI clothes remover

Video Face Swap
Swap faces in any video effortlessly with our completely free AI face swap tool!

Hot Article

Hot Tools

Notepad++7.3.1
Easy-to-use and free code editor

SublimeText3 Chinese version
Chinese version, very easy to use

Zend Studio 13.0.1
Powerful PHP integrated development environment

Dreamweaver CS6
Visual web development tools

SublimeText3 Mac version
God-level code editing software (SublimeText3)

Hot Topics
 1663
1663
 14
14
 1419
1419
 52
52
 1313
1313
 25
25
 1264
1264
 29
29
 1237
1237
 24
24
 How to Download Windows Spotlight Wallpaper Image on PC
Aug 23, 2023 pm 02:06 PM
Windows are never one to neglect aesthetics. From the bucolic green fields of XP to the blue swirling design of Windows 11, default desktop wallpapers have been a source of user delight for years. With Windows Spotlight, you now have direct access to beautiful, awe-inspiring images for your lock screen and desktop wallpaper every day. Unfortunately, these images don't hang out. If you have fallen in love with one of the Windows spotlight images, then you will want to know how to download them so that you can keep them as your background for a while. Here's everything you need to know. What is WindowsSpotlight? Window Spotlight is an automatic wallpaper updater available from Personalization > in the Settings app
 How to batch resize images using PowerToys on Windows
Aug 23, 2023 pm 07:49 PM
Those who have to work with image files on a daily basis often have to resize them to fit the needs of their projects and jobs. However, if you have too many images to process, resizing them individually can consume a lot of time and effort. In this case, a tool like PowerToys can come in handy to, among other things, batch resize image files using its image resizer utility. Here's how to set up your Image Resizer settings and start batch resizing images with PowerToys. How to Batch Resize Images with PowerToys PowerToys is an all-in-one program with a variety of utilities and features to help you speed up your daily tasks. One of its utilities is images
 Introduction to the process of extracting line drawings in PS
Apr 01, 2024 pm 12:51 PM
1. Open the software and import a piece of material, as shown in the picture below. 2. Then ctrl+shift+u to remove color. 3. Then press ctrl+J to copy the layer. 4. Then reverse ctrl+I, and then set the layer blending mode to Color Dodge. 5. Click Filter--Others--Minimum. 6. In the pop-up dialog box, set the radius to 2 and click OK. 7. Finally, you can see the line draft extracted.
 iOS 17: How to use one-click cropping in photos
Sep 20, 2023 pm 08:45 PM
With the iOS 17 Photos app, Apple makes it easier to crop photos to your specifications. Read on to learn how. Previously in iOS 16, cropping an image in the Photos app involved several steps: Tap the editing interface, select the crop tool, and then adjust the crop using a pinch-to-zoom gesture or dragging the corners of the crop tool. In iOS 17, Apple has thankfully simplified this process so that when you zoom in on any selected photo in your Photos library, a new Crop button automatically appears in the upper right corner of the screen. Clicking on it will bring up the full cropping interface with the zoom level of your choice, so you can crop to the part of the image you like, rotate the image, invert the image, or apply screen ratio, or use markers
 How to automate tasks using PowerShell
Feb 20, 2024 pm 01:51 PM
If you are an IT administrator or technology expert, you must be aware of the importance of automation. Especially for Windows users, Microsoft PowerShell is one of the best automation tools. Microsoft offers a variety of tools for your automation needs, without the need to install third-party applications. This guide will detail how to leverage PowerShell to automate tasks. What is a PowerShell script? If you have experience using PowerShell, you may have used commands to configure your operating system. A script is a collection of these commands in a .ps1 file. .ps1 files contain scripts executed by PowerShell, such as basic Get-Help
 How to edit photos on iPhone using iOS 17
Nov 30, 2023 pm 11:39 PM
Mobile photography has fundamentally changed the way we capture and share life’s moments. The advent of smartphones, especially the iPhone, played a key role in this shift. Known for its advanced camera technology and user-friendly editing features, iPhone has become the first choice for amateur and experienced photographers alike. The launch of iOS 17 marks an important milestone in this journey. Apple's latest update brings an enhanced set of photo editing features, giving users a more powerful toolkit to turn their everyday snapshots into visually engaging and artistically rich images. This technological development not only simplifies the photography process but also opens up new avenues for creative expression, allowing users to effortlessly inject a professional touch into their photos
 PS copy layer shortcut key
Feb 23, 2024 pm 02:34 PM
In the PS copy layer shortcut keys, we can know that if you want to copy a layer when using PS, you can use the shortcut key [Ctrl+J] for quick copying. This introduction to the shortcut keys for copying layers can tell you the specific operation method. The following is the detailed content, so take a look. PS copy layer shortcut key answer: [Ctrl+J] Specific method: 1. Open the image in PS and select the layer that needs to be copied. 2. Press [Ctrl+J] on the keyboard at the same time to complete the copy of the layer. Other copying methods: 1. After opening the image, press and hold the layer and move the [New Layer] icon downwards. 2. After moving to the icon, let go. 3. The layer copy is completed.
 Complete list of ps shortcut keys
Mar 11, 2024 pm 04:31 PM
1. Ctrl + N: Create a new document. 2. Ctrl + O: Open a file. 3. Ctrl + S: Save the current file. 4. Ctrl + Shift + S: Save as. 5. Ctrl + W: Close the current document. 6. Ctrl + Q: Exit Photoshop. 7. Ctrl + Z: Undo. 8. Ctrl + Y: Redo. 9. Ctrl + X: Cut the selected content. 10. Ctrl + C: Copy the selected content.


